| KIT: | Revell 1/72 Gato class submarine |
| KIT #: | 0384 |
| PRICE: | $99.00 MSRP |
| DECALS: | Four options |
| REVIEWER: | Greg Ewald |
| NOTES: | Huge model, mediocre molding |
| HISTORY |
I have a preview here: http://modelingmadness.com/reviews/misc/ships/previews/ewaldgatop.htm
One of the finest fleet submarines ever made, the Gato and its sister classes made history well into the 1950’s, with sheer dependability and rugged construction. Couple those with the ability to wreak quite a lot of devastation with ten torpedo tubes and massive deck guns, and you have yourself quite the war machine ! “Can this boat go down? Like a rock Sir!”
The film “Operation Petticoat” came out in 1959, starring Cary
Grant as the skipper of the fictional submarine “Sea Tiger” at the outset of
World War Two. Tony Curtis gets dragged into the mess as the supply officer with
a ten-finger discount at his disposal, which makes for some fairly good comedy.
While remaining light-hearted, the film does capture the desperation of the
United States forces during those first few weeks of an unwanted war, low on
supplies, low on ammunition, low on just about
 everything.
The submarine is sunk at her mooring while trying to get re-supplied, and when she is finally refloated, many parts are scrapped, including all of her guns, and two of her engines.
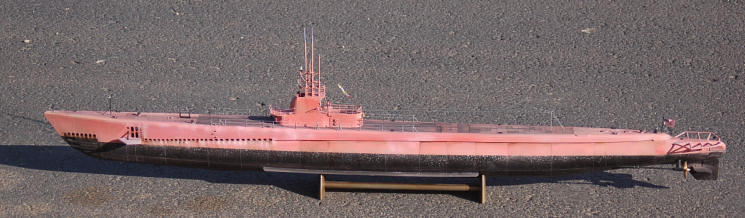
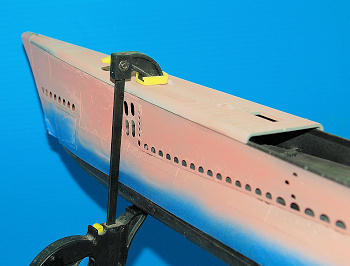
The hull is battered and starting to rust, so they have to use what paint they can scrounge up ( with the nefarious help of the wily supply officer), twelve drums of lead white, and eight drums of red, hence the pink colour. Since the submarine was so light in the water, the hull line is much lower than it would be normally, and they are attacked before they can get the over coat of gray on, much to the chief’s chagrin.
They have also managed to pick up some rather busty nurses who were stranded on a pacific island and need transportation, none of which have ever been on board a sub.
“If you’ve ever wondered what we are fighting for, there
is your answer!”
In the film, they do make it to a safe port, after being attacked by friendly forces, who think the Japanese are pulling a fast one by painting a sub pink.
There were several submarines used in the filming of the movie, the pink one is the USS Balao, the first in her class, an improved Gato. “Get underway? In that?”
| THE KIT |
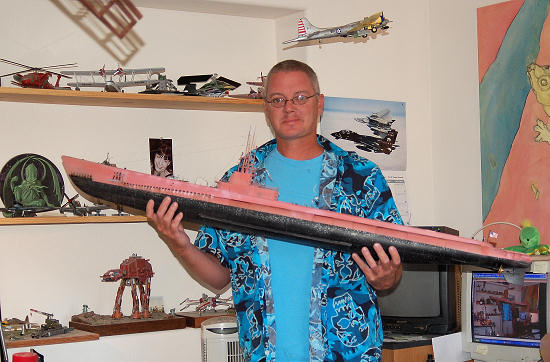
 If you
have read the review, you will see how much of a monster this thing is. It is
not only hard to move around, it is a right bugger to work on, so make sure you
have a long bench. I made one from a 6 foot long board on top of two bar stools.
If you
have read the review, you will see how much of a monster this thing is. It is
not only hard to move around, it is a right bugger to work on, so make sure you
have a long bench. I made one from a 6 foot long board on top of two bar stools.
The fit is really poor considering the price tag, and you will need a substantial amount of putty to fill in the many sinkholes and joints. Some of the detail is amazingly good, and some of it is so poor that you shake your head in wonder. With the success of the 72nd scale U-Boat, it looks like they may have rushed production on this model. Some of the parts were warped, and had to be steamed back into shape.
They do thoughtfully provide pre-bent metal parts for the steps, which is nice, but then why did they supply a plastic radar dish? Go figure. Hey, at least they provided drilled out vent ports. “It just ain’t right!”
| CONSTRUCTION |
Though the Balao was used for the pink submarine in the film, this class was not available on the 10th of December in 1941, when the film starts, so I decided to build it in the “spirit” of the film.
 Be
sure to read through the instructional pamphlet completely, and pick out your
order in the steps, because the manufacturer’s assembly order is ridiculous.
Be
sure to read through the instructional pamphlet completely, and pick out your
order in the steps, because the manufacturer’s assembly order is ridiculous.
When you attach the main hull together, you may well see up to
a ½ “ gap in the middle, this will require bar clamps or the like to hold it
together while your AC glue dries. Since the hull is round, you will need to put
sandpaper on the jaws of the clamps to keep them from slipping off every time
you tighten them. Set this as ide
to thoroughly cure, at least a day. “Oh, Ramone?”
ide
to thoroughly cure, at least a day. “Oh, Ramone?”
The bow assembly required the same treatment, glue it, then clamp it and let dry. Before you attach this bit to the main hull, you will want to attach the plane “axles” together, but don’t attach the actual diving planes yet. With all of the man-handling this beast is going to get, leave off as much of the clutter as is possible.
 In step
5, you get to attach the rear hull together, once again, break out the clamps
and sandpaper to hold the thing in place. I’d leave the propellers off of the
struts for right now, once again, moving this kit around is an exercise in
patience, and the last thing you want is to go dinging your walls with it.
Rather than put the propeller guards on in step 7, assemble the whole hull
first, because you’re going to need to do some putty work after step 8.
In step
5, you get to attach the rear hull together, once again, break out the clamps
and sandpaper to hold the thing in place. I’d leave the propellers off of the
struts for right now, once again, moving this kit around is an exercise in
patience, and the last thing you want is to go dinging your walls with it.
Rather than put the propeller guards on in step 7, assemble the whole hull
first, because you’re going to need to do some putty work after step 8.
Before you glue on the upper hull sections, decide on just what you want to install, as there are several holes to be drilled for davits and fittings. No ship’s boats or rafts are included, if you put in the davits, hit your spares box. “Serve yourself and save!”
I built mine basically out of the box, the only modification
was filling the holes for the deck guns, as the Sea Tiger had all of hers
removed. It would be a good idea to prepaint most of the interior of the sail
prior to assembly, as quite a bit is going to be unavailable after the two
halves are attached together. The clear pieces were left o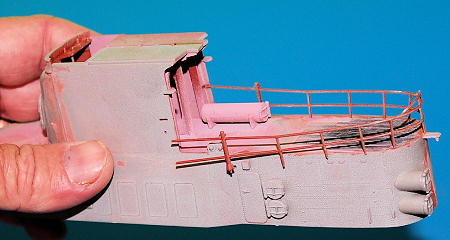
You will have to drill out the holes for the wire ladders, a roto tool or a pin vise would be the way to go. Revell gives you jigs to set the wire steps in place, but I found them to a real pain in the rear.
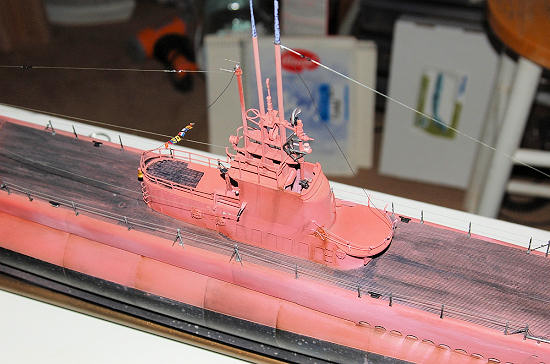
The railings on the sail do need special attention. The rear is made out of three formed plastic pieces. Glue the starboard side on first, then the rear, then the port. Test fit everything six ways from Sunday, because the fit is not so hot. Worse, on the bow section of the sail, you just get the uprights. Revell does include some very nice rigging line with more kinks in it than a gay pride parade, but using wire or stretched sprue would be much, much easier. I carefully threaded the right diameter of sprue through the rail fittings, and then glued them in place to the sail location points using ac glue and accelerator.
The periscopes are almost works of art, the fit is just about flawless, and the topmost section turns out beautifully. I did leave off the last two pieces of scope until the model was ready for a shelf, though. Dang walls.
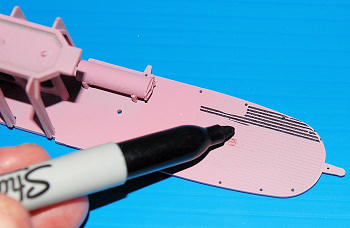 You can
use a sharpie brand marker to get a good effect on the sail deck.
You can
use a sharpie brand marker to get a good effect on the sail deck.
Once again, test fit the observation deck railings before you glue them, mine took a bit of sanding to fit just right, and limit the amount of putty you need for the psr. I put on the lower railing first let it dry, then pulled the two halves together when I glued in the upper section. .
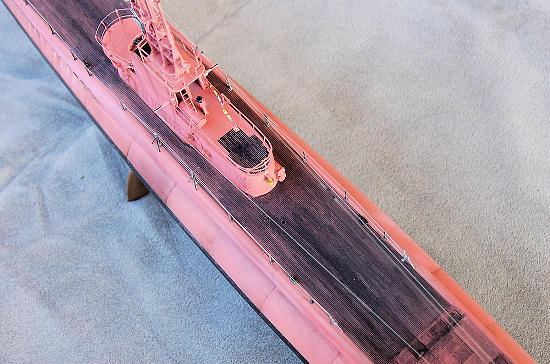
The completed sail fits on quite nicely to the painted deck, requiring very little white glue filler. Once the sail is on and dry, you can start with the fiddly bits. Wait to put in the deck stanchion railing posts until you have gotten all of the small stuff installed on the sail, or you will be knocking them off right and left. (port and starboard?) 6 pound test fishing line worked wonderfully for the rail roping, glue down one end, thread it through, and then weight down with a pair of hemostats until dry. I did use the kit supplied line for the flag ropes, once wetted down it sags in the right manner. I attached some spare flags from another Revell kit, their standard flag package that comes with just about every ship (except for this one), since the kit decal ID flags supplied with the Gato are far out of scale. Purists will want to either make their own, or resort to aftermarket decal flags.
For the American flag at the rear of the ship, I cut a piece of aluminum and put it into the decal that wraps around the rope. Once this is dry, you can bend the flag to any “windblown” configuration that you want. “We may be going in because of a woman’s brassier, but we are going in.”
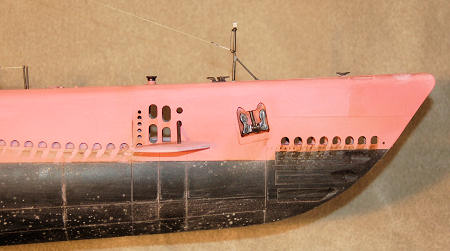
| COLORS & MARKINGS |
In the film, they use 12/8 of white to red, the problem
is that lead white is different than just “white”, and if you mix acrylics in
this ratio, you will end up with an out of scale coloured red sub. By varying
the pink tone , starting lighter to a higher portion of red, you can simulate a
paneled and weathered WW2 sub. “That’s a pretty strange colour to be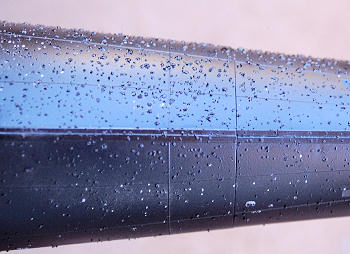 painting government property!”
Don’t forget, since this sub only had two engines, and a few torpedoes, the hull is riding higher in the water than the normal fleet sub.
First off, I primed the entire submarine in Krylon automotive
primer gray. Masking off the top section, I sprayed the hull again with Matte
Aluminum. With a spray bottle, lightly hit the sub with droplets, and then shake
salt over the upside down beast. This needs to dry for at least a few hours
before you spray on the satin black lower hull colour. Wait for quite a while,
at least a day, and then gently remove the salt granules from the sub with warm
water and a 3M pad or fine sandaper. I like to do this at least three times,
with the final coat being the lightest, the more variance you get in your
speckles, the better it will look. Once again, let it completely dry, then do an
ink and acrylic sludge wash over the whole
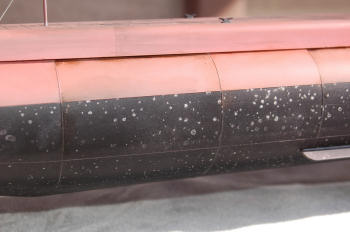 underneath.
This will cure quickly, and you can modify some of the panel colours with more
washes, doing it in series, letting them dry in between. Having slightly varied
panels will help to accentuate the subs sections, and make it less drab to look
at.
underneath.
This will cure quickly, and you can modify some of the panel colours with more
washes, doing it in series, letting them dry in between. Having slightly varied
panels will help to accentuate the subs sections, and make it less drab to look
at.
Many fleet subs, and certainly the Sea Tiger, had no markings on the tower, so you can forgo the decals.
The decks were painted with a non-skid black in the film, but I used a weathered black and gray finish to better simulate the war-torn look of the submarine, by washing the segments over and over. If you want to do the strict movie version, a sharpie marker would be the best approach.
 hite
ratio constantly, as I wanted to continue with the faded look. Once this was all
dry, I sealed the sub with a light coat of Testors clear flat, and let it cure.
hite
ratio constantly, as I wanted to continue with the faded look. Once this was all
dry, I sealed the sub with a light coat of Testors clear flat, and let it cure.
Using Minwax brand wood oil stains, I applied a series of drip marks to the drain ports of the sub, letting it sit on for about five minutes and then gently blotting it off with a Q-Tip.
By now, you should be getting used to waiting for things
to dry, so do it. When the oil stain has dried, about 24 hours in
It is really easy to make the tension blocks for the antenna lines with just two drops of white glue, spaced about a 1/16th of an inch apart. Let these dry, and paint them silver, then apply a black wash.
| CONCLUSIONS |
 This kit
builds into something really fantastic, even with the substandard detail.
Hopefully, Revell and other companies will begin to pay a little more attention
to just how good the high priced kits go together, and we won’t have to spend
uberbucks on aftermarket to improve a 100 dollar model.
This kit
builds into something really fantastic, even with the substandard detail.
Hopefully, Revell and other companies will begin to pay a little more attention
to just how good the high priced kits go together, and we won’t have to spend
uberbucks on aftermarket to improve a 100 dollar model.
I am also dedicating this build to my father who served in the Marine Corps in the South Pacific in World War Two. I will miss his advice on colouration, and just how things really were. Sometimes, what you read in a book isn’t exactly true. They fought a bloody and brutal campaign against tough odds, and with limited supplies. My father was one of the two surviving members of his platoon. Semper Fidelis, Dad, and rest in peace, 2008.
| REFERENCES |
http://en.wikipedia.org/wiki/Gato_class_submarine
May 2008
If you would like your product reviewed fairly and quickly, please contact me or see other details in the Note to Contributors.