| KIT: | Lindberg Jolly Roger Pirate Ship |
| KIT #: | 70874 |
| PRICE: | $10 - 20 |
| DECALS: | You get a flag! |
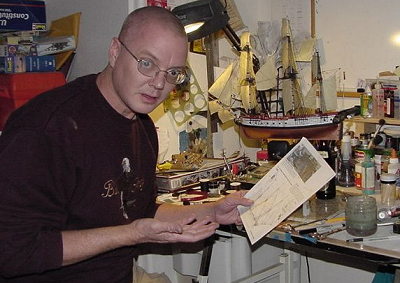
| REVIEWER: | Greg Ewald |
| NOTES: | Rebox of La Flore kit. |
| HISTORY |
Arrr, shiver me timbers ! The better part of my youth was spent wildly chasing about with my comrade pirates (Brian, Steve, and his sister Calli) in the hills of Minnesota, swinging wooden swords(1x2’s) at each other after watching an Errol Flynn movie like “Captain Blood”. The films depicted the pirates as vicious, yet courteous, marauders of the open sea, defying all who would dare try to enslave them !
 For once, Hollyweird was actually somewhat correct. The pirates came from
different stock; disgraced Captains, men of learning, slaves, women who were
tired of being subjugated, and orphans as young as nine. Banding together, they
fought for themselves and for money, and were almost all somewhat anarchistic.
Though the “golden” age of piracy was brief, about 50 years, it inspired the
flames of imagination to many an artist, after all, who can forget Stevenson’s
“Treasure Island” ? The love of pirates certainly hasn’t faded, with the
“Pirates of the Caribbean” series doing so well, I still see some of the
neighborhood kids racing around talking in pirate voices…perhaps I’ll make them
some wooden swords, now that I have a wood shop and all.
For once, Hollyweird was actually somewhat correct. The pirates came from
different stock; disgraced Captains, men of learning, slaves, women who were
tired of being subjugated, and orphans as young as nine. Banding together, they
fought for themselves and for money, and were almost all somewhat anarchistic.
Though the “golden” age of piracy was brief, about 50 years, it inspired the
flames of imagination to many an artist, after all, who can forget Stevenson’s
“Treasure Island” ? The love of pirates certainly hasn’t faded, with the
“Pirates of the Caribbean” series doing so well, I still see some of the
neighborhood kids racing around talking in pirate voices…perhaps I’ll make them
some wooden swords, now that I have a wood shop and all.
The ships used by the pirates were as varied as the group who sailed in them, and almost any ship could be made into a pirate vessel. Incredibly overcrowded, they probably weren’t as clean as the naval ships of the myriad governments, and frequently sported additional weapons and odd riggings that made for faster sailing. My kind of people.
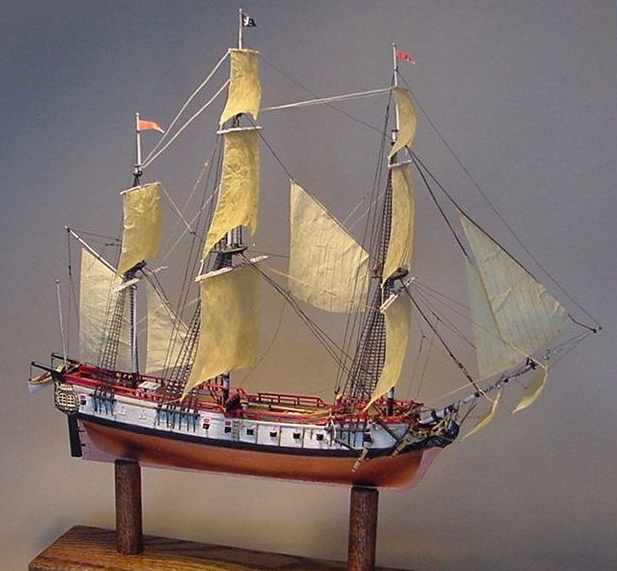
The La Flore was an 18th century frigate, certainly a beautiful ship that any pirate captain would have made his flagship, being fast and deadly, good in the heavy seas, yet light enough to sail close in to shore.
| THE KIT |
Ahoy there! Avast and prepare for warpage! The molds on this kit are tired, and the styrene reflects it. Detail is sketchy at best, and the amount of flash is awe-inspiring. The two part hull is cast in dark brown, as is the sprue for the cannon and details, while the masts and decks are tan.
The vacuum formed sails are ever present, but don’t do what a lot of shipbuilders do and toss them away, more on that later.
About 18 inches from stern to bowsprit, it makes for a nice shelf or desk display model, big enough to be impressive, without being so huge that one feels the need to build a mantle to support the bugger. The J.R. is also easily available, and at a low cost…I picked mine up off of ebay for 4 bucks, and even the stores here sell them for around 15, which is quite a good deal for the amount of fun you can have building it, speaking of which…
| CONSTRUCTION |
 The fifteen step process (not
counting the rigging) looks deceivingly simple. Printed on white paper, the
grainy photocopies showing construction are unbelievably difficult to figure
out, and much of my time was spent squinting, or looking at other ship builds to
figure out what goes where. First thing to do, of course, is paint the decks.
Using the good old method of rattlecan spraying them black, then brown, then
tan, works well to simulate weathered wood. Wait until completely dry, and then
lightly sand away with some 220 grit paper…this will expose the paint layers
underneath, giving you a wonderful graining effect. Then spray on some matt
finish, and attack it with pastels and coloured pencils to get some variety
going, remember this is supposed to be worn and bloodstained wood decking, arrr
! (it really helps to make pirate voices when you build this beastie, keeps you
from going crazy carving off the pounds of flash) Now it’s time for the reason
the ship was so feared, the cannons. The instructions called for the modeler to
glue the barrels to the chassis’s and then glue those to the deck, so that’s
what I did, and oh boy, was that a mistake. After painting the chassis, glue
them to the deck, but leave the barrels aside in a safe container until later.
Once your lower deck has all of the components on it, attach the upper deck to
it using a slow setting c/a glue, since you have to kind of finagle the all the
little parts together before it sets up on you. Set this assembly off to the
side to
The fifteen step process (not
counting the rigging) looks deceivingly simple. Printed on white paper, the
grainy photocopies showing construction are unbelievably difficult to figure
out, and much of my time was spent squinting, or looking at other ship builds to
figure out what goes where. First thing to do, of course, is paint the decks.
Using the good old method of rattlecan spraying them black, then brown, then
tan, works well to simulate weathered wood. Wait until completely dry, and then
lightly sand away with some 220 grit paper…this will expose the paint layers
underneath, giving you a wonderful graining effect. Then spray on some matt
finish, and attack it with pastels and coloured pencils to get some variety
going, remember this is supposed to be worn and bloodstained wood decking, arrr
! (it really helps to make pirate voices when you build this beastie, keeps you
from going crazy carving off the pounds of flash) Now it’s time for the reason
the ship was so feared, the cannons. The instructions called for the modeler to
glue the barrels to the chassis’s and then glue those to the deck, so that’s
what I did, and oh boy, was that a mistake. After painting the chassis, glue
them to the deck, but leave the barrels aside in a safe container until later.
Once your lower deck has all of the components on it, attach the upper deck to
it using a slow setting c/a glue, since you have to kind of finagle the all the
little parts together before it sets up on you. Set this assembly off to the
side to
 dry
thoroughly. Leave off the wheel and upper deck parts for the moment, they will
only break off when it comes time to glue the hull halves together.
dry
thoroughly. Leave off the wheel and upper deck parts for the moment, they will
only break off when it comes time to glue the hull halves together.
Speaking of the hull, you will want to paint the two sides before assembling them. The instructions call for white below, a black band, and wood tone on the gun deck sides, which is somewhat correct, but make that white really dirty if you want to be accurate, as it was a mixture of god knows what and whitewash that discoloured rapidly in the sea. My vote was for a copper bottom hull, after all, Captain Jack has enough doubloons to spring for the added barnacle barrier! Ok, it’s time for the big step…take a deep breath and break out the tape and rubber bands and clamps of every size, then apply some heavy glue to the keel, and carefully, oh so carefully, fit the twin deck assemblage inbetween the hulls, then clamp, tape, band the sucker together, and set aside for quite a while. Now, see why we didn’t put the guns into the cradles yet? Yep, they would have been flying all over the place, feeding the carpet monster. Which is what happened to me.
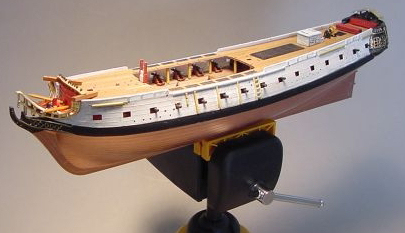 If you haven’t yet built or procured a ship jig, now is the time to do it. I
went down to the local Lowe’s to buy some oak for the keel clamping jig, and
found this plastic modelers jig (“Columbian model #63501”) for ten bucks, hell,
the wood would have cost more than that! It works beautifully, and you are
going to need to have some way of holding the ship steady while you start to
attach all of the deck parts.
If you haven’t yet built or procured a ship jig, now is the time to do it. I
went down to the local Lowe’s to buy some oak for the keel clamping jig, and
found this plastic modelers jig (“Columbian model #63501”) for ten bucks, hell,
the wood would have cost more than that! It works beautifully, and you are
going to need to have some way of holding the ship steady while you start to
attach all of the deck parts.
Now that the hull is dry, you can go ahead and put on the chicken coop (Huh? Don’t remember those in the films), main wheel, upper cover, breastbeams, vents, capstan, and the deadeyes. Using a pair of modeling tweezers or ‘stats will aid you in all of this.
The bow assembly is a little
funky, and I didn’t like the figurehead too
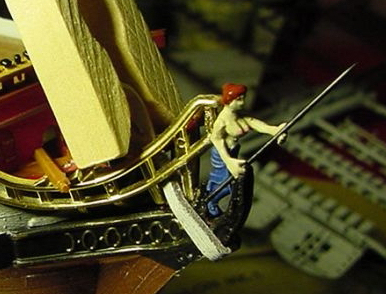 much,
so I modified it heavily to look like my wife, (yes, she can hold a spear) and
glued the breastwork. On the ship, jeez guys. The anchor studs go into place
easily, and I left my front doors open a little for character.
much,
so I modified it heavily to look like my wife, (yes, she can hold a spear) and
glued the breastwork. On the ship, jeez guys. The anchor studs go into place
easily, and I left my front doors open a little for character.
Moving towards the stern, attach the ladders that you have already painted, then the stern section and transom. It is easiest to paint these black, and then use a gold marker to pick out the carvings and railings, so that’s what I did. Hey, this is looking like a ship! I veered from the instructions by making two boat davits to extend off of the stern, many of the frigates had such an arrangement, and it adds a bit of distinction to the craft. Using styrene, it was a matter of just a few minutes work to get them glued into place. I’d leave off putting on the gunport covers right now, and wait until final assembly, so there is less chance of breakage occurring while we start on the railings. Like most of the other bits on a ship model, it really is easiest to paint these separately, then glue them on, making sure they are really, really sturdy, as you will be attaching some tensioned rigging lines to them later on.
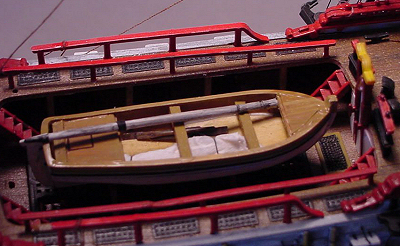 The ships boats. With the smaller jolly boat going to be hung off of the
davits, I needed to dress up the larger whale boat by scratchbuilding a lower
deck, and upper crossmembers, with styrene and basswood. A toothpick serves as
the take down mast.
The ships boats. With the smaller jolly boat going to be hung off of the
davits, I needed to dress up the larger whale boat by scratchbuilding a lower
deck, and upper crossmembers, with styrene and basswood. A toothpick serves as
the take down mast.
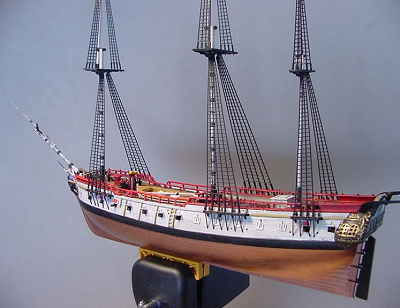 Masts
and the bowsprit were painted flat white, then washed with van dyke brown and
flat black to bring out the rope details, and give them a “worn” look. The
preformed ratlines are actually quite nice in this kit, just make sure to NOT
glue them in place until your rigging is done, just insert them into the fitting
pegs and wait. The masts themselves are ok for being formed out of styrene, one
of mine was warped and had to be straightened using warm water and a lot of
piratical squinting. Use a good sturdy glue to hold these in place, since with
tension, they might bend easily.
Masts
and the bowsprit were painted flat white, then washed with van dyke brown and
flat black to bring out the rope details, and give them a “worn” look. The
preformed ratlines are actually quite nice in this kit, just make sure to NOT
glue them in place until your rigging is done, just insert them into the fitting
pegs and wait. The masts themselves are ok for being formed out of styrene, one
of mine was warped and had to be straightened using warm water and a lot of
piratical squinting. Use a good sturdy glue to hold these in place, since with
tension, they might bend easily.
With your three masts, bowsprit, and flagmast in place, go ahead and make the anchors, though you will need to find some heavy thread for the anchor lines. I found some wonderful stuff at a craft store nearby, and pillaged their stock for future projects. Arrr!
| COLORS & MARKINGS |
 Most of the painting for these
ships is largely by speculation, and a constant referral to old works of art and
the dubious literary resources available. Theories about what colour was used
where and when abound, without much fact to back them up, so you are left
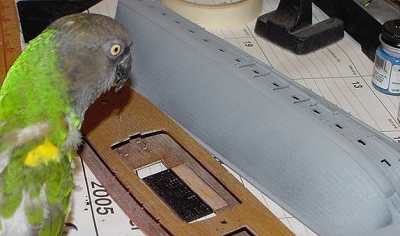
somewhat on your own…kind of liberating, isn’t it? All’s you need is a parrot
on your shoulder, and a cutlass in your hand!
Most of the painting for these
ships is largely by speculation, and a constant referral to old works of art and
the dubious literary resources available. Theories about what colour was used
where and when abound, without much fact to back them up, so you are left
somewhat on your own…kind of liberating, isn’t it? All’s you need is a parrot
on your shoulder, and a cutlass in your hand!
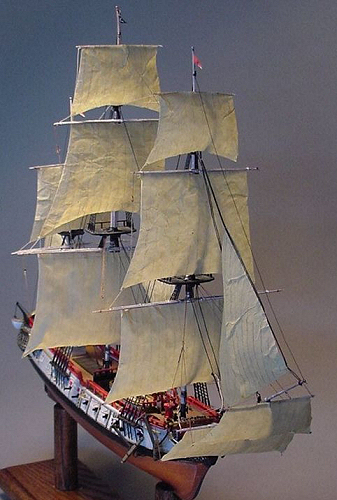
While I began this project with the purpose of having the ship rigged with red sails, after making a set, I realized that they were too overpowering, and went with a standard linen look.
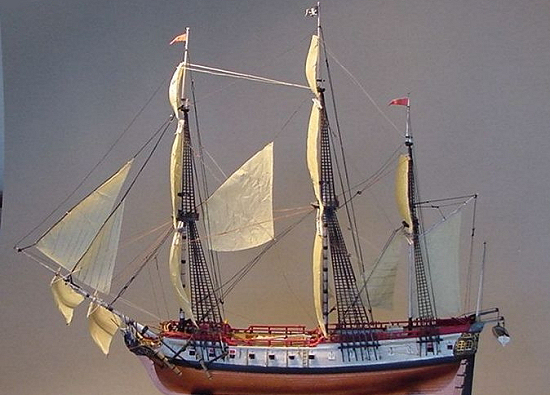
Sails: When you see a sailing ship model, it is usually fully rigged, standing and running, with no sails at all…but I wanted my “Jack’s Bloody Bitch” to look like it was ready for the open waves, so I turned to a rather simple way to make rather convincing sails out of common paper, using the vac sails as a mold.
Wet down a piece of tan typing
paper with a small pump sprayer and let it drape over the vac sheet, then using
a bristle brush, gently start prodding the paper down over the convex sails,
brushing to bring out the ribbed details. Once you have the paper down all the
way, put it on a shelf and let it dry overnight. In the morning, spray the
sheet down with clear acrylic satin (rattle can ) . Remove the paper, which now
has taken on the appearance of the individual sails, and again using the clear
acrylic, give it a blast for some extra rigidity. Now you can cut out the
individual sails and use these for your ship…the paper has a lovely translucent
effect that mimics a sail much better than any vacuum formed plastic could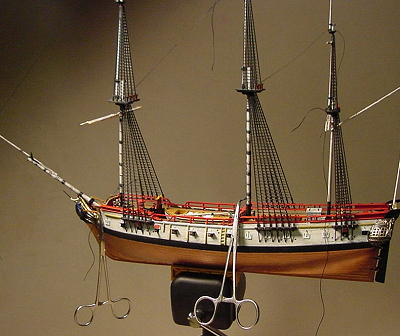 ever do.
Rigging: There isn’t enough space here to go on and on about how to rig a ship, check out the resources below and give it your best shot. I’ve often heard from modeler’s, “Wow, I’d like to build one of those, but I hate the thought of doing the rigging.” Don’t let it frighten you, do as much of the rigging as you care to do, and be sure to work in short stretches, about half an hour at a time is as much as most of us can take. Alligator clips and hemostats will work wonders for you on this bit of the build. But, in three or four days of little work periods, your spouse or your kids will walk in and say “WOW ! How did you do that?”, and you can grin. When you are running the lines, make sure not to overtension the knots as you go along…one trick I’ve learned is to always leave one end with a running (able to be loosened or tightened) knot. Once the whole array is in place, hit each knot with a small drop of white glue to seal the deal, stand back, and gape in awe at what you have accomplished. Arrr! (note to all ship modelers: I make no pretense to be any sort of expert on what lines go where, just study the drawings, and do the best you can is my vote.)
| FINAL CONSTRUCTION |
 Ok, now we have lines running
this way and that, and spiders on the walls are looking at you with envy, but
there is still more to do. Using a pair of hemostats or tweezers, put a drop of
slow setting glue on each cannon peg, one at a time, and carefully maneuver them
through the gunports, and into the cradles. When these have set up, you can
glue on the gunport covers, or actually leave them off…since they often were in
the south seas for better ventilation in the decks. The ratlines now have to
be trimmed to fit, and using drops of c/a glue, fixed into place. The directions
call for the modeler to bend the lower part of the main ratlines into the hull,
but I decided to just cut them off, and using some stretched sprue, replaced
them all to fit…ah, much nicer !
Ok, now we have lines running
this way and that, and spiders on the walls are looking at you with envy, but
there is still more to do. Using a pair of hemostats or tweezers, put a drop of
slow setting glue on each cannon peg, one at a time, and carefully maneuver them
through the gunports, and into the cradles. When these have set up, you can
glue on the gunport covers, or actually leave them off…since they often were in
the south seas for better ventilation in the decks. The ratlines now have to
be trimmed to fit, and using drops of c/a glue, fixed into place. The directions
call for the modeler to bend the lower part of the main ratlines into the hull,
but I decided to just cut them off, and using some stretched sprue, replaced
them all to fit…ah, much nicer !
| CONCLUSIONS |
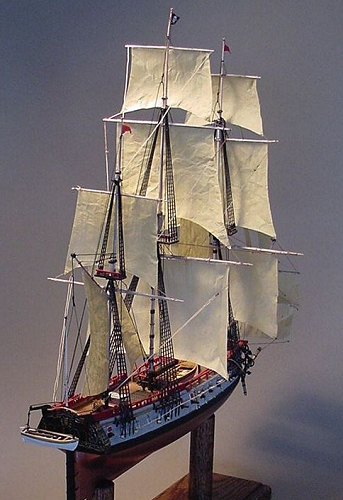
Certainly not a weekend build, but for the money, one of the most rewarding projects a modeler can tackle…fairly easy, somewhat time consuming, but the end is worth the wait. Don’t let the rigging frighten you, go out and buy one, and soon you will be asking for noggins of rum and grog, snarling at the table, and saying “ahoy matey” with all the joy in the world. “Fifteen men on a dead man’s chest” Indeed !
April 2006
| REFERENCES |
http://sailing-ships.oktett.net/square-rigging.html
http://www.pbenyon.plus.com/B_S_M/Contents.html
http://en.wikipedia.org/wiki/Pirate
Review kit courtesy of: a deal on ebay and Shanlyn’s patience (thanks hon!)
If you would like your product reviewed fairly and quickly by a site that has over 300,000 visitors a month, please contact me or see other details in the Note to Contributors.