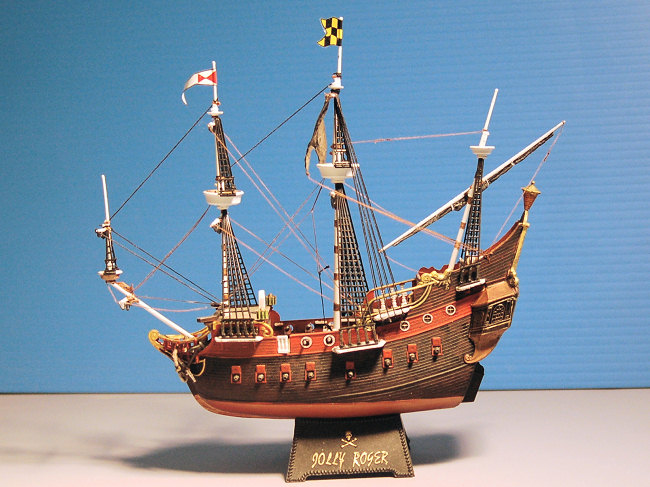
Revell Caribbean Pirate Ship
| KIT #: | 0386 |
| PRICE: | $12.99 |
| DECALS: | One option |
| REVIEWER: | Greg Ewald |
| NOTES: | Avoid at any cost, matey! |
| HISTORY |
 This one is totally
fictional, but based lightly on a Dutch Flute style of ship, with an odd crow’s
nest on the forward bowsprit (riding there must have been only for the bold!).
You’ve read my review of the Lindberg Jolly Roger, so you already know how I
feel about pirates, unfortunately my parrot, Gus, has moved over to a breeder’s
house, so there are no pics with him in it. I had to do all of my
“Arrrrgghhh-ing” by myself.
This one is totally
fictional, but based lightly on a Dutch Flute style of ship, with an odd crow’s
nest on the forward bowsprit (riding there must have been only for the bold!).
You’ve read my review of the Lindberg Jolly Roger, so you already know how I
feel about pirates, unfortunately my parrot, Gus, has moved over to a breeder’s
house, so there are no pics with him in it. I had to do all of my
“Arrrrgghhh-ing” by myself.
That being said, the pirates were the scourge of the south seas in their hey-day, and well deserved too, I might add…life on one of these ships was fraught with danger at every swell, every turn of mood, every conflict.
My kind of people.
| THE KIT |
O.K. This ship is sold by Revell of America, molded in Poland, the instructions are from China. Guess that really does make it cosmopolitan, no?
It is also possibly the worst looking piece of plastic to come out of a cardboard box that I have ever come across. Flash? Flash? You could create a lot of spare parts from all of the over-molding. Test fitting, you just jump up and down for joy when something looks like it is even going to come close to fitting in place.
Everything is done in an oily black, so make sure you have some cans of grey sanding primer handy, as the colour scheme is all over the map.
Like most ship kits, there are a plethora (not of piñatas) of parts that go into building this tiny model…lots of sanding and carving are going to be required, definitely not for the kids!
| CONSTRUCTION |
 First off, prime
everything…and yes, I mean everything. I spent over ten hours just cleaning up
the flash and getting rid of as many injection pin marks as I could without
going berserk. Arrrghh.
First off, prime
everything…and yes, I mean everything. I spent over ten hours just cleaning up
the flash and getting rid of as many injection pin marks as I could without
going berserk. Arrrghh.
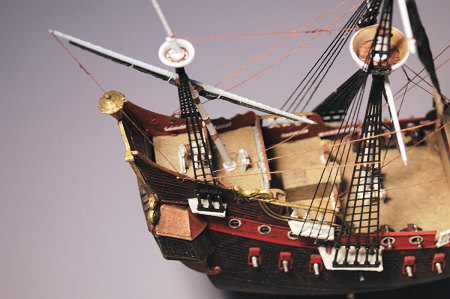
The deck was done in the fantastic technique written about by Len Roberto and used in the Lindberg construction, though without as much colouration…those pirate planks were D-I-r-t-y !!!
The connection points for the smaller bits, like the fife rails and such, are so weak that you will want to not attach them until you have the hull assembled, or the carpet monster will snag them up.
Whatever you do, don’t glue in the deck house beam, part 20, in step 2…if you do so, you won’t be able to fit in the forward mast. Yeah, I did…hey, that is why we write these things!
The hull required four clamps, six clothespins, a bit of tape, and a lot of wishing to close up…even the photo on the box top of the kit shows a massive seam. Break out the bondo and the sandpaper.
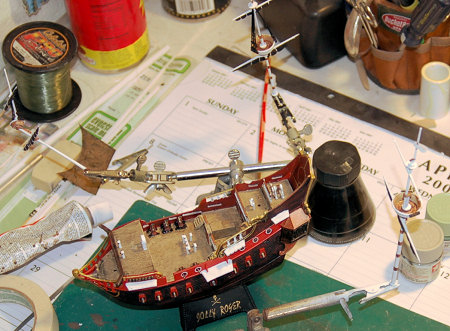 Surprise, surprise, surprise ! The masts actually go together fairly easily,
though there are no location pins for most of anything, and you need to test fit
over and over. Hey, after the hull, you’ll be happy.
Surprise, surprise, surprise ! The masts actually go together fairly easily,
though there are no location pins for most of anything, and you need to test fit
over and over. Hey, after the hull, you’ll be happy.
Once you have all of the main bits together, go ahead and start gluing in the smaller rails and ladders, carefully…this plastic did not react well to Zap or regular C/A glues for me. The ratlines are molded waaaaaaaay out of scale, but at this point, you are going to be on your tooth’s edge to finish, so you won’t care too much, and they fit into the masts without much effort.
| COLORS & MARKINGS |
Like most ship kits, you are going to want to paint this one as you go along with the construction. I used Tamiya acrylics and Krylon rattlecans for mine, the spray paint doing the larger areas, and the Tamiya for the smaller bits. One note on using this brand of acrylic paint…you can not use a wet brush, the paint will clump up on you like crazy. Thin it down, and rotate brushes so you always have a dry one available.
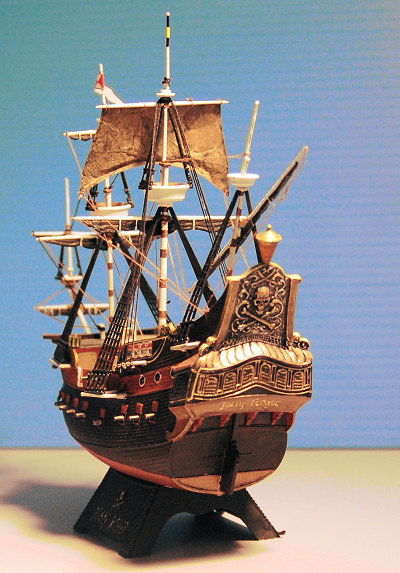
After most of the kit was
together, I gave it a nice oily sludge wash, and picked out the gold and silver
with paint pens, the detail 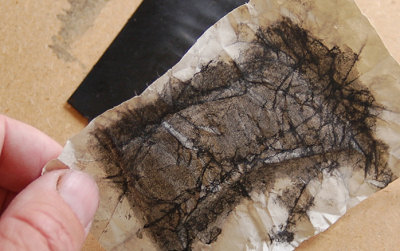 is
so overdone on the scrollwork that this is easy.
is
so overdone on the scrollwork that this is easy.
For the sail, I used the kit plastic sail as a mold for a black paper cast, it looks better, and is a little translucent, like cloth actually is.
Consulting a book on rigging, I did try to get a semblance of something workable for this ship using different grades of tan, brown, and black thread…it is too small for deadeyes, so use knots instead.
Of course, the instructions show the flags on backwards (typical), but the decals themselves are actually fairly nice. They would have been better off with a standard paper sheet though, as trying to get the two halves to line up when you wrap them around the mast is an adventure in frustration. I left off the huge skull and crossbones for the one full sail, and the over-large Jolly Roger…it was just too much.
| CONCLUSIONS |
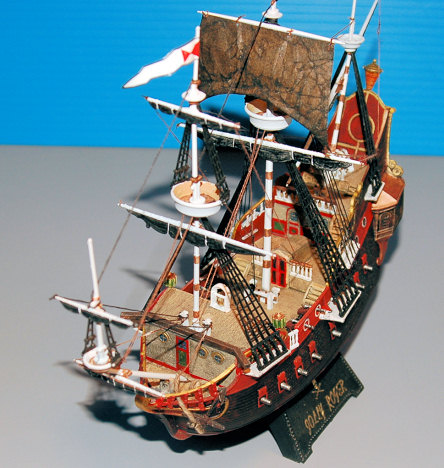 To be honest, I hated this
kit…finishing it only because I felt a sense of duty to conclude a purchase with
a final product. My wife thinks it is “cute”, and actually wanted to put it up
on the mantel. You would be much better off picking up another Lindberg kit
than attempting to make anything decent out of this, this, this….oh heck, I
can’t even say it here.
To be honest, I hated this
kit…finishing it only because I felt a sense of duty to conclude a purchase with
a final product. My wife thinks it is “cute”, and actually wanted to put it up
on the mantel. You would be much better off picking up another Lindberg kit
than attempting to make anything decent out of this, this, this….oh heck, I
can’t even say it here.
Truly a disappointing build, as I had bought three of them for some kids who are into pirates, and thought they would be fun for them to model. With all of the fit problems, and the need for clamps, etc…this junker is not for the kids, or for a weekend project.
Total time? 28 hours of work. Yipes.
| REFERENCES |
You can google Pirates if you want to, or ships…but you won’t find anything on this thingy.
May 2007
Greg Ewald
Copyright ModelingMadness.com. All rights reserved.
If you would like your product reviewed fairly and fairly quickly, please contact the editor or see other details in the Note to Contributors.