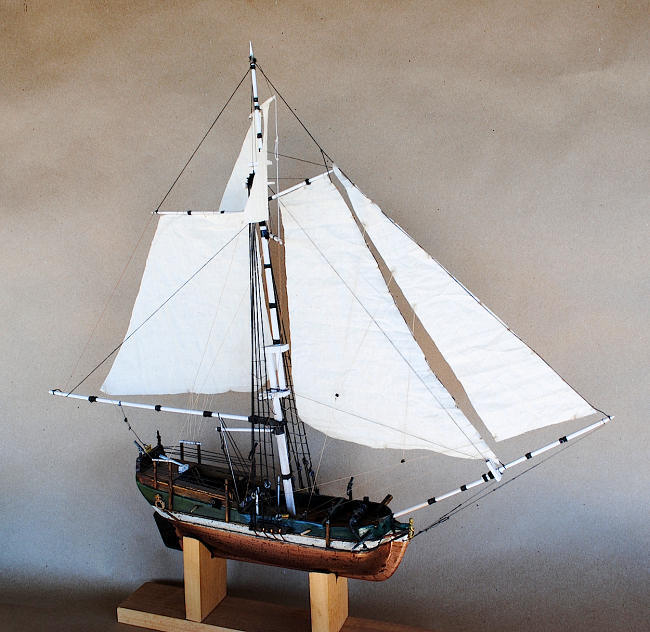
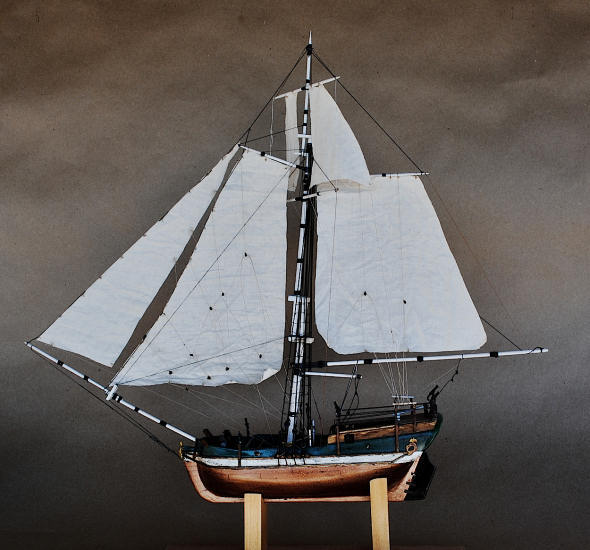
1/60 Fast Naval Sloop
| KIT #: | ? |
| PRICE: | $A lot |
| DECALS: | options |
| REVIEWER: | Greg Ewald |
| NOTES: |
Model Shipways “sultana” hull, the rest is scratch |
| HISTORY |
The golden age of piracy. Wind torn canvas, and men of steel in ships of
wood ! Yo Ho !
Tearing into merchant fleets and robbing them of their silver and
gold !
Fighting hand to hand and always coming out on top.
Yeah, well the reality was rather gritty. More sailors died from scurvy
or the “pox” than did in combat.
Even while combating dysentery, the myriad of fevers,
and std’s…some still found time to actually fight in their warships.
Oh yes, we have all seen Cap’n Kidd and his band slaughter all sorts,
but the truth is far uglier. Most of the pirates were teenagers (at best), and
could barely fence with a foil, let alone a cutlass. Nope, the combat was mostly
done in a gruesome fashion, with simple grenades and cannon shot.
Many of the smaller cannons did not even use balls, but
just a mishmash of metal bits (horse nails, etc) launched into the enemy from
damn near point blank range. Blood spilled all over the decks, and the marauders
would jump aboard and spear or cut any man who opposed them.
I doubt they were wearing white blouses, unless they had
just stripped them from the women they had raped.
 The
ships they used were anything they could find or steal or buy.
Some of the pirate “greats” used large ships, almost of
the line…most preferred something that could be gotten in and out from shallow
waters, and FAST.
The
ships they used were anything they could find or steal or buy.
Some of the pirate “greats” used large ships, almost of
the line…most preferred something that could be gotten in and out from shallow
waters, and FAST.
The “fast sloop” was an incredible build of ship. It only drafted about
ten feet or so, even when loaded, and could click along at a rapid 11 plus knots
under full sail.
Oars were available for sculling into tight channels, or up
rivers to meet up with scallywags, whores, and city delegates(Who were also
often scallywags and whores).
With up to fourteen guns, this ship could slip up fast to it’s prey, and
like the falcon of the sea it was, tear into the prey before they had a chance
to know what was hitting them.
Of course, most of the time, a flag was flown that
showed the ship to be of a piratical nature, and an agreement could be met
between the two enemies…all to benefit the pirates, of course.
A black or red flag was the most common, but many
pirates chose to decorate theirs with skulls and crossbones and the like. The
term “Jolly Roger” is often bandied about, and probably comes from the French
term of “joli rouge” (pretty red).
The “fast sloop” was unusual in the size of its bowsprit…often the same
length as the ship itself. This immense amount of canvas gave the small craft
and incredible speed for its day, and was widely favoured by many of the worst
of the pirates, including the notorious “black beard”.
The navy had the same idea, however, and tagged BB in an inlet with two
sloops of their own, and in hand to hand/gun combat, the world’s most fearsome
pirate was cut down. But not after killing quite a number of people. He had been
drinking quite a lot of rum the night before, and it took five pistol shots, and
21 wounds to bring him to his death. Yo Ho, indeed.
This ship is fictional, and based on the tales of the “rum-runners” that scurried about the east coast, carrying untaxed cargo, and now and again seizing any quarry they could find. “ A pirate's life for me !” Nah, I think I will just build models. I’m 46, and too old to go sailing about and drinking rum. Well, maybe just a smidge?
| THE KIT |
This whole
project began a number of years ago in a ship group build…the wooden “Sultana”
from Model Shipways.
There was no pink on it, and I quickly lost interest,
and pushed it to the back of the stacks.
I do , however, love pirate stories (ask me what my
favourite book is, I dare ya)
and when a friend gave me a book on pirate ships, and I
saw the fast sloop, well…the kitten was out of the bag !
If you have never built a wooden kit, the Sultana is a good one to start
on…it is much easier than some of the other “beginner” kits out there, and less
apt to lead to frustration.
Most of this kit, other than the original hull and the metal fittings, was made from dowels, toothpicks, doll house furnishings, bits of scrap wood, and whatever else I could scrounge up. The sails are made from cotton tight weave that was found at a craft store.
| CONSTRUCTION |
 This
was a loooooong project, so bear with me.
I looked over the instructions for the assembly of the
Sultana, and shrugged “WTF?”
I mean, really? Really?
Good heavens, I could build a canoe and go out fishing
in the same amount of time !
Then I came to my senses and realized that I live in the
desert, and if I build a canoe, it would just be a waste. So I built this boat
instead. Besides, it takes up less shelf space, right?
This
was a loooooong project, so bear with me.
I looked over the instructions for the assembly of the
Sultana, and shrugged “WTF?”
I mean, really? Really?
Good heavens, I could build a canoe and go out fishing
in the same amount of time !
Then I came to my senses and realized that I live in the
desert, and if I build a canoe, it would just be a waste. So I built this boat
instead. Besides, it takes up less shelf space, right?
You can’t really scratchbuild much without a fair assortment of tools,
unless you are a magical carpenter from…oh heck.
I used pretty much every thing I had on this one, to be
honest…from the scrolling saw, the mortising press, the drill press, and
everything I think Dremel ever invented.
The main hull was sanded down with a pointing sander, and bits removed
that weren’t on the two schematics I could find of the Fast Sloop (FS from now
on…hey, I have to type this s…stuff).
You are going to need to fill the wood with a putty of
some sort, if you are going for the Italian look (au natural), you will need to
find a suitable wood putty.
I painted mine, so I went with bondo…it dries fast, and
sands well.
Once the hull was cut into something reasonable of shape, I glued on the
keel that I had made from basswood. I like to use “gorilla glue” for these, it
is a foaming polyester glue that sticks things like hookers on a politician.
(there’s that reference again, huh?)
A wonderful tool for the scratchbuilder can be found at any local
hardware store…the awesome contour gauge. It is basically a series of pins that
you push into a stationary object, and then can replicate it in another media.
In this case, after putting on the keel and sanding it down to a rough
shape, I used the contour gauge to make a platform for the ship out of some
scrap lumber. This will serve as the “modeling bench” for the ship, and if all
goes well, the base for it as a display.
The Hull: There
are a lot of options for the hull. Sanding it smooth, or planking it. Sorry, but
I took the coward’s route and sanded it down, filling as
necessary.
Painting has to be ongoing on a sailing ship, so I finished the
hull first, and let it cure. For about a year. Yeah, yeah, I know…I can be a
slacker. We will get to the painting later. We have a lot of work to do !
The Deck:
I used basswood strips for the decking, gluing them down
with ac glue and using small weights. You can also use pin nails, but I didn’t
feel like spending the time on that.
The hold holes were mortised out with the drill press
and a mortising bit (about 20 bucks at harbor freight, around 80 at home
despot).
I did use the metal bits from Model Shipways for the grates, even though
they are really inaccurate for the original scale of the ship…they suited my
oddball size perfectly. The oar ports were cut into the sides, and the oars
whittled from some pine stock I had floating around. Pardon the pun.
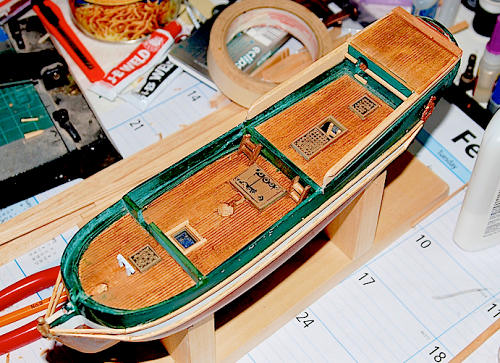 The
railings were made from more basswood. (that’s good bass!) and mounts were made
for the cannonades. I decided to drill out the holes for the mast at this time.
Note to self: always drill major stuff PRIOR to
attaching the rails. The bitts were made from toothpicks from a grocery store,
and glued into place in drilled holes as well. OK, now holes have been drilled,
and the rails re-attached, we are ready for….
The
railings were made from more basswood. (that’s good bass!) and mounts were made
for the cannonades. I decided to drill out the holes for the mast at this time.
Note to self: always drill major stuff PRIOR to
attaching the rails. The bitts were made from toothpicks from a grocery store,
and glued into place in drilled holes as well. OK, now holes have been drilled,
and the rails re-attached, we are ready for….
The Mast:
The FS’s had an extremely high mast, with a lot of sail
to hold. I can’t imagine the cajones that those guys must have had to climb up
that far. I used doweling for the main stem of the mast, and then chopsticks
(courtesy of our local take out Chinese place) for the upper mast and
crossmembers.
It was not uncommon for privateers to move the masts after a vessel had
been acquired, so you can pick your location as you want.
I put mine where I figured the center of gravity would
be, since it is a heavy sail that they rigged up.
All of these bits were painted as construction went along, the thought
of masking all of this off would have given me a bigger headache than the main
construction, which was already a headache. I did not glue the main mast in
place until I had finally decided upon:
Placing the bowsprit:
The bowsprit on these sloops was often near to the same
length as the ship itself !
Using a long dowel, I fitted the thing into an angled
hole drilled in with a cordless drill. Yeah, freestyle baby !
Attaching a jiboom to the front was easy enough, with a
piece of basswood for the striker plate. Yep, more chopsticks were used. It’s a
good thing I like Chinese food.
We are now close to the rigging, but first:
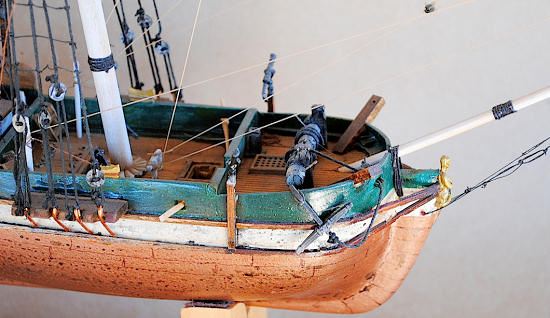 Cannons
and cannonades:
I used the cannonades from the metal pieces in the Sultana kit,
but scratchbuilt the larger 9 pounders from wood. I just couldn’t find anything
of the right size available, though I am sure they are out there somewhere,
lurking where it is damp and dark…*chuckle*
Cannons
and cannonades:
I used the cannonades from the metal pieces in the Sultana kit,
but scratchbuilt the larger 9 pounders from wood. I just couldn’t find anything
of the right size available, though I am sure they are out there somewhere,
lurking where it is damp and dark…*chuckle*
The cannons were put on slides with wheels chocked at the back, and tied
into place, as a rum runner would have had them. I am sure they would have
probably had a piece of sheepskin condom placed over the end to prevent rusting
from the seawater, but I had spent too much time drilling the darned things out,
and wanted them to show off.
The cannonades were mounted on the railing posts, per
the sketches that I could find of a FS. I managed to knock them off repeatedly
during the lengthy installation of:
The Sails:
I was torn about what to use for the sails. I normally
use vellum paper that is stained, but I really liked the rustic look of the
ship, and wanted to use something a bit grainier…so I went with a very tightly
woven cloth from a craft store, stained with the remnants of my coffee (I am
trying to cut down, o.k.?) from that morning. The panel lines of the sail, after
they had dried in the lovely phoenix sun, were drawn in with a 2B pencil, subtle
enough, but still noticeable. Now came the fun part. The rigging. I run the
lines I am going to be using through a chunk of
beeswax or the like (note: chapsticks make a wonderful
alternative, and they are small…I like “Bert’s Bees” )
 Rigging:
Rigging changed on ships monthly, according to wind and weather. Mine is
definitely not “fully rigged”, sorry, but after a while, a shelf sitter just
gets to be too much. ( I know, Frank, you are probably flipping me off right
now, dang perfectionist)
I went with a ship’s rigging that was most likely in
port, with many of the main lines down.
I used the traditional dark line for the standing
rigging, and a mocha for the running lines.
I made my own blocks and tackle, since this was out of
scale for anything else available. I only drilled into my finger once during the
process, which is something of a record for me. I figure the little bit of blood
on the sails just makes it more authentic, right?
Rigging:
Rigging changed on ships monthly, according to wind and weather. Mine is
definitely not “fully rigged”, sorry, but after a while, a shelf sitter just
gets to be too much. ( I know, Frank, you are probably flipping me off right
now, dang perfectionist)
I went with a ship’s rigging that was most likely in
port, with many of the main lines down.
I used the traditional dark line for the standing
rigging, and a mocha for the running lines.
I made my own blocks and tackle, since this was out of
scale for anything else available. I only drilled into my finger once during the
process, which is something of a record for me. I figure the little bit of blood
on the sails just makes it more authentic, right?
Making the ratlines was rather straightforward, I just made a simple jig
with some finishing nails on a piece of scrap pine, and tied up the lines…gluing
them as I went. Yeah, I know, they aren’t totally neat and perfect. Guess what?
Neither were the real ones.
After you have the standing rigging attached, it is time to position your coffee soaked sails (you could use tea if you want, brits) and tie them off the assorted booms. Then, using the lighter coloured thread, start stitching in the running rigging, tying off to the bitts as necessary. I like to just use a simple clove hitch, and a drop of white glue to hold them in place.
| COLORS & MARKINGS |
I painted the hull in a primer white, that was then washed down with
India ink watered down with alcohol. The rubbing kind, although I suppose you
could use whiskey if you wanted to.
I then sprayed the draft in a copper (krylon rattlecan).
Bear in mind, the painting took place during the construction, so bits and
pieces were painted prior to final assembly !
The green was brush painted on, just as it would have
been back in the day, and a few flecks here and there didn’t bother me at all.
Yeah, I know, I know.
As far as markings went, I added none…a runner wouldn’t have used them
at all. “Dead men tell no tales” and “If you don’t ask me a question,
I won’t tell you a lie”, right?
| CONCLUSIONS |
A long, but very fun project. It isn’t gorgeous, but I love it, and it
makes me grin and sing the song below often.
If you haven’t tried a scratch build, do yourself a favour, and kick one
up. You may have a problem going back to kits with instructions !
| REFERENCES |
http://www.youtube.com/watch?v=x5JRXBq9J44
http://www.thewayofthepirates.com/pirate-life/sloop.php
“The Pirates”
Time/Life books in the series “the seafarers”
April 2011
If you would like your product reviewed fairly and quickly, please contact me or see other details in the Note to Contributors.