| KIT #: | 5328 |
| PRICE: | $16.98 |
| DECALS: | One option |
| REVIEWER: | Scott Lyle |
| NOTES: |
| HISTORY |
One of the most revolutionary ships in history, the launch of the HMS Dreadnought in 1906 changed the face of naval warfare virtually overnight. Instantly the most powerful warship in the world, the Dreadnought’s name came to represent an era – any ship built before her was a pre-dreadnought; decrepit and obsolete. Navies around the world were forced to begin building new Dreadnought-type battleships themselves, thereby creating a ship-building arms race that was one of the factors that ultimately led to World War I.
What made the Dreadnought so revolutionary was not a single new technology, but a combination of new technologies including steam turbine propulsion, a single caliber of main armament, and a modern fire control system.
In the late 1800s battleship designs generally
featured large guns mounted in turrets or barbettes located fore and aft, with
the sides of the ship mounting many smaller caliber guns whose high rate of fire
could shower the enemy with small but damaging shells. There was no effective
fire control system however, and the effective range of all of the guns was
rarely greater than 2000 meters. Long range gunnery testing led officials to
develop a fire control system where the splashes of the shells around the target
were observed, with minor gunnery changes ordered accordingly. Testing revealed
that using that method increased the practical range of the guns to 7,000
meters. It did create a new problem however – how to differentiate between the
splashes of the large and small guns? Gunnery observers onboard the ship
wouldn’t know wh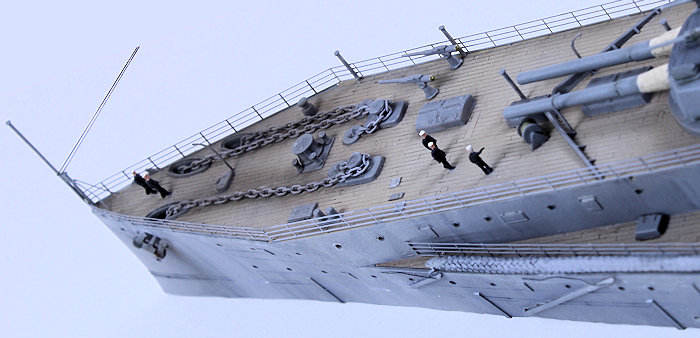 ich splash belonged to which gun, and thus not know which guns
to adjust.
ich splash belonged to which gun, and thus not know which guns
to adjust.
In 1903 the chief designer of the Italian Navy, Vittorio Cuniberti, proposed to solve the problem by arming battleships with a single caliber of large gun. While his ideas fell on deaf ears within the Italian Navy, officials in the Royal Navy, particularly one Jackie Fisher, had been considering the same idea. In 1904 Fisher became the First Sea Lord, then the most powerful position in the Royal Navy, and immediately began pushing for a new class of battleship armed with an “all-big-gun” armament. He claimed he could design a ship armed solely with 12” guns and capable of a speed of 21 knots - and deliver it in less than a year.
While Fisher dealt with understandable skepticism, the “all-big-gun” theory was actually put to the test in battle. Analysis of the Battle of Tsushima in May 1905 between Russian and Japanese battleships confirmed that the only guns that had a measurable impact during the engagement were the largest guns – at that time 12” in diameter. The decision to go “all-big-gun” was thus confirmed as sound.
In parallel with the armament development, Fisher pushed for steam turbine propulsion, a then-young technology that showed great promise but had yet to sway the Royal Navy brass. The system had many advantages including reduced cost and weight, higher reliability, and better fuel efficiency. They operated best at high speeds however; in fact to operate properly at low speeds, four propellers were required, negating some of the cost and weight savings. For his new battleship design however Fisher demanded that they be installed.
Construction of the new ship began in October
1905. To speed the building process the hull’s design was simplified as much as
possible and bulkhead designs from previous classes were utilized. The
Dreadnought was launched just four months later, though fitting out took another
ten months. By October 1906 she began her first power plant tests and was deemed
fully complete in December 1906. Her fourteen
 month construction time remains a
record for a ship of that size and was roughly half as long as it took to
normally build a battleship. As a result she entered service a full four years
ahead of her American and Japanese rivals.
month construction time remains a
record for a ship of that size and was roughly half as long as it took to
normally build a battleship. As a result she entered service a full four years
ahead of her American and Japanese rivals.
When commissioned the Dreadnought was the largest battleship in the world, displacing 21,845 tons fully loaded. She was armed with ten 12 inch guns in five turrets, three on the centerline and one on each side. This configuration gave her twice the firepower of any other ship then in service. She could also control those guns with a new centralized fire control system that allowed all the guns to be fired at the same target, unlike previous designs that featured local control of each gun turret.
In 1906 the naval world was the Dreadnought’s oyster. The most powerful battleship in the world, she rendered all other ships obsolete. Jackie Fisher stated that compared to the Dreadnought, all other ships could neither fight nor run away. While she missed out on that great battle of the dreadnoughts, the Battle of Jutland in May 1916, the ships that fought in that battle were her direct descendents.
The end of the “War to End All Wars” brought with it heavily reduced defense budgets around the globe. The Royal Navy’s aggressive ship building program was scaled back, and the Dreadnought herself became a victim of the cutbacks. Broken up and sold for scrap in 1921, it was an ignominious end for one of history’s most revolutionary ships.
| THE KIT |
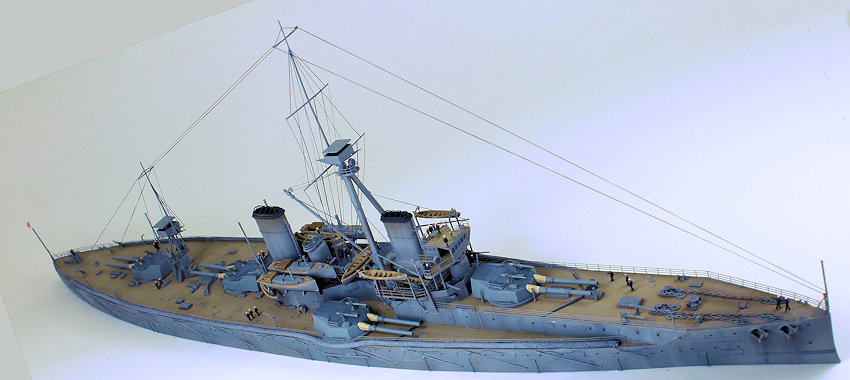
 About the size of a WW2 cruiser, this kit is quite
a bit smaller than a 1/350 Hood or Bismarck. Nonetheless Trumpeter’s kit comes
to you in a sturdy box packed to the top with sprues. The hull is split in left
and right halves with no waterline option, so waterline builders like me will
have some Dremeling to do.
About the size of a WW2 cruiser, this kit is quite
a bit smaller than a 1/350 Hood or Bismarck. Nonetheless Trumpeter’s kit comes
to you in a sturdy box packed to the top with sprues. The hull is split in left
and right halves with no waterline option, so waterline builders like me will
have some Dremeling to do.
There are nine sprues wrapped in thin foam to protect the most fragile parts, of which there are many. The sprues feature very fine and thin parts, some of the thinnest I’ve seen. Four frets of photo etch are included, raising the possibility of not needing to purchase further photo etch. I usually resort to Eduard photo etch sets for my ship builds, and for this kit they have issued two sets, an overall detail set and a hand railings set. The photo etch Trumpeter provides fulfills about 75% of Eduard’s overall detail set, so in the interest of saving some money I opted only for the Eduard handrail set. A very small decal sheet provides some British flags, and a full color painting guide is also included. The instructions are typical Trumpeter – meaning they are perfectly good.
| CONSTRUCTION |
The ship more or less breaks down into two modules; the forecastle, or smaller, upper deck, and the larger, lower deck. I started by painting both decks, first pre-shading them with Tamiya Red Brown and then coating them with Tamiya Wooden Deck Tan. A thinned down wash of MIG Productions’ Dark Wash was applied next, and then both decks were set aside to dry. I then picked out the molded-in details with Testors Dark Gull Gray, the color I chose to represent “Home Fleet Gray”.
Construction of the forecastle then started in earnest, gluing on the small details, painting them by hand, and slowly building up the levels. I jumped around within the instructions as needed to assemble the small posts and beams that support the upper levels.
 Some of the decking should be painted either a
dark steel gray color or a linoleum brown shade, and for that I used Testors
Gunship Gray and a 50/50 mix of Vallejo Saddle Brown and Chocolate Brown
respectively. I painted those decks and picked out their details by hand until
the forecastle was complete save for the masts, rigging, and large gun turrets,
which I left for later.
Some of the decking should be painted either a
dark steel gray color or a linoleum brown shade, and for that I used Testors
Gunship Gray and a 50/50 mix of Vallejo Saddle Brown and Chocolate Brown
respectively. I painted those decks and picked out their details by hand until
the forecastle was complete save for the masts, rigging, and large gun turrets,
which I left for later.
I then turned my attention to the hull, which I wanted to cut down to waterline size. I first scored along the waterline of each half with a heavy knife a few times until I could bend and snap the lower halves off. I then glued the halves together along with the internal stiffeners that Trumpeter provides. I glued the main deck on next, and then started adding the small details of the torpedo nets onto the sides of the hull. It was then that I realized that I cut the hull to the wrong height – I had the waterline of the ship too low, making the hull too high (insert frustrated, angry noises!)
To resolve this annoyance (something like this comes up with every model, doesn’t?) I drew the proper waterline onto the hull with a marker and then very carefully used my Dremel with a cutting wheel to trim the offending plastic away. After that I painted the hull, first priming it with Tamiya’s Light Spray Primer (rattle can), then pre-shading it with Tamiya XF-69 NATO Black. That was followed with Testors Dark Gull Gray, with a little Testors White thrown in to lighten and splotch things up a bit.
Next I glued the forecastle to the hull and then proceeded to add all of the small details on the main deck. It was now time to add some weathering. Since I was depicting the Dreadnought as it was near the time of its launching I wanted to keep the weathering subtle. I applied small dabs of White and Paine’s Gray oil paints to the gray surfaces of the hull and superstructure and then used White Spirit and a wide brush to pull the oil paints in a downward direction to create some streaking. A dark gray wash was also applied to the various gray pieces of equipment to provide some contrast.
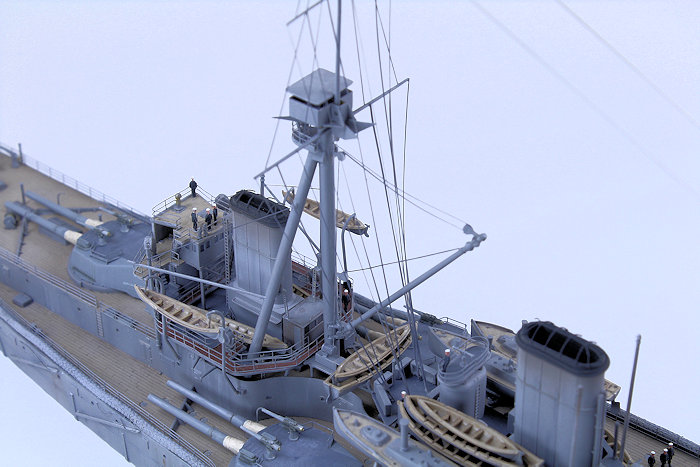
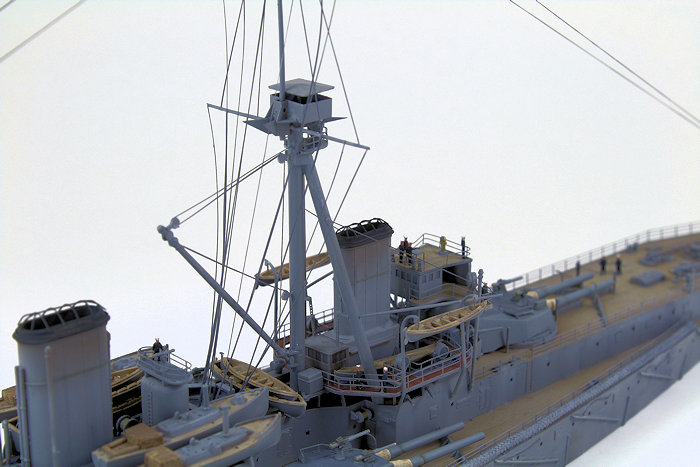
 It was now time to start adding the most fragile
details, a good sign because the end of the build was near – but also a bad sign
because the model gets progressively trickier to handle! The fore and aft masts
were added and rigged with pieces of stretched sprue. Photos of the real
Dreadnought show a ship positively covered in rigging. Following my references I
added various pieces of stretched sprue to the masts and the main crane but
stopped before all of the pieces were in place because the area just started to
look too busy. Stretched sprue scale-wise is larger than real-life rigging and
so I felt continuing to add all of it would overpower the model. That and to be
honest, there’s only so much model rigging one man can handle…
It was now time to start adding the most fragile
details, a good sign because the end of the build was near – but also a bad sign
because the model gets progressively trickier to handle! The fore and aft masts
were added and rigged with pieces of stretched sprue. Photos of the real
Dreadnought show a ship positively covered in rigging. Following my references I
added various pieces of stretched sprue to the masts and the main crane but
stopped before all of the pieces were in place because the area just started to
look too busy. Stretched sprue scale-wise is larger than real-life rigging and
so I felt continuing to add all of it would overpower the model. That and to be
honest, there’s only so much model rigging one man can handle…
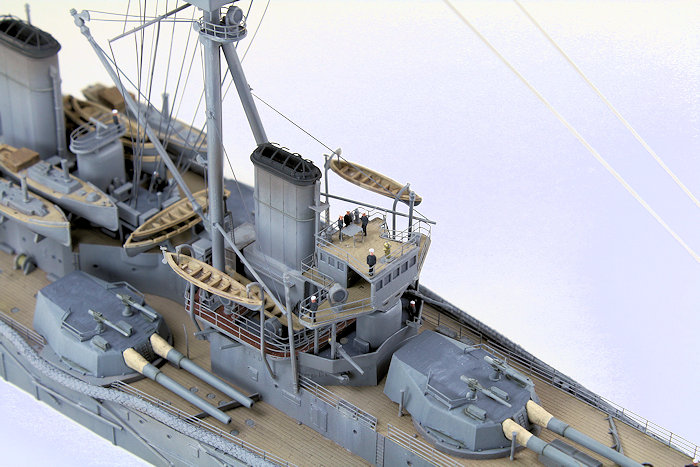
With the rigging under control I next added the lifeboats to the superstructure and then tackled the kit’s one dramatic omission - the torpedo nets. A bit of an odd concept, the real ship featured metal nets that were rolled up and stored along the outer edges of the deck. When danger was afoot the nets could be swung out away from the hull on booms and unfurled, creating a sort of curtain around the ship. Extending down below the ship’s waterline, any torpedo coming towards the ship would strike the nets and detonate safely away from hull (but presumably blow the hell out of that section of net). In practice the nets created enormous drag when extended and after a few years were removed from the ship. Since I was modeling the ship as it was when it was launched however, I had to have the nets. Trumpeter includes the booms in the kit, but alas, no nets. To replicate them I used thin, black shoe laces, cut to the right length. I sprayed them with Tamiya Primer Gray and then CA glued them to the edge of the deck. And yes, this marks the first time I’ve ever used shoe laces on a model.
A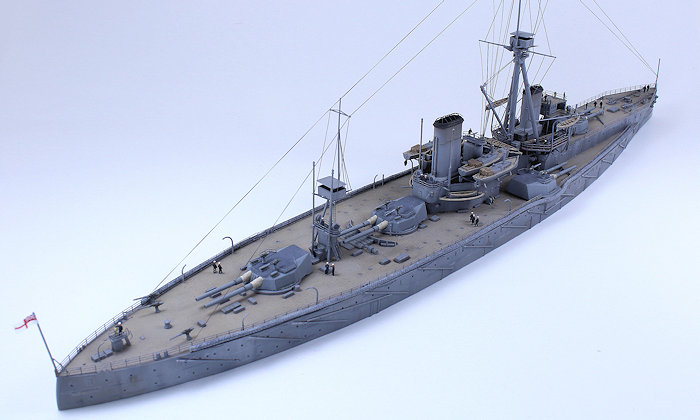 nother fiddly task was up next – adding the photo
etch hand rails. I coated them with Tamiya Primer Gray, covered that with Flat
Gull Gray, and then carefully glued them in place. The large gun turrets were
assembled, painted, and added next, and I followed that with the last bit of
rigging. Using EZ Line (a very fine elastic from Bobe’s Hobby Shop – highly
recommended!), I added some lines up high from stem to stern.
nother fiddly task was up next – adding the photo
etch hand rails. I coated them with Tamiya Primer Gray, covered that with Flat
Gull Gray, and then carefully glued them in place. The large gun turrets were
assembled, painted, and added next, and I followed that with the last bit of
rigging. Using EZ Line (a very fine elastic from Bobe’s Hobby Shop – highly
recommended!), I added some lines up high from stem to stern.
Two steps remained before I could proclaim “Done!” The first was the addition of the famous Royal Navy flag decal to the post on the ship’s stern, and the last was the addition of some resin 1/350 L’Arsenal naval figures. This was my first time adding said figures to a ship model, and I like the look they bring to the kit. They add a little touch of humanity to the model, and it was fun to position them on the various decks. And with that…done.
| CONCLUSIONS |
Another fine ship model from Trumpeter. I’m dating myself but I can remember in the 1980s and 90s when new 1/350 ship releases came out so rarely that when they did they were cause for major celebration. Now it’s hard to think of a major ship that hasn’t been released in 1/350 – a nice problem to have. I heartily recommend this kit, and look forward to adding to my basement’s “naval yard” in the future.
| REFERENCES |
- Kagero Publishing, 3D #21, “The Battleship HMS Dreadnought”
- Osprey Publications, New Vanguard #200, “British Battleships 1914-18 (1)”
- Wikipedia, the Online Encyclopedia
February 2016
Copyright ModelingMadness.com
If you would like your product reviewed fairly and fairly quickly, please contact the editor or see other details in the Note to Contributors.