Academy 1/700 Titanic (LED edition)
| KIT #: | 14220 |
| PRICE: | 20.99 GBP |
| DECALS: | One option |
| REVIEWER: | Jeffery Simpson |
| NOTES: | Box art shows a completed (unpainted) model with led illumination from inside the model shining through the superstructure and gaps in the hull as well as from portholes and windows. |
| HISTORY |
See the Preview
| THE KIT |
See the Preview
| CONSTRUCTION |
 The instructions were looked
through to identify parts that would need painting as identified with a number
in a triangle. I like to write out a little list of these numbers and the colour
name to keep from having to turn over the instructions.
The instructions were looked
through to identify parts that would need painting as identified with a number
in a triangle. I like to write out a little list of these numbers and the colour
name to keep from having to turn over the instructions.
Detaching parts with a normal sprue cutter followed by a trim with scalpel and /or sanding stick proved to be satisfactory in most cases. Some parts did not have much clearance and needed to be cut off the sprues with a scalpel. Since the sprues are not flat, to make it easier to detach these small parts the pieces that jutted up and down from the plane of the sprue were cut away, there was no need to label these items they were all distinctive. Early in the build a small black capstan shot off and was swallowed by the ‘carpet monster’, after that I was more careful. A small cylinder was carved from black sprue to replace the missing capstan. Academy do provide a couple of extra cranes, two types of vents and deck-chairs, but not capstans.
Generally the assembly sequence shown in the instructions was followed except for putting aside fragile components like masts and flag poles to be fitted last. The provided plastic ratlines did not look in keeping with the rest of the model and four 43mm x 3mm lengths of nylon mesh were substituted. In many cases glue could be applied from the rear of the part, for example under the deck, so in general parts were easily glued in a neat manner.
 Some difficult fitting was
encountered. Having glued D18 and 19 in Step 1, I had to trim away under the
superstucture to get a fit at Step 22. It might be better to leave these parts
off and test fit them at that later step. Doing so could well also improve the
fit of part D5 to the superstructure front at Step 23.
Some difficult fitting was
encountered. Having glued D18 and 19 in Step 1, I had to trim away under the
superstucture to get a fit at Step 22. It might be better to leave these parts
off and test fit them at that later step. Doing so could well also improve the
fit of part D5 to the superstructure front at Step 23.
Similarly at Step 6 parts D36 and D37 are a tight fit into the deck, there is actually no need to glue them since the boat deck, part B1 grips these parts tightly. Having glued D36 and 37 at step 6 the deck B1 had to be forced down over these parts at Step 11 with a visible gap.
| COLORS & MARKINGS |
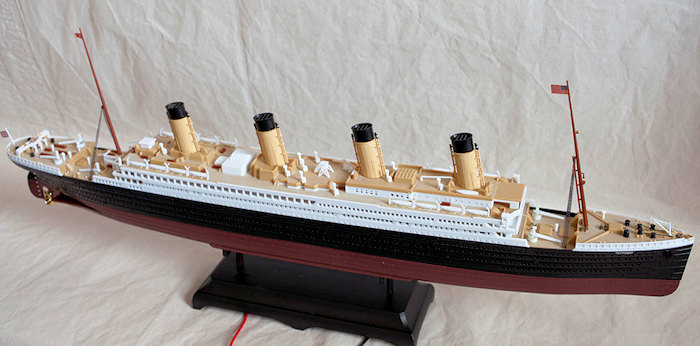
The instructions give alternative colour numbers for paint by many different manufacturers. They do not explicitly say so, but an attractive model could be assembled without any painting, the multi-coloured parts have a nice semi-matt surface finish.
The funnel colour gave me some concern, the plastic is bright orange and the suggested paint is also orange. However I have read that "White Star" line's funnel colour was "buff" and the colour painting that I referred to (of the Titanic's sister ship Olympic) shows a pale yellow colour. Vallejo 847 Dark Sand seemed a reasonable compromise. The funnels were primed with Vallejo Desert Sand primer, straight out of the bottle, with a brush. Then top coated with a 1:1 thinned Dark Sand, brush applied, the strident orange plastic funnels took several coats to turn "buff".
 Vallejo Deck tan thinned 4:1 was
applied with a brush to the decks. Detail painting as per the instructions:
grey, white, black, brown etc. was done as the parts were fitted. The anchors
are described as "bronze" but I decided to paint them gloss black since this
seems more plausible than metallic bronze even for a ship on its maiden voyage.
Some deck areas and the stern steering position were painted with what I felt
were plausible colours. However the major part of the lower hull, hull and
superstructure remained in the unpainted plastic colours.
Vallejo Deck tan thinned 4:1 was
applied with a brush to the decks. Detail painting as per the instructions:
grey, white, black, brown etc. was done as the parts were fitted. The anchors
are described as "bronze" but I decided to paint them gloss black since this
seems more plausible than metallic bronze even for a ship on its maiden voyage.
Some deck areas and the stern steering position were painted with what I felt
were plausible colours. However the major part of the lower hull, hull and
superstructure remained in the unpainted plastic colours.
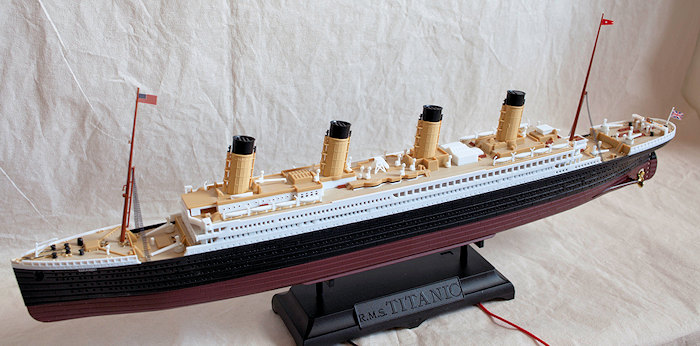
Foolishlym decal application was left right to the end, it would have been better to apply them before fitting the masts. Academy do not suggest using setting solutions and, indeed, when Micro "Set" and "Sol" were tried they failed to have any effect. Satin varnish was flowed under and over the markings to seal them to the hull. The flag decals were difficult to fold over themselves, they were also varnished, keeping my fingers crossed that they don't unglue themselves. I might add that the White star flag had a miraculous escape from the ‘carpet monster’, but not before I had cut out a substitute pennant from coloured paper. I also managed to get the union jack the correct way up, Hooray!
| ADDING LIGHTS |
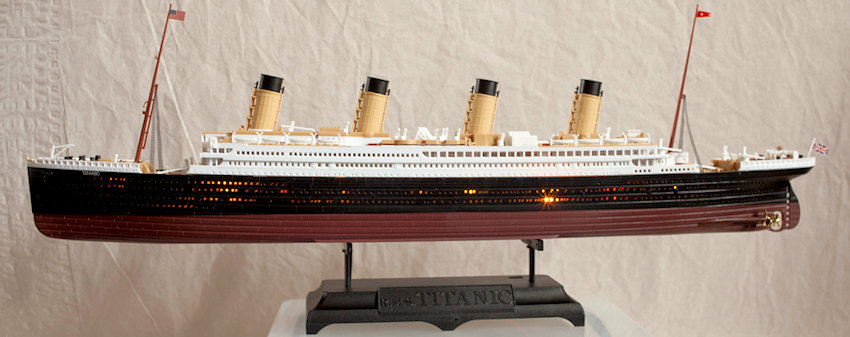
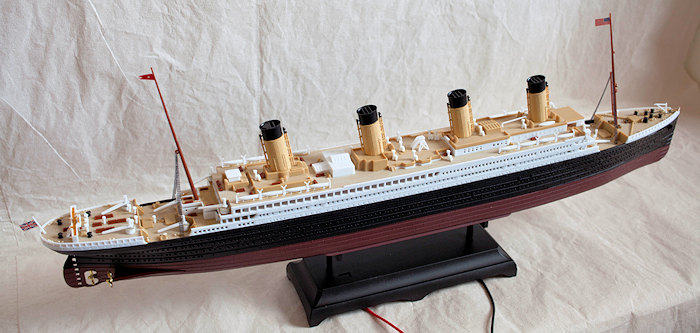
The preview explains how I proposed to tackle the lighting. However switching on the provided 3 volt lights after they had been dropped in the hull revealed that they are too bright for my taste. The box art actually shows the lights glowing through the plastic, the joins between hull and superstructure as well as all of the portholes and most of the windows, clearly this is what Academy intend.
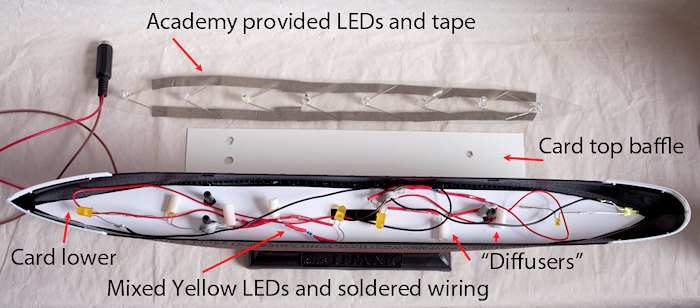 Looking for more of a soft glow
from some of the portholes I bought a mixed pack of 10 yellow/ orange LEDs for
£4. These are normal 1.5 volt LEDs, although I don't have a brightness measure
suffice it to say that they are much softer than the Academy "bright white"
ones. They were soldered in two strips of 5 with 310 ohms of resistors in each
strip, making them suitable for 12 volt operation. I had them at a spacing of
25mm (1 inch) compared to the original spacing of 35mm, but I should have
experimented with even closer spacing before soldering them, perhaps also with
some sort of "light guide" inside the hull. However even these low intensity
LEDs can be seen through the white plastic superstructure. Two pieces of white
card were cut out in the hull plan shape and one was dropped in and the LEDs
placed on it, with the other card on top to reduce the light leakage. After
another test diffusers (short sections of white drinking straws) were placed
over the brightest of the LEDs. It became clear that I was not going to get the
effect I wanted without a lot more work and experimentation so I decided to
settle for a few groups of illuminated portholes in yellow and orange/red with
some dark portholes and windows.
Looking for more of a soft glow
from some of the portholes I bought a mixed pack of 10 yellow/ orange LEDs for
£4. These are normal 1.5 volt LEDs, although I don't have a brightness measure
suffice it to say that they are much softer than the Academy "bright white"
ones. They were soldered in two strips of 5 with 310 ohms of resistors in each
strip, making them suitable for 12 volt operation. I had them at a spacing of
25mm (1 inch) compared to the original spacing of 35mm, but I should have
experimented with even closer spacing before soldering them, perhaps also with
some sort of "light guide" inside the hull. However even these low intensity
LEDs can be seen through the white plastic superstructure. Two pieces of white
card were cut out in the hull plan shape and one was dropped in and the LEDs
placed on it, with the other card on top to reduce the light leakage. After
another test diffusers (short sections of white drinking straws) were placed
over the brightest of the LEDs. It became clear that I was not going to get the
effect I wanted without a lot more work and experimentation so I decided to
settle for a few groups of illuminated portholes in yellow and orange/red with
some dark portholes and windows.
| CONCLUSIONS |
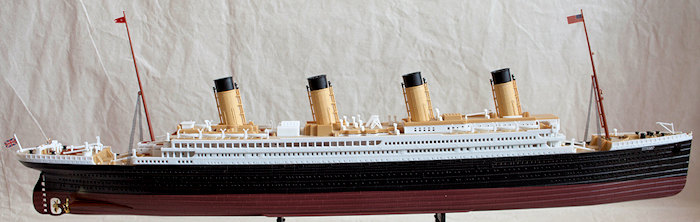 The box art clearly shows that the
kit can be assembled and illuminated satisfactorily, there is no real need to do
any painting and as such the kit offers exceptional value for money.
The box art clearly shows that the
kit can be assembled and illuminated satisfactorily, there is no real need to do
any painting and as such the kit offers exceptional value for money.
I found two or three problems with the fit of parts and the decals were disappointing.
My own effort to produce a "softer" illumination was not completely successful and is no reflection on the quality of the kit.
| REFERENCES |
For the funnel colour I looked at the cover art of "Olympic the old reliable" by Simon Mills, waterfront books published in 1995
For a plausible account of
the tragedy I have read and recommend "the Last log of the Titanic" by David G
Brown, McGraw Hill 2001
August 2016
Copyright ModelingMadness.com
If you would like your product reviewed fairly and fairly quickly, please contact the editor or see other details in the Note to Contributors.