Airfix 1/600 HMS Belfast
| KIT #: | A07141 |
| PRICE: | 20 Euros |
| DECALS: | |
| REVIEWER: | Frank Spahr |
| NOTES: | Aftermarket barrels and radar |
| HISTORY |
There is hardly any need for an introduction on this ship. HMS Belfast si the sole surviving British major warship from WW2. She has been moored close to London´s Tower Bridge since 1971 as a floating museum. Commissioned only in September, 1939, her war service began inauspiciously with the new ship falling victim to a German magnetic mine in November, 1939, breaking her back. Reconstruction was extensive and took almost three years, with Belfast returning to the front only in November, 1942. She was widely active during the rest of WW2, first serving on the Russian convoy routes, taking part in sinking Scharnhorst, then bombarding the French coast during the Normandy landings, and later after a tropical refit, being sent to the Pacific, arriving shortly before the end of hostilities. Belfast also served in the Korean war, was again extensively modernized and reduced to reserve only in 1963. She was narrowly saved from the scrapper´s torch and hopefully will be around for a long time yet as a museum and a reminder of armored warships armed with guns.
| THE KIT |
I like giving old kits a chance, reliving and rose-tinting my childhood
memories before the real onset of old age. Having grown up with Airfix kits, I
enjoy building them to my current standards. This kit is one of Airfix´ last
1:600 offerings, and amongst the best of them. It shows the effort of putting in
as much detail as possible at the time, and despite various oversize and clunky
items, it is mainly true to the original as reconstructed in 1942. Comparison
with the recent 1:350 Trumpeter kit shows the absence of
 some
of the newer kit´s glitches, such as incorporating features of the museum ship.
The Airfix kit has the correct anchor layout, and the depiction of the bridge
wind deflectors, though clunky, is closer to the original than the modern
offering.
some
of the newer kit´s glitches, such as incorporating features of the museum ship.
The Airfix kit has the correct anchor layout, and the depiction of the bridge
wind deflectors, though clunky, is closer to the original than the modern
offering.
All in all this is a thankful subject for the application of some TLC to arrive
at a pleasing result.
| CONSTRUCTION |
 mate
base and model once the latter is completed, giving me good access to the ship
and enabling me to glosscoat the base
easily. The base is made from a
piece of insulation foam board, cut to size and cut out for the hull. The
surface was machined using rather coarse tools in an electric drill, then sanded
and painted with white wall paint to get the appropriate surface texture. Green
and dark blue acrylic paint from the airbrush gave the desired shade, and after
thorough curing, the base was heavily glosscoated with solvent-based clear gloss
from a rattle can.
mate
base and model once the latter is completed, giving me good access to the ship
and enabling me to glosscoat the base
easily. The base is made from a
piece of insulation foam board, cut to size and cut out for the hull. The
surface was machined using rather coarse tools in an electric drill, then sanded
and painted with white wall paint to get the appropriate surface texture. Green
and dark blue acrylic paint from the airbrush gave the desired shade, and after
thorough curing, the base was heavily glosscoated with solvent-based clear gloss
from a rattle can.
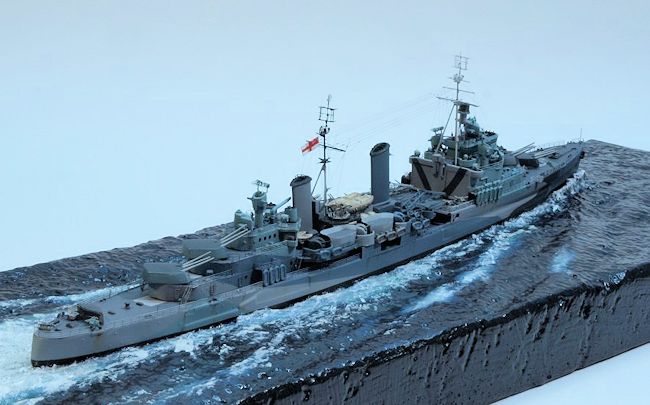
In building the ship I addressed the various subassemblies, cleaning
them up, assembling them and detailing them as felt needed. The idea obviously
is to keep the level of detail uniform throughout the model, avoiding to leave
any really clunky items that might stand out like the proverbial sore thumb.
Drilling out scuttles, removing molded-on inclined ladders (know in the trade as
„aztec stairs“), adding the helpfully-designed WEM PE goes a long way in that
respect. A further important issue is replacing the soft and oversize and
sometimes warped plastic masts and yards with brass items, be they machined
conically or straight. I have a stock of conically machined brass that is
helpful for masts, plus various gauges of brass wire, and a steel wire brush
donating a steel wire now and then.
That way, the various subassemblies proceeded reasonably well; but the
real problem in this project proved the paint scheme.
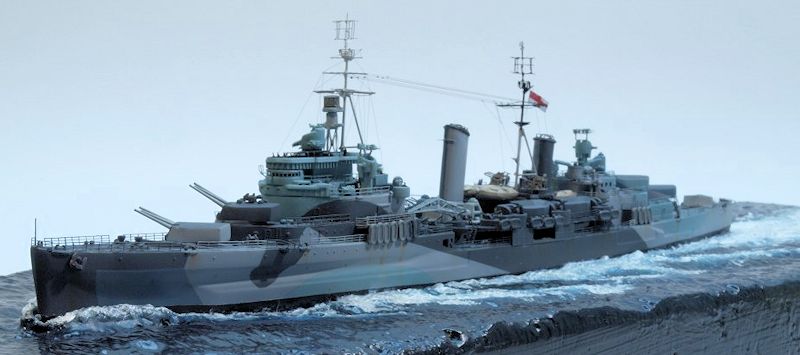
| COLORS & MARKINGS |
Even though the ship exists, and is painted in camo, this does not help,
as neither the scheme nor the shades used correspond with reference images and
the available literature. You need to consult your references and really pay
attention to detail, plus you need to decide whom to believe.
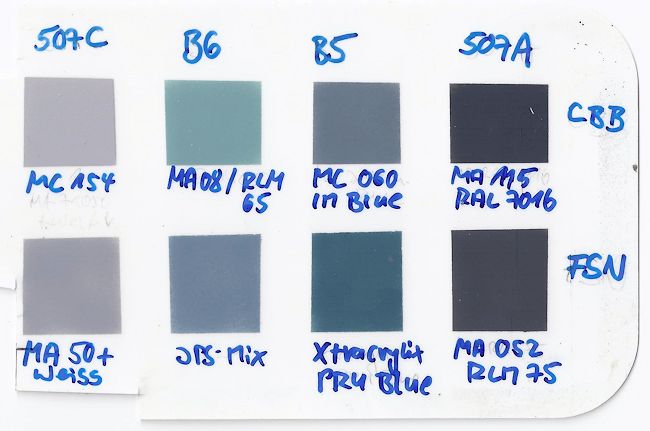 I
decided to go with Alan Raven, as a real authority on the subject, so used his
abovementioned volumes from the Warship perspective series. From this source I
used the profiles, plus the information on the colour of the wooden decks, and
the colour of the turret faces and hangar doors.
I
decided to go with Alan Raven, as a real authority on the subject, so used his
abovementioned volumes from the Warship perspective series. From this source I
used the profiles, plus the information on the colour of the wooden decks, and
the colour of the turret faces and hangar doors.
Arriving at conclusive decisions which panel of the camo scheme had what
shade was still a matter of some discussions, as the profiles are not 100% clear
here. I spent quite some time discussing the issue with my friend Christian
Bruer who is building the new Trumpeter kit at the time. We looked into the
available images and finally agreed on which shade to go where. Both of us being
acrylic paint users, we found the next obstacle being to match available
acrylics to the came shades needed. Yes, there is no dedicated acrylic line of
WW2 Royal Navy shades yet. The shades being frequently rather on the peculiar
side, it would be very much appreciated by us RN modelers if a manufacturer
would help us here.
In the
end, and after painting a lot of samples, photographing them, mailing them,
discussing them, buying more bottles of paints, both Christian and I arrived at
slightly different conclusions, so if ever our two Belfasts will sit side by
side at a show, they will look, um, individual. But I hope – and believe - they
both will look credible. I for one used lightened Vallejo Model Air 50 (Light
Grey) for AP 507 C, Vallejo Model Air 08 (RLM 65) for B6, Xtracrylix PRU Blue
for B5, and Vallejo Model Air
52 (RLM 75) for AP 507 A.
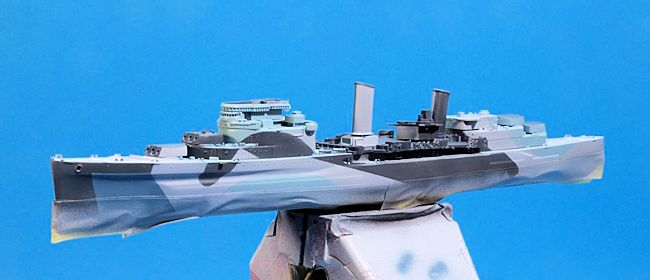 The
camo scheme made a certain amount of masking necessary, as in masking not just
the hull, but all the individual deck levels. That took some time but was no
real problem. All the superstructure painted, it was assembly time. Step by step
the deck levels and the associated detail was added, always trying to work from
the centre of the vessel ahead and astern and from the centerline to the
periphery, in order to minimize collateral damage. So at some point in time I
had all the superstructure where it needed to be, with all the railings,
inclined ladders, all the prepared boats, searchlights, AA guns and other
paraphernalia. I had added a number of Lion Roar PE figures, had added the
prepared brass mast assemblies, and was able to rig the model using the very
fine yet sturdy Caenis monofilament. Speaking of the figures, I followed the
example of another modeler (sorry, I forgot where I found this method) and added
some „body“ to the little fellas. The method is very clever and helpful. You
apply CA glue in the desired areas of the figure, and then dip it into baking
soda. That soaks into the CA and cures immediately, and adds a third dimension
to the little gingerbread men.
The
camo scheme made a certain amount of masking necessary, as in masking not just
the hull, but all the individual deck levels. That took some time but was no
real problem. All the superstructure painted, it was assembly time. Step by step
the deck levels and the associated detail was added, always trying to work from
the centre of the vessel ahead and astern and from the centerline to the
periphery, in order to minimize collateral damage. So at some point in time I
had all the superstructure where it needed to be, with all the railings,
inclined ladders, all the prepared boats, searchlights, AA guns and other
paraphernalia. I had added a number of Lion Roar PE figures, had added the
prepared brass mast assemblies, and was able to rig the model using the very
fine yet sturdy Caenis monofilament. Speaking of the figures, I followed the
example of another modeler (sorry, I forgot where I found this method) and added
some „body“ to the little fellas. The method is very clever and helpful. You
apply CA glue in the desired areas of the figure, and then dip it into baking
soda. That soaks into the CA and cures immediately, and adds a third dimension
to the little gingerbread men.
| FINAL CONSTRUCTION |
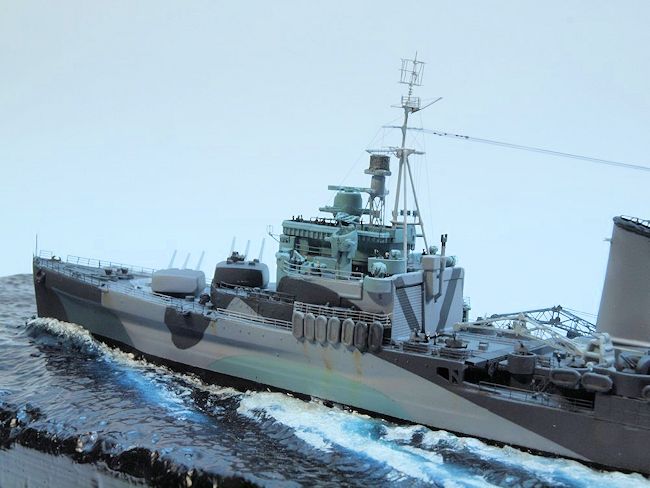
A final
difficulty arose with my least favorite items on British WW2 vessels. The
Type 281 masttop radar arrays PE assemblies are very iffy to build, hard to
attach to the masts, and supremely in danger of inadvertently being bent or
knocked off, so you get the whole package of modeling woes in a few pieces
of gossamery brass.
I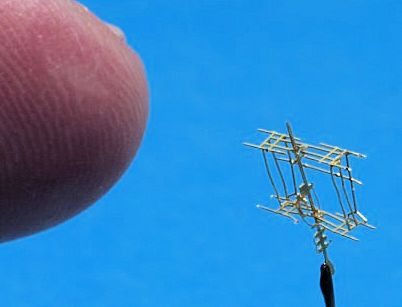 ´m
no rivet counter, I hardly ever measure any model kit, being happy enough if
it looks right. The problems start if it doesn´t, obviously. I grudgingly
had to admit to myself that the WEM parts for the type
281 looked seriously oversize. Compared to any image, they looked vast. You
know, even if you´re firmly
grounded in the TLAR camp, that won´t do, so I had to find a solution that
kept some shreds of my sanity, as it obviously involved building yet smaller
antenna arrays than the already small and flimsy WEM parts. Looking into the
AOTS book with its scale drawings, I found that the part should be 5 mm wide
in 1:600 scale. It actually was 8 mm wide, and that was simply too much. In
the end, my friend Guido Hopp found a 1:700 set of British WW2 radars by
Lion Roar that fit the bill. These parts explored yet new reaches of
iffiness and needed all my resources in the patience and zen department to
assemble them. That done, I solemnly swore to add them to the model at the
very end of the build and then close the display box over them. For ever.
´m
no rivet counter, I hardly ever measure any model kit, being happy enough if
it looks right. The problems start if it doesn´t, obviously. I grudgingly
had to admit to myself that the WEM parts for the type
281 looked seriously oversize. Compared to any image, they looked vast. You
know, even if you´re firmly
grounded in the TLAR camp, that won´t do, so I had to find a solution that
kept some shreds of my sanity, as it obviously involved building yet smaller
antenna arrays than the already small and flimsy WEM parts. Looking into the
AOTS book with its scale drawings, I found that the part should be 5 mm wide
in 1:600 scale. It actually was 8 mm wide, and that was simply too much. In
the end, my friend Guido Hopp found a 1:700 set of British WW2 radars by
Lion Roar that fit the bill. These parts explored yet new reaches of
iffiness and needed all my resources in the patience and zen department to
assemble them. That done, I solemnly swore to add them to the model at the
very end of the build and then close the display box over them. For ever.
Before I
was able to do that, it was completion time, adding all the missing railings
to the bow and stern, cleaning up the paintjob, dirtying up same with some
limited weathering and hiding as many blemishes as possible under a merciful
flat coat. The model was then glued to the base using clear acrylic gel.
That gel was also used to close any remaining gaps between ship and base,
before some final drybrushing with white artist´s oil paint completed the
blending in.
| CONCLUSIONS |
I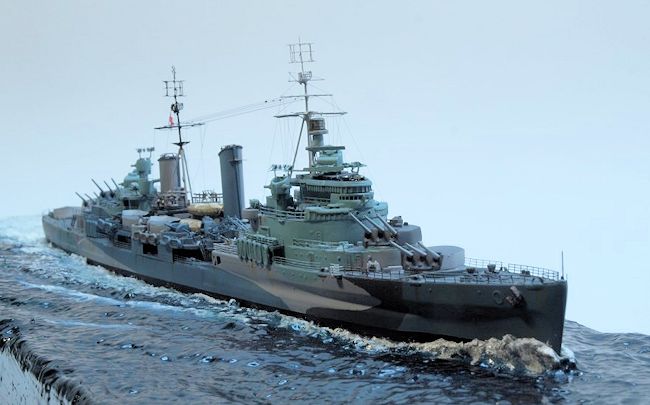 again recognized how each modeler will arrive at their own interpretation of a
subject, and how each of us will implement this interpretation according to
their own standards, skills, preferred techniques and their aesthetic
perceptions. Which is a good thing. All the best modelers I know have their own
recognizable style and their own standards and demands. None of them, though,
will impose their style or standards on other modelers. It is, as the classic
saying goes, YOUR hobby, and it´s up to you what you make of it. Plus, it´s
there to provide fun and satisfiction with a job well done, things ever harder
to find in most our professional lives, and hence very much appreciated by yours
truly in his time in the modeling den.
again recognized how each modeler will arrive at their own interpretation of a
subject, and how each of us will implement this interpretation according to
their own standards, skills, preferred techniques and their aesthetic
perceptions. Which is a good thing. All the best modelers I know have their own
recognizable style and their own standards and demands. None of them, though,
will impose their style or standards on other modelers. It is, as the classic
saying goes, YOUR hobby, and it´s up to you what you make of it. Plus, it´s
there to provide fun and satisfiction with a job well done, things ever harder
to find in most our professional lives, and hence very much appreciated by yours
truly in his time in the modeling den.
December 2014 If you would like your product reviewed fairly and fairly quickly, please contact the editor or see other details in the
Note to
Contributors.