Airfix 1/600 HMS Manxman
| REVIEWER: | Frank Spahr |
| NOTES: | Currently not in the catalogue, last reissue in 2005 in combo with HMS Suffolk |
| HISTORY |
In 2015, Arthur Nicholson´s book "Very Special Ships" was published. It deals comprehensively with the British Abdiel Class of Fast Minelayers of World War 2. Construction, service and fate of the ships of this class are fully covered; the book also makes a gripping read and is well illustrated, even including colour profiles for the various camouflage schemes the ships sported. This book made me really, really want to built a ship of this class.
The
Abdiels were a unique design. They were almost as large as contemporary light
cruisers, they were very fast, being constructed around a large mine deck and a
very strong powerplant. The ships´ armament was limited to a number of AA guns.
They were designed to intrude into enemy waters
 unseen, deliver their load of
mines and retreat as fast as possible.
unseen, deliver their load of
mines and retreat as fast as possible.
They did perform this duty, but only as their secondary role. Their high speed and large cargo space made them ideal fast transporters in enemy waters, and as such they were utilized heavily in the support of the British Mediterranean campaign, most notably in the siege of Malta. Their only drawback was their limited range.
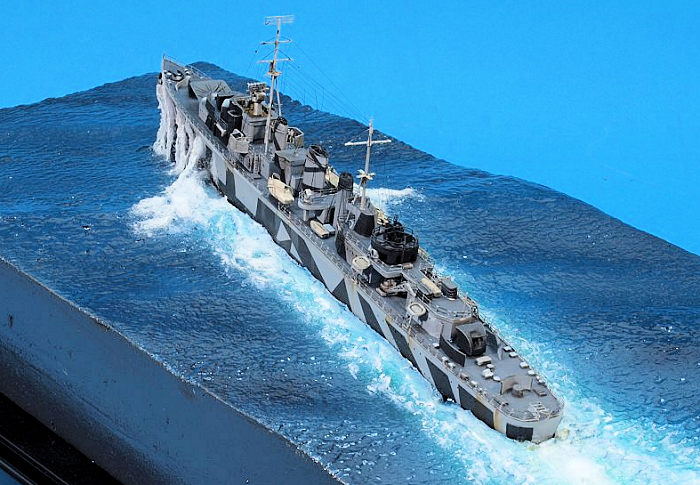
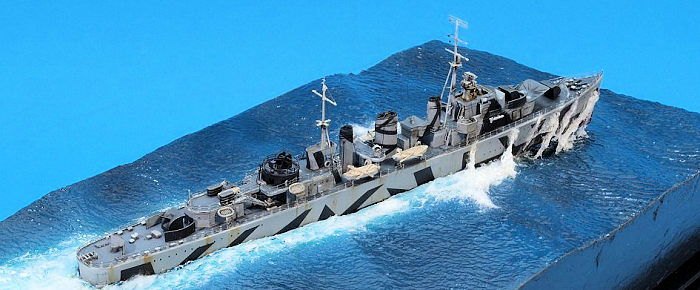
Apart from this important and dangerous service, ships of the class served both in the Indian Ocean and the Pacific in various roles, showing the adaptability and usefulness of the design. This dangerous frontline service led to the loss of three out of six ships of the class. The survivors served in the postwar navy, with Manxman being scrapped only in 1972. That same year, Airfix produced their 1:600 kit of Manxman in injected styrene, which is one of the best kits in this series. There is also a 1:700 Matchbox kit of the last two units Ariadne and Apollo, which has also been reboxed by Revell. White Ensign Models has produced a fine 1:350 resin kit of the lead ship of the class, Abdiel. Being a card-carrying Airfix fan with little remaining diplay space, I built the Airfix kit from my stash, deciding on HMS Abdiel in the lively splinter camo she sported in the Mediterranean in 1941.
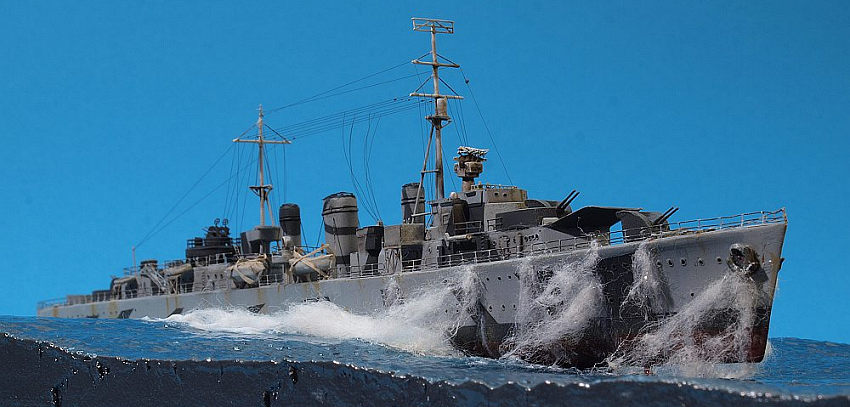
My
presentation was aimed at the cover of Nicholson´s book, with the ship in heavy
seas and her bows exposed. So I started my build with gluing the hull halves
together and cutting a piece of foam board roughly to size. This board was
shaped into the desired lively wave pattern using a gas torch (the culinary,
créme - brulée - making size, nothing industrial). The vessel should be placed
slightly 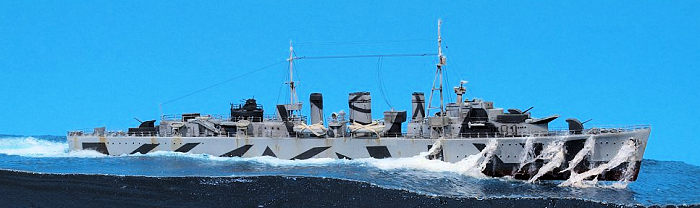 oblique on the base and with her bridge at about the crest of a wave.
That would expose her bow and let it hover over the yet undisturbed water ahead,
just prior to come smashing down. Water would run off the bow from its last
impact into the sea.
oblique on the base and with her bridge at about the crest of a wave.
That would expose her bow and let it hover over the yet undisturbed water ahead,
just prior to come smashing down. Water would run off the bow from its last
impact into the sea.
To achieve a credible result, I would have to select a realistic height of the waves, neither too shallow nor too exaggeratedly high.
To get a
feeling for what was needed, I looked into a lot of reference images of British
warships in heavy seas. Only after achieving the wave pattern did I cut the
piece to its final size. That makes for much neater borders. That done, I did
the cutout for the hull with a hobby knife. In doing so, I always end up with
gaps and blemishes. Luckily there is cheap acrylic caulking from the hardware
supermarket to address these goofs. I wrapped the hull in masking tape and
covered that with vaseline, and then pressed it into the caulking. After curing
for a full day I was able to remove the hull, trim excess caulking and work with
base and ship separately from then on.
| THE KIT |
This kit
is reasonably well detailed from the outset, so it needs a bit less work than
other Airfix ships, such as the Iron Duke, to name one. I mostly removed
oversized splinter shields, carefully drilled the scuttles open and added the
missing mine doors at the stern using styrene and PE railing stock. The splinter
shi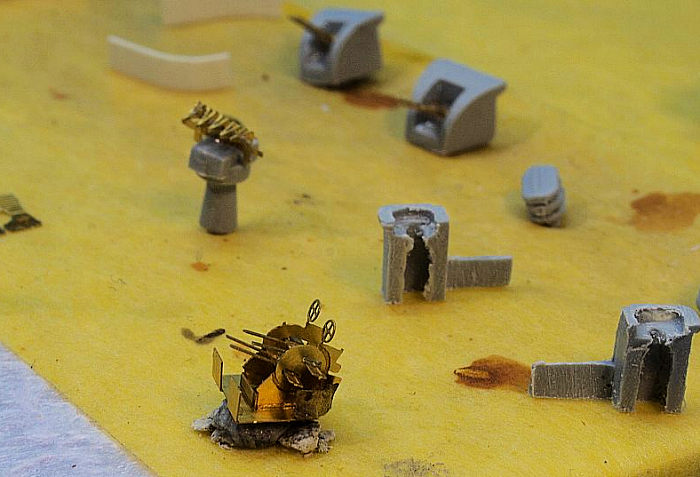 elds were replaced with annealed brass material from the borders of old PE
frets. Apart from that I used WEM´s PE set for this kit. It comprises light AA,
directors, railings, watertight doors, depth charge rails, cranes and other
details. I replaced the barrels of the twin 4 inch guns with adequate machined
brass items from my stash. As usual with me, the masts were completely rebuilt
from machined tapered brass and steel wire. Thus they are both more delicate and
sturdy than the kit items.
elds were replaced with annealed brass material from the borders of old PE
frets. Apart from that I used WEM´s PE set for this kit. It comprises light AA,
directors, railings, watertight doors, depth charge rails, cranes and other
details. I replaced the barrels of the twin 4 inch guns with adequate machined
brass items from my stash. As usual with me, the masts were completely rebuilt
from machined tapered brass and steel wire. Thus they are both more delicate and
sturdy than the kit items.
This was mainly routine work, even though the multiple AA guns were fiddly builds. My two challenges in this project were painting a really intricate splinter camo and replicating a ship in heavy seas.
| CONSTRUCTION |
Having prepared the hull and various sections of the superstructure, I de-greased them with lighter fluid and primed them from a rattle can I bought at an automotive paints supplier. After drying, the hull was first sprayed a Vallejo ModelAir dark grey coming close to AP 507A which is rather dark. Now I masked the boot topping and sprayed the lower hull bright red. On the dark base, that came out as the brick red I had aimed at. After drying, the lower hull was masked and the upper hull resprayed in dark grey. I then sprayed the decks in a medium grey. Now I copied the colour profile from Nicholson´s book to size for my model and placed it under a sheet of glass. I then placed kip 308 masking tape on the glass and carefully cut out the dark elements of the camo with a fresh #11 blade. These were now applied to the model, and that done, the model was sprayed in AKAN´s AP 507 C. After removing all the masks the model looked fresh from the builder´s yard.
 I
continued work on the base as follows: To smoothen any roughness caused by the
gas torch, I applied white glue to the base, excluding the disturbed water
around the vessel. After curing,
I
continued work on the base as follows: To smoothen any roughness caused by the
gas torch, I applied white glue to the base, excluding the disturbed water
around the vessel. After curing,
I stippled white wall paint on the base to achieve the desired surface texture. After drying, I sprayed one shade of green and three shades of blue with my airbrush. That made for both a credible overall colour of the sea, but also for a smooth transition between undisturbed and disturbed water. White artist´s oil paint was used for further highlighting.
In building the ship, I could now assemble the prepainted subassemblies. Starting with the superstructure, I then added the funnels and further details, always working from the centre to the preriphery to prevent damage. The ship´s boats from the kit were used, but covered with tarps made from cigarette paper infused with clear gloss acrylic, as they are not well detailed. The outboard railings were added last. They were sprayed light grey and the horizontal wires hand painted a darker grey, making them optically less intrusive.
The vessel was weathered using a dark wash made of Humbrol thinner and dark artist´s oil paint, plus with oil paint filters. I always try not to overdo things and arrive at a general look that seems credible to me. As always, it´s the eye of the beholder that counts, so any modeler may have their own preferred look. As the vessel shows part of her lower hull, that was also weathered with oils. The ASDIC dome was also added to the lower hull. The ship was crewed with Lion Roar PE figures which were made a little more three-dimensional using CA glue and baking soda.
The vessel was rigged with Albion Alloys .1 mm nickel steel wire for the funnel stays, and UNI caenis monofilament for the rest. This was glued with CA glue and tightened with heat, where necessary. A final flat coat sealed the model, using Winsor & Newton´s Galleria acrylic.
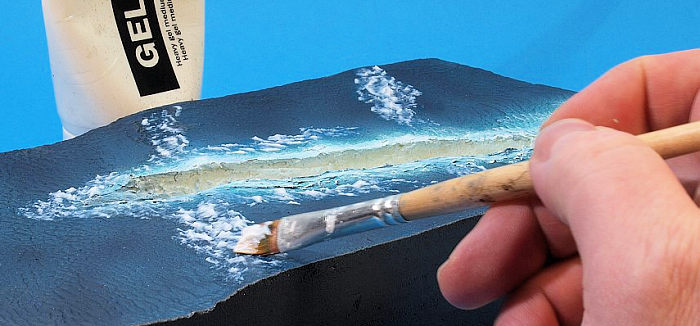 Continuing work at the base, I had built up the crests of the waves and other
areas I wanted to accentuate. One or more thin layers of high gloss transparent
artist´s acrylic gel work well here and add an effect of depth to the base. You
just need to make sure the layers are thin enough and give them enough time to
cure in order to end up transparent. The water effect proper was achieved by
multiple layers of clear solvent-based high gloss spray from a rattle can - but
only after all the previous water-based work had thoroughly dried.
Continuing work at the base, I had built up the crests of the waves and other
areas I wanted to accentuate. One or more thin layers of high gloss transparent
artist´s acrylic gel work well here and add an effect of depth to the base. You
just need to make sure the layers are thin enough and give them enough time to
cure in order to end up transparent. The water effect proper was achieved by
multiple layers of clear solvent-based high gloss spray from a rattle can - but
only after all the previous water-based work had thoroughly dried.
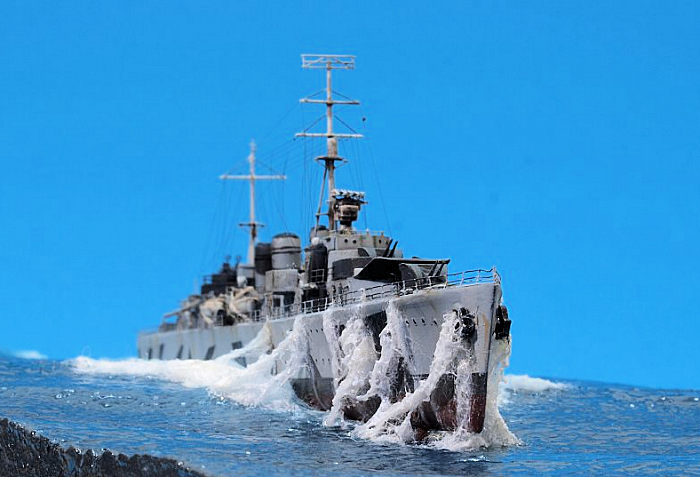
"Mating" the model to the base turned out to be the clincher of the project, and needed several revisions. The model was mounted on the base using clear gloss acrylic. So far, so good. I needed to simulate the runoff of water from the last wave, both on the ship and on the surface of the water below it. I used clear gloss acrylic (aka Klear) plus cotton wool, clear gloss acrylic gel and white artist´s oil paint. It turned out a tedious and long process with many images taken and discussions with my modeling friends, and I really learned how hard it is to simulate dynamic water.
I for
instance changed the runoff from perpendicular to an angle slanting astern, to
increase the feeling of speed. The main issue was how to handle the cotton wool
fibres. I felt unable to simulate a
 spray of water which consists of myriads of
droplets, but tried to hint at it with the fibrous wool. But - the more fibres
you see, the less convincing the illusion. The more gel or paint you add to the
cotton wool, the more massive the runoff gets, losing the "spray" look. I
finally arrived at a compromise (as so often in life) I can live with. But as
always - your mileage may vary.
spray of water which consists of myriads of
droplets, but tried to hint at it with the fibrous wool. But - the more fibres
you see, the less convincing the illusion. The more gel or paint you add to the
cotton wool, the more massive the runoff gets, losing the "spray" look. I
finally arrived at a compromise (as so often in life) I can live with. But as
always - your mileage may vary.
I am sure that nifty digital editing might have helped. Simply photographing the model with a long exposure whilst directing an airstream from a fan would make a drastic difference. But I want to display my model at a show and let people there see the same they would see in my review, so I refrained from "enhancing" the images.
| CONCLUSIONS |
It still pays off to put some work into this old kit. A bit of cleanup and detailing leads to a pleasing result on limited shelf space. And yes, I think it is worth trying one´s hands on making a livelier seascape for once.
4 April 2017
Copyright ModelingMadness.Com. All rights reserved.
Thanks to
for the preview kit. You can find this kit at your favorite hobby shop
or on-line retailer. If you would like your product reviewed fairly and fairly quickly, please
contact
the editor or see other details in the
Note to
Contributors. Back to the Main Page
Back to the Review
Index Page
Back to the Previews Index Page