Trumpeter/Pit Road 1/700 HMS Renown 1942
|
KIT #: |
05764 |
|
PRICE: |
20 Euros |
|
DECALS: |
One option |
|
REVIEWER: |
Frank Spahr |
|
NOTES: |
Photo etched parts WEM Nr.
747 (18 €)
Machined brass barrels
15 inch/42 BMK 01700RN381
(1 €/piece) |
Together with her sister Repulse,
HMS Renown was a brainchild of Admiral „Jackie“ Fisher and his
predilection for large, fast, heavily armed and lightly armoured vessels.
Ordered during Fisher´s last stint in the Admiralty during WW 1, Renown was
completed rapidly. Battle experience off Jutland led to modifications during
construction and a further rebuild almost immediately after her delivery. Both
times, her lacking deck armour was augmented. She was used for patrols in the
North Sea during WW 1, but did not have to fight.
 Between
the wars she served in the battlecruiser squadron, but was also used as a Royal
yacht for voyages abroad. She was reconstructed twice; the first rebuild in the
1920s was minor, but the second in the 1930s was very thorough and changed her
appearance and capabilities dramatically. This reconstruction, in the lines of
those performed on Warspite and Queen Elizabeth, provided a
totally new superstructure, aircraft installations, an improved main armament
and a new secondary armament, new machinery and new fire control systems. A
similar reconstruction was scheduled for HMS Hood but could not be
implemented.
Between
the wars she served in the battlecruiser squadron, but was also used as a Royal
yacht for voyages abroad. She was reconstructed twice; the first rebuild in the
1920s was minor, but the second in the 1930s was very thorough and changed her
appearance and capabilities dramatically. This reconstruction, in the lines of
those performed on Warspite and Queen Elizabeth, provided a
totally new superstructure, aircraft installations, an improved main armament
and a new secondary armament, new machinery and new fire control systems. A
similar reconstruction was scheduled for HMS Hood but could not be
implemented.
During WW 2 , Renown was
deployed virtually around the world. She searched for the Graf Spee,
fought Scharnhorst and Gneisenau off Norway, was involved in the
hunt for the Bismarck and the battles for Malta, she covered Russian
convoys and the North African landings. In 1943, her AA and radar fit was
improved and the aircraft installations removed. She spent 1944 in the Pacific
with the British Eastern Fleet. Early in 1945, she was recalled to the UK and
decommissioned. In 1948 she was finally scrapped, as the last surviving of
Jackie Fisher´s battlecruisers.
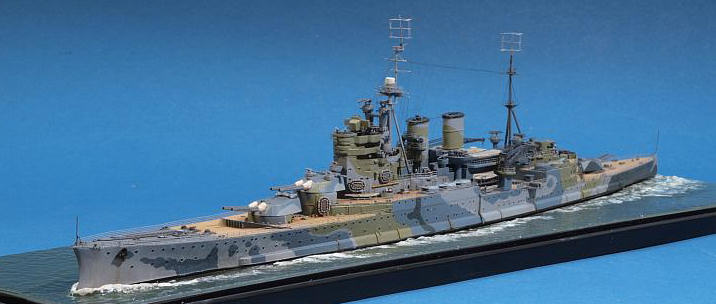
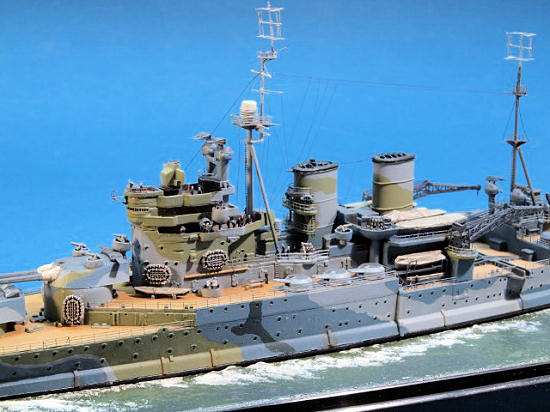
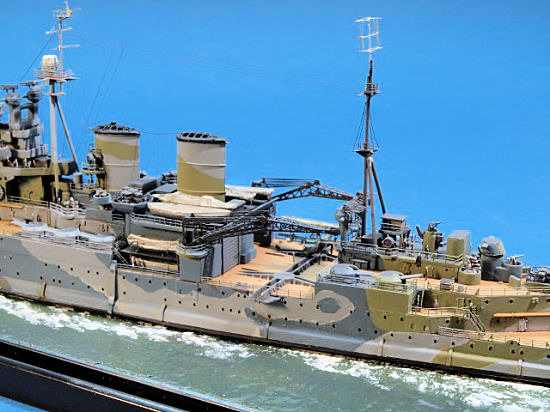
Trumpeter´s convincing
model kit depicts HMS Renown during the first half of WW2; it´s a very
neat base for a model of this elegant ship. At the time, Renown sported
an intricate disruptive camouflage scheme, which makes the model even more
interesting in my eyes.
The purpose of these
disruptive schemes was to blur the contours of the vessel and thus make it
harder to be targeted, especially by observers on submarines. With the massive
progress in radar technology in WW 2, optical targeting lost its overall
importance; even submarines found other means of targeting. Uniform grey schemes
proved more useful against the growing threat from aircraft – hence the gradual
disappearance of disruptive schemes towards the end of the war.
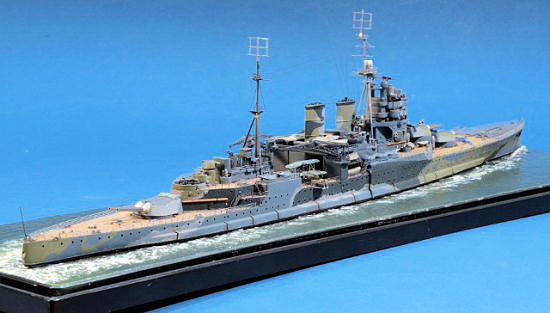
 I
decided to digress from the supplied colour profile and use the one from Alan
Raven´s „Warship perspectives“ booklet. I assume (purely from my personal point
of view) that Raven´s drawing shows the original camo scheme applied to
Renown and that the other available profiles show the scheme at a later
point in time and after some partial repaints.
I
decided to digress from the supplied colour profile and use the one from Alan
Raven´s „Warship perspectives“ booklet. I assume (purely from my personal point
of view) that Raven´s drawing shows the original camo scheme applied to
Renown and that the other available profiles show the scheme at a later
point in time and after some partial repaints.
My amount of aftermarket
In building model ships,
I find I can´t do without aftermarket detail items, even though there are
builders that use far more of them than I do. There are certain items which
can´t be reproduced convincingly in injected plastic, and which will make a
model look crude, especially when viewed in magnification. Railings and radar
arrays immediately spring to mind, but there´s a mind-blowing plethora of other
items which can be added or replaced. Not all of these do make sense, though,
with some being beyond my abilities to assemble, and with others not better than
kit parts, and others yet being more delicate than the kit parts, but being
two-dimensional not looking the part.
Machined brass can be used to produce
details circular in diameter, most notably gun barrels, but also masts and
yards, searchlight supports, derricks and other items. Brass barrels tend to be
sharper in definition than injected plastic items, and they also have no mold
seams to remove. Moreover they are straight and reasonably sturdy. Last but not
least brass barrels may be produced in much finer diameters than injected
plastic or cast resin items. Their additional cost is justified to me if I see
them making a difference, which is my condition on any aftermarket use – it
needs to make sense and make an improvement. I don´t do „l´art pour l´art“.
In this case, I used
WEM´s excellent PE set which is designed for their own resin kit of the ship. As
such, the PE comes without any instructions, with just a parts list. Luckily I
found scans of the kit instructions on the net – these were pretty helpful with
several subassemblies. I added BMK´s very neat and affordable brass barrels. The
classic book by Raven and Roberts on WW2´s British Battleships was used as my
main reference.
Construction started
with the hull, which was glued to the waterline bottom plate and adjusted on the
selected Trumpeter display. Holes were drilled through hull bottom and display
plate, and nuts secured inside the hull with dental resin. The considerable
length of the hull and the display box´ tendency to warp necessitated the use of
several screws to attach the hull without serious gaps. In this case, the model
was to be displayed on a common display with fellow modelers, so I was unable to
 just
glue screws into the hull. Those would have stood proud of the hull bottom plate
and have prevented displaying the model as planned.
just
glue screws into the hull. Those would have stood proud of the hull bottom plate
and have prevented displaying the model as planned.
Now I was able to prepare the
seascape for display. After marking the hull´s perimeter by misting grey paint
over it with my airbrush, I sculpted the wave and wake effects using plastic
filler and a spatula for artist´s oil paints. A lot of products will work, these
days I buy filler from the hardware store – virtually the same as modeling putty
and way cheaper. Areas of disturbed
water were reproduced by „hacking“ at the material with a wire brush. Any excess
material was trimmed or sanded quite easily after curing. The water surface
proper was simulated by applying white wall paint with a large brush in a
stippling motion. This process allows the simulation of ay given wave pattern
and may be repeated and corrected if necessary. The surface may even be sanded
after curing. I chose a green shade for the sea, applying the acrylic paint via
airbrush. After that was properly cured, the surface was sealed with several
layers of solvent-based clear gloss from a hardware store rattle can – only that
will bring the surface to life and provide proper reflections.
During the numerous
curing breaks, the deck was added to the hull. Scuttles and hawsepipes were
carefully drilled. Construction of the superstructure started at the same time,
doing whatever subassemblies making sense. To enhance the look of the
superstructure, the bridge windows were simulated using appropriately spaced PE
railing, after cutting out the molded – in windows.
As soon as possible, I
started painting. First, the subassemblies were primed
with a grey enamel primer. The wooden decks were then sprayed Revell Afrika
beige, followed by a brown washing with artist´s oils thinned with Humbrol
thinners. The steel decks were painted Vallejo Dark Sea Grey. To simulate the
corticene coating found on several bridge decks, JPS Linoleum paint was
 used.
used.
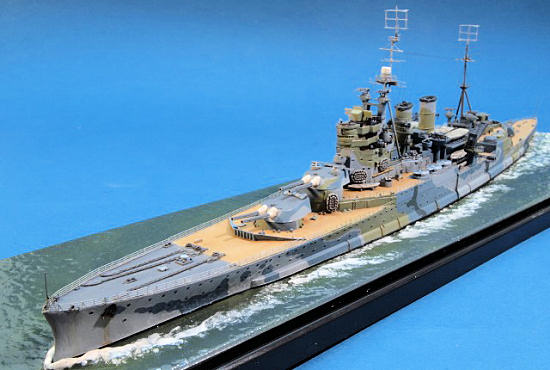
This of course, was only
the prelude to some serious painting, as in getting the pretty intricate camo
scheme done. As there are no dedicated acrylic RN paints, and I much prefer
acrylics over enamels, I had to find substitutes. Working from the samples in
the Warship Perspectives series, I searched and found various matches from
various manufacturers – Revell, Vallejo, JPS and Xtracrylix. This is obviously a
pretty low-tech and idiosyncratic approach, and would probably land in a deep
Colour Police dungeon on bread and water. But to me it worked and looked all
right. To paint the camo, I started spraying the boot topping in a very dark
grey and masking it off. Then the hull sides were sprayed in the lightest camo
shade. Upon drying, the colour demarcations were marked with pencil (free hand,
eugh!), and the remaining shades hand-painted. This proved quite tricky and
daunting when it came to the superstructure, but it proved feasible, albeit with
the usual back-and-forthing. Getting an optivisor helped a lot and reduced the
defects visible only in images, but not at the workbench.
Parallel to this, the
numerous other subassemblies were built and painted as per camo scheme. After
adding the 15 inch brass barrels, I sculpted the blast bags from dental wax,
which went quite fine. In building the secondary and tertiary armament, I chose
t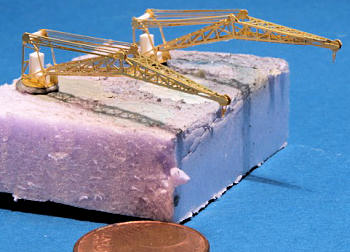 o
mix and match kit items with PE parts to achieve a viable compromise between
delicacy and three-dimensionality. The ship´s cranes were built virtually from
PE only, with just some styrene items to hint at machinery.
o
mix and match kit items with PE parts to achieve a viable compromise between
delicacy and three-dimensionality. The ship´s cranes were built virtually from
PE only, with just some styrene items to hint at machinery.
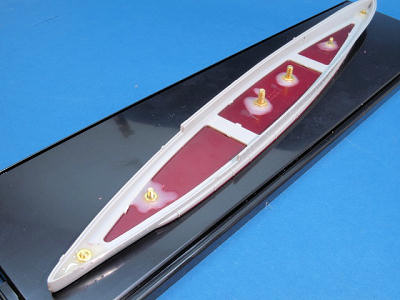
To save work and humour
my laziness, all the boats were covered with tarpaulins. These were made from
cigarette paper which was infused with Revell Aqua clear gloss. That made for a
very realistic result with proper creases. The tarpaulins were then painted JPS
deck tan;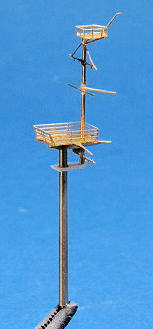 a final brown wash made them look even better. The Carley floats were sprayed
grey; a dark wash nicely highlighted their finely molded structure.
a final brown wash made them look even better. The Carley floats were sprayed
grey; a dark wash nicely highlighted their finely molded structure.
The radar office which
is mounted on stilts atop the aft superstructure was modified per reference
images with wider passageways. To enhance stability, the masts were substitutued
with turned brass items from BMK. Combining these with the intricate PE
starfishes and platforms from WEM led to a nice result. At the funnels, WEM PE
gratings were carefully bent and applied. The most tricky part of the build was
to complete the very iffy radar arrays – the masttop type 281 sets almost drove
me nuts one night.
 As
always working from center to periphery, the subassemblies were added to the
model. Pre-sprayed railings were added using CA glue and not too long sections
to prevent warping. Any gaps around the railings were filled with
PVA
glue. The railings were carefully brush-painted in camo after adding them to the
model.
As
always working from center to periphery, the subassemblies were added to the
model. Pre-sprayed railings were added using CA glue and not too long sections
to prevent warping. Any gaps around the railings were filled with
PVA
glue. The railings were carefully brush-painted in camo after adding them to the
model.
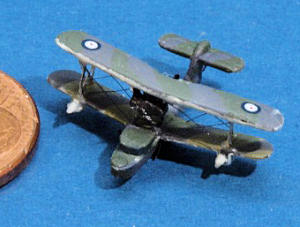
The Walrus aircraft was detailed with WEM PE parts and rigged with
Caenis monofilament. It was mounted
on the catapult as if it was undergoing a check. PE crew members from Lion Roar
brought the decks to life. Finally the ship was rigged. Tan stretched sprue was
used for the signal lines,
UNI
fliyfishing thread in 8/0 and 20 den (Caenis) was used for the standing rigging.
Flagpoles were added from fine brass wire and PE parts.
The model received hardly
any weathering, as it was meant to show the ship right after her repaint. Some
slight marks were aded below the anchors, using brown oil paint.
 This
is a quite attractive and pleasing Trumpeter kit without major goofs noticeable
to moi; using today´s excellent aftermarket will really bring it to life.
This
is a quite attractive and pleasing Trumpeter kit without major goofs noticeable
to moi; using today´s excellent aftermarket will really bring it to life.
Frank Spahr
June 2012
If you would like your product reviewed fairly and fairly quickly, please contact the editor or see other details in the
Note to
Contributors.
Back to the Main Page
Back to the Review
Index Page