| HISTORY |
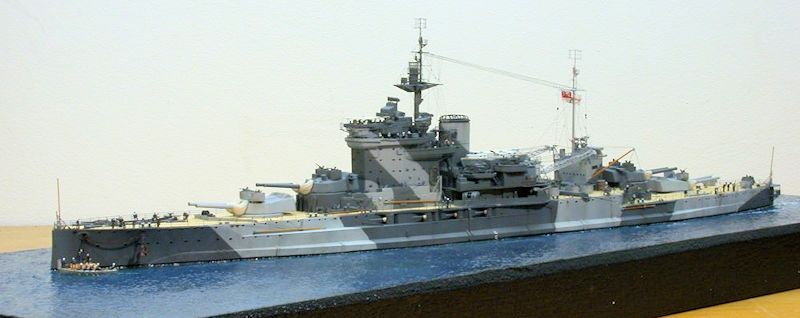
Academy 1/350 HMS Warspite
| KIT #: | 14105 |
| PRICE: | 50.00 Euros |
| DECALS: | One option |
| REVIEWER: | Frank Spahr |
| NOTES: | Includes photo etch parts. Upgrade Set 35001 F1, Manufacturer Pontos; Price @ $120.00 |
| HISTORY |
 HMS
Warspite was one of the most famous and hard-fighting British battleships,
serving in both world wars. She belonged to the groundbreaking Queen – Elizabeth
– Class that introduced oil-fired boilers and the 15 inch gun into the Royal
Navy battle squadrons. She was thoroughly reconstructed in the mid 1930ies, with
a new powerplant, new superstructure, improved artillery and various other
improvements. She was employed almost world-wide during WW 2, most notably off
Norway and in the Mediterranean. It was there that she was almost lost after a
hit by a German guided bomb. She was never fully repaired, only so far as to be
able to render naval gunfire support during and after the Normandy landings. She
sustained more damage by a mine in the Channel, and was only provisionally
repaired and regunned to provide more bombardment service during the allied
advance. She fired her last shots on 1 November, 1944, off Walcheren island, and
was then deactivated. On her last voyage to the breakers, she broke tow in the
spring of 1947, and grounded off the Cornish coast, where she was broken up over
the course of the next years. There is a memorial to this proud ship close to
the causeway to St. Michael´s Mount at the village of Marazion.
HMS
Warspite was one of the most famous and hard-fighting British battleships,
serving in both world wars. She belonged to the groundbreaking Queen – Elizabeth
– Class that introduced oil-fired boilers and the 15 inch gun into the Royal
Navy battle squadrons. She was thoroughly reconstructed in the mid 1930ies, with
a new powerplant, new superstructure, improved artillery and various other
improvements. She was employed almost world-wide during WW 2, most notably off
Norway and in the Mediterranean. It was there that she was almost lost after a
hit by a German guided bomb. She was never fully repaired, only so far as to be
able to render naval gunfire support during and after the Normandy landings. She
sustained more damage by a mine in the Channel, and was only provisionally
repaired and regunned to provide more bombardment service during the allied
advance. She fired her last shots on 1 November, 1944, off Walcheren island, and
was then deactivated. On her last voyage to the breakers, she broke tow in the
spring of 1947, and grounded off the Cornish coast, where she was broken up over
the course of the next years. There is a memorial to this proud ship close to
the causeway to St. Michael´s Mount at the village of Marazion.
| THE KIT |
Academy´s 1:350 kit of HMS Warspite shows her in her mid-war fit. It is a
well-fitting kit though not exceptionally detailed. There is no waterline
option, and you have to tackle some unsightly seams within t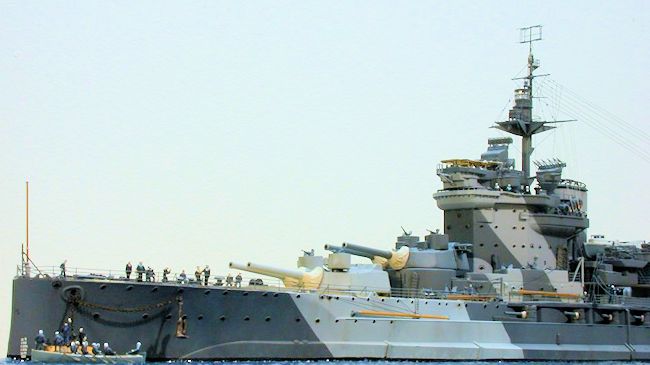 he scribed deck.
Nonetheless it is a very neat kit that offers a very convincing value for money.
The icing on the cake is the Pontos „detail up set“ which is really
comprehensive and takes this kit not just to the next level, but rather up a few
extra steps.
he scribed deck.
Nonetheless it is a very neat kit that offers a very convincing value for money.
The icing on the cake is the Pontos „detail up set“ which is really
comprehensive and takes this kit not just to the next level, but rather up a few
extra steps.
It contains oodles of dedicated PE, a neat wooden deck, useful resin items, dry transfers, and a veritable treasure trove of machined brass. In all, it extends the scope of upgrade sets and introduces a number of items I for one so far may have dreamt of but never thought I´d really hold them in my grubby pair of mitts. The only downside is the instructions which are incomplete, hard to see and a bit on the arbitrary side. They can, though, be downloaded from the Pontos website as PDF files; when viewed under appropriate magnification, they tend to give away some of their secrets.
| CONSTRUCTION |
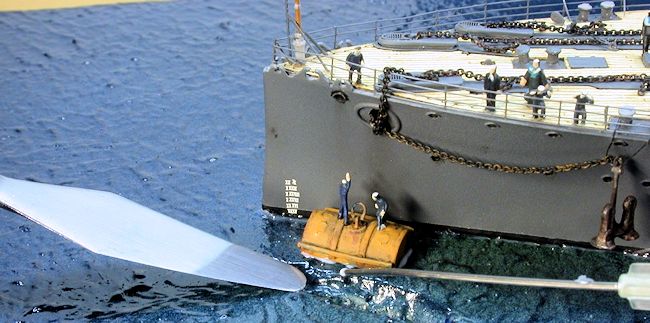
First of all it was time to decide on how to present the model. I chose the
drill of mooring the ship to a buoy upon return to a roadstead. A boat with a
mooring party was sent to the buoy to receive the anchor chain lowered from the
ship and shackle it to the buoy. The ship would be kept stationary at the time
against current and winds by engine power. So I cut an appropriate base from 40
mm foam board and built a mooring buoy from a leftover 1:35 scale fuel drum,
some styrene stock, some PE parts and wire. The two halves of the hull were
assembled with their stiffeners, using the pretty strong
Plast-i-Weld glue. It takes great care in application due to its
volatility. After curing the hull was waterlined, the deck was added afterwards
and glued from below. According to the Pontos instructions, various molded on
deck 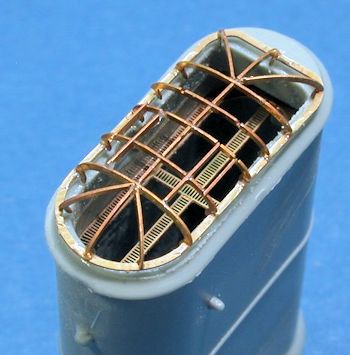 structures were now removed. Some seams were puttied and sanded, which
would have been a hassle if I had not used the wooden deck. At the same time, I
started assembling the superstructure sections, which fit well. As a total
novice in the use of wooden decks, I made some tests and found that the deck
glued very well and could be weathered with thinned oil paint if desired.
structures were now removed. Some seams were puttied and sanded, which
would have been a hassle if I had not used the wooden deck. At the same time, I
started assembling the superstructure sections, which fit well. As a total
novice in the use of wooden decks, I made some tests and found that the deck
glued very well and could be weathered with thinned oil paint if desired.
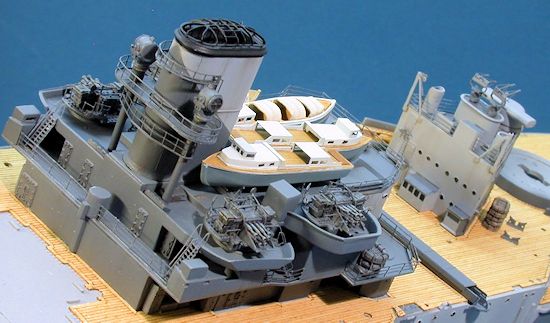
A
project of this size and complexity consists of numerous subassemblies, some of
them more daunting than others, and we´re free which to tackle first. I for one
considered the multipart funnel grill and the even fiddlier bridge wind
deflectors the most scary of the lot, and so started with them. I was surprised
at how well they tackled in the end; they were surely not easy, and needed
thought, patience and some skill, but on the whole worked as advertised. The
wind deflectors didn´t fit perfectly, but could be fitted to my satisfaction
yet.
Already now I realized how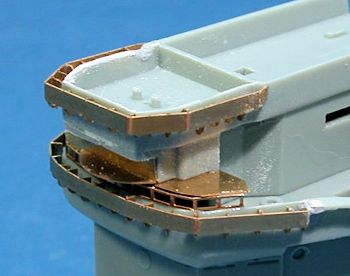 much this upgrade set would improve the kit. I should find one glitch of this
kit later in the project in this area.
much this upgrade set would improve the kit. I should find one glitch of this
kit later in the project in this area.
Parallel to working on the pretty demanding funnel platforms I fit the hull, the
mooring buoy and the ship´s boat to the base and determined their respective
positions. Holes were drilled into the foam board that would enable screws to
press the vessel to the base for gluing. A cutout was made for the ship´s boat.
The base was then painted with white wall paint in a stippling motion to add
some structure to it reminiscing of water. After drying, the base was sprayed in
green and blue hues using modeling acrylics. That thoroughly cured (more than a
week), the base was heavily sealed with solvent based clear gloss from a rattle
can. That completed work on the base until the final stage.
I
had tackled the next iffy subassembly awhile: Quite traditionally, the Queen
Elizabeth class vessels had officer accommodation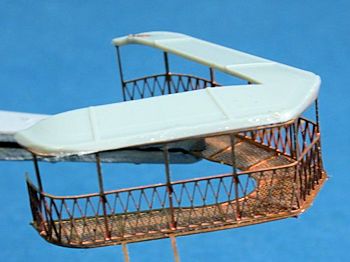 at the stern, with the admiral
having the most spacious quarters at the actual stern of the vessel, with a
covered stern gallery for a spot of fresh air in private. Other than with her
sister vessels, Warspite´s stern gallery was retained during her reconstruction,
so I was tasked to bend and glue very delicate PE parts, if possible without
flooding them with glue. The result looked quite all right and was rigid enough,
once glued to the styrene cover.
at the stern, with the admiral
having the most spacious quarters at the actual stern of the vessel, with a
covered stern gallery for a spot of fresh air in private. Other than with her
sister vessels, Warspite´s stern gallery was retained during her reconstruction,
so I was tasked to bend and glue very delicate PE parts, if possible without
flooding them with glue. The result looked quite all right and was rigid enough,
once glued to the styrene cover.
I
was now able to prime and paint the hull. I gently sanded the plastic to give
the paint better adhesion, then de-greased it with alcohol, prior to spraying
automotive primer from a rattle can. Now the boot topping was sprayed a dark
grey and masked, followed by masking and spraying the two shades of the
camouflage scheme. Vallejo acrylics were used. The hull was weathered only
rather gently, by applying filters from artist´s oils. Finally the hull was
ready for the application of the wooden deck. I divided the larger part at the
breakwater to have more manageably sized pieces first. Wearing surgical gloves
for fear of compromising
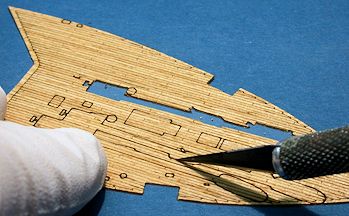 the adhesive coating, I recut and cleared up the deck
parts with a fresh X-ACTO blade and pried them loose from the backing. Then the
individual parts were placed and pressed on the deck where they stick to the
present day, eighteen months later. The deck´s fit was excellent, there was only
one place where it was too short, right at the hangar doors. I closed the gap
with styrene later.
the adhesive coating, I recut and cleared up the deck
parts with a fresh X-ACTO blade and pried them loose from the backing. Then the
individual parts were placed and pressed on the deck where they stick to the
present day, eighteen months later. The deck´s fit was excellent, there was only
one place where it was too short, right at the hangar doors. I closed the gap
with styrene later.
Now was the time to replace the numerous deck details removed prior to
applying
the wooden deck. The catapult was the largest and most intricate of these.
Honestly I´m not sure whether the catapult was retained or removed upon the
deletion of the floatplanes. In an earlier model depicting Warspite at the time
of her wrecking, I had omitted the catapult. Here, I used the catapult with its
covers as I did not feel
 up to filling up the gaps it would have left with
wooden deck material. I have seen a lot of Warspite models with floatplanes and
catapult and AA gun tubs; personally I am fairly sure that one the gun tubs were
installed no floatplane would have been operated any more. Hence I omitted the
planes from my build.
up to filling up the gaps it would have left with
wooden deck material. I have seen a lot of Warspite models with floatplanes and
catapult and AA gun tubs; personally I am fairly sure that one the gun tubs were
installed no floatplane would have been operated any more. Hence I omitted the
planes from my build.
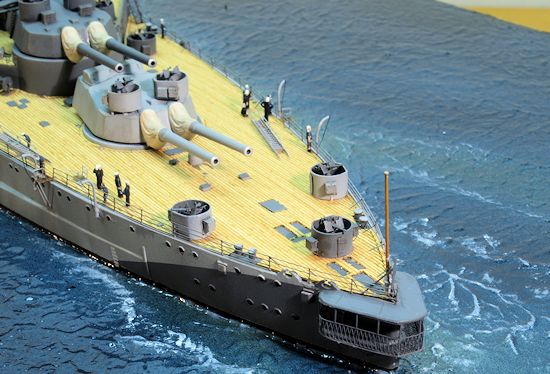
Pontos has done a billiant job of depicting the numerous details on the
foredeck, too. You get virtually anything needed for anchor handling, in
multilayer relief-etched PE and assorted resin to boot. That was true modeling
fun, especially as the parts fit!
A
more iffy job was to apply various large and curved PE parts surrounding the
wooden deck. These were pre-painted to minimize the risk of damage to the wooden
deck. The numerous PE deck hatches needed preparation and a systematic approach.
I usually apply kabuki tape to blocks of foam board and collect my small parts
there for painting and weathering prior to installation. In this case, lots of
markings were scribbled on the tape to remind me which hatches went where.
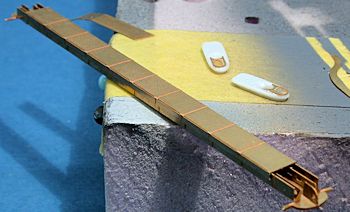
 The multipart breakwater needed care and time; as it was markedly wider than the
deck, I clipped its ends. I may have goofed here but found it looked right.
The multipart breakwater needed care and time; as it was markedly wider than the
deck, I clipped its ends. I may have goofed here but found it looked right.
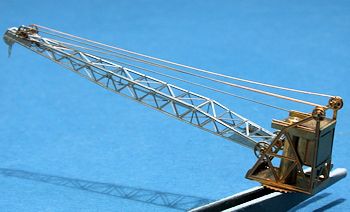
The two cranes are another example for the high standard of the upgrade set.
Using the kit PE, the pastic parts are repalced by a combination of PE and
machined brass which renders a delicate yet sturdy plus credible result.
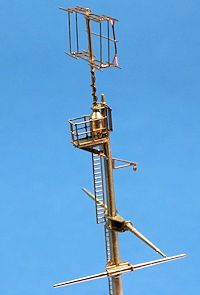 There are some subassemblies that tend to drive me nuts for my incompetence. The
type 281 masttop warning radars have been my major bugbears in all my period RN
builds. In this case, the Pontos developers have really done their homework and
come up with an immensely well thought out design combining PE and machined
brass that build easily and really looks the part. Bravo Zulu! Once I had
studied and digested the instructions, the masts proved to be equally well
designed and very strong. Especially the PE parts for connecting the yardarms to
the masts really make the difference and are world apart from gluing or
soldering.
There are some subassemblies that tend to drive me nuts for my incompetence. The
type 281 masttop warning radars have been my major bugbears in all my period RN
builds. In this case, the Pontos developers have really done their homework and
come up with an immensely well thought out design combining PE and machined
brass that build easily and really looks the part. Bravo Zulu! Once I had
studied and digested the instructions, the masts proved to be equally well
designed and very strong. Especially the PE parts for connecting the yardarms to
the masts really make the difference and are world apart from gluing or
soldering.
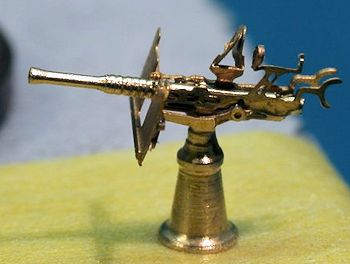
The eight barreled pompoms proved a trickier foe, and their big advantage lies
in their beautifully turned characteristic barrels. I was not happy with the PE
ammo boxes, I feel in hindsight those would have been easier and equally nice in
resin. On the whole the pompoms are very good representations of the original,
and make the model stand out yet more.
 I
was most impresed with the 20 mm Oerlikon AA guns, which are very well designed
and look very convincing. These guns were shipped by virtually any allied
vessel, and having them available in this quality is a vast improvement over
earlier offerings.
I
was most impresed with the 20 mm Oerlikon AA guns, which are very well designed
and look very convincing. These guns were shipped by virtually any allied
vessel, and having them available in this quality is a vast improvement over
earlier offerings.
The heavy turrets were built almost as an afterthought or rather as a sideline.
They did fit well, I only had to trim the resin blastbags a bit.
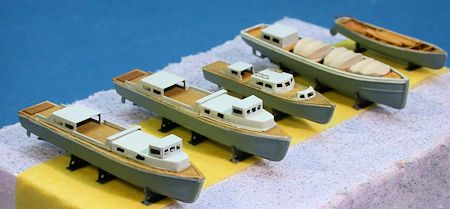
The numerous ship´s boats proved to be models in their own right once they got
the Pontos treatment with lots of PE. Given enough care and time, they built
well. I put some extra work into the 45 ft launches, opening up the covers
sternwards with minidrills and files to achieve a more realistic look. The boats
were painted (without any hard evidence) in a different grey from the hull.
Their wooden decks were simulated by drybrushing brown artist´s oil paint over a
beige acrylic base.
 The numerous PE boat cradles were iffy to fold and assemble, but their
relief-etched structure looked most pleasing. Parallel to building them I made
the ten boat booms. These agin were little works of art assembled from machined
brass and PE, „workable“ and with eyebolts for rigging. The wooden booms were
painted as decribed above for the boats decks.
The numerous PE boat cradles were iffy to fold and assemble, but their
relief-etched structure looked most pleasing. Parallel to building them I made
the ten boat booms. These agin were little works of art assembled from machined
brass and PE, „workable“ and with eyebolts for rigging. The wooden booms were
painted as decribed above for the boats decks.
Numerous other parts followed, like ready ammunition boxes, flag lockers,
bollards, cleats, searchlights, binoculars and so on. May of the ready ammo
boxes had to be added to the finely cast resin AA gun tubs, taking good care
what went where. More and more foam board blocks with taped-on parts piled up in
my modeling den.
Then came the point in the project when progress became visible. Screws were
fixed to the three superstructure blocks, both to mount them on my vise and for
later fixing the superstructure block to the hull. Now I was able to paint the
blocks in camo and add the numerous detail parts. At this point, the first
 railings were added, too. These are tailormade and relief-etched bending marks
are provided to ease assembly. The included supports were helpful and easy to
work with. I replaced the anchor chains with items from German supplier Saemann
which were smaller and looked more to scale. They were blackened and added to
the model.
railings were added, too. These are tailormade and relief-etched bending marks
are provided to ease assembly. The included supports were helpful and easy to
work with. I replaced the anchor chains with items from German supplier Saemann
which were smaller and looked more to scale. They were blackened and added to
the model.
Finally I was able to add the superstructure blocks to the model, and the many
emptied foam board blocks showed how many parts I had already added. When all
the railings and the boat booms were mounted, too, I started manning my vessel.
I used prepainted PitRoad sailors as well as my dwindling supplies of Goffy
resin figures.
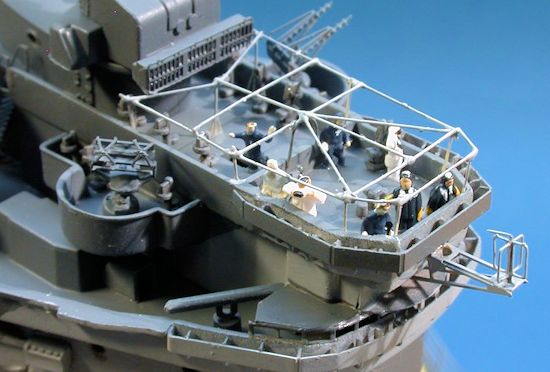 And that was when I realized what I should have seen much earlier. The kit
splinter shields at the compass platform were much too low, they hardly reached
up to the figures´ waists. Reference images showed that the real thing had been
much higher. It was time for a brainwave to get out of this situation.
Rebuilding the bridge and the PE wind deflector was out of the question, so I
came up with a cowardly and brutal solution: The entire bridge crew had their
legs amputated at mid-thigh height, which brought their heads to the right
height. To somehow hide the carnage, I constructed an awning over the compass
platform using various PE and wire items, plus cigarette paper infused in clear
acrylic. After curing, it was painted in a canvas shade and was drybrushed.
And that was when I realized what I should have seen much earlier. The kit
splinter shields at the compass platform were much too low, they hardly reached
up to the figures´ waists. Reference images showed that the real thing had been
much higher. It was time for a brainwave to get out of this situation.
Rebuilding the bridge and the PE wind deflector was out of the question, so I
came up with a cowardly and brutal solution: The entire bridge crew had their
legs amputated at mid-thigh height, which brought their heads to the right
height. To somehow hide the carnage, I constructed an awning over the compass
platform using various PE and wire items, plus cigarette paper infused in clear
acrylic. After curing, it was painted in a canvas shade and was drybrushed.
Now the cutter was also manned, receiving rowers and a coxswain. Two hands were
placed in the cutter´s bow, two more on the buoy where the delicate maneouvre of
shackling and sealing the splint with lead was performed. The oars were sourced
from my collection of leftover PE.
Always working away from the model´s centerline, the last additions to the hull
were added
- the very nice
flagpoles, the cutter´s davits and the stern gallery. The latter ´s fit was
worse than during the initial fitting, but I was able to close the remaining
gaps with white glue. I placed the accommodation ladders on the deck, as if they
were just being prepared for deploying. Some (un-mutilated) figures were placed
around 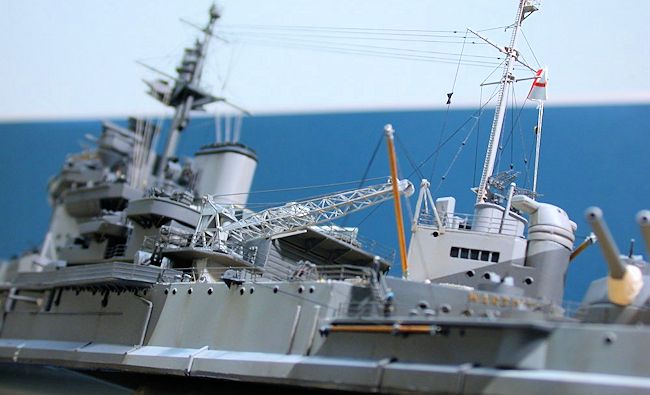 the decks to bring some life to the model.
Now I was able to tackle my least favorite job, as in rigging the model. I used
UNI flyfishing thread, gauge 8/0 in black and tan; this was glued at the start
of any individual line using CA gel. That cured, the line was led to its
destination, the excess weighted with pliers or clothes pins or the like to make
it taut. Then the end point was secured using thin CA. That also cured, the
excess was trimmed with a fresh X-ACTO blade. I tried to follow the spirit of
the various rigging plans in my references without aiming at going all the way.
Remember, it is my least favorite task. Isolators were simulated with droplets
of PVA glue, painted black after curing. The rudder indicators were cut from PE
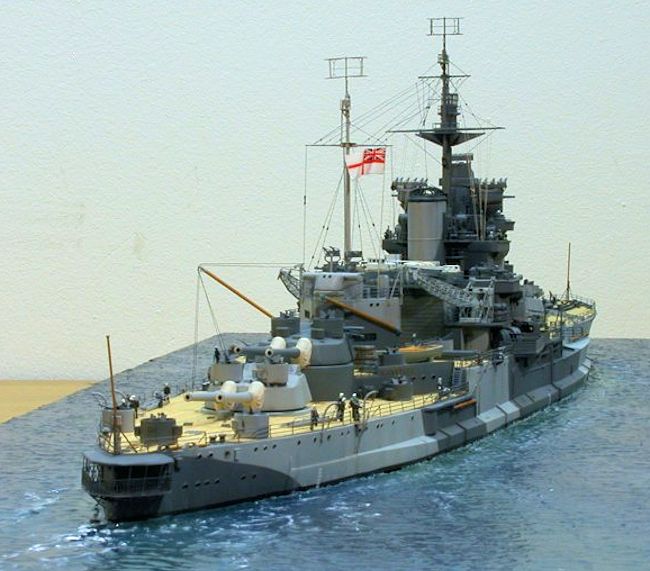
sheet and painted black. The White Ensign is the kit decal, applied to aluminum
foil and selaed with clear acrylic paint. The flag was then shaped as desired,
the edges touched up with paint, and the flag then glued to its line.
 Now the entire model was checked for flaws again and numerous minor glitches
addressed. Finally the entire model was sprayed Vallejo Model Air Clear Flat to
cover gluey stains and blend everything in.
Now the entire model was checked for flaws again and numerous minor glitches
addressed. Finally the entire model was sprayed Vallejo Model Air Clear Flat to
cover gluey stains and blend everything in.
The „marriage“ of model and base was the final exciting moment. I placed blobs
of clear silicone caulking below the hull, placed the model on the base and
screwed it tight through the barbettes as prepared earlier. Any remaining gaps
between model and base were filled with clear gloss acrylic gel. Now I was able
to add the buoy and the manned cutter, also using acrylic gel. After everything
was cured, I removed the screws and added the heavy turrets before placing the
model into its display box.
| CONCLUSIONS |
 We´re living in the best modeling times these days. We have access to vast
amounts of references, we can connect with fellow modelers and get helpful
answers to a lot of questions popping up in a project, plus we have a growing
number of high-quality model kits, and now we also have upgrade sets that make
said models even nicer and more accurate. I very much enjoyed building this
model and the warm reception it received at various model shows. I even more
enjoyed meeting the people behind Pontos and talking to Mr Park, who designed a
lot of this upgrade set. I´m looking forward to more new kits and upgrade sets!
We´re living in the best modeling times these days. We have access to vast
amounts of references, we can connect with fellow modelers and get helpful
answers to a lot of questions popping up in a project, plus we have a growing
number of high-quality model kits, and now we also have upgrade sets that make
said models even nicer and more accurate. I very much enjoyed building this
model and the warm reception it received at various model shows. I even more
enjoyed meeting the people behind Pontos and talking to Mr Park, who designed a
lot of this upgrade set. I´m looking forward to more new kits and upgrade sets!
| REFERENCES |
Ross Watton: The Battleship Warspite (Anatomy of the Ship series). London 1986
R.A. Burt: British Battleships 1919-1945. Barnsley 2012
February 2014
If you would like your product reviewed fairly and fairly quickly, please contact the editor or see other details in the Note to Contributors.