
Airfix 1/600 HMS Warspite
| KIT #: | ? |
| PRICE: | ? |
| DECALS: | ? |
| REVIEWER: | Frank Spahr |
| NOTES: |
| HISTORY |
 ircraft hangars and catapult. Radar and AA were upgraded successively. Only one
vessel of the class, Barham, was lost to a German U-boat, the others survived
the war, albeit suffering extreme damage.
ircraft hangars and catapult. Radar and AA were upgraded successively. Only one
vessel of the class, Barham, was lost to a German U-boat, the others survived
the war, albeit suffering extreme damage.
Warspite was almost lost after being
hit off Salerno by a German gliding bomb, and was never fully repaired, only to
an extent that enabled her to lend Naval Gunfire Support during the Normandy
landings. After being hit by a magnetic mine, she was again provisonally
repaired. She fired her last shots during the attack on Walcheren island and was
taken out of service in February, 1945.
| THE KIT |
| CONSTRUCTION |
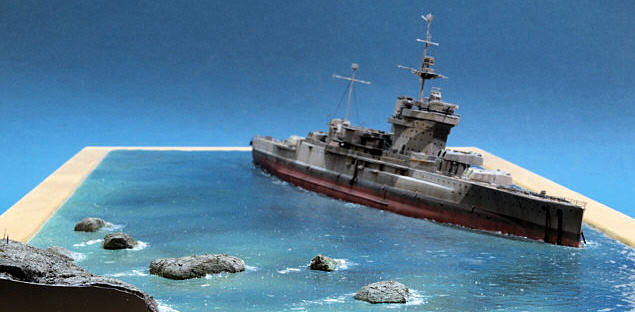
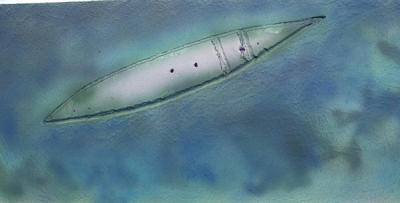
In this case, the idea for the
diorama was there before the kit got into my
eager paws. On a trip to Cornwall
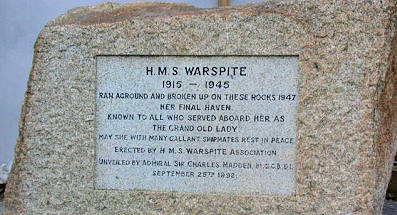
in 2005, I happened upon a memorial to HMS Warspite erected near the site of her
final scrapping, right opposite St. Michael´s Mount. I hadn´t been aware of
Warspite´s end before that and was duly impressed. Surfing the net, I later
found some images and descriptions of her
 fate on the Cornish coast and soon
decided I would build the old, clunky and not too expensive Airfix kit as her
wreck. Fast forward several years – Airfix threatened to re-release the hitherto
hardly available kit, but it took some time before it actually hit the German
online shops. Discussing future projects at a model show, I learned that a
modeling pal had a surplus Warspite and we soon agreed that he would sell it to
me. I was pretty excited when I had the battered box in hand and again was able
to build what had been one of the top favorite kits of my youth.
fate on the Cornish coast and soon
decided I would build the old, clunky and not too expensive Airfix kit as her
wreck. Fast forward several years – Airfix threatened to re-release the hitherto
hardly available kit, but it took some time before it actually hit the German
online shops. Discussing future projects at a model show, I learned that a
modeling pal had a surplus Warspite and we soon agreed that he would sell it to
me. I was pretty excited when I had the battered box in hand and again was able
to build what had been one of the top favorite kits of my youth.
I started by building the hull plus
the deck, making modifications where I found them to be necessary and visible.
Prior to her last voyage, Warspite´s armament and boats had been removed, same
as part of her radar equipment. The casemate guns had been removed and plated
over, so I replaced the parts with styrene tubing. Scuttles were drilled open.
The ove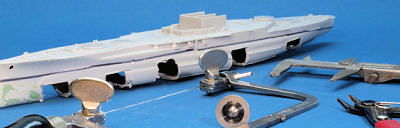 rly thick stern walk cutout was partially filled and a new piece was made
from styrene. Numerous access panels to the various compartments of the bulge
were hinted at using a flattened section of brass tubing, which was heated and
carefully pressed at the desired locations, leaving an oval mark. The catapult
was removed and the deck sanded. Unneeded mounting holes in the decks were
filled with styrene stock and sanded. Oversize splinter shields and molded on
stairs were removed likewise. I did not address the issues of the wrong shapes
of the bulges and the bow and stern.
rly thick stern walk cutout was partially filled and a new piece was made
from styrene. Numerous access panels to the various compartments of the bulge
were hinted at using a flattened section of brass tubing, which was heated and
carefully pressed at the desired locations, leaving an oval mark. The catapult
was removed and the deck sanded. Unneeded mounting holes in the decks were
filled with styrene stock and sanded. Oversize splinter shields and molded on
stairs were removed likewise. I did not address the issues of the wrong shapes
of the bulges and the bow and stern.
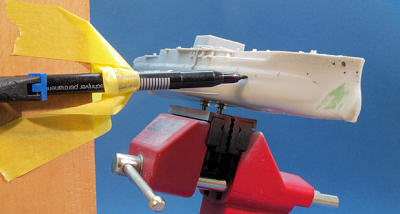
Having completed the hull, it was
time to think about mounting it on the diorama. Having the hull fixed to my
adjustable vise with threaded bars, I inclined the hull to the degree I wanted
to show in the dio. Various shots of Warspite show her various states of
 necessary demarcation line was
drawn on the hull using an indelible marker. For fears of the hull deforming
after sawing the underwater part off, I first cut away sections and successively
glued pieces of sprue from side to side to retain the shape. That done, the rest
of the underwater hull was removed and the edges smoothed. The model was then
primed with a tan enamel paint prior to paintwork on the wood decks.
necessary demarcation line was
drawn on the hull using an indelible marker. For fears of the hull deforming
after sawing the underwater part off, I first cut away sections and successively
glued pieces of sprue from side to side to retain the shape. That done, the rest
of the underwater hull was removed and the edges smoothed. The model was then
primed with a tan enamel paint prior to paintwork on the wood decks.
Now I could position the m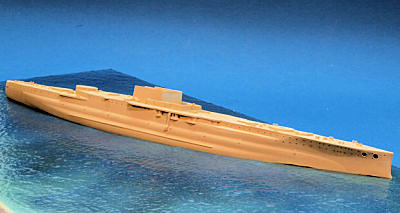 odel on my
base. Using a standard IKEA picture frame, I cut a piece of foam board to fit it
and placed the model diagonally on it. The hull´s perimeter was traced and some
material removed so the hull would sit snugly. Two metal screws were fixed to
the underside of the main deck to mount the model on the vise, and openings were
drilled into the foam board to accept them. The foam board was then painted with
white wall paint and a big brush in a stippling motion to achieve a slightly
irregular surface. I wanted a calm sea on a fine spring day, soon before
scrapping began in earnest and the ship was still fairly complete. The wall
paint was then left to dry.
odel on my
base. Using a standard IKEA picture frame, I cut a piece of foam board to fit it
and placed the model diagonally on it. The hull´s perimeter was traced and some
material removed so the hull would sit snugly. Two metal screws were fixed to
the underside of the main deck to mount the model on the vise, and openings were
drilled into the foam board to accept them. The foam board was then painted with
white wall paint and a big brush in a stippling motion to achieve a slightly
irregular surface. I wanted a calm sea on a fine spring day, soon before
scrapping began in earnest and the ship was still fairly complete. The wall
paint was then left to dry.
 Using some images from my Cornwall
trip as guide, the base was then sprayed in various layers and shades of
acrylics to simulate areas of varying depth, underwater rocks and plant growth.
After I was satisfied, the surface was sealed with a sizable number of layers of
gloss clear lacquer from a rattle can – only this step brings the surface to
life and makes it resemble actual water.
Using some images from my Cornwall
trip as guide, the base was then sprayed in various layers and shades of
acrylics to simulate areas of varying depth, underwater rocks and plant growth.
After I was satisfied, the surface was sealed with a sizable number of layers of
gloss clear lacquer from a rattle can – only this step brings the surface to
life and makes it resemble actual water.
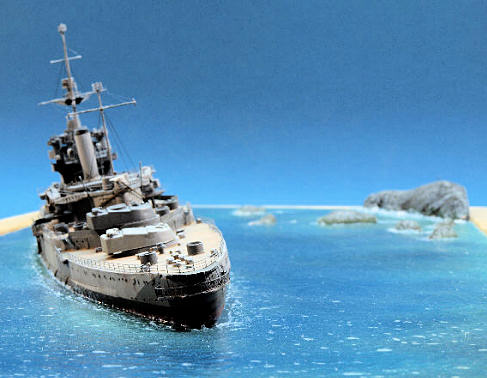
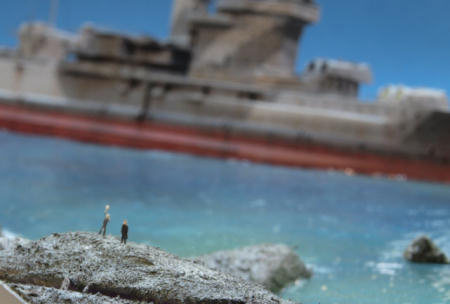
Now this was quite nice, but still lacking interest – so I experimented on making rocks from my trusty foam board. Using a saw, some files and sanding sticks, I shaped several pieces to hopefully credible rocks. One larger piece was shaped to occupy a corner of the base and play the part of a bit of the Cornish coast. Using various shades of Vallejo ModelAir greys, they were sprayed and then drybrushed with lighter shades of artist´s oils, using grey and some green around the waterline. The rocks were mounted on the base using acrylic gel. Some limited foam and turbulent water was hinted at by drybrushing white artist´s oil paint. In the end I thought the base looked the part and called it quits to continue on the vessel.
| COLORS & MARKINGS |
The next issue I addressed was
painting the model, especially the camo and the wooden decks. The Shipcraft
volume contains nice profiles that show Warspite´s late war camo and offers
shades for it. I used Vallejo ModelAir Light Grey and Dark Sea Grey to
substitute for the correct shades, which would be weathered heavily anyway. The
vessel had been moored at Portsmouth without maintenance for two years prior to
her last voyage, so in this case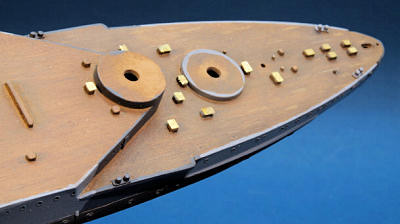 I wouldn´t have to restrict my weathering
efforts too much. The hull sides were duly masked and sprayed in a comfortingly
uneventful manner. Revell Aqua Color Anthracite was used for the boot topping,
and brick red from the same manufacturer for the antifouling coat.
I wouldn´t have to restrict my weathering
efforts too much. The hull sides were duly masked and sprayed in a comfortingly
uneventful manner. Revell Aqua Color Anthracite was used for the boot topping,
and brick red from the same manufacturer for the antifouling coat.
The deck had to the best of my knowledge been her teak deck to the last, and I tried to hint at a wooden deck look with simple means. After priming the model in tan enamel, I used various shades of acrylics to mark individual planks, especially on the quarterdeck. Then came different shades of artist´s oils, applied in a drybrushing manner, always hinting at how I thought a dilapidated teak deck might look after two years of neglect, the not too gentle removal of equipment, and a stormy journey plus a shipwreck. When I was convinced this was the best I could do, I let the deck dry and then sealed it with Vallejo´s excellent ModelAir Matt Varnish. Then the deck fittings were refined using PE parts from the kit – I did not aim at correctly replicating any vent, skylight, access hatch or ready ammo locker. After completing that, the deck fittings and superstructure parts were hand-painted in the appropriate camo shades.
| CONSTRUCTION CONTINUES |
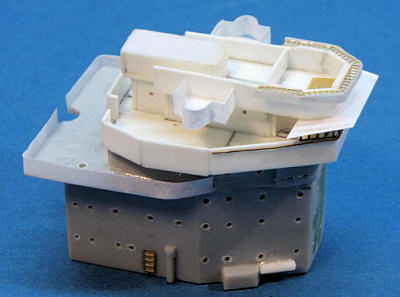 The biggest part of the build went
into the block bridge which was partly rebuilt from styrene stock as per its fit
post 1943 (when some of it was modified). Working with the kit parts and the
drawings in the AOTS volume as guides, I slowly but surely made my way through
the various bridge levels. Splinter shields were made from CA-infused paper or
from old PE frets. The wind deflectors around the topmost deck were hinted at
with PE ladder stock and CA-infused paper. The bridge windows were also made
from ladder stock. I was quite happy with the new look of the bridge, as a
ship´s bridge is like its face to me and needs to be credibly rendered.
The biggest part of the build went
into the block bridge which was partly rebuilt from styrene stock as per its fit
post 1943 (when some of it was modified). Working with the kit parts and the
drawings in the AOTS volume as guides, I slowly but surely made my way through
the various bridge levels. Splinter shields were made from CA-infused paper or
from old PE frets. The wind deflectors around the topmost deck were hinted at
with PE ladder stock and CA-infused paper. The bridge windows were also made
from ladder stock. I was quite happy with the new look of the bridge, as a
ship´s bridge is like its face to me and needs to be credibly rendered.
On
the plus side, building the ship this way meant no hassle with iffy PE
pom-poms and other parts of sheer terror, no upgrading or detailing of ship´s
boats, no replacement of gun barrels – quite a lot of stuff that simply needn´t
be there. On the other hand, I needed to think of what to do with the spaces
where the discarded items had been. L´Arsénal´s Structural parts again proved to
be very helpful, so I added circular PE parts to the spaces where the pom-poms
and DP guns had been. The numerous circular emplacem ents where 20 mm guns had
been were mostly made from styrene tubing thinned from the inside. The kit parts
of the various gun directors and rangefinders were detailed as per the AOTS
drawings. The main gun turrets were accordingly detailed; as per reference
images, „tarps“ were rigged across the openings of the A and Y turret, using
ents where 20 mm guns had
been were mostly made from styrene tubing thinned from the inside. The kit parts
of the various gun directors and rangefinders were detailed as per the AOTS
drawings. The main gun turrets were accordingly detailed; as per reference
images, „tarps“ were rigged across the openings of the A and Y turret, using
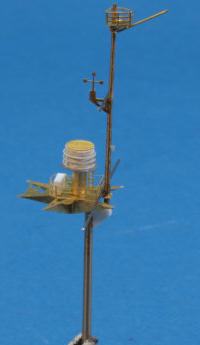 The masts were made from tapered BMK
brass stock, PE and wire, with some scratchbuilt additions. The radar lantern
was made from styrene tubing and the abovementioned L`Arsénal parts.
The masts were made from tapered BMK
brass stock, PE and wire, with some scratchbuilt additions. The radar lantern
was made from styrene tubing and the abovementioned L`Arsénal parts.
After removing the molded-on anchor
chains, the chainways were redone using scrap PE fret, openings for the chains
were drilled open and enlarged. Saemann brass chains, suitably blackened were
used.
Some effort went into the funnel and
the very iffy platforms festooning it. The funnel searchlights were modified
using brass wire instead of the oversize styrene mounts.
Having addressed the number of
subassemblies, I was able to start weathering the model, one of the most
pleasant tasks during this build. Artist´s oils and Humbrol thinner make up an
excellent wash, and using filters of tiny dots of oil paints and working on them
with Q-tips help a lot. Using five or six shades of artist´s oils, I was able to
bring the surface to life and to show the weathering of this neglected vessel.
Around the waterline, greenish hues were used to hint at algal growth,
rust was hinted at rather with brownish than reddish shades, as the small scale
will not easily tolerate excessive contrasts.
It was about at this time when I
realized I needed something to gently press the model to the base when mounting
it. I had decided to use silicone on the two threaded bars that ran through the
base, and clear acrylic gel all around the hull. As I only mount my models when
they are completed, I needed spots for applying pressure. My idea was to use two
threaded bars running
 through the barbettes of A and X turret, and it worked
fine when I dry-fit the parts.
through the barbettes of A and X turret, and it worked
fine when I dry-fit the parts.
So I was able to bring all the
subassemblies together. Working as usual inside out, I started at the vessel´s
centerline and worked towards the periphery. Numerous PE boat cradles were made,
pre-painted and glued as closely to where I thought they ought to be from the
drawings in my references. The cranes had been prepared and only needed to be
mounted once the rest of the subassemblies were ready. The hangar doors were
made from Evergreen´s very useful „N-scale Car siding“. I have no idea how the
hangars were furnished after the aircraft installations were removed, so I
thought it best to cover the insides up. As usual, the sternwalk railings and
cover were a major PITA, especially as the WEM parts are thought for the correct
more pointed shape of the real vessel and not for the more bulgy shape of the
model. But I was able to get things working somehow. Like the rest, the stern
walk was seriously weathered and dirtied.
The vessel was rigged using Caenis
and
 Having come so far, I added some flat
coats to the model, checked for flaws, repainted here and there, and finally
found a significant goof. I had used railings around the DP guns, but should
have used splinter shields. So this part was redone using some suitable PE from
the WEM HMS Tiger set.
Having come so far, I added some flat
coats to the model, checked for flaws, repainted here and there, and finally
found a significant goof. I had used railings around the DP guns, but should
have used splinter shields. So this part was redone using some suitable PE from
the WEM HMS Tiger set.
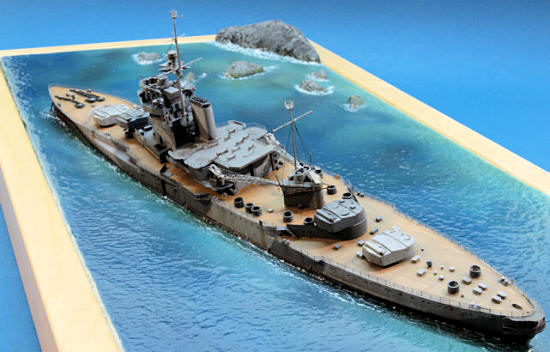
Having painted and weathered them, a really final flat coat was sprayed, the vessel left to dry, and the next morning it was mounted on the base as described above. Some more acrylic gel was applied from a disposable syringe, which was sculpted using an artist´s spatula. After curing, some drybrushing with white artist´s oil paint completed the work on the water. Now the threaded bars were removed and the two missing turrets finally glued to the model. As a final touch I added two PE figures to the coast, plus two PE bicycles which are very hard to notice at all. My idea was to show two youths having cycled to the coast to have a look at the stricken battleship.
| CONCLUSIONS |
To me, this kit is still very nice and useful despite its shortcomings, and a fine base for whatever ideas I might have. I very much enjoyed this project and like the outcome.
October 2010
If you would like your product reviewed fairly and quickly, please contact me or see other details in the Note to Contributors.