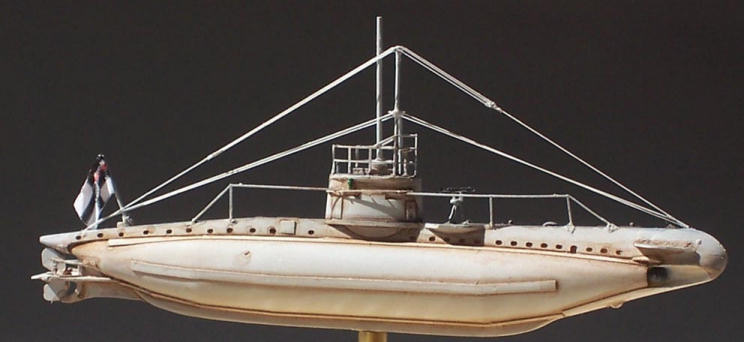
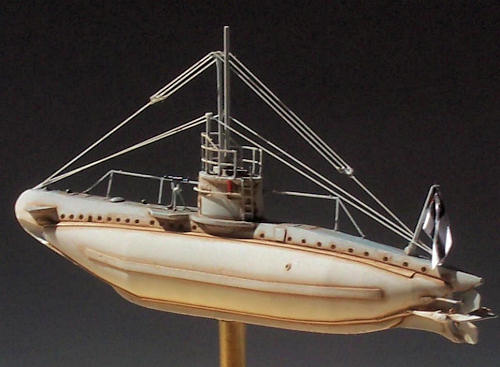
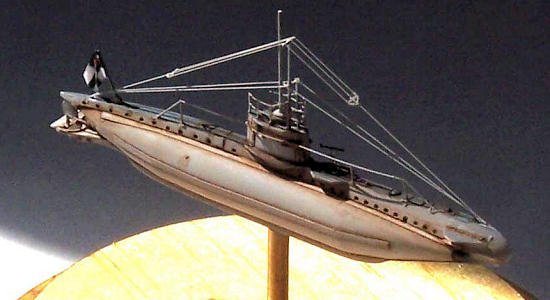
U-Boat Laboratorium’s 1/350
German WWI Type UB-I submarine
| KIT: | Hasegawa 1/72 F-18C Hornet "VFA-131 Wildcats CAG" |
| KIT #: | 350-01 |
| PRICE: | €15.00 |
| DECALS: | None |
| REVIEWER: | Kyle Bodily |
| NOTES: | Resin multi-media kit |
| HISTORY |
The UB-I boats were built to
fill a need placed by the Imperial German Navy for a small coastal submarine.
It had to be maneuverable so it could operate in the unique shoals and
sandbars in the
Almost as soon as the war
began, two shipyards began to build the type UB-I.
UB-1 to UB-8 were built at Friedrich Krupp Germaniawerft in
 The
first UB-Is went to sea in January of 1915.
They had some good points and some bad.
It could submerge in 22 seconds.
That is fast. It had a range
of 1600 nautical miles for a six-day autonomous cruise and a maximum depth of
160 feet/50 meters. For armament it
carried two torpedoes (45 cm type C/06 or C/06 Ds) and an 8mm machinegun (MG 08)
on the forward deck. The torpedo
tubes could only be reloaded from the surface and the torpedoes had to be loaded
directly into the tubes at that.
These boats just didn’t have the room to store their torpedoes any other way but
loaded in the tubes.
The
first UB-Is went to sea in January of 1915.
They had some good points and some bad.
It could submerge in 22 seconds.
That is fast. It had a range
of 1600 nautical miles for a six-day autonomous cruise and a maximum depth of
160 feet/50 meters. For armament it
carried two torpedoes (45 cm type C/06 or C/06 Ds) and an 8mm machinegun (MG 08)
on the forward deck. The torpedo
tubes could only be reloaded from the surface and the torpedoes had to be loaded
directly into the tubes at that.
These boats just didn’t have the room to store their torpedoes any other way but
loaded in the tubes.
These boats were small and
the crews liked to refer to them as “Nähmaschine” or
sewing machine.
Interestingly they were so small that the second a torpedo was launched the boat
lost 1,786 lbs/810 kg of forward ballast.
The resultant aft CG shift was so drastic that the boat’s bow was in
danger of braking the surface and giving away the boats location to the enemy.
To prevent this, the crew would have to all run forward the moment the
torpedo left the boat to keep the CG as close to neutral as possible.
Its only other armament was one 8mm machinegun on the foredeck that could
be removed before diving.
The boat was not fast; it
could make 6 knots on the surface and 5.5 knots submerged.
For power the UB-1s had a 60 h.p. diesel engine and a 120 h.p. electric
motor. I am told that this small
power plant was the reason for the crewmen giving the type it’s nähmaschine
nick name.
UB-I boats fought and
operated pretty much everywhere shipping could be harassed.
They were stationed in the
Many of these boats were
painted like little seamonsters with eyes and a mouth.
The most successful UB-I was not one of these seamonsters but a plain
nondescript looking boat. It was
the UB-6.
 The UB-6
was built at Friedrich Krupp Germaniawerft in
The UB-6
was built at Friedrich Krupp Germaniawerft in
The UB-6 completed some 60
war patrols including participating in Admiral Scheer’s failed attempt to ambush
the British Grand Fleet just prior to the Battle of Jutland.
The UB-6 sank 15 ships including the Destroyer HMS Recruit.
She damaged another two ships and captured a third for a total of 7,559
tons sunk or captured and 1,101tons damaged.
Three countries operated the
UB-I type boats in the Great War.
Germany operated seventeen boats,
| THE KIT |
 Wow
another really solid box. Nice
comprehensive instructions with well written histories for the basic boat and
four individual boats to include pictures.
The instructions are quite useful since the model is a little over 3
inches long. They show the boat
with all parts in their proper place with nice big five view drawings.
Wow
another really solid box. Nice
comprehensive instructions with well written histories for the basic boat and
four individual boats to include pictures.
The instructions are quite useful since the model is a little over 3
inches long. They show the boat
with all parts in their proper place with nice big five view drawings.
Now for parts and WOW they
are truly nice. The resin hull is
incredible. I am always impressed
to see how well some resin kits are cast.
These cottage industry type kits are hand made and mastered.
That means that someone sat down and hand made the original so a mold
could be made to cast the run. My
kit is flawless, no matter how hard I looked and checked references I couldn’t
find anything wrong with it. The
photo-etch parts look very well made and I’ve no doubt they’ll be very easy to
work with.
| CONSTRUCTION |
The first thing I did was to
drill a hole in the center of the keel to place a piece of brass tubing to mount
it on a stand. I got a pre-shaped
piece of wood for the base and drilled a hole in the center of it for another
piece of brass tube. The tube in
the base is one size larger then the one on the keel of the boat, this allows
the two tubes to telescope into one another.
Now I can build the sub with the stand out of the way and also not worry
about getting the stand messed up.
The tube in the sub also gives you a nice little handle as you build.
That is something I find quite handy.
 Now
we’ll get into the meat and potatoes.
I began by putting on the screw and building the rudder and planes. Next
were the two torpedo covers and the forward dive planes.
The forward dive planes were fixed in a slightly downward angle.
This is shown in the instructions but until I read about them I was going
to attach them in a level or neutral position.
Thank goodness for references, right.
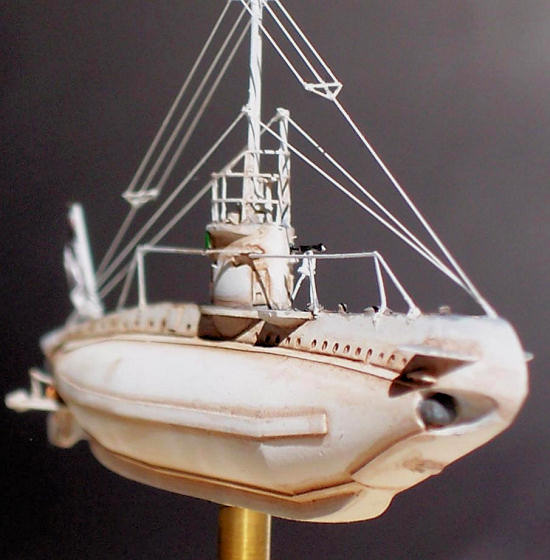
Before I added the railings I drilled holes for the periscope and radio
antenna mast. Now I attached the
helm. These boats spent most of
their time on the surface, so all had an external or exposed helm on the coning
tower, and the railings.
Now
we’ll get into the meat and potatoes.
I began by putting on the screw and building the rudder and planes. Next
were the two torpedo covers and the forward dive planes.
The forward dive planes were fixed in a slightly downward angle.
This is shown in the instructions but until I read about them I was going
to attach them in a level or neutral position.
Thank goodness for references, right.
Before I added the railings I drilled holes for the periscope and radio
antenna mast. Now I attached the
helm. These boats spent most of
their time on the surface, so all had an external or exposed helm on the coning
tower, and the railings.
Just before painting I added
the little periscope and antenna mast. Then drilled two little holes for the
rigging and sent the boat to the paint shop.
After everything was
painted, I added the rigging and radio antennas.
Lastly I weathered the whole thing.
I used the same weathering process for all the models I’ve built.
That is that I start out with a very diluted color like rust.
The paint is so diluted that only one coat is almost undetectable.
I just add coats to darken it as needed.
The cool thing about this method is that any one coat is really not
noticeable. So if you make a
mistake you will not see it unless you make the same mistake several times.
It is the addition of coats that make things get slowly darker.
And that is about it. Up she goes in the model display case.
| COLORS & MARKINGS |
Interestingly I found a lot
of pictures on the Internet. This
helped me immensely. The only
problem here was that the only picture that I could find of the UB-6 was pretty
grainy. It was however clear enough
to see that the UB-6 was at least at that time a plain boat without anything
like eyes or a mouth on it. Also
the U-bo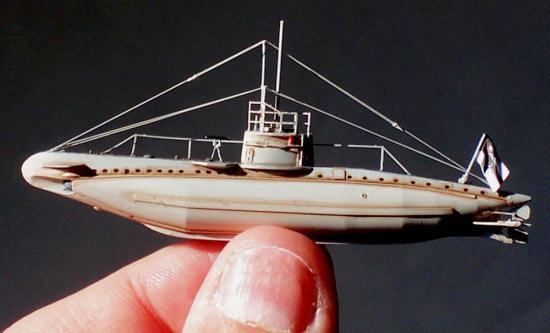 at
net had many good references. Just
keep in mind that the profile that is posted at the U-boat net of the UB-I class
is that of the late war MINELAYER MODIFICATION.
All UB-I boats in German service that survived long enough were converted
in to minelayers. This kit is of
the early war torpedo armed type of UB-I. This caused me much puzzlement while I
researched the build until I found a reference that explained the conversion of
the German boats. I’ve not found
any reference that states that the Austria-Hungarian or Bulgarian UB-I boats
were given any such modifications.
at
net had many good references. Just
keep in mind that the profile that is posted at the U-boat net of the UB-I class
is that of the late war MINELAYER MODIFICATION.
All UB-I boats in German service that survived long enough were converted
in to minelayers. This kit is of
the early war torpedo armed type of UB-I. This caused me much puzzlement while I
researched the build until I found a reference that explained the conversion of
the German boats. I’ve not found
any reference that states that the Austria-Hungarian or Bulgarian UB-I boats
were given any such modifications.
The paint scheme was an overall coat of Silver gray. After it had dried I masked off the upper horizontal surfaces and painted them a 50/50 mix of silver-gray and anthracite gray. I touched every thing up with a paintbrush and added the rigging. Lastly I weathered like I’ve already said and VIOLA, I’m done.
| CONCLUSIONS |
I can’t remember when I had
more fun and felt that a kit was more rewarding.
This thing is little, that made it all the harder but everything was so
nice and fit so well that I was able to enjoy the whole build.
The research that has gone into this kit is of the highest quality. Like
I said earlier “My kit is flawless, no matter how hard I looked and checked
references I couldn’t find anything wrong with it”.
I really looked since the profile of the kit did not mach up with the
profile on U-boat net and I do consider them to be the best single reference
site on the web.
I can recommend this little
jewel to anyone that wants to try it. I think it is a good value and fairly
simple. In spite of its size I
think it would make an excellent first resin ship kit.
I have found that U-Boat
Laboratorium has other nice looking kits.
If this UB-I is any indication they should all be great kits.
Their site shows that they are scheduled to come out with a 1/350 scale
SMS Scharnhorst. The SMS
Scharnhorst and the SMS
Now this is the first in a
series of three builds of this kit.
I’ll be building them as three different UB-Is in the service of the three
countries that operated the type.
This one is the first build and the German version. The second build will be of
the Austro-Hungarian
| REFERENCES |
“U-boats of the Kaiser’s
Navy” Osprey New Vanguard #50
“The U-boat net” www.uboat.net lots of information here. I consider this site the single best reference on the web.
March 2010
If you would like your product reviewed fairly and quickly, please contact me or see other details in the Note to Contributors.