Heller 1/150 'Passat'
| KIT #: | 80888 |
| PRICE: | $ |
| DECALS: | One option |
| REVIEWER: | George Komatsoulis |
| NOTES: |
Model Expo black rigging line in 0.012 inch and 0.018 inch needed to complete. |
| HISTORY |
The F.
Laeisz Company was founded in Hamburg in 1824 as a hat manufacturer,
expanding into shipping in 1839 by purchasing the brig ‘Carl’. The company’s
first purpose built ship, the bark
Pudel was ordered in 1857 (‘Pudel’ apparently was the nickname of Carl
Laeisz’s wife, derived from her hairstyle – ‘pudel’ is poodle in German).
Over the years, the Laeisz Company built a variety of iron and steel hulled
cargo ships, whose names began with ‘P’ and that had a reputation for speed
and timely delivery, for which they were nicknamed ‘Flying P liners’. The
Flying P liners included some of the largest sailing ships ever built,
including the 5 mast, full ship-rigged windjammer
Preussen, and the so called eight
sisters: Pangani, Petschili, Pamir,
Passat, Peking, Priwall, Pola
and Padua, 4 masted steel
barques constructed in the early years of the 20th century.
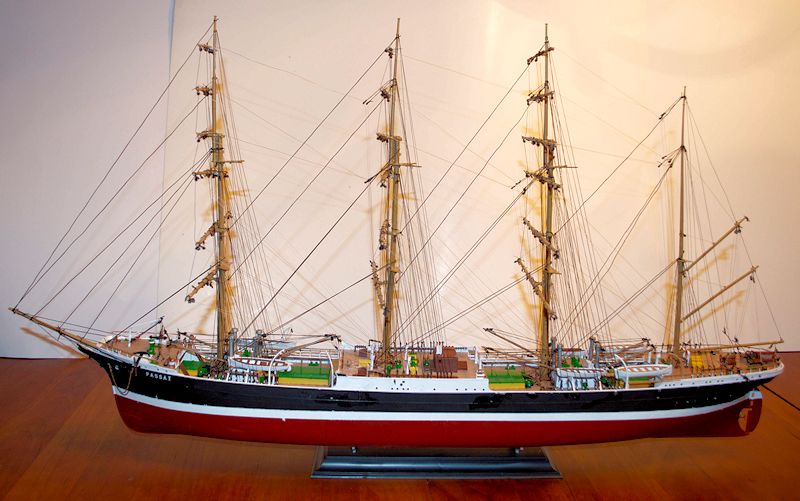
 Passat
(‘Tradewind’) was built by the Blohm and Voss Company in Hamburg in 1911 for
a cost of approximately 680,000 gold marks. Her steel hull is painted in
black and red, with a white boot stripe, mirroring the colors in the
Imperial German flag. Passat is a barque, with three identical, ship rigged
mats and a fore-and-aft rigged jigger (a smaller fore and aft rigged mast).
Like many of the other Flying-P liners, she was put into the nitrate trade
with Chile (general cargo to Chile, nitrate back to Germany), and regularly
crossed Cape Horn. During World War I, the Passat was interned in
Chile until being transferred to France as part of German war reparations.
The ship was put up for auction in 1921 and repurchased by F. Laeisz.
Passat returned to the nitrate trade until 1932, when she was sold to
the Gustaf Erickson Line, for whom she hauled grain. The Passat was
sold to shipbreakers in 1951 and was only saved due to the intervention of
Heinz Schliewen, who bought and modernized the ships. Eventually, the ship
was purchased by a group of German ship owners and put back into service
until 1957, when the ship was decommissioned. In 1957, the town of Lübeck
purchased Passat who uses it as a youth hostel and museum ship,
moored in Travemünde, a borough of Lübeck. Although Passat is
nominally part of the ‘8 sisters’, only Pamir is a true sister ship.
Passat
(‘Tradewind’) was built by the Blohm and Voss Company in Hamburg in 1911 for
a cost of approximately 680,000 gold marks. Her steel hull is painted in
black and red, with a white boot stripe, mirroring the colors in the
Imperial German flag. Passat is a barque, with three identical, ship rigged
mats and a fore-and-aft rigged jigger (a smaller fore and aft rigged mast).
Like many of the other Flying-P liners, she was put into the nitrate trade
with Chile (general cargo to Chile, nitrate back to Germany), and regularly
crossed Cape Horn. During World War I, the Passat was interned in
Chile until being transferred to France as part of German war reparations.
The ship was put up for auction in 1921 and repurchased by F. Laeisz.
Passat returned to the nitrate trade until 1932, when she was sold to
the Gustaf Erickson Line, for whom she hauled grain. The Passat was
sold to shipbreakers in 1951 and was only saved due to the intervention of
Heinz Schliewen, who bought and modernized the ships. Eventually, the ship
was purchased by a group of German ship owners and put back into service
until 1957, when the ship was decommissioned. In 1957, the town of Lübeck
purchased Passat who uses it as a youth hostel and museum ship,
moored in Travemünde, a borough of Lübeck. Although Passat is
nominally part of the ‘8 sisters’, only Pamir is a true sister ship.
| THE KIT |
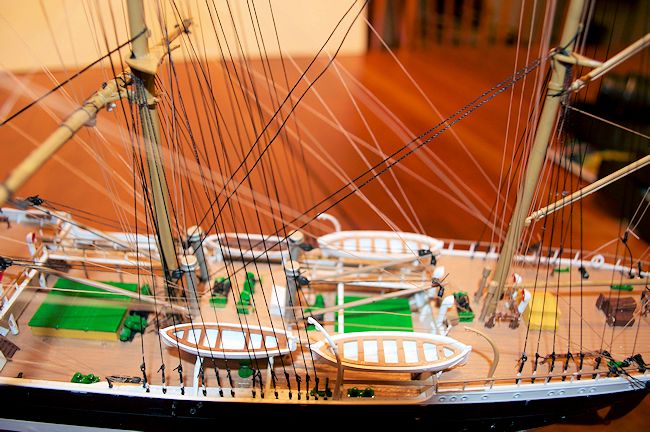
I am not certain of the age of the kit, although given that many of the instructions appear to be typed (!), I’m going to guess that it has been around for some time. Despite its age, it is well molded, flash is not a real problem (even on the hundreds of tiny blocks that are de rigeur for a ship this size) although many pieces have ejector pin marks. This isn’t a huge problem given that the rigging tends to dominate a ship of this nature anyway. You get 2 hull halves plus 18 sprues representing 9 distinct sprue designs, molded in black, brown, grey and white. Of the 18 you get 4 each of 2 sprues with (respectively) blocks and various generic ship components (life rings, ladders, capstans, oars, etc.), 3 copies of a sprue that contains all of the parts for the fore, main and mizzen masts and 2 copies of a sprue with other components replicated around the ship. For the scale, the ship is very detailed.
| CONSTRUCTION |
Like
many ship modelers, I tend to break the ship down into a series of
sub-assemblies that are not always congruent with the instructions, however
these instructions pretty much follow that path, starting with the hull and
weather decks, followed by the construction of the large number of deck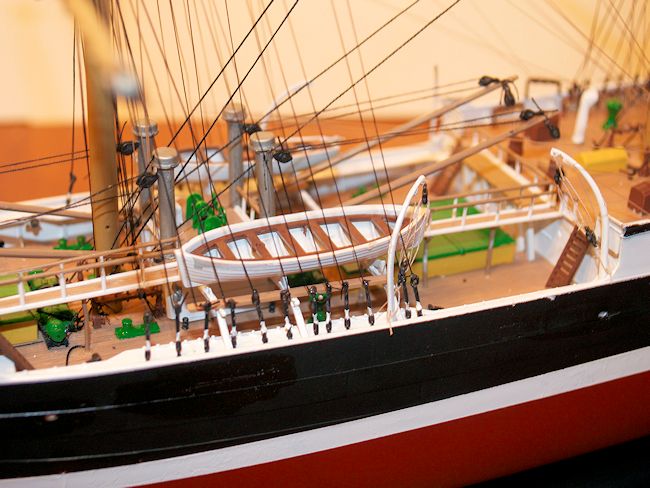 structures, and masts/yards and ending with siting the various elements on
the weather decks. For a model this complex, it is almost essential to paint
everything before it is assembled, performing such touch up as required. Fit
was generally quite good, with the exception of the stern of the hull
halves, which required significant clamping and putty to obtain a reasonable
fit.
structures, and masts/yards and ending with siting the various elements on
the weather decks. For a model this complex, it is almost essential to paint
everything before it is assembled, performing such touch up as required. Fit
was generally quite good, with the exception of the stern of the hull
halves, which required significant clamping and putty to obtain a reasonable
fit.
At this point, it is probably worth mentioning some things about the directions; which are arguably among the worst I have ever seen. They are clearly old, have been through several rounds of resolution reducing duplication, and alas, are in French. Fortunately parts are numbered, but the diagrams are so complicated (and each part has a second number designating what color(s) it should be painted) that you spend a fair amount of time scrutinizing them to decide where to put things. There are also parts that need to be put on both sides of the ship that are sometimes shown and sometimes left out for clarity. As the ship is not completely symmetric, this too adds to the confusion. Later in the instructions, there is a translation of the French instructions into a variety of languages (including English), but rather than reprint the diagrams with the translations, they simply take all of the text on a specific page and print a translation, one section after another. Frankly, I didn’t use the translation much, because it is almost hilariously bad; it looks like it was done by doing a word for word substitution of the French word for an English word almost without regard to context.
| COLORS & MARKINGS |
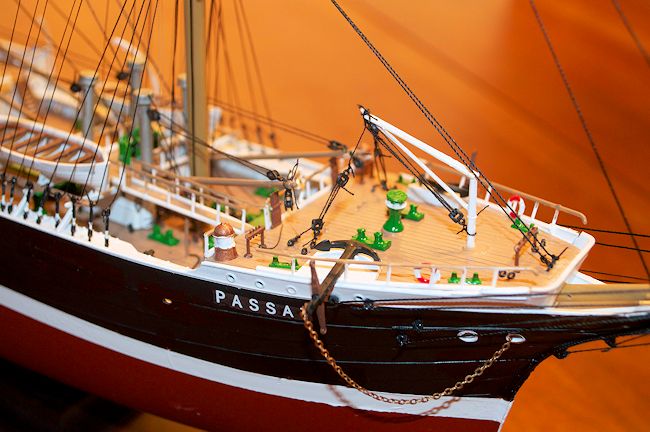
The hull was painted using Tamiya Color for plastics spray paints; first a coat of flat black, followed by dull red and then white for the boot stripe. Essentially everything else was brush painted using Model Master or Tamiya paints. The Passat was rather brightly colored (I usually model warships, and so various grays are my standards), with green and yellow hold covers and a variety of bright green fittings (capstans, cleats, etc). One observation I will make at this point is that it seemed that whatever the final color of the part, Heller molded it in the opposite color. So, lots of parts that were going to be white were molded in black, gray or brown; lots of brown parts were molded in gray or black; etc. It’s just a nuisance – particularly with regard to the black parts that were going to become white - but it seemed a bit odd to me.
| RIGGING |
The
defining feature of most sailing ship models is their rigging, and the
Passat certainly has plenty of it. At the risk of bringing up a pile of
information many people won’t care about, a few words on nomenclature to
begin with. First, while everyone knows what a mast is, a full, square
rigged mast is typically made from 3 spars. From bottom to top the spars are
the lower mast, the topmast and the topgallant mast. The topmast sits on the
on the top, a platform where the lower mast and topmast are joined.
Similarly, the topgallant mast sits above the topmast and there is a
platform called the crosstrees at the junction (some ships also have a
separate ‘royal mast’ above the topgallant, but that is not the case with
Passat. The standing rigging exists to stabilize these structures. Forestays
run from the mast to the deck (or to the boom, the spar that protrudes from
the bow) towards the bow and keep the mast from falling toward the stern.
Shrouds run from the mast to the transom (for the lower mast) the top (for
the topmast) and the crosstrees (for the topgallant) and stabilize the mast
side to side. Finall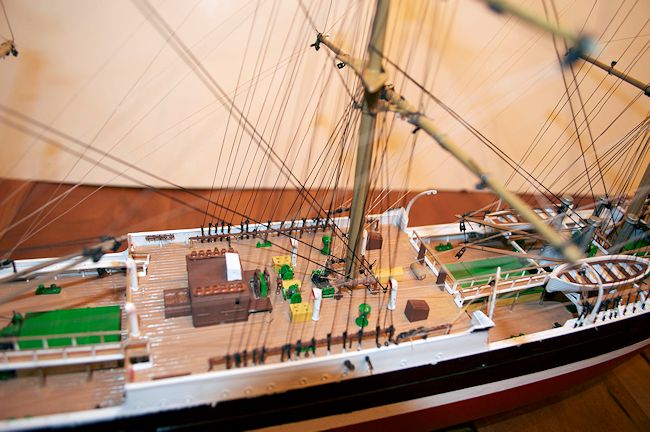 y,
backstays run to the transom (from all of the spars) and prevent the mast
from falling forward. On the masts are horizontal members called yards that
support the sails. From the bottom up they are the course yard, the lower
and upper topsail yards, the lower and upper topgallant yards and the royal
yard. The sails attached to each yard have the same name, i.e. the course
sail is attached to the course yard. You identify the relevant
mast/spar/sail by prepending the mast name (bow to stern): fore, main,
mizzen). Thus, the topmost yard on the third mast is the mizzen royal yard.
This model is designed to reproduce essentially all of the standing rigging.
y,
backstays run to the transom (from all of the spars) and prevent the mast
from falling forward. On the masts are horizontal members called yards that
support the sails. From the bottom up they are the course yard, the lower
and upper topsail yards, the lower and upper topgallant yards and the royal
yard. The sails attached to each yard have the same name, i.e. the course
sail is attached to the course yard. You identify the relevant
mast/spar/sail by prepending the mast name (bow to stern): fore, main,
mizzen). Thus, the topmost yard on the third mast is the mizzen royal yard.
This model is designed to reproduce essentially all of the standing rigging.
The standing rigging is concerned with keeping the masts structurally sound;
the running rigging is about moving the yards and sails around. There are
four major types of rigging for moving the yards around: halyards for
lifting yards into higher positions, downhauls for moving yards into lower
positions, topping lifts (which look like inverted V’s) to prevent the yards
from twisting in the vertical plane (i.e. to keep them perpendicular to the
mast) and braces, that are used to swing the yards from side to side so that
the ship can operate in different wind directions. The halyards and some of
the topping lifts are represented in the instructions. Maneuvering the sails
is the job of sheets and clew, tack, bunt and leech lines. These lines
attach to parts of the sail and are used to trim them or to assist in the
job of raising the sail to the yard above when not wanted or needed. The
Passat kit does not include instructions for most of the sail lines;
only the clew lines are represented. This isn’t necessarily a bad thing,
ships laid up without their sails often remove these lines (no sense
exposing sails or line to bad weather for an extended port visit), although
clew lines were apparently often left attached to the ends of the yards. I
should also point out that the instructions did not identify the lines shown
as clew lines, I am interpreting this from the way that the rigging diagrams
are set up.
The prior discussion covers the square rigged parts. The jigger is rigged
fore and aft, which is to say that the sails are in a plane with the long
axis of the ship. The Passat has a two spar jigger that has the same
type of standing rigging (forestays, shrouds and backstays) with three spars
oriented toward the long axis of the ship, from top to bottom, the boom and
two gaffs. Like the yards on the square sails, there are halyards to raise
the gaffs and topping lifts to help keep them from shifting vertically. The
sails mounted on these spars (again top to bottom are the lower spanker,
upper spanker and the gaff topsail.
 Because
of the way the sail is mounted there is less running rigging, primarily
sheets that move the boom and the gaffs from port to starboard. Most of this
rigging is represented in the model.
Because
of the way the sail is mounted there is less running rigging, primarily
sheets that move the boom and the gaffs from port to starboard. Most of this
rigging is represented in the model.
This brings me back to the instructions which were not, in my view, as good
as they could have been. The Revell 1:96 USS Constitution (another
ship I have built) has 40 pages of rigging instructions, breaking the job
down into a set of manageable size tasks that are clearly shown on a whole
series of diagrams. The Passat by contrast covers the entire rigging
process in three large, low quality pictures that clearly have errors.
Fortunately, I had rigged ships before; I can imagine that it would be much
more difficult without that prior experience.
Rigging begins during the construction of the ship itself; the instructions
(correctly in my view) recommend that you attach blocks to the masts and
yards before mounting them on the masts and attaching the masts to the hull
(although additional blocks need to be added during the rigging process). In
all, you put more than 200 blocks on the three square rigged masts and
yards. Most rigging instructions I have seen start with the shrouds,
ratlines and backstays, but these instructions recommend inverting the
process. Instead, they start with the 9 cranes that were used to load and
unload the holds, followed by the forestays, halyards, topping lifts and
braces. Given how much of the length of the ship’s transom was covered by
the shrouds and backstays, this seemed sensible and so I followed the
instructions. On the whole, the provided line (2 colors, 2 diameters each)
was pretty good, but I needed additional line (black, 0.012 and 0.018 inch
diameters) from Model Expo to finish the project. Next were what appear to
be the clew lines (although they were not so identified) and finally the
shrouds, backstays and ratlines.
The ratlines were supposed to have been manufactured using line (which is
not supplied) and a ‘machine’ supplied with the kit. The premise was that
you set up a series of horizontal and vertical threads, and then painted
them with glue to create the ratlines. This was (to say the least)
ineffective for me. I have heard of other complaints about the ratline maker
from Heller kits. After this failure, I simply rigged the shrouds without
the ratlines, using the larger diameter 0.018 inch thread I had purchased
from Model Expo. I may put the ratlines in sometime in the future (and I
will likely model the ship’s current arrangement of using 3 shrouds per mast
for the lower ratlines rather than the 5 shrouds that are shown in the
diagrams), but for now they are omitted. The Passat was built
recently enough that it uses metal turnbuckles rather than rope deadeyes, so
the backstays and shrouds were attached via a set of short, thin (but it
turned out surprisingly strong) plastic parts that had been installed in the
first steps.
Three additional observations on the rigging. First, I left off the
footropes on the yards. The masts were already very cluttered, and my
observation from the Revell Constitution was that even at 1:96 they
were very difficult to make convincing. Second, although I hadn’t planned on
using sails, I was surprised that they were not included. Interestingly,
although you put blocks on the yards for bunt lines, the instructions don’t
include any directions for putting the lines themse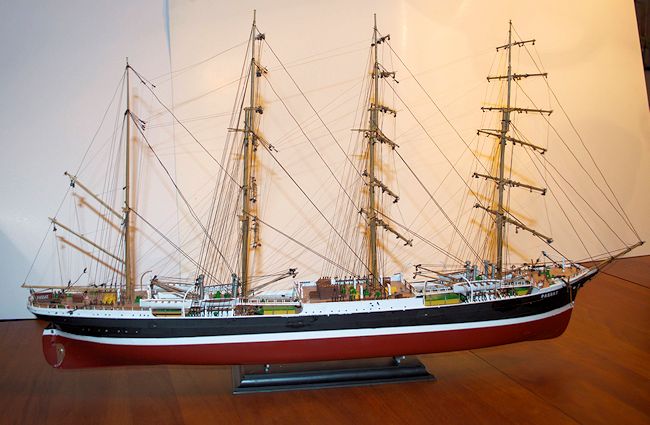 lves
onto the ship. It may be that this was done to give the yards a bit of
interest, while not cluttering things up worse than they are (and it is
cluttered, there are 106 shrouds and backstays and 54 braces, for example)
but it was still a bit odd that there were no instructions in case you
wanted to put the lines on. Finally, the instructions suggest some very
elaborate rigging for the 4 sets of 8 symmetric cranes. Although I rigged
the lines to raise and lower the cranes, I didn’t bother rigging the lines
that would have raised and lowered the lines attached to the end of the
cranes. The instructions were not very clear on how to rig them, and my
reading of the diagrams suggested it would be necessary to rig both cranes
in each pair to the same, very inaccessible mounting point, so I left it
off.
lves
onto the ship. It may be that this was done to give the yards a bit of
interest, while not cluttering things up worse than they are (and it is
cluttered, there are 106 shrouds and backstays and 54 braces, for example)
but it was still a bit odd that there were no instructions in case you
wanted to put the lines on. Finally, the instructions suggest some very
elaborate rigging for the 4 sets of 8 symmetric cranes. Although I rigged
the lines to raise and lower the cranes, I didn’t bother rigging the lines
that would have raised and lowered the lines attached to the end of the
cranes. The instructions were not very clear on how to rig them, and my
reading of the diagrams suggested it would be necessary to rig both cranes
in each pair to the same, very inaccessible mounting point, so I left it
off.
The final steps were rigging the boat winches (which were not in the
diagrams – I based the rigging on photos of the Cutty Sark) and
placing the boats and five decals at which point, you have an impressive
model 75 cm long and 40 cm tall.
| CONCLUSIONS |
At the end of the day, the kit produces a very nice model; it is large,
very detailed and looks to be fairly accurate to the real ship. With
regard to the latter, the Passat as a subject has many advantages
– the ship still exists, it is relatively new and made of steel, and so
hasn’t gone through the large numbers of reconstructions typical of
older wooden vessels. With all of that said, I would not recommend this
ship as a first large sailing ship model. The instructions are such a
mess (particularly with regard to the rigging) and the combination of
the large amounts of rigging, the detailed (but therefore cluttered),
multi-level decks and 1:150 scale mean that everything is packed in very
close and many of the line endpoints are fairly inaccessible. However,
if you have some rigging experience under your belt, this makes a
marvelous ship. I would have loved to have had this ship in 1:96 or
1:100 where I would have had just a little more room to move my tools as
I was working, although a 1:100 ship would be more than a 110 cm long
and make for complicated display.
| REFERENCES |
http://en.wikipedia.org/wiki/Passat_(ship)
http://en.wikipedia.org/wiki/Flying_P-Liner
http://en.wikipedia.org/wiki/F._Laeisz
http://sailing-ships.oktett.net/square-rigging.html
Pictures of the Passat in Tavemünde: http://www.skyscrapercity.com/showthread.php?p=81000940
December 2014
If you would like your product reviewed fairly and fairly quickly, please contact the editor or see other details in the Note to Contributors.