Revell 1/144 Fast Attack Craft Class 143A
| KIT #: | ? |
| PRICE: | 19,99 € |
| DECALS: | One option |
| REVIEWER: | Frank Spahr |
| NOTES: |
Additonally used: Saemann PE parts: Stanchions No. 3130 (5,90€) Ladders
No. 3004 (4,10€), shackles with screw No. 3080 (2,70€), eyes 2x2 mm No.
3071 (2,30€), L´Arsénal 350 53 Structural Parts Set 2 (7€) Build time @
150-200 hours. |
| HISTORY |
Germany is about to end her 90-year history of
operating Schnellboote
or Fast Attack Craft. The remaining units of the 143A class are about to be
decommissioned as new corvettes K 130 finally reach fleet acceptance. From small
beginnings in WW1, the
Schnellboote have developed into
very potent small warships, with the 143A´s the epitome of this development.
 In NATO,
Germany was tasked with denying the Soviet Fleet to leave the Baltic. To this
end, the Bundesmarine
(Federal navy, since our reunification
Deutsche Marine – German
navy) built and operated a succession of
Schnellboot classes with a
view to surprise attacks on enemy shipping. Earlier classes were an evolution of
WW2 designs and armed primarily with torpedoes and AA guns.
In NATO,
Germany was tasked with denying the Soviet Fleet to leave the Baltic. To this
end, the Bundesmarine
(Federal navy, since our reunification
Deutsche Marine – German
navy) built and operated a succession of
Schnellboot classes with a
view to surprise attacks on enemy shipping. Earlier classes were an evolution of
WW2 designs and armed primarily with torpedoes and AA guns.
The introduction of guided missiles seriously increased the punch the
vessels could pack, and the distance at which they could strike. The first
guided-missile boats, armed with the French Exocet, later to gain notoriety in
the Falklands war, were the class 148. They were succeeded by the class 143
which was built in two sub-groups: Apart from the four Exocets common to both,
143 was fitted with two of the standard 3 inch Oto Melara guns, plus two torpedo
tubes, whereas 143A received the
With Germany changing her policy to participate in international military operations, the 143A´s were deployed in areas and climates they were never designed for – operating off Lebanon and Djibouti in conditions seriously taxing the crew´s endurance. As the threat environment and required warship capabilities changed, the vessels lost their original mission and are hence being replaced by slower ships with a longer endurance. Nonetheless, these vessels have rendered an excellent service over the course of almost 30 years.
| THE KIT |
Revell has produced kits of the 143 and 143A class in the early 1990ies,
and after a hiatus, the latter kit has been re-issued in 2008. The kit is a very
faithful and credible reproduction of the well-documented vessels for the time
of its first issue.
 Modifications
applied to the vessels after that date need to be retrofitted, as they are not
included in the kit. The parts are well-molded, though not without some sink
marks. The plastic railings are oversized and could benefit from replacement. A
nice and comprehensive decal sheet is provided with some very useful stencils
and markings for all vessels of the class. Flags are provided printed on paper.
Revell´s typical clear multi-step instruction and their well-known paint
references to their own brands only complete the kit.
Modifications
applied to the vessels after that date need to be retrofitted, as they are not
included in the kit. The parts are well-molded, though not without some sink
marks. The plastic railings are oversized and could benefit from replacement. A
nice and comprehensive decal sheet is provided with some very useful stencils
and markings for all vessels of the class. Flags are provided printed on paper.
Revell´s typical clear multi-step instruction and their well-known paint
references to their own brands only complete the kit.
Getting the kit and planning the build
I was landed with this kit like the proverbial virgin with the child. A
friend of mine had persistently asked for someone to review the kit, and had met
less than lukewarm responses. Upon a meeting in Hamburg, he brought the kit and
placed it into my not really open but rather reluctant hands. Upon opening the
box and sifting through the sprues, I pretty soon developed a fondness for this
model, overcame my reluctance, agreed upon reviewing and even building it, even
on the fast lane and speeding past the several dozen unbuilt kits I have at any
given time.
Pawing the sprues, one of my friends exclaimed:
„Look here, they even have an Oscar!“ Hey, I´m a card-carrying landlubber, so I
was entirely clueless about what the name meant in this respect.
Oscar
turned out to be the name all the man-over-board-drill-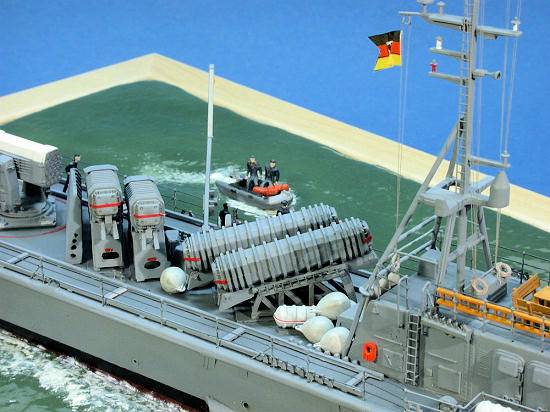 dummies
have in our navy, and he was present dangling from a mast bracing next to some
fenders. Not without sink marks and looking like a cross between a deep-diving
suit and a fighter robot from the 1950ies, but there he was, ready to be thrown
overboard and be retrieved by the crew. By the way: Later on I learned that the
Royal Navy uses the same name for their dummies, so I assume we adopted it from
them.
dummies
have in our navy, and he was present dangling from a mast bracing next to some
fenders. Not without sink marks and looking like a cross between a deep-diving
suit and a fighter robot from the 1950ies, but there he was, ready to be thrown
overboard and be retrieved by the crew. By the way: Later on I learned that the
Royal Navy uses the same name for their dummies, so I assume we adopted it from
them.
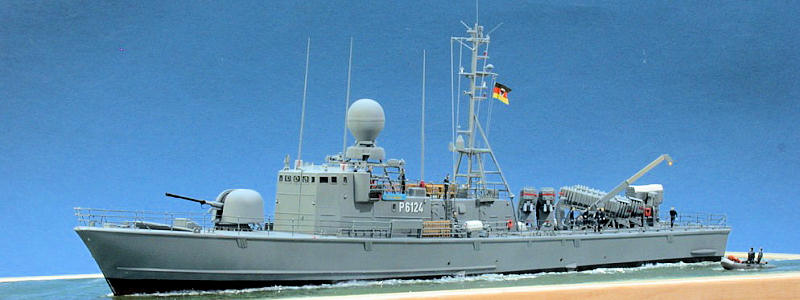
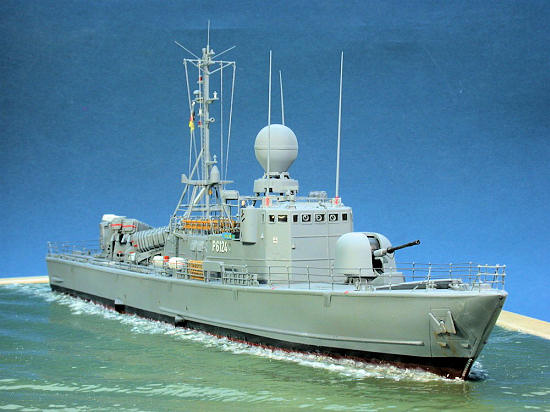
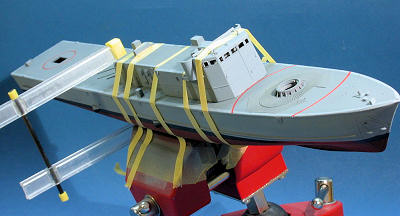
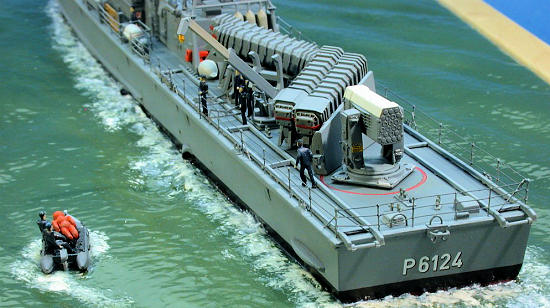
I almost immediately saw an oscar-themed diorama made from this kit, so I started reading and asking questions over the next weeks. On the one hand, I wanted to identify what improvements the kit needed, on the other I wanted to learn more about the drill Oscar was used for. Klaus Gaeth of www.schnellboot.net kindly provided images of an Oscar drill, thanks a lot for your help! My friend Guido Hopp had visited one of the vessels during an open ship and had taken a number of very helpful images which he provided to me – thank you, Guido! Olaf Rahardt´s volume on the 143´s „Schiffsprofile Nr. 11“ included a huge amount of useful information and was duly bought. As Guido had visited S 74 „Nerz“ ( German for mink) I decided to model this vessel. Luckily, „Nerz“ has a website with extensive image galleries which proved very useful to fill the gaps in my other references.
| CONSTRUCTION |
I started by assembling the entire hull including
the deck. Some putty was used but not overly much. I tend to prepare my
seascapes in this early stage as long as the hull is uncritical to handle. For
my diorama, I had decided to show the ship´s inflatable boat returning with
Oscar after picking him up. So the vessel herself would be slowing down and the
inflatable approaching her from port and astern. So I cut a piece of 30 mm foam
board (insulation board from the hardware supermarket) to fit into my standard
IKEA picture frame, and made a cutout for the hull. An old bread knife works
well for this task. Remaining
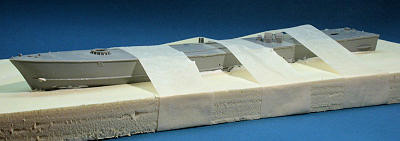 gaps were
filled with acrylic filler from the hardware supermarket.
For this step, the hull was
insulated using vaseline. A slight swell was produced by cutting and sanding the
foam board material. The disturbed water astern the vessel was enhanced by
carefully spraying paintbrush cleaner to the base – make sure you have good
ventilation and don´t overdo it, as the stuff eats into the base and melts it,
if used too copiously. The area for the inflatable was identified and prepared
by sanding and slight spraying of paintbrush cleaner.
gaps were
filled with acrylic filler from the hardware supermarket.
For this step, the hull was
insulated using vaseline. A slight swell was produced by cutting and sanding the
foam board material. The disturbed water astern the vessel was enhanced by
carefully spraying paintbrush cleaner to the base – make sure you have good
ventilation and don´t overdo it, as the stuff eats into the base and melts it,
if used too copiously. The area for the inflatable was identified and prepared
by sanding and slight spraying of paintbrush cleaner.
 Now
the base was painted with ordinary white wall paint, using a large brush in a
stippling motion. This seals the surface where needed and achieves the slightly
irregular surface crucial to the final water effect. After drying, Revell Aqua
Color #68 was sprayed to give the base the hue of the Baltic on an overcast day.
All the disturbed water was drybrushed with white paint. That fully dried, the
base received several coats of solvent-based clear gloss lacquer from a hardware
supermarket rattle can. This gives the right gloss and reflection to the base.
Any further wave effects were
achieved using layers of acrylic gel and white artist´s oil paint. Finally, the
base was ready to mount the 143A and the inflatable.
Now
the base was painted with ordinary white wall paint, using a large brush in a
stippling motion. This seals the surface where needed and achieves the slightly
irregular surface crucial to the final water effect. After drying, Revell Aqua
Color #68 was sprayed to give the base the hue of the Baltic on an overcast day.
All the disturbed water was drybrushed with white paint. That fully dried, the
base received several coats of solvent-based clear gloss lacquer from a hardware
supermarket rattle can. This gives the right gloss and reflection to the base.
Any further wave effects were
achieved using layers of acrylic gel and white artist´s oil paint. Finally, the
base was ready to mount the 143A and the inflatable.
Returning to the vessel, I sifted
through my references to find out what to change and what to detail. The size of
the model and the number of subassemblies eased parallel working on a number of
them.
I started by replacing the rather featureless
bases of the Exocet launchers, which originally are a sort of latticework
construction. To build these parts from styrene stock, I needed multiple parts
neatly cut in identical lengths and angles. To achieve this, I b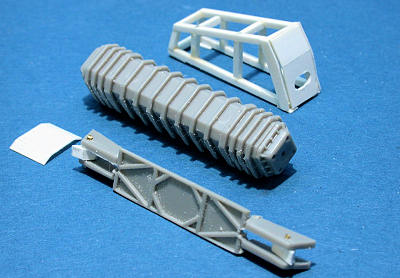 ought
„The Chopper II“ by NWSL, a very useful cutting tool. Thanks to Andreas Nickel
of
www.anfatman.de
for providing this (at the time)
hard to find tool. After removing the molded on bases and plating the holes in
the deck over, I built four of the bases from styrene, each of them comprising
about two dozen individual parts – quite a lot of work, but definitely worth it.
The missile canisters themselves
were further
ought
„The Chopper II“ by NWSL, a very useful cutting tool. Thanks to Andreas Nickel
of
www.anfatman.de
for providing this (at the time)
hard to find tool. After removing the molded on bases and plating the holes in
the deck over, I built four of the bases from styrene, each of them comprising
about two dozen individual parts – quite a lot of work, but definitely worth it.
The missile canisters themselves
were further
 detailed
as per reference images, adding their hinge mechanisms. The two aftermost
canisters received blast deflectors. Even though what I did is not entirely
correct, I feel it is an improvement over the kit parts. The
detailed
as per reference images, adding their hinge mechanisms. The two aftermost
canisters received blast deflectors. Even though what I did is not entirely
correct, I feel it is an improvement over the kit parts. The
The numerous molded-on fairleads did not look
sharp enough, so I replace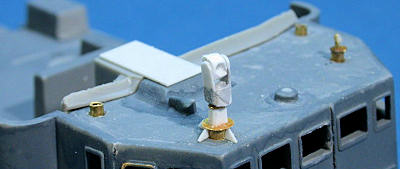 d
them by scratchbuilt items. The gun turret was built almost OOB – I added steps
leading to the access hatch and the handwheel to open the hatch. The latter was
taken from an old and OOP PE sheet by Scheuer & Strüver. The gun barrel was
carefully drilled open, and a wire
d
them by scratchbuilt items. The gun turret was built almost OOB – I added steps
leading to the access hatch and the handwheel to open the hatch. The latter was
taken from an old and OOP PE sheet by Scheuer & Strüver. The gun barrel was
carefully drilled open, and a wire
 was added
to it.
was added
to it.
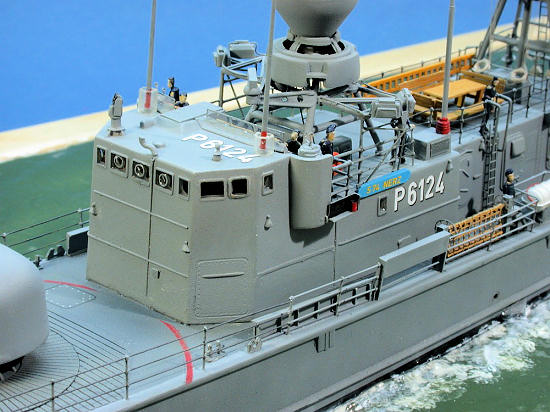
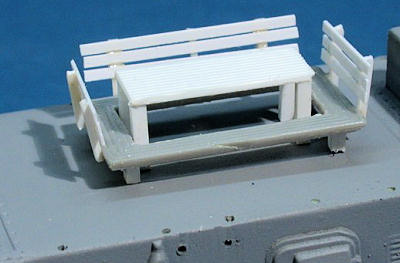
The superstructure was prepared as a subassembly to ease painting. It
needed some filling and sanding, plus some modifications per reference images.
The molded on vertical ladders were removed and replaced by PE items. The picnic
bench was detailed using styrene stock.
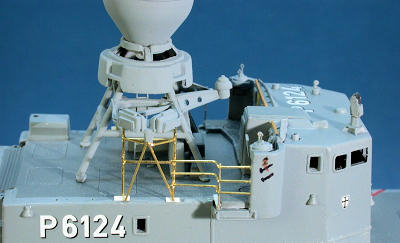
The most notable addition to the superstructure was the infrared
sighting system MSP 500 which was scratchbuilt using PE and styrene stock.
At the bridge front, the blast pipe of the pre-wetting system was added
using soldering wire. The bases for the rather massive antennas were also added.
| COLORS & MARKINGS |
Now came the time of painting the model. Acrylics were used throughout
the build. After discussing the scheme with a naval officer friend of mine I
settled for Revell 57 for the vertical and 79 for the horizontal surfaces. I
rather masked and sprayed the boot
 topping
with
Revell
9 than tried using the kit decals. The lower hull was sprayed Revell 37. I
relied upon reference images for the paint demarcations, especially on the
superstructure. I had wanted to engrave
topping
with
Revell
9 than tried using the kit decals. The lower hull was sprayed Revell 37. I
relied upon reference images for the paint demarcations, especially on the
superstructure. I had wanted to engrave
 the red
warning circles to the deck, but ended up with cutting masks and spraying them.
the red
warning circles to the deck, but ended up with cutting masks and spraying them.
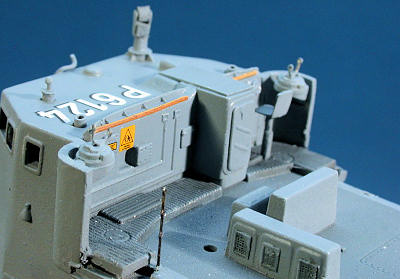
When it came to „marrying“ the superstructure to the hull, I ran into
trouble. Despite all the dryfitting and removal of interfering locator pins I
had done, it wouldn´t fit. So I had to apply serious pressure and still ended up
with annoying gaps to fill. Having completed that, I further detailed the
superstructure. Some boxes for firefighting equipment were added, with the
typical labels designed and printed to size. I also added a „bridge-art“ I had
seen in some reference images, a mink riding two missiles. I have no idea about
the correct timeframe for that, but I liked it and included it anyway. As in any
project, there was a time when I thought I´d never get through cleaning up and
painting all the small parts I had yet to add, especially as more of them popped
up when looking through my references. So I added a bitt and another pre-wetting
blast pipe with its protectiv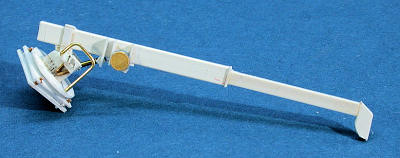 e
wire frame to the stern. Now came another visible addition, the boat crane for
the inflatable boat. It was built per reference images using styrene stock and
generic PE. L´Arsénal´s „Structural Parts“ were again most helpful here.
e
wire frame to the stern. Now came another visible addition, the boat crane for
the inflatable boat. It was built per reference images using styrene stock and
generic PE. L´Arsénal´s „Structural Parts“ were again most helpful here.
The open bridge received a wooden railing quite visible in the references, plus
„optics“ for the sighting instruments in the bridge wings. As mentioned before,
the kit decals are very nice and helpful, they also contain some stencils for
the bridge and some for the
| FINAL CONSTRUCTION |
The original masts are very intricate and complex designs. The more I
looked at the references, the more I realized I would only be able to hint at
their complexity. So they were detailed moderately using styrene and wire to
improve the overall look. On the main
 mast, some
antennas and a signal yard with PE eyes were added, and the plastic ladder was
replaced by PE. Having completed the radar mast, it was glued to the model and I
was able to begin with the railings.
mast, some
antennas and a signal yard with PE eyes were added, and the plastic ladder was
replaced by PE. Having completed the radar mast, it was glued to the model and I
was able to begin with the railings.
To replace the oversize kit railings, I had bought PE stanchions of the required
height and number of holes for the bars.
www.saemann.de
has very useful PE parts for projects like this, highly recommended. Following
the principle of working from the centreline of the model to the periphery, I
started on the superstructure railings. Stanchion positions were identified and
drilled, and the stanchions were then superglued. The vessel has both sections
of railing with sturdy steel tubing and e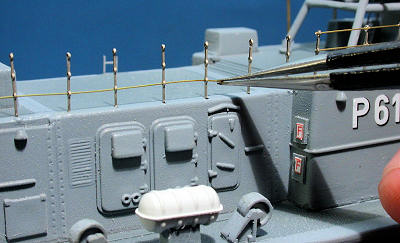 asily
removable sections of railing with wire. Both sorts are present on the
superstructure. As the holes in the stanchions are .3 mm in diameter, I had
planned to use .2 mm brass wire for the wire sections. That worked fine and
looked to scale even when painted. The larger diameter sections were
individually cut and glued between the stanchions using .5 mm wire. That proved
to be a lot of work, but looked convincing, too. Inclined bracings were
added from .3 mm brass wire. This wire was also used on the trickiest parts of
the railings, those surrounding the life raft canisters on the main
asily
removable sections of railing with wire. Both sorts are present on the
superstructure. As the holes in the stanchions are .3 mm in diameter, I had
planned to use .2 mm brass wire for the wire sections. That worked fine and
looked to scale even when painted. The larger diameter sections were
individually cut and glued between the stanchions using .5 mm wire. That proved
to be a lot of work, but looked convincing, too. Inclined bracings were
added from .3 mm brass wire. This wire was also used on the trickiest parts of
the railings, those surrounding the life raft canisters on the main
 deck.
Here, I carefully enlarged the holes in the stanchions to accept the stronger
wire, and then bent three hopefully identical wire sections to shape. These were
carefully threaded on the required number of stanchions, and the whole wibbly-wobbly
assembly then glued into the pre-drilled holes in the deck. Once glued,
the railing was very sturdy throughout the ship. Right ahead from this part of
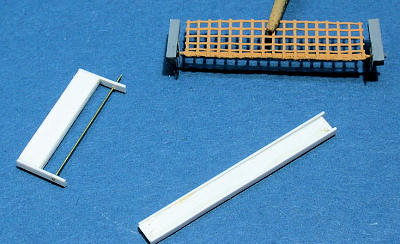
the railing, three items had to be scratchbuilt on both sides of the vessel – a
gangplank, a scrambling net and a box of - to me - unidentified purpose, in
short a BOUP.
My stock of
styrene, PE and wire helped a lot, and surplus material from a screen door was
well suited for the net. Building the rest of the railing was time-consuming,
yet not hard. I was pretty happy with the result in all its brass glory. Brush
painting the entire assembly proved to be tedious and I needed several
correction runs befo
deck.
Here, I carefully enlarged the holes in the stanchions to accept the stronger
wire, and then bent three hopefully identical wire sections to shape. These were
carefully threaded on the required number of stanchions, and the whole wibbly-wobbly
assembly then glued into the pre-drilled holes in the deck. Once glued,
the railing was very sturdy throughout the ship. Right ahead from this part of
the railing, three items had to be scratchbuilt on both sides of the vessel – a
gangplank, a scrambling net and a box of - to me - unidentified purpose, in
short a BOUP.
My stock of
styrene, PE and wire helped a lot, and surplus material from a screen door was
well suited for the net. Building the rest of the railing was time-consuming,
yet not hard. I was pretty happy with the result in all its brass glory. Brush
painting the entire assembly proved to be tedious and I needed several
correction runs befo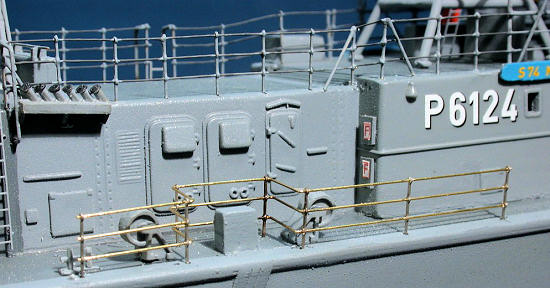 re
the paint covered all the brass. Using a darker shade for the wire railings, I
got pretty close to the look of the real thing and have to say this is the best
looking railing I have built so far – in my eyes, obviously.
re
the paint covered all the brass. Using a darker shade for the wire railings, I
got pretty close to the look of the real thing and have to say this is the best
looking railing I have built so far – in my eyes, obviously.
Having come so far, I added the remaining mast and the bridge roof antennas. For
the latter, turned brass items from BMK for masts were used. The transparent
plastic casings were simulated using the clear protective plastic from new
paintbrushs.
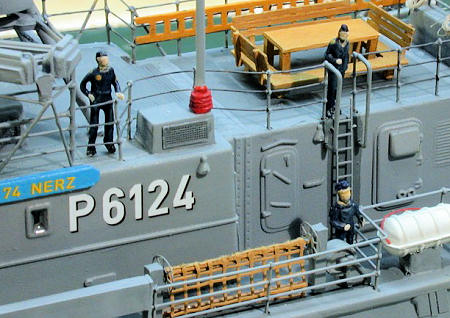
Crewing the ship
A ship in a diorama needs a crew – so I had to find about a dozen crew
figures visible on deck and aboard the inflatable. I had once bought a large bag
of spectacularly ugly and garishly painted N-scale figure which I use for
conversions like this. They were modified and repainted for enlistment in
Germany´s navy. Care was taken to let all of them do something that was credible
in the situation depicted. Having glued the figures to the model, I added some
minimal rigging in the shape of signal lines. Tan flyfishing thread was used.
Havign brought everything together now, the model was sprayed with Vallejo
ModelAir´s excellent matt varnish to blend things in and hide embarassing glue
marks. The model was weathered only minimally, as German navy vessels tend to be
very well-kept. I just added some slight traces of rust on and below
 the
anchor.
the
anchor.
Prior to gluing the model to the diorama, the last task was to add the bridge
glazing. Here, MicroScale´s Kristal Klear was used – a transparent white glue
which is superior to our German white glue brands. The final touch was to add
centrifugal disks to the three middle bridge windows. They are included in
Revell´s decal sheet, but I didn´t like the option, so I made my own versions
from sections of brass tubing and PE oars. These were glued and sprayed, and
inserted (with bated breath, obviously) into the fresh Kristal Klear, hoping
that the glue´s surface tension would suffice to hold them in place. The result
looks worth the effort to me.
That cured, the vessel was glued to the base using dabs of silicone caulking
applied from below. Any remaining gaps were filled with acrylic gel.
| CONCLUSIONS |
 Despite
some fit issues, this is an excellent kit of an attractive vessel the rendered
services her designers never would have imagined. It is well detailed from the
outset, and its large scale and the abundant references ease improving it a lot.
No matter whether you build the kit OOB of however detailed, I can but highly
recommend it to you!
Despite
some fit issues, this is an excellent kit of an attractive vessel the rendered
services her designers never would have imagined. It is well detailed from the
outset, and its large scale and the abundant references ease improving it a lot.
No matter whether you build the kit OOB of however detailed, I can but highly
recommend it to you!
Technical data (Rahardt): Displacement 397,5t; Length 57,52 m; Beam 7,76 m;
Draught 2,19 m; Propulsion: 4 x MTU Turbodiesel @ 4,000 hp, four shafts; Maximum
speed 42 kn; Range @ 33 kn 658 nm; Armament: 1 x OTO-Melara 76 mm 78 L/62 / 4 x
Exocet MM 38 SSM / 1 x
| REFERENCES |
-
Olaf Rahardt: Schiff Profile Nr. 11: Schnellboote Klasse 143 / 143 A;
Stengelheim 2006.
-
Website of Schnellboot S 74 Nerz:
www.s74-nerz.de
January 2011
If you would like your product reviewed fairly and quickly, please contact me or see other details in the Note to Contributors.