Trumpeter 1/350 Prinz Eugen
|
KIT #: |
5313 |
|
PRICE: |
$139.95 SRP |
|
DECALS: |
One option |
|
REVIEWER: |
Tom Cleaver |
|
NOTES: |
|
Named for Prince Eugen of
Savoy,
the heavy cruiser “Prinz Eugen” was the last of the “Admiral Hipper” class, and
was launched on
August 22, 1938.
The ship was part of an ambitious shipbuilding program that began in 1936
when
Great Britain
negotiated a new naval treaty with
Germany.
The Anglo‑German Naval Agreement allowed German naval strength to grow to
35% of that of the Royal Navy, each class of ship being considered separately.
This agreement effectively allowed
Germany
to create a new “High Seas Fleet” that could challenge the Royal Navy in the
North Sea
and would be ready for service by 1944.
With Hitler’s decision to go to war in 1939 rather than waiting till
1944, “Prinz Eugen” was commissioned
August 1, 1940
into a fleet that was unprepared for war, which faced a vastly superior enemy.
 Operation
Rheinübung:
Operation
Rheinübung:
Following the successes achieved by the raiding sorties of the cruiser
“Admiral Hipper” and that of the battle cruisers “Scharnhorst” and “Gneisenau”
that had greatly disrupted trans-Atlantic convoys during the winter of
1940‑1941, Admiral Erich Raeder decided to launch a more ambitious operation,
Operation Rheinübung. As
originally set, a powerful battle group composed of the battleships “Bismarck,”
and “Tirpitz,” with “Scharnhorst” and “Gneisenau” would be sent into the
Atlantic
to attack Allied merchant shipping.
“Scharnhorst” and “Gneisenau” were in
Brest,
having just completed a successful two-month cruise, Operation Berlin,
under the command of Admiral Günther Lütjens, during which they sank or captured
22 ships with a total tonnage of 116,000 tons.
As the plans were being drawn up, “Scharnhorst” entered dry dock to
undergo machinery repairs which made her unavailable until June. “Bismarck” was
finishing her sea trials, but “Tirpitz,” which had only been commissioned on
February 25, had not completed trials, and would not be available until
later in the year.
In light of the situation, Admiral Raeder decided that “Bismarck” and the
heavy cruiser “Prinz Eugen” would sortie into the
North Atlantic
in late April under the command of Admiral Lütjens, where they would be joined
at sea by the “Gneisenau.” However,
on April 6, “Gneisenau” was struck in the stern by torpedo dropped by a Beaufort
of 22 Squadron, which damaged her sufficiently to force her into dry dock for
repairs. Once in dry dock, she was
hit on the night of 10/11 April by four aerial bombs, which extended the repair
work into the late summer. Thus,
the German task force was reduced to “Bismarck” and “Prinz Eugen,” the only
warships available to attack enemy merchant shipping that spring.
As she sortied to join
Bismarck
in late April, “Prinz Eugen” was struck by a mine on
April 23, 1941,
which delayed the operation until she could join “Bismarck”
on May 18.
 While some in the Naval high command counseled a delay until the fall of
1941, when the full force would be ready and would have the additional benefit
of longer nights during which to break out into the North Atlantic, the Germans
were also concerned that the United States could enter the war at any time,
which would make such a mission far more difficult.
Thus, the decision was made for the “Bismarck”
and “Prinz Eugen” to depart Gotenhafen, transit the Skaggerak and disappear into
the
North Atlantic,
where they would refuel from the tanker “Weissenberg” and then enter the western
North Atlantic
through the
Denmark Strait
where they would commence attacks against British shipping.
While some in the Naval high command counseled a delay until the fall of
1941, when the full force would be ready and would have the additional benefit
of longer nights during which to break out into the North Atlantic, the Germans
were also concerned that the United States could enter the war at any time,
which would make such a mission far more difficult.
Thus, the decision was made for the “Bismarck”
and “Prinz Eugen” to depart Gotenhafen, transit the Skaggerak and disappear into
the
North Atlantic,
where they would refuel from the tanker “Weissenberg” and then enter the western
North Atlantic
through the
Denmark Strait
where they would commence attacks against British shipping.
Sink the
Bismarck!
In May 1941,
Britain
stood alone against Nazi
Germany.
In early May, the British noted an increase in German recon flights
between
Greenland
and
Jan Mayen Island.
It was feared these were the first moves to ascertain favorable
conditions for a breakout by “Bismarck.”
On May 14, Home Fleet commander Admiral John Tovey received a report from the
British Flag Officer in
Iceland,
that the Germans were most likely planning for an Atlantic breakout by “Bismarck.”
“Bismarck” and “Prinz Eugen” were discovered by the Swedish cruiser “Gotland”
while transiting the Skaggerak May 20.
As a result, the ships put into
Bergen
on May 21 to await bad weather, where their presence was reported by the Swedes
and the Norwegian underground.
Admiral Tovey ordered the cruisers “Suffolk” and Norfolk” to patrol the
Denmark Strait in anticipation of a German break out in a similar manner to what
had been done in Operation Berlin.
That night he ordered the battle cruiser H.M.S. “Hood,”commanded by
Captain Ralph Kerr and flying the flag of VADM Lancelot E. Holland, Commander
Battle Cruiser Squadron and Second-in-Command of the Home Fleet, and the new
battleship “Prince of Wales,” to sail for Hvalfjord with the destroyers
“Electra,” “Anthony,” “Echo,” “Icarus,” “Achates,” and “Antelope,” where they
would meet the two cruisers. The
two capital ships and their four accompanying destroyers departed
Scapa Flow
at 0100 on May 22.
The Royal Navy needed to know if the Germans were still in
Bergen.
A daring maximum-range mission in appalling weather was flown by a Fleet
Air Arm Martin Maryland that was normally used as a target tug on May 22.
The crew reported the Germans were gone.
The chase was on.
Tovey ordered Admiral Holland to forego refueling and enter the
Denmark Strait
directly while the Home Fleet sortied from
 Scapa Flow.
As the weather worsened on the night of May 22, the German battle group
headed north, with three destroyers in the lead and the “Prinz Eugen” bringing
up the rear. At 0420 on May 23, the destroyers were ordered to return to
Trondheim,
while “Bismarck” and “Prinz Eugen” maintained their northward course at 24
knots. At 1237 there was a submarine and air alarm.
When this ended, the colorful tops of the main and secondary turrets were
painted grey, and the swastikas on the decks were covered with canvas. With this
finished, the ships group set a
northwest course to the
Denmark Strait.
The day was cloudy and the fog was
so thick that “Bismarck” and “Prinz Eugen” had to switch on their searchlights
from time to time in order to maintain contact and keep position. At 1811, ships
were reported sighted to starboard, but it was soon realized these were actually
icebergs. Having reached the ice
limit, the battle group set a course of 240 degrees.
At approximately 1915, Able Seaman Newell, the starboard after look out
aboard “Suffolk,”
saw the Germans through the gloom of a snowstorm.
Contact!
The cruisers shadowed the Germans and reported contact, though “Norfolk”
was driven off by several salvos from “Bismarck”
when she got too close.
When he received this report, Admiral Holland ordered battle stations and
prepared to meet the Germans any time after 0200 on Mary 24, 1941. “Hood” and
“Prince of Wales” increased speed to 29 knots as they headed for the
interception. Their destroyers fell
behind, unable to keep up in the
North Atlantic
gales.
Aboard “Bismarck,”
the forward radar had been disabled by the blast of the forward turrets. Admiral
Lütjens ordered “Bismarck”
to exchange position with “Prinz Eugen” since her radar was intact.
The powerful armament of “Bismarck”
kept the British cruisers from coming closer. This change would produce great
confusion for the British the next morning, since the last report had been sent
from “Suffolk”
before this change.
At 2300, “Suffolk”
lost contact with “Bismarck”
when the British thought the battleship
had reversed course and was heading towards them.
“Suffolk”
changed course, but when they realized “Bismarck”
had not done so and returned to the original bearing, the Germans had
disappeared in the snowstorm. “Suffolk”
found it impossible to keep radar contact in the circumstances.
Aboard “Hood,” Admiral Holland received the news. With no definite
position for the Germans, he ordered the crews to relaxed action stations and
reduced speed to 25 knots, while changing course to the north to cover any
possible reversal by the Germans. At 0247, “Suffolk”
regained contact. Her report placed
the Germans 35 miles north-west of “Hood” and “Prince of Wales.”
Holland
changed course for the interception and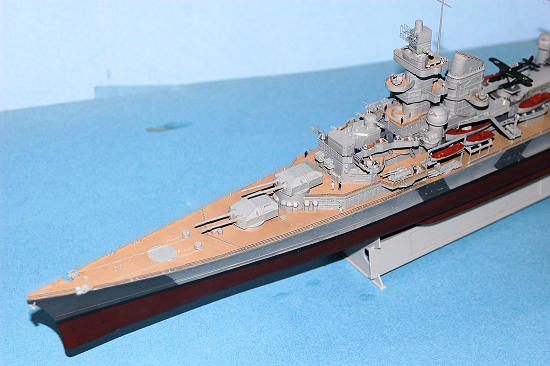 ordered speed increased to 28 knots.
At 0510, Admiral Holland ordered, "Prepare for instant action" and the
crews of both ships went to battle stations. At 0535, lookouts in “Prince of
Wales” sighted smoke and mast tops at a range of 38,000 yards, 18 nautical
miles. At 0537 they were confirmed as “Bismark” and “Prinz Eugen.”. “Prince of
Wales” reported the contact at 0537: "Emergency to Admiralty and C in C Home
Fleet. One battleship and one heavy cruiser, bearing 335, distance 17 miles. My
position 63-20 North, 31-50 West. My course 240. Speed 28 knots".
At 0537,
Holland
ordered his ships to turn 40º starboard together, which placed the enemy fine
off their starboard bows. The British ships rushed toward the enemy at 29 knots,
with “Prince of Wales” 800 yards off the starboard quarter of “Hood.”
Approaching thus, the rear turrets of both British ships were masked, halving
their firepower.
The Germans had been aware of the approaching British ships through use
of their hydrophones. They expected
cruisers and were unaware of what they were up against at first.
At 0537 the Germans sighted what they thought was a light cruiser at
about 19 miles on their port side. At 0543, another unidentified ship was
sighted to port, and thereafter the alarm was given aboard “Bismarck” and “Prinz
Eugen.” The identification of the
enemy ships was uncertain, with both now mistakenly thought to be heavy
cruisers. Identifying the enemy was vital in order to choose the right shells.
When lookouts identified the fighting top of “Hood,” a wave of fear went through
“Bismarck.”
As one survivor later recalled, “HMS Hood had been the terror of our war
games.” “Bismarck” and “Prinz Eugen”
went to battle stations at 0545.
Knowing that “Hood” could not withstand plunging fire, Admiral Holland’s
plan was to close the range quickly, then turn at short range to bring his full
armament to bear, keeping his ships in close formation for gunnery
concentration. Heavy sea spray posed a problem for his optical directors; the
Germans were able to utilize their full armament while their superior optical
equipment suffered less from wind and sea spray, since the wind was on their
disengaged sides.
At 0550, Admiral Holland ordered “Hood” and “Prince of Wales” to both
engage the lead German ship which was presumed to be “Bismarck,”
though it was “Prinz Eugen.” Aboard “Prince of Wales” the mistake was corrected
quickly. The initial misidentification came from the fact the German ships had
similar silhouettes and were nearly indistinguishable at battle ranges and
because of the last report by “Suffolk,”
which put “Bismarck”
in the lead.
At 0552, range was 25,000 yards and the British turned 20º toward the
enemy. Action commenced when “Hood” fired her first salvo. Half a minute later,
“Prince of Wales” followed suit. Hood’s first salvo fell near “Prinz Eugen” but
did not actually hit. The opening salvo from “Prince of Wales” was observed to
be at least 1,500 yards over and to the right/aft of “Bismarck.”
“Hood” continued to fire on “Prinz Eugen” while “Prince of Wales” engaged “Bismarck.”
At 0555 Captain Lindemann
gained permission to open fire from Admiral Lütjens. “Prinz Eugen” shot first,
followed by “Bismarck.”
Both concentrated their fire on “Hood.” The first “Bismarck”
salvo fell in front and slightly to starboard of “Hood.”
The second fell between “Hood” and “Prince of Wales” while the third
appeared to straddle “Hood.” “Prinz Eugen” fired three salvoes, one of which
straddled “Hood” at the same time the third “Bismarck”
salvo fell. Either one 15 inch shell from “Bismarck”
or one or more 8 inch high explosive shells from “Prinz Eugen” struck Hood near
the base of the main mast on the port side of the shelter deck. Most likely this
was from “Prinz Eugen,” given that a hit by “Bismarck”
would have caused more damage.
 This started a fire that spread across the shelter deck to port of the
main mast and aft superstructure. It reached the
ready-use ammunition lockers and the ammunition began “cooking off.” The
shelter deck was hellish as 4 inch shells and 7 inch Unrotated Projectile rocket
mines began detonating. Those who could not take cover were killed or wounded in
the storm of fire.
This started a fire that spread across the shelter deck to port of the
main mast and aft superstructure. It reached the
ready-use ammunition lockers and the ammunition began “cooking off.” The
shelter deck was hellish as 4 inch shells and 7 inch Unrotated Projectile rocket
mines began detonating. Those who could not take cover were killed or wounded in
the storm of fire.
Believing he was out of the danger zone for plunging fire, Admiral
Holland ordered another 20 turn to port which allowed the rear turrets to fire.
One or more of the rear turrets on “Hood” did open fire.
Admiral Holland then ordered another 20 turn to port, which was executed
between 0559-0600, to bring his ships broadside-on to their opponents.
At this moment, “Hood” was dealt her death blow.
The fifth salvo from “Bismarck” straddled, with one or two shells
striking “Hood” around the main mast, through a narrow weak zone in her side.
Aboard “Prince of Wales,” Captain Leach saw Hood: "...at the moment when a salvo
arrived and it appeared to be across the ship somewhere about the mainmast. In
that salvo there were, I think, two shots short and one over, but it may have
been the other way round. But I formed the impression at the time that something
had arrived on board Hood in a position just before the mainmast and slightly
starboard. It was not a very definite impression that I had, but it was
sufficiently definite to make me look at Hood for a further period. In fact I
wondered what the result was going to be, and between one and two seconds after
I formed that impression, an explosion took place in the Hood, which appeared to
me to come from very much the same position in the ship. There was a very fierce
upward rush of flame the shape of a funnel, rather a thin funnel, and almost
instantaneously the ship was enveloped in smoke from one end to the other."
In fact, the after magazine had blown up.
Those on “Prince of Wales,” “Norfolk” and “Suffolk,” as well as their
German adversaries on “Bismarck” and “Prinz Eugen,” could not believe their
eyes: the “Mighty Hood,” most famous of warships, had just been devastated. It
was unfathomable to all. The ship - from just before the main mast aft to "Y"
turret - was laid waste.
In moments, the remains of the stern swung vertical and quickly sank.
The bow swung high in the air at an angle between 45º and vertical and
pivoted as it sank. According to the Germans, as the bow rose, Hood’s forward
turrets fired one last salvo. If this is true, it was likely from a short or
mechanical failure.
The “Hood,” the most famous British battleship, symbol of the dominance
of the Royal Navy, was gone. From a
crew of 1,418 men, only Midshipman William Dundas, Able Seaman Robert Tilburn
and Signalman Ted Briggs survived.
After “Hood” blew up, “Bismarck”
turned to starboard and concentrated fire on “Prince of Wales,” which had
altered her course to avoid the wreck of the Hood, which placed her between the
sinking “Hood” and the Germans, who were presented with an easy target switch.
At 0602, “Bismarck”
hit “Prince of Wales” in the bridge, killing everyone except her Captain, John
Leach, and another man. The distance decreased to 15,310 yards, and Prinz Eugen
brought her 10.5cm heavy anti‑aircraft battery into action. “Prince of Wales”
was at a disadvantage, and at 0603 launched a smoke screen and retreated after
being hit four times by “Bismarck” and three times by “Prinz Eugen.” “Prince of
Wales” fired three more salvoes with "Y" turret under local control as she
retreated, but obtained no hits. At 0609 the Germans fired their last salvo and
the battle ended. The British were amazed that the German ships maintained
course rather than following “Prince of Wales” and finishing her off.
“Prinz Eugen” was not hit during the battle, though some shells from
“Hood” landed close in the opening phase of the engagement. However, “Bismarck”
had been hit on the port side by three heavy shells probably from “Prince of
Wales.” As a result of these hits,
1,000 tons of salt water got into the forecastle, which blocked several hundred
tons of fuel oil in the lower
 tanks.
As a result, the top speed of “Bismarck”
was reduced to 28 knots and the battleship was 3 degrees down by the bow with a
9 degree list to port, which brought tips of the starboard propeller out of the
water at times. The starboard void tanks were flooded to reduce the bow trim and
list. While the damage was not serious, the loss of fuel was to affect the
remaining course of action.
tanks.
As a result, the top speed of “Bismarck”
was reduced to 28 knots and the battleship was 3 degrees down by the bow with a
9 degree list to port, which brought tips of the starboard propeller out of the
water at times. The starboard void tanks were flooded to reduce the bow trim and
list. While the damage was not serious, the loss of fuel was to affect the
remaining course of action.
At this point, Admiral Lütjens had two main options. The first was to
return to
Norway
and the second to carry on into the
North Atlantic.
He chose to push on, detaching “Prinz Eugen” for commerce raiding, while
“Bismarck”
would turn toward
France
where she could link up with “Scharnhorst” and “Gneisenau” for further Atlantic
operations once repairs were made.
At 0950, Captain Brinkmann aboard “Prinz Eugen” was informed of the
damage received by “Bismarck.”
At 1100, after surveying “Bismarck”
for fuel loss, “Prinz Eugen” resumed
position in front. They were
pursued by three British ships, now under command of Rear‑Admiral Wake‑Walker: “Suffolk”
from the starboard quarter, and “Norfolk”
with “Prince of Wales” from the port quarter. At 1240 “Bismarck” and “Prinz
Eugen” set a new course of due south at 24 knots.
At 1420, Admiral Lütjens signaled Captain Brinkmann that in a coming rain
squall “Bismarck”
would turn west while “Prinz Eugen” would maintain course south for three hours
before commencing independent operations.
At 1540, the Germans entered a rain squall, and the execution order
"Hood" was given. “Bismarck”
turned to starboard at 28 knots, however “Suffolk”
was shadowing very close from the starboard quarter and the maneuver failed. At
1600 “Bismarck”
resumed position astern of “Prinz Eugen.” At 1814, “Bismarck”
turned to starboard at high speed again. This time the maneuver was successful.
“Prinz Eugen” maintained course and left formation.
“Bismarck”
was left alone to face her fate.
On May 26, “Prinz Eugen” refueled from the supply ship “Spichern.”
She patrolled the Atlantic sea lanes until May 29, during which time no
ships were sighted. On May 229, “Prinz
Eugen” suffered damage to her engines and was forced to turn for
Brest,
where she arrived on
June 1, 1941.
Operation Rheinübung was over.
While Prinz Eugen would participate in the famous “Channel Dash” the
following February, she took no more active role in the war until the Spring of
1945, when she provided covering fire for the evacuation of German forces from
the Baltic States in the fall of 1944, and the evacuation of East Prussia from
Danzig in February and March 1945.
On
May 8, 1945,
“Prinz Eugen” surrendered in
Copenhagen.
After the war, she was turned over to the
United States,
where she was used as a target in the
Bikini
underwater atomic tests in 1945.
After surviving two atomic bombs, the ship stranded and sank at Enubuh on
December 22, 1946.
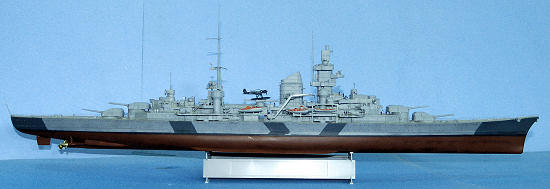
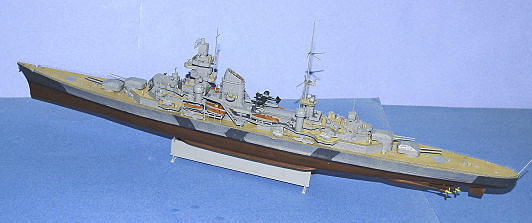
This is the first kit of “Prinz Eugen” in 1/350 scale.
The kit is fully state of the art in terms of molding and detail, and
marks Trumpeter as being now the leading mainstream manufacturer of ship kits.
Fit is closer to perfect than any other Trumpeter ship model I have
worked with. The kit also provides several sheets of photo-etch railing.
While it is done in the 1945 configuration, this is primarily the
addition of more 20mm anti-aircraft weapons.
As is now standard, the hull is divided at the waterline, allowing the
modeler the choice of a waterline or full hull model.
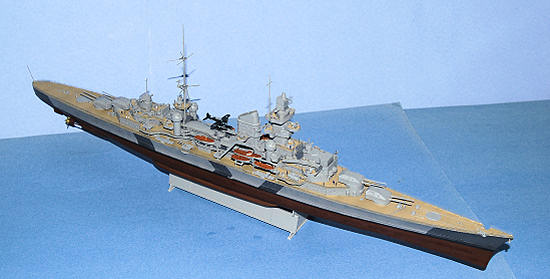
 I wanted to do “Prinz Eugen” as she appeared during
Operation Rheinübung in May 1941.
According to a post by a modeler at The Ship Model Forum, one has to
do the following to create a 1941 “Prinz Eugen”:
I wanted to do “Prinz Eugen” as she appeared during
Operation Rheinübung in May 1941.
According to a post by a modeler at The Ship Model Forum, one has to
do the following to create a 1941 “Prinz Eugen”:
The two forward high-angle AA-directors lack their domed tops, which were
handed over to the Russians. In place of the domed tops, ordinary
3m-rangefinders were installed.
The AA platform in front of the conning tower, directly above the
Admiral's Bridge, had a surrounding solid bulwark from
Brest
on, whereas the earlier version just featured a railing and a searchlight
instead of the Flakvierling.
The AA platforms on either side of the funnel were searchlight platforms.
The four triple torpedo launchers did not feature the anti-spray cupola.
The additional deckhouse beneath the searchlight platform of the main
mast needs to be removed.
Aft of this additional deckhouse, between the main mast and the aft
rangefinder/gun director base, there are a few changes in the layout of the
bulwarks.
For the 1941 project, one also needs to remove the 20mm anti-aircraft
armament. This involved filling
holes in the decks, which I did using Evergreen rod.
For my project, my limited supply of spare parts for ships precluded my
coming up with the earlier rangefinders, so I left the forward high-angle
AA-directors alone. I also left the
AA platform above the Admiral’s bridge alone.
As for the deckhouse below the mainmast, I left that alone. And made no
attempt at changing the aft layout since I couldn’t find sufficient information
to accomplish this. Since I know
that White Ensign Models is developing a photo-etch set for this kit, I expect
it will be possible in the future to modify the kit to a more accurate 1941
standard, which I plan to do when possible.
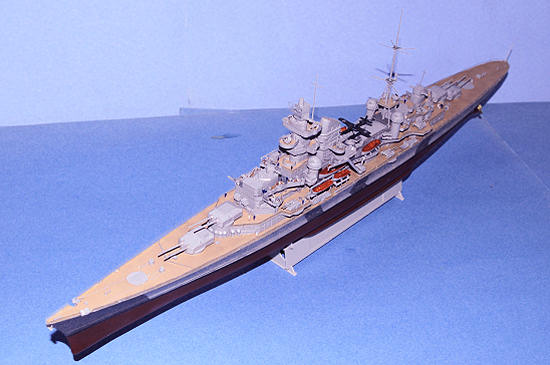
For me, construction starts with the hull. While Trumpeter would have you
assemble everything above the waterline and then attach the lower hull, I attach
upper and lower hull at the beginning, so I can work that joint from inside and
outside. I am happy to report that
this is the first Trumpeter ship kit I have done where the fit of upper and
lower hulls was easy.
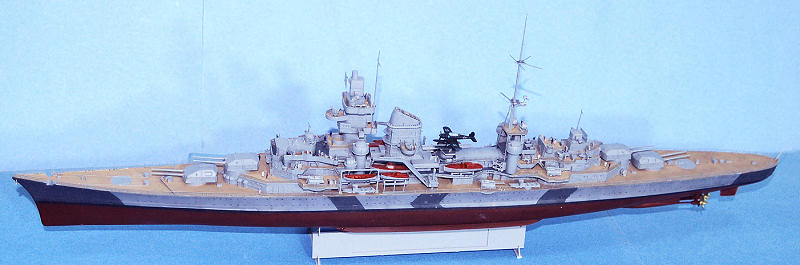
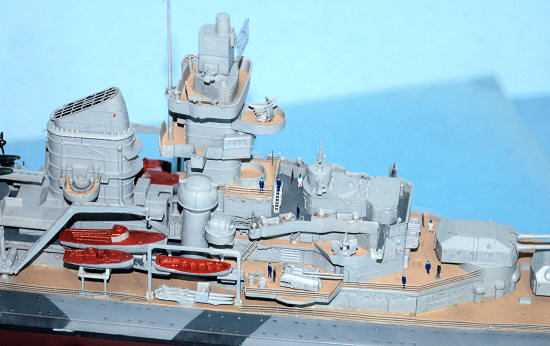
I then painted the hull, starting with the red waterline, then
masking off for the black border and then the hull camouflage.
The information on exactly what was done when the ship was repainted
in
Norway
prior to the breakout differs between the
 Kbismarck.com
website and the Prinz Eugen website, which I think are the two most useful
sources of research. I went
with the Kbismarck site pattern.
I used Tamiya “Hull
Red” with some additional “Flat Red” mixed in, with “Sky Grey” and “Dark
Sea
Grey” for the camouflage colors.
Kbismarck.com
website and the Prinz Eugen website, which I think are the two most useful
sources of research. I went
with the Kbismarck site pattern.
I used Tamiya “Hull
Red” with some additional “Flat Red” mixed in, with “Sky Grey” and “Dark
Sea
Grey” for the camouflage colors.
I next painted all the decks with Tamiya “Deck Tan” which I then applied
a “wash” of Tamiya “Smoke” to pop out the planking detail.
All the rest of the parts were painted prior to assembly, with a mixture
of Xtracrylix “Ocean Grey” and “British Light Grey”.
I also painted the metal decks with Xtracrylix “Dark
Sea
Grey.” I chose to use Xtracrylix
here because I knew I would be touching up the paint as construction proceeded,
and Xtracrylix dries the same shade whether applied with an airbrush or a
paintbrush.
When all this was done, I began assembly.
I first attached the main deck.
Trumpeter gives instructions for doing different sections of the
superstructure as sub-assemblies, and I followed this.
Because of the excellent parts fit, I had no problems with any of
this.
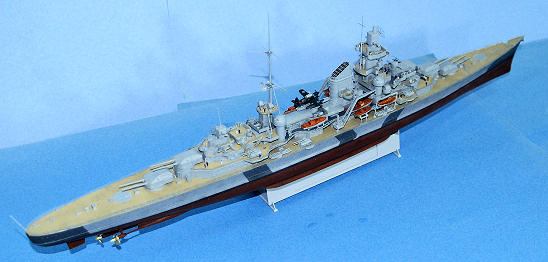
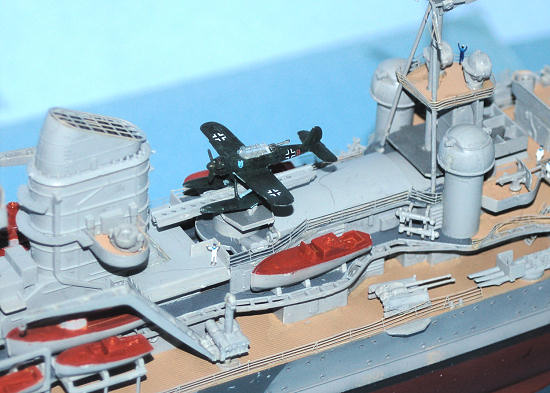
I created the Ar-196 airplane by combining parts from the Revell “Bismarck”
kits airplanes - which give a more solid airframe - with the Trumpeter floats,
which give more accurate shape and better struts.
The airplane was painted with Xtracrylix
 RLM 72/73/65,
brush-painted. I used a combination
of the Revell and Trumpeter decals to get accurate national insignias.
No swastikas are provided.
RLM 72/73/65,
brush-painted. I used a combination
of the Revell and Trumpeter decals to get accurate national insignias.
No swastikas are provided.
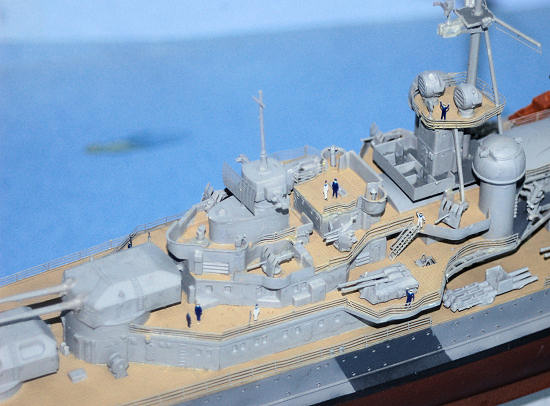
Once everything was assembled, I proceeded with the photoetch detail,
applying it in several sessions as I worked from the upper superstructure down
to the main deck. The photoetch
didn’t include the radar arrays, so I used left-over photo-etch from another
project to approximate that for the time being until I get the White Ensign set.
Thank god for Gator Glue, which makes all this photo-etch work far easier that
it would be if I was using cyanoacrylate glue.
When all that was complete, I took a set of Eduard 1/350 pre-painted
figures, and placed several around the upper decks.
The figures do a very good job of giving the observer a sense of just how
big the original ship was.
I elected not to rig the ship at this time, since I am planning to update
the ship with additional detail in the future when I get the White Ensign set
and 1/350 rigging is best left alone forever after once done.
This is the best Trumpeter ship kit I have built yet.
“Prinz Eugen” is one of the most attractive all-gun cruisers ever
built, and the model certainly catches her elegant lines. While there are a
lot of parts here, it is not really a difficult kit and a modeler who has
done at least one other ship kit would have no problem with this kit, so
long as you take your time.
Oh, and do plan to attach the anchors last.
That way you won’t inadvertently knock one off as I did without noticing
while applying the photoetch railings.
I always liked ship models when I was younger, and it has been fun the
past two years to get back into doing the occasional ship, particularly with
Trumpeter providing such nice kits of ships I always wanted to build.
With the Trumpeter “Hood,” and the Tamiya “Prince of Wales” that I have
in the to-do pile, with this kit I can finally have the main combatants of the
Battle of the Denmark Strait on my shelves.
Highly recommended.
Thanks to Stevens
International for the review kit.
Tom Cleaver
October 2009If you would like your product reviewed fairly and quickly, please
contact
me or see other details in the
Note to
Contributors.
Back to the Main Page
Back to the Review
Index Page