
| KIT #: | 05777 |
| PRICE: | $45.00 SRP |
| DECALS: | One option |
| REVIEWER: | Dale Rannals |
| NOTES: |
| HISTORY |
Roma,
named after two previous ships and the city of Rome was the fourth Vittorio
Veneto-class battleship of Italy's Regia Marina (Royal Navy). The construction
of both Roma and her sister ship Impero was due to rising tensions around the
world and the navy's fear that only two Vittorio Venetos, even in company with
older rebuilt pre-First World War battleships, would not be enough to counter
the 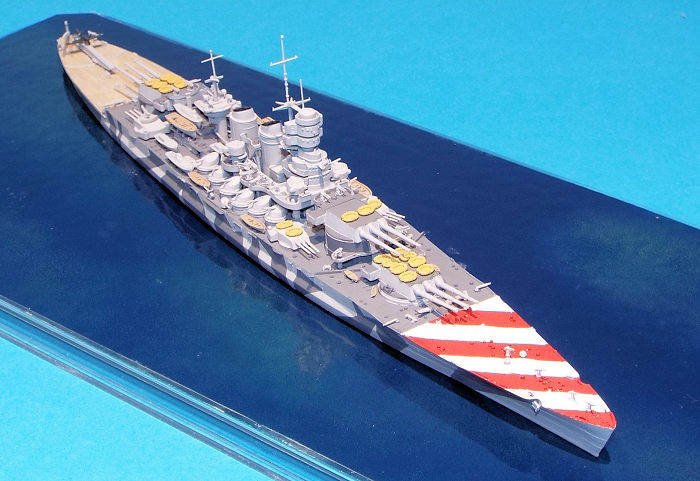 British
and French Mediterranean Fleets. As Roma was laid down almost four years after
the first two ships of the class, some small improvements were made to the
design, including additional freeboard added to the bow.
British
and French Mediterranean Fleets. As Roma was laid down almost four years after
the first two ships of the class, some small improvements were made to the
design, including additional freeboard added to the bow.
As completed Roma displaced over 45,000 tons with a length of 790ft and a beam of 108ft. She carried nine 15” rifles , and with 128,000shp, could move these around at 30kts. Her secondary armament consisted of twelve 6” along with twelve 3.5” stabilized anti-aircraft mounts. Numerous 37mm and 20mm cannon were carried. Her armor scheme took up about 31% of her displacement, but as we shall see … even with 6” decks (max), her armor (and actually the armor of any other battleship) proved insufficient against the new weapons coming into use.
Roma was commissioned into the Regia Marina on 14 June 1942, but a severe fuel shortage in Italy at that time prevented her from being deployed; instead, along with her sister ships Vittorio Veneto and Littorio, she was used to bolster the anti-aircraft defenses of various Italian cities. In this role, she was severely damaged twice in June 1943, from bomber raids on La Spezia. After repairs in Genoa through all of July and part of August, Roma was deployed as the flagship of Admiral Carlo Bergamini in a large battle group that eventually comprised the three Vittorio Venetos, eight cruisers and eight destroyers. The battle group was scheduled to attack the Allied ships approaching Salerno to invade Italy (Operation "Avalanche") on 9 September 1943, but the news of the 8 September 1943 armistice with the Allies led to the operation being canceled. The Italian fleet was instead ordered to sail to La Maddalena (Sardinia) and subsequently to Malta to surrender to the Allies.
While the force was
in the 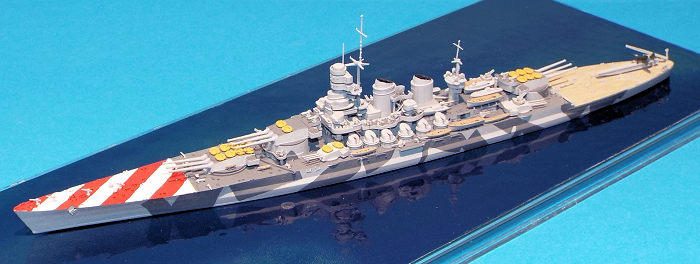 Strait
of Bonifacio, Dornier Do 217s of the German Luftwaffe's specialist wing KG
100—armed with Fritz X radio-controlled bombs—sighted the force. The first
attack failed, but the second dealt Italia (ex-Littorio) and Roma much damage.
The hit on Roma caused water to flood two boiler rooms and the after engine
room, leaving the ship to limp along with two propellers, reduced power, and
arc-induced fires in the stern of the ship. Shortly thereafter, another bomb
slammed into the ship which detonated within the forward engine room, causing
catastrophic flooding and the explosion of the #2 main turret's magazines,
throwing the turret itself into the sea. Sinking by the bow and listing to
starboard, Roma capsized and broke in two, carrying 1,393 men—including
Bergamini—down with her.
Strait
of Bonifacio, Dornier Do 217s of the German Luftwaffe's specialist wing KG
100—armed with Fritz X radio-controlled bombs—sighted the force. The first
attack failed, but the second dealt Italia (ex-Littorio) and Roma much damage.
The hit on Roma caused water to flood two boiler rooms and the after engine
room, leaving the ship to limp along with two propellers, reduced power, and
arc-induced fires in the stern of the ship. Shortly thereafter, another bomb
slammed into the ship which detonated within the forward engine room, causing
catastrophic flooding and the explosion of the #2 main turret's magazines,
throwing the turret itself into the sea. Sinking by the bow and listing to
starboard, Roma capsized and broke in two, carrying 1,393 men—including
Bergamini—down with her.
| THE KIT |
A box full of grey sprues welcomes you upon opening the box. One hull bottom and one hull plate are done in red plastic. Two small sprues of clear plastic are included, each offering a different style of aircraft carried. Instructions are typical Trumpeter..... meaning they are very clear and complete, but I do have issues with the stated order of assembly. A small PE fret is present as is decal sheet for aircraft markings. As usual for Trumpeter there is a full color picture showing both sides and top view as a painting guide. This is a feature I very much appreciate.
| CONSTRUCTION |
The first part of construction was doing a bit of research on Italian Navy colors used. I found that Royal Navy 507C and Dark Ghost Grey (both Model Master colors) were very good matches for the light and dark greys used on Regia Marina vessels. So I took the box of sprues to the airbooth and sprayed pretty much everything 507C. The deck I painted dark ghost grey. While painting the 507C I had a hard time seeing what was actually being painted. The grey color of the plastic is almost a perfect match for the color I was spraying.
 Construction
proper began next. Looking over the instructions, I noticed once again Trumpy’s
method of having you attach the hull plate or the hull bottom as the very last
step. This is soooooooo wrong. I cannot imagine needing to handle a completed
kit and try to fit the hull on last. It makes no since to me since it is so easy
to do as the first step. As I was doing a waterline version, the hull plate was
attached. I started building up sub-assemblies thru-out the instruction sheet
and crossed things off as they were completed. I also circle small bits in any
step that I do not attach at the time, so I do not forget to add them later.
While doing this I also worked on the hull camouflage. My mistake here was doing
it freehand, or I should say trying to do it freehand. I didn’t go all that well
and even though it looks fine from normal viewing distance, in hindsight I
should have masked and painted, especially since it is all straight line
patterns. Painting the red and white identification stripes was another area of
grief. The stripes run across all sorts of deck fittings, so masking here was
not very practical. So I painting this freehand also. Again ….. it looks okay,
just don’t look too closely. Also, I found discrepancies between the box art and
the full color sheet as to how far the stripes go on the deck. I started looking
through pictures online and found several different stripe schemes on Roma, so
either one is correct. I opted for the shorter/smaller area.
Construction
proper began next. Looking over the instructions, I noticed once again Trumpy’s
method of having you attach the hull plate or the hull bottom as the very last
step. This is soooooooo wrong. I cannot imagine needing to handle a completed
kit and try to fit the hull on last. It makes no since to me since it is so easy
to do as the first step. As I was doing a waterline version, the hull plate was
attached. I started building up sub-assemblies thru-out the instruction sheet
and crossed things off as they were completed. I also circle small bits in any
step that I do not attach at the time, so I do not forget to add them later.
While doing this I also worked on the hull camouflage. My mistake here was doing
it freehand, or I should say trying to do it freehand. I didn’t go all that well
and even though it looks fine from normal viewing distance, in hindsight I
should have masked and painted, especially since it is all straight line
patterns. Painting the red and white identification stripes was another area of
grief. The stripes run across all sorts of deck fittings, so masking here was
not very practical. So I painting this freehand also. Again ….. it looks okay,
just don’t look too closely. Also, I found discrepancies between the box art and
the full color sheet as to how far the stripes go on the deck. I started looking
through pictures online and found several different stripe schemes on Roma, so
either one is correct. I opted for the shorter/smaller area.
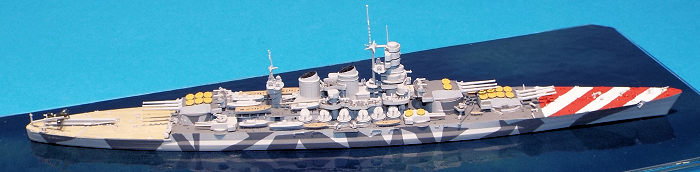
 The build
is pretty straightforward as far as ships go. The main turrets give you the
option of having elevating rifles without bags, or stationary ones with bags. I
went with stationary since I like the look of the canvas bags. The
sub-assemblies build up well with no issues that I can think of. The twin
funnels have photo-etch clinker screens on top which is a nice touch and
enhances the look of the model. I didn’t quite get them bent right, but again,
as long as you don’t look too closely…….
The build
is pretty straightforward as far as ships go. The main turrets give you the
option of having elevating rifles without bags, or stationary ones with bags. I
went with stationary since I like the look of the canvas bags. The
sub-assemblies build up well with no issues that I can think of. The twin
funnels have photo-etch clinker screens on top which is a nice touch and
enhances the look of the model. I didn’t quite get them bent right, but again,
as long as you don’t look too closely…….
The kit contains PE for two small radars above the rangefinders but after a good amount of time trying to bend them and being, well, lets just say less-than-successful.....I left them off.
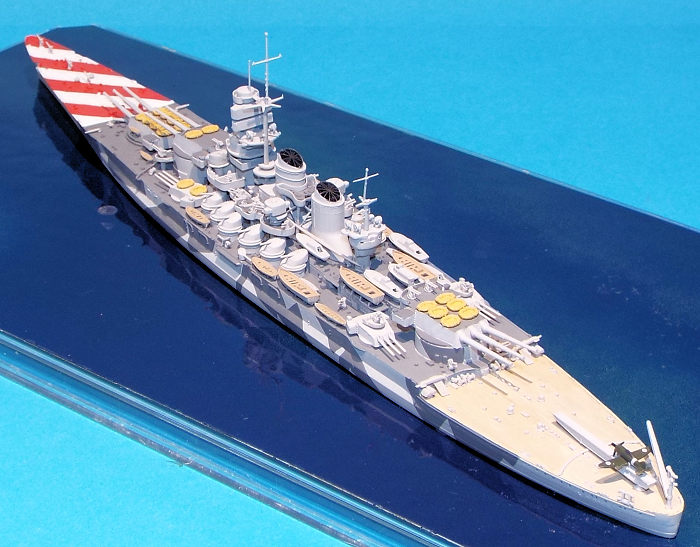
Let’s talk about that PE for a bit. What Trumpy chose to depict in photo-etch
seems almost random, and that annoys me. For instance, there is a structure on
the fantail forward of the catapult that is PE-only (I mangled it beyond
recognition so it was left off), and aft of the catapult is a crane that you can
do in either PE or plastic, and PE definitely looks better of course. BUT ….
Right between the two is a rath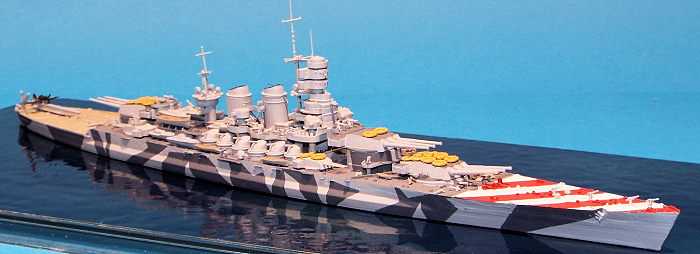 er
large catapult that would look gorgeous in PE, but this is not included. I find
that odd. Using PE for the two structures, to me, would emphasize the fact that
the catapult is not PE, it would sort of stand out. I rather wish Trumpy would
have just included the funnel clinker screens and left it at that. But this is
just me nit-picking, so I digress…..
er
large catapult that would look gorgeous in PE, but this is not included. I find
that odd. Using PE for the two structures, to me, would emphasize the fact that
the catapult is not PE, it would sort of stand out. I rather wish Trumpy would
have just included the funnel clinker screens and left it at that. But this is
just me nit-picking, so I digress…..
As with most ship models, you plug away at building but never really seem to get anywhere, then all of a sudden a ship metamorphoses in front of you. It’s a strange phenomenon. The last thing I did was assemble the aircraft. You get a couple of options here, a scout biplane or a single seat fighter. I used the Re.2002 fighter.
| CONCLUSIONS |
I have always thought the Italian Vittorio Venento class were exceptionally handsome ships. They have a certain elegance about them. The Trumpeter kit shows these lines well. This kit builds up well, but at 1/700 scale you need to be ready for some tiny, tiny parts. Also, sitting in with the “fleet” of my other 1/700 ships, the recognition stripes really stand out and gather a lot of comments. Recommended to anyone with an interest in these beautiful Italian warships.
| REFERENCES |
Internet
Battleship Design and Development by Norman Friedman ISBN 0-8317-0700-3
19 December 2017
Copyright ModelingMadness.com
Thanks to me for picking this one up when it was on sale.
If you would like your product reviewed fairly and quickly, please contact the editor or see other details in the Note to Contributors.