| KIT #: | Z 23 (Limited Run) |
| PRICE: | €60.00 in 2007 |
| DECALS: | One option |
| REVIEWER: | Frank Spahr |
| NOTES: | Hasegawa PE set # 72113, Gunze Sangyo enamel paint set used |
| HISTORY |
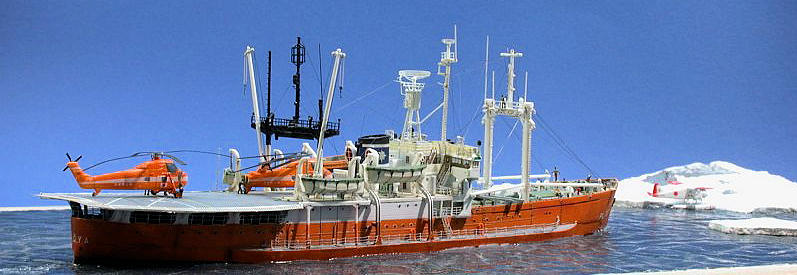
Soya,
Japan´s first Antarctic exploration vessel, today forms a key exhibit of Tokyo´s
 Sachalin. Soya survived the war and in 1956 was extensively converted
for Antarctic exploration service. Between 1956 and 1962, she undertook six
trips to the Antarctic. At Luetzow-Holm - Bay on Queen Maud – Land, the Japanese
scientific station Showa was constructed.
Sachalin. Soya survived the war and in 1956 was extensively converted
for Antarctic exploration service. Between 1956 and 1962, she undertook six
trips to the Antarctic. At Luetzow-Holm - Bay on Queen Maud – Land, the Japanese
scientific station Showa was constructed.
| THE KIT |
Immediately upon learning that
Hasegawa issued such an interesting kit, I wanted one. Sadly I missed the first
limited edition, and I half forgot about it until I received a review example of
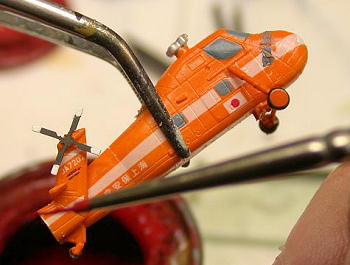
the second edition. This kit depicts the vessel after reconstruction undertaken
to operate the larger S-58 helicopters, and it looks markedly different from the
first issue. White metal figures of a crew member and two sled dogs are included
as a bonus – obviously those are the two famous dogs mentioned above. Apart from
this bonus, the kit comprises sixteen sprues white styrene, four sprues of clear
styrene and one of bronze styrene. A large decal sheet, a piece of chain and a
piece of wire complete the kit. The parts are finely detailed, crisply molded,
with no apparent flaws. The sheer number of small and delicate parts is
overwhelming, the parts count for this pretty small vessel is a whopping 323.
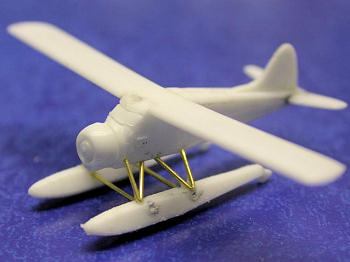
The five aircraft are especially
nice. Two Bell 47 (molded in clear styrene), two S-58 and a
Another strong point of the kit is
the instruction booklet, though not the info on the vessel – apart from five
rather hidden lines, it´s all Japanese. The rest is cutting edge. The 22 steps
are drawn extremely clearly and precisely, and they even follow a logical
construction sequence (which is quite uncommon with other manufacturers);
possible issues are adressed, and the colour callouts (referenced to Gunze
paints) include real names. There are full references as to which parts are to
be replaced by the matching Hasegawa PE set. The painting and decaling guides
are very clear and concise, too. My personal highlight was the inclusion of
seven (!) rigging plans that literally leave no question unanswered.
The matching PE set and the Gunze paint set complete the material needed. The PE is exceptionally complex and very delicate. Relief etching has been extensively employed to include fold marks to ease construction, and most of the parts are easily removed from the fret. Some of the parts are very fiddly and hard to work with, though. The railing pieces are individually etched – that eases work but leaves no reserves when botching a part. The paints work fine, but they need the special Gunze thinner, other thinners will not work. A possible replacement when working with acrylics would be Vallejo #829 Amaranth Red for the upper hull, and #946 dark red for the lower hull. Best check it yourself!
| CONSTRUCTION |
Due to the kit´s complexity and high
quality, and excellent instructions – I just followed them :O
Further reference was found at
www.modelwarships.com – Dave
Lockhart has taken a lot of images aboard Soya and published his walkaround.
Construction commenced with the
multi-part hull; careful assembly helped preserve the delicate surface. Liquid
cement was applied from the inside and did a good job in getting the hull both
sturdy and clean. The numerous bulkheads were added, seams were cleaned up, all
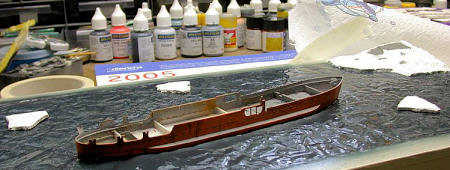
the portholes were drilled open – pretty soon the hull was ready for painting. I
started by spraying a grey primer; the insides of the bulwarks were sprayed
Xtracrylix Neutral Grey. Now the entire hull was sprayed Gunze Orange, yet in
v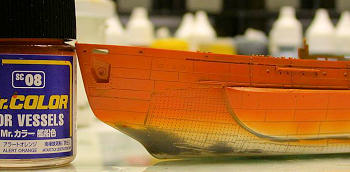 arying thickness, utilizing the grey primer as a sort of pre-shading. Marking
the waterline was eased by the painting plan which is provided in the model´s
actual size. I did use extra-fine masking tape
and Tamiya tape for this demarcation. Prior to spraying the new shade I
resprayed orange over the tape – now the original shade
would creep into any glitch in the masking and save extra work. After
spraying the lower hull, the white areas were masked and sprayed in a like
manner. After drying, the lower hull was cut away a few mi
arying thickness, utilizing the grey primer as a sort of pre-shading. Marking
the waterline was eased by the painting plan which is provided in the model´s
actual size. I did use extra-fine masking tape
and Tamiya tape for this demarcation. Prior to spraying the new shade I
resprayed orange over the tape – now the original shade
would creep into any glitch in the masking and save extra work. After
spraying the lower hull, the white areas were masked and sprayed in a like
manner. After drying, the lower hull was cut away a few mi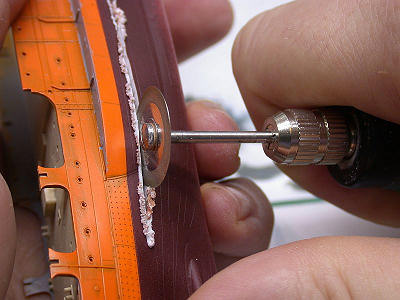 llimeters below the
water line. After cleanup, the hull was ready to be fit into the diorama, the
making of which is detailed below.
llimeters below the
water line. After cleanup, the hull was ready to be fit into the diorama, the
making of which is detailed below.
Now the decks were painted. Various
acrylic paints were used, the caulking was highlighted with an acrylic wash. The
numerous deck fittings were hand painted Xtracrylix Neutral Grey. The flight deck
was sprayed Xtracrylix Extra Dark
Sea Grey and gloss-coated with Future to ease decaling. Future was also used to
prepare the hull for decaling. The decals worked fine with some use of Micro
Sol, and no silvering was observed. After drying, they were sealed with another
layer of Future and then an acrylic flat coat.
The numerous deck fittings on the
quarterdeck were made and added in an uneventful manner (you need that now and
then, too). The two large and very cleanly molded winches were painted a
bluish-greenish mixture of RLM 65 and 83. A dark wash enhanced the nice details.
Two watertight doors were added from leftovers from a WEM PE set for HMS Hood.
Now the flight deck could be glued and secured using
various clamps.
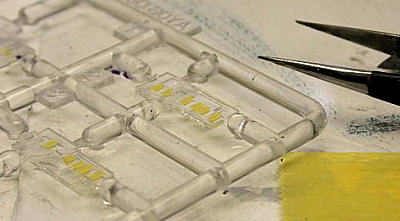 Some parts cause really
disproportionate problems. This may be due to the complexity of the part in
itself or to the trepidations the modeler has re working with the part. I really
dislike working with clear styrene due to the brittleness of the material and
the implied risks of working with the material. Seeing the front of the bridge
being molded in clear styrene, I was not happy at all. I would have much
preferred having some nice and clean rectangular openings for the bridge windows
– fill them with white glue and be happy. In this case you need to mask the
numerous windows meticulously, which is an exercise in frustration in itself. To
add insult to injury, you are supposed to add decals
Some parts cause really
disproportionate problems. This may be due to the complexity of the part in
itself or to the trepidations the modeler has re working with the part. I really
dislike working with clear styrene due to the brittleness of the material and
the implied risks of working with the material. Seeing the front of the bridge
being molded in clear styrene, I was not happy at all. I would have much
preferred having some nice and clean rectangular openings for the bridge windows
– fill them with white glue and be happy. In this case you need to mask the
numerous windows meticulously, which is an exercise in frustration in itself. To
add insult to injury, you are supposed to add decals with the wooden window
frames/surrounds after painting, which means you end up with decal film over
your prized clear styrene anyway, taking away from the intended crystal clear
transparency. I tried several times to mask the windows using liquid mask (Humbrol
Maskol), which didn´t work out and necessitated removing the acrylic paint with
white spirit. In the end I bit the bullet and masked the windows using tiny
rectangles cut from Tamiya tape – tedious but the only method I saw. As
expected, the decal film made the windows less transparent.
with the wooden window
frames/surrounds after painting, which means you end up with decal film over
your prized clear styrene anyway, taking away from the intended crystal clear
transparency. I tried several times to mask the windows using liquid mask (Humbrol
Maskol), which didn´t work out and necessitated removing the acrylic paint with
white spirit. In the end I bit the bullet and masked the windows using tiny
rectangles cut from Tamiya tape – tedious but the only method I saw. As
expected, the decal film made the windows less transparent.
The next disappointment was
assembling the bridge structure – I ended up with gaps that needed filling and
sanding in the immediate vicinity of abovementioned fiddly decals. The bridge
structure´s inclined ladders were replaced by Saemann and WEM parts – the very
 limited space on the upper decks necessitated using the WEM parts. To me, WEM
and Saemann inclined ladders are superior in 1:350 scale as you can actually
bend the individual steps.
limited space on the upper decks necessitated using the WEM parts. To me, WEM
and Saemann inclined ladders are superior in 1:350 scale as you can actually
bend the individual steps.
Now I started working with the
Hasegawa PE in earnest. The railings are individual and well fitting parts –
hence all the posts and blockouts are where they need to be. Moreover, each part
has a relief-etched folding base which makes for excellent gluing to the deck,
but is more visible than standard PE railings´ narrow base. The downside of
having individual parts is obviously that you have no room for goofs, errors and
blunders, as no spare railing is provided. I started with the numerous parts for
the stern, then those at the superstructure. The latter were coated with white
glue and painted JPS RAF White to simulate the canvas dodgers.
The small yet intricate radar mast
proved a formidable opponent. The PE parts were pretty demanding to work with
and took a lot of time. I had to lengthen the shaft of the radar antenna as it
had no sufficient clearance. The mast was completed but not yet added to the
vessel to prevent damage from handling the model.
Contrary to the instructions I
continued with the plethora of deck fittings on the fore deck and astern the
superstructure – winches, vents, cable reels and the like. The funnel was
assembled, cleaned up, the PE lad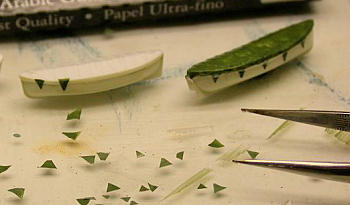 ders were added, and then the funnel was
painted white. The blue and the black stripe were also painted. I opted for
using the decals for the emblems instead of the PE parts. The masts were built
straight OOB – they are highly detailed and fiddly enough as they are.
ders were added, and then the funnel was
painted white. The blue and the black stripe were also painted. I opted for
using the decals for the emblems instead of the PE parts. The masts were built
straight OOB – they are highly detailed and fiddly enough as they are.
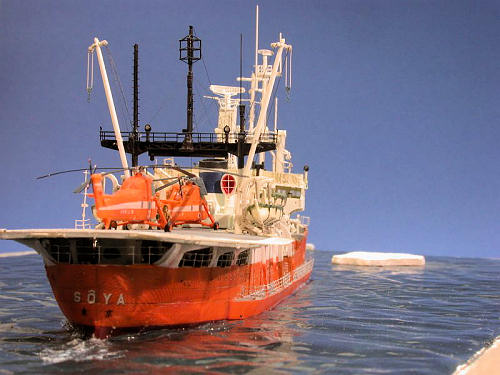
The canvas covers for the boats were
molded on yet I felt they could do with some more texture. So I added a cover
from cigarette paper soaked in thinned white glue. The triangular pieces with
the eyes for the tie-down were added from pieces of cigarette paper painted and
cut to shape. The decal sheet contains decals for that purpose, too, but I chose
to use my own version in this case.
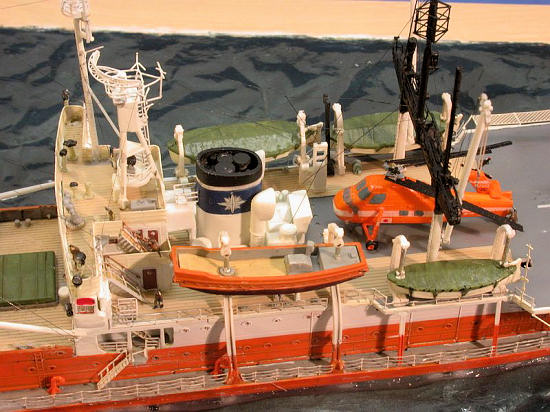
 Working from the center to the sides,
I arrived at the deck edges, adding railings and flight deck netting. It is
advisable to add these fragile items not too soon, as they hardly stand
handling. The sounding platforms are especially delicate. Having added every
last item, I gave the ship a flat coat to blend everything in. Having a
well-kept vessel, only rather subdued weathering was applied using pastel
chalks.
Working from the center to the sides,
I arrived at the deck edges, adding railings and flight deck netting. It is
advisable to add these fragile items not too soon, as they hardly stand
handling. The sounding platforms are especially delicate. Having added every
last item, I gave the ship a flat coat to blend everything in. Having a
well-kept vessel, only rather subdued weathering was applied using pastel
chalks.
The diorama was built from a picture
frame. The glass pane and its backing was removed, and the wooden frame mounted
atop a  piece of particle board covered with finely crinkled household aluminum
foil. A thin layer of Vaseline between particle board and foil improves adhesion
and prevents excess crinkling. Now plaster was poured into the frame from its
backside to a layer of about half an inch for stability. Excess plaster was
poured onto the glass pane in a thinner layer. The surface of the wet plaster on
the glass pane was covered with baking soda. After curing, the frame was removed
from the particle board, excess plaster was cleaned up and I was able to mount
the ship. The pretty soft plaster allowed easy carving so the vessel fit pretty
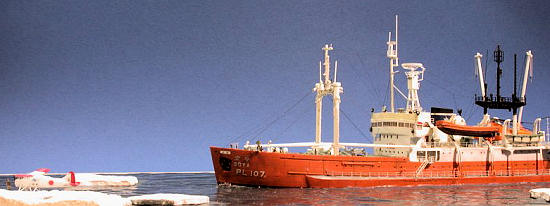
snugly into the still surface I had in mind. Wanting to show the ship
approaching the coast at minimal speed, I added a bit of coastline to one corner
of the diorama, again using plaster cast into a makeshift mold of wooden
profiles. The plaster from the glass pane was broken into conveniently sized
piece of particle board covered with finely crinkled household aluminum
foil. A thin layer of Vaseline between particle board and foil improves adhesion
and prevents excess crinkling. Now plaster was poured into the frame from its
backside to a layer of about half an inch for stability. Excess plaster was
poured onto the glass pane in a thinner layer. The surface of the wet plaster on
the glass pane was covered with baking soda. After curing, the frame was removed
from the particle board, excess plaster was cleaned up and I was able to mount
the ship. The pretty soft plaster allowed easy carving so the vessel fit pretty
snugly into the still surface I had in mind. Wanting to show the ship
approaching the coast at minimal speed, I added a bit of coastline to one corner
of the diorama, again using plaster cast into a makeshift mold of wooden
profiles. The plaster from the glass pane was broken into conveniently sized
 pieces for ice floes and rocks for the coastline. Again baking soda was used to
add some texture to the surfaces.
pieces for ice floes and rocks for the coastline. Again baking soda was used to
add some texture to the surfaces.
After curing and masking the wooden
frame, the base was painted. The water was sprayed JPS acrylic Sea Blue, the ice
floes were painted with white wall paint, and the rocky areas were brushpainted
using various grey acrylics. I made the mistake of adding an enamel gloss coat
before letting the plaster dry completely – unsighty bubbles from the escaping
moisture were the result. Hence I needed
 many layers of gloss coat before
arriving at a satisfying result.
many layers of gloss coat before
arriving at a satisfying result.
The ice floes were added to the base
using white glue. Some inevitable
touchups followed.
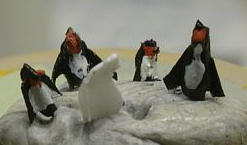
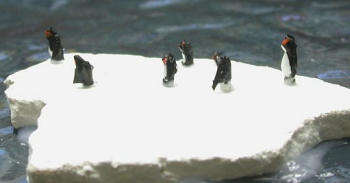
To complete the diorama, I needed
some figures of people and some animals. From the PE set, I used the penguins,
made a bit more rotund by applying white glue to their bellies, but sadly three
out of the five penguins went AWOL during the build. So I had to make
replacements. I could not make my penguins as small as the PE birds had been, so
I checked out penguin sizes on the net. Luckily, emperor penguins at 4 ft would
end up at 3.5 mm and be manageable. The smaller species were just too tiny for
me. After some deliberations I started with some styrene rod that was carved and filed into the likeness of a penguin´s head. The winglets were made from paper,
and the well-rounded belly was made from white glue. After careful painting the
birds look credible to the naked eye and were
 glued to the ice floes. The crew
figures are a mix of Preiser styrene and L´Arsénal resin figures, painted and
spread over the ship and around the aircraft at the coastline.
glued to the ice floes. The crew
figures are a mix of Preiser styrene and L´Arsénal resin figures, painted and
spread over the ship and around the aircraft at the coastline.
The vessel was rigged ove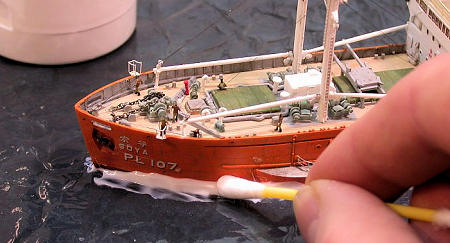 r the course
of several highly unpleasant evenings, using stretched sprue. The excellent
rigging diagrams left no chickening out for alleged want of documentation, but
the fragility of the material made me destroy half of what I added so I had to
redo a lot of what I did. I tend to liken this process with shaving a rubber
balloon with a chainsaw. Finally I called it quits, made some last
r the course
of several highly unpleasant evenings, using stretched sprue. The excellent
rigging diagrams left no chickening out for alleged want of documentation, but
the fragility of the material made me destroy half of what I added so I had to
redo a lot of what I did. I tend to liken this process with shaving a rubber
balloon with a chainsaw. Finally I called it quits, made some last
 touchups and
added the vessel to the base. For this process, clear acrylic gel was used,
which was applied with artist´s spatulas in several layers (the stuff shrinks!)
Excesses were removed using q-tips. After several days of curing, I was
touchups and
added the vessel to the base. For this process, clear acrylic gel was used,
which was applied with artist´s spatulas in several layers (the stuff shrinks!)
Excesses were removed using q-tips. After several days of curing, I was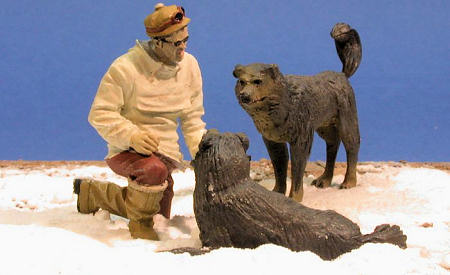 really
done.
really
done.
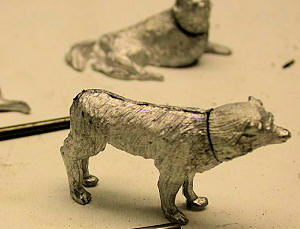
I also built the white metal figures,
but being anything but a figure modeler (let alone painter!) I just made them in
a very basic way. Despite careful cleanup, they needed quite some filling and
sanding after assembling the parts using CA glue. A motor tool proved very
helpful. After priming the metal figures using Gunze´s Mr Metal Primer, they
were sprayed MM enamel primer and then brush painted with various acrylics. For
the dogs, I also used my airbrush. Some slight drybrushing completed the
minimalist approach to figure painting.
| CONCLUSIONS |
This is an excellent kit, though it is challenging and partly over-engineered. I needed several breaks and in-between projects to keep up sufficient motivation for it. If you can lay your hands on it, I do recommend it – and rather with the PE than without it!
| REFERENCES |
http://www.modelwarships.com/features/walkaround/soya-dl/index.html
http://en.wikipedia.org/wiki/S%C5%8Dya_(icebreaker)
August 2009
If you would like your product reviewed fairly and quickly, please contact me or see other details in the Note to Contributors.