Trumpeter 1/72 LCM-3 (Landing Craft Mechanized)
| KIT #: | 07213 |
| PRICE: | $19.95 MSRP |
| DECALS: | Several options |
| REVIEWER: | Bill Michaels |
| NOTES: | Can be built as US or British craft |
| HISTORY |
Please visit the preview for the 1/35 kit for some background history of the type.
| THE KIT |
After
they released the 1/35 scale kit, Trumpeter followed it up with a 1/72 and
1/144 scale version of the boat. I’ve previewed all three of them, and
have the 1/35 scale kit under construction as a conversion to an RC model.
Here’s a quick comparison of the three kits:
1/35
scale: 22 inches long, 161 parts.
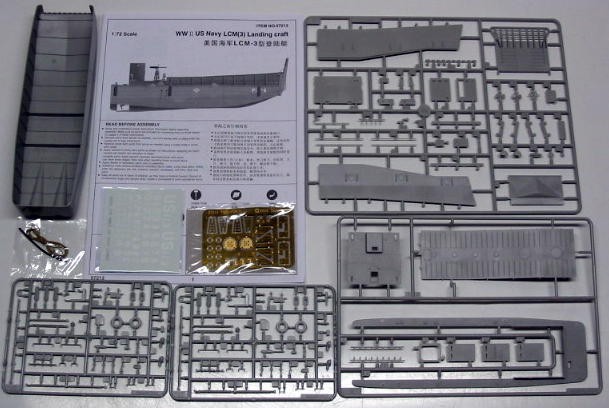
1/72 scale: 8 inches long, 140 parts
1/144 scale: 4 inches long, 48 parts
Getting Started
 Before
you start construction, you will need to decide if you’re going to do a US
or a British boat. There are several minor differences between the two,
and the instructions clearly call out which fittings are for which boat. A
nice touch is that the pieces themselves have markings on the back (USN or
RN) that point out which holes need to be opened for which boat. If you
choose a British boat, you’ll have to find some references with the color
scheme- the kit box art and instructions only show a US boat.
Before
you start construction, you will need to decide if you’re going to do a US
or a British boat. There are several minor differences between the two,
and the instructions clearly call out which fittings are for which boat. A
nice touch is that the pieces themselves have markings on the back (USN or
RN) that point out which holes need to be opened for which boat. If you
choose a British boat, you’ll have to find some references with the color
scheme- the kit box art and instructions only show a US boat.
When I started out, I decided to do a US boat, as I wanted to keep my options open. I decided not to do the British boat, as I wasn’t sure about the colors, and I thought I might want to do a boat that wasn’t from D-Day. (The decals for the British boats are only for the Normandy landings.)
| CONSTRUCTION |
Construction starts with the hull- props, shafts, and rudders. The one-piece hull was nicely molded, and had just two little dimples on the bottom. These were the injection points for the mold, and were easily filled with a little putty. The shafts, rudders, and prop guards all fit well.
I left the props off for now, so they were out of the way when the rest of the hull was painted. Just like in the 1/35 scale edition of the kit, the props are one of the few weak points of the kit. They are molded with thick, flat blades, with almost no pitch. Fortunately, they aren’t prominent on the finished model. By the way, the instructions tell you to paint them copper, but brass is really a more appropriate color for a small boat prop.
 The rest
of construction is done topside, starting with the pilothouse. The
pilothouse consists of four flat pieces glued up to form the basic box.
These were the only other parts that needed filling. Each piece had four
big ejection pin marks that should be filled- if you don’t fill them,
they’ll be visible, as there is no roof.
The rest
of construction is done topside, starting with the pilothouse. The
pilothouse consists of four flat pieces glued up to form the basic box.
These were the only other parts that needed filling. Each piece had four
big ejection pin marks that should be filled- if you don’t fill them,
they’ll be visible, as there is no roof.
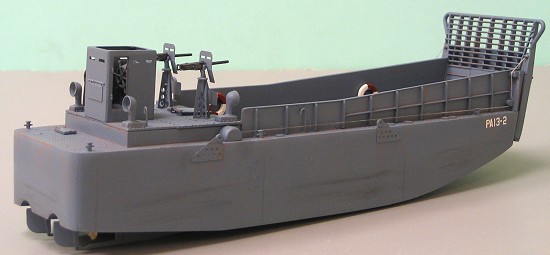
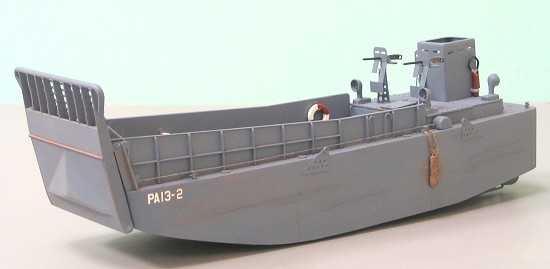
The next step calls for assembling the bow ramp and mounting it to the hull. The ramp can be installed in either the raised or lowered position. I’d recommend leaving the ramp off, and install it near the end of construction. If you’re going to be building the ramp in the open position, it would be at risk for getting knocked loose during the building process. If you’re going to build it closed, you leaving it off makes it easier to paint the well deck.
I decided to build mine with the ramp closed, but I still left it off. Without the ramp in place, the forward end of the boat is can be squeezed to give a tight fit against the sides of the well deck. If you glue the ramp on now, you may accidentally make the hull a little too narrow or too wide.
The hinges for the ramp are in two parts- top and bottom. During test fitting, I found that they didn’t fit very well- they didn’t fit over the hinge pins molded in the ramp and line up correctly. However, I found that it isn’t a problem—if you put the ramp in the closed position, you can’t see the upper hinge part. Conversely, if you opt for an open ramp, you can’t see the lower hinge.
Construction now moves on to the aft deck. Here, I found one error where the kit parts don’t match the instructions. On the underside of the deck, there are recesses and labels that make it look like you’re supposed to cut away the two circles that will later go under the PE base of the machine gun mounts. I did cut those circles out, and then discovered that the instructions don’t tell you to remove this material- the circle removed is too large to fill with the brass disc that is the base of the gun mounts. (Fortunately, I hadn’t tossed the removed material, and was able to replace it without a lot of trouble.
It looks to me that the cut marks and labels on the underside of the deck are simply a case of Trumpeter copying the 1/35 scale kit too closely- on the larger kit, you are supposed to cut them out. The instructions don’t tell you to cut them out, bit they don’t you to ignore the “cut here” markings, either….Well, this wouldn’t be a build of mine without one minor mess-up somewhere!
 I am overdue in
pointing out that the fit of the parts is very good throughout. I was a
little nervous about how the well deck would fit in the hull, but it really
fit tightly. (Leaving the ramp off until after the well deck is installed
helps, too.)
I am overdue in
pointing out that the fit of the parts is very good throughout. I was a
little nervous about how the well deck would fit in the hull, but it really
fit tightly. (Leaving the ramp off until after the well deck is installed
helps, too.)
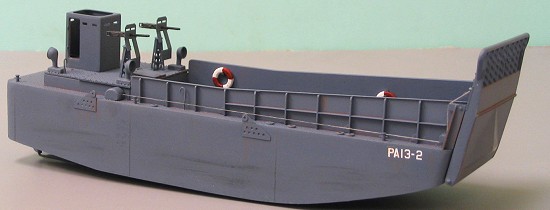
The kit comes with a nice sheet of PE brass details. The gun base, mount, and shield are all made from brass. Other detail parts include the lifting padeyes, on the side of the hull, and the mounting brackets for the life rings. The PE parts all look good, and fit well.
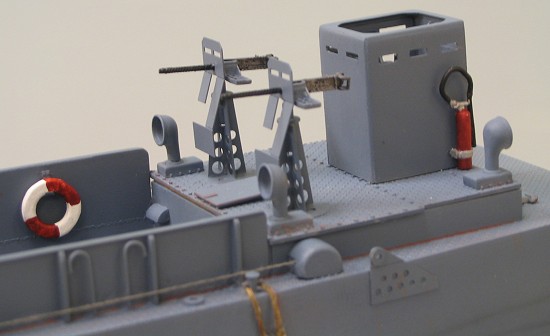
I assembled the gun mounts and glued them in place on the deck using superglue. Just like the 1/35 scale kit, this kit features nicely detailed .50 cal machine guns. In addition to the brass parts, the guns, cradles, handles, and ammo boxes are all molded separately. (I left the guns off until final assembly.)
The kit is finished up with the installation of various details around the deck. One of the details is the fire extinguisher one the side of the pilothouse. Just like the large scale kit, this kit features a small vinyl tube that is supposed to be the hose for the extinguisher. The hose is the same one provided with the 1/35 scale kit, so it is really overscale here. I replaced it with a small piece of insulation taken from a small piece of wire.
One other change I did make was to the small candy cane shaped fuel tank vents. These parts are molded in plastic, but are a very small diameter. The problem was, they were so fragile, I could not clean up the sprue attachment points without damaging them. So, I replaced them with parts made from the appropriate diameter brass rod.
| COLORS & MARKINGS |
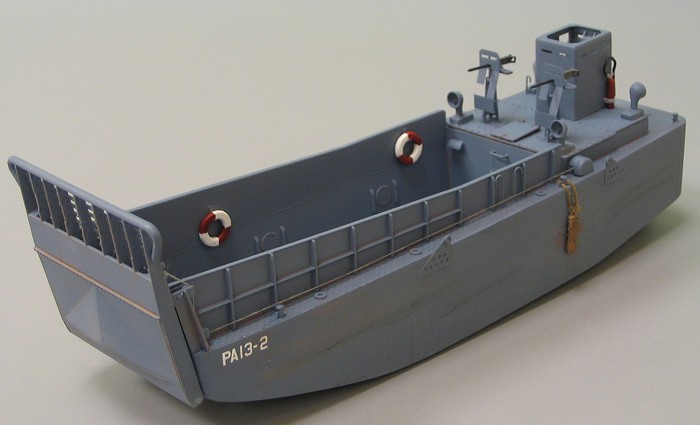
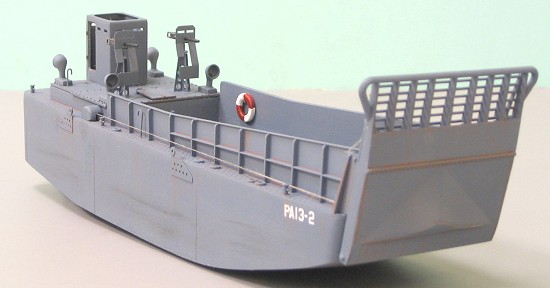
I decided to do my boat in the WW2 US Navy color scheme of overall Ocean Gray 5-0, the bluish gray featured on the box art. I used PollyScale Acrylics throughout. First, I took advantage of the fact that the ramp was off to make sure I got a good coat of paint on the interior of the well deck and the inside surfaces of the ramp. After it dried, I painted the rest of the hull. I then attached the bow ramp, but held off on adding the ramp cables until the very end.
I brushed on a coat of future at the bow, to prepare for the decals. The decal sheet that comes with the kit gives you three main options. Each option includes a selection of numbers and letters to allow you to make a variety of boats with unique numbers:
(1) USN boats from the D-Day landings. A number of boats used at the Normandy landings were not from Attack Transports- they were towed across the channel. These boats carried large “US” or “UK” letters on the hull, with the boat number. The decal sheet includes the “US” lettering, plus a set of numbers to make a variety of boats.
(2) Boats from the USS Crittenden (APA-77). This is the boat shown in the color and markings section of the instruction sheet. The Crittenden was a late war transport, which participated in the landing of occupation troops on Japan. (An odd choice for Trumpeter to pick, it seems- there was a large number of transports with far more distinguished war records.)
(3) Boats from the USS Jospeh T. Dickman (APA-13). The Dickman was one of the first Attack Transports manned by US Coast Guard crews. The Dickman earned six Battle Stars, including the landings at North Africa, Silcily, D-Day, and Okinawa. The Dickman carried a couple dozen or more LCVPs, and 2-4 LCMs. Boats from Attack Transports carried the hull number of the transport, plus an identifier. (1-28 for the LCVPs, A-D for the LCMs.) I chose to do the first boat, so my model got the markings PA13-A.
As an ex-US Coast Guardsman, picking option (3) was the obvious choice for me!
 Once the decals were in
place, it was time for a flat coat, and some weathering. Boats carried by
the Dickman saw a lot of use. The ship was one of first Attack Transports,
so it saw a lot of action. When it wasn’t participating in the actual
landings, it was employed in training the troops for the next operation.
The boats would have seen a lot of use, with limited opportunities for
cosmetic maintenance.
Once the decals were in
place, it was time for a flat coat, and some weathering. Boats carried by
the Dickman saw a lot of use. The ship was one of first Attack Transports,
so it saw a lot of action. When it wasn’t participating in the actual
landings, it was employed in training the troops for the next operation.
The boats would have seen a lot of use, with limited opportunities for
cosmetic maintenance.
The boats were painted one color, and did not have anti-fouling bottom paint. But d much marine growth, as the period of time spent at rest in the water would have been minimal. Most of the weathering would be a lot of minor wear and tear as they were hoisted in and out, over and over, and as they were used for the many practice runs and beachings. (And remember, everyone was learning together- boom operators, Bosuns, Coxswains, and the troops.)
So, here’s what I did….
To start, the model has been painted overall Ocean Gray, had a coat of future on the hull, had the decals applied, and an airbrushed coat of Polly scale flat clear. I let all of that dry for a few days.
The first thing I did was hit a lot of the edges with my artist’s pencils. I have two that I use a lot for weathering- one a dark brownish-orange and one a brighter orange. I hit all the edges, especially those on the outside of the boat. I then used my silver pencil to highlight the areas around the guns and the entrance to the pilothouse- areas subject to a lot of wear, where rust wouldn’t get a chance to form.
The next step in the weathering process was to add little rust stains and tire marks in the well deck. After that was complete, the last step was to add the effects of some bumps and scrapes to the outside of the hull. I used dark gray pastels to give some subtle rub marks and waterline stains that you see on many workboat hulls. I added one of the rope fenders, and used a matching pastel color to leave the marks on the hull caused by a fender rubbing back and forth.
| FINAL CONSTRUCTION |
I finished up the model by adding the last few details. The guns were assembled, painted, and installed. The life rings were installed, and the props were attached. The final step was to install the thread for the ramp. The kit provides dark brown thread that is a pretty good representation of rope, but it is not really appropriate for the steel cable for the ramp winch. I used some fine light gray thread instead.
Here’s a tip from sailing ship modeling-- use beeswax to get rid of the “fuzzies” on the thread. You can find a small package of it in the sewing supplies department. Run the silver thread through the beeswax, pull the thread taught between your hands, and run it back and forth across a hot light bulb. The heat of the lamp will melt the wax into the thread, holding down the stray fibers.
| CONCLUSIONS |
Highly recommended. The detail level is very good, it really feels like a scaled down version of a very good 1/35 scale kit, with nearly the same level of detail as found in the larger model. For the price, these are nice little boats— they are half the size of the larger model, and, at $20 retail, only about one-third the price.
 Dragon
also has an LCM in 1/72. I’ve only seen it in the shop, and read someone
else’s in box review. Based on that, I think the Trumpeter kit is a better
display model, while the Dragon kit is aimed at war gamers and diorama
builders. (The Dragon kit doesn’t include the under-water details the
Trumpter kit has; but it does come with some figures and a beach diorama
base.)
Dragon
also has an LCM in 1/72. I’ve only seen it in the shop, and read someone
else’s in box review. Based on that, I think the Trumpeter kit is a better
display model, while the Dragon kit is aimed at war gamers and diorama
builders. (The Dragon kit doesn’t include the under-water details the
Trumpter kit has; but it does come with some figures and a beach diorama
base.)
Like the other boats in the Trumpter series, this one does not include any figures. Trumpeter released an LCM Crew in 1/35 scale- sold separately. It would have been nice if they had just included a set of figures for the 1/72 scale kit, as it doesn’t seem practical to produce and sell a set of only 3 figures in this scale. I also wish that they had included a display stand.
Overall, the kit was a very enjoyable build. I’m not a big fan of tiny brass details, especially in 1/72 scale. But, the small fret of brass included with this kit makes sense—the parts they chose to do in brass are appropriate, and aren’t too hard to incorporate into the model. This would be a good kit for someone who hadn’t used brass parts before.
I really like the way the finished model came out. It has been added to my growing collection of 1/72 scale armor kits- next to my DUKW. I think my next project will be an appropriate vehicle to serve as cargo….
| REFERENCES |
Allied Landing Craft of World War 2, US Naval Institute Press.
Allied Landing Craft in Action, Squadron/Signal Publications.
September 2005
Review kit courtesy of my ongoing attempts to keep the local shop financially viable.
If you would like your product reviewed fairly and fairly quickly, please contact the editor or see other details in the Note to Contributors.