Naval Models 1/350 HNLMS Friesland
|
KIT #: |
350-02 |
|
PRICE: |
@ 105 EUR |
|
DECALS: |
Yes |
|
REVIEWER: |
Frank Spahr |
|
NOTES: |
Naval Models PE set 350-02 RL
, Price @ 19 EUR.
Machined
brass barrels Master SM 350 053 (6 EUR), PE inclined ladders, Saemann
# 3065 (2.40 EUR for a set of 4 ), UNI caenis 20 den monofilament
rigging thread.
|
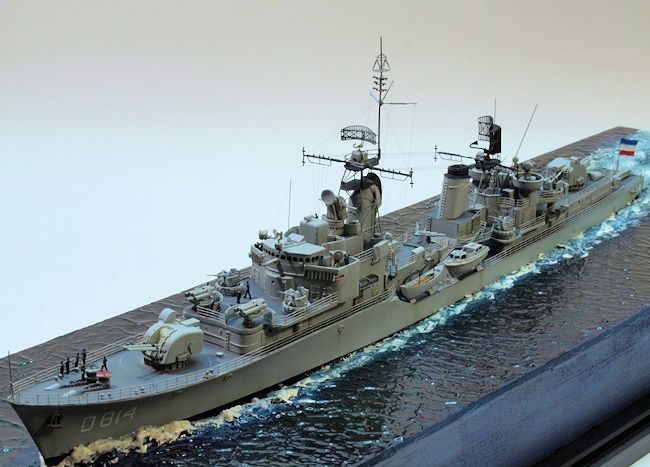
The eight vessels of the Friesland
class were commissioned by the Royal Netherlands Navy between 1956 and 1958.
This second postwar class of destroyers was roomier than the preceding Holland
class. Its armament was provided by Swedish manufacturer Bofors. For the
powerplant,
the systems used in
 American Gearing class destroyers were built under licence. The ships
served throughout a big part of the cold war and received limited
upgrades only. The namesake Friesland was scrapped in 1979, the remaining
vessels were transferred to Peru in the early 1980s.
American Gearing class destroyers were built under licence. The ships
served throughout a big part of the cold war and received limited
upgrades only. The namesake Friesland was scrapped in 1979, the remaining
vessels were transferred to Peru in the early 1980s.
Dutch manufacturer Naval
Models offers a range of resin or multimedia
kits of mainly Dutch vessels. This kit is one of their earlier offerings.
It comes with a dedicated PE fret, wire and decals. The complementing additional
PE fret further details the model and provides alternative parts for some of
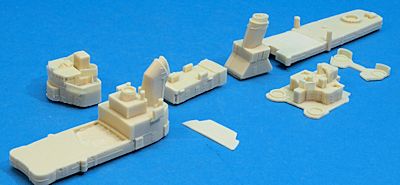
those included in the kit. The resin is reasonably well cast, yet not
exceptional, with more casting blemishes and larger casting plugs to be removed
than usual with the best products on the market. The kit instructions are very
well thought out and actually represent a building sequence that makes sense,
instead of the rather theoretic sequences you will often find, especially with
injection-moulded kits.
 I started with cleaning up the resin
parts, doing some repairs with putty and drilling the (fortunately round) bridge
windows deeper.
I started with cleaning up the resin
parts, doing some repairs with putty and drilling the (fortunately round) bridge
windows deeper.
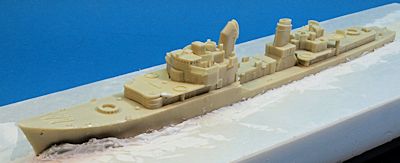
In building a waterline
model, the one-piece hull will either have to be laboriously reduced or the
full-hull model be embedded in a waterline block. I prefer doing the latter, so
I made a cutout in a fitting piece of foam board, sanded it to accept the hull
as good as I could, which left varying gaps. After insulating the hull with
vaseline, I applied white acrylic caulking from the hardware supermarket to the
base and fit the hull into the cutout, sculpting the acrylic caulking in the
process as desired. After two days curing time, I was able to remove the hull
and clean it up with lighter fluid prior to further work. The base was further
sanded and sculpted, and then painted in my usual method using white wall paint
for the desired surface structure and then various shades of
 acrylic model
paints. All that fully cured, the base received several coats of a high gloss
solvent-based clear coat, followed by some drybrushing with white artist´s oil
paint. It was then set aside for the final process of mating ship and base.
acrylic model
paints. All that fully cured, the base received several coats of a high gloss
solvent-based clear coat, followed by some drybrushing with white artist´s oil
paint. It was then set aside for the final process of mating ship and base.
Returning to the ship, I continued
identifying subassemblies, cleaning parts up, assembling them and painting them.
On the whole, this model was built straight out of the box, save a few
exceptions. Firstly, I much prefer machined brass barrels to resin items, they
simply better look the part to me. Sadly, the rather peculiar 120 mm Bofors gun
barrels are unavailable as brass items. So I spent quite some while looking up
photos of the original guns and sifting through the aftermarket offerings to
find something that matched to a reasonable
 extent. Finally I settled for
Master´s 140 mm barrels for the IJN cruiser Nagara. Each barrel received a piece
of .2 mm brass wire to what I assume this was a coolant pipe
in the original gun. For the 40 mm AA guns, I only found barrels for the
earlier model from WW 2. After some filling with CA glue and the addition of a
small piece of styrene stock, they looked enough alike to feel I could get away
with it.
extent. Finally I settled for
Master´s 140 mm barrels for the IJN cruiser Nagara. Each barrel received a piece
of .2 mm brass wire to what I assume this was a coolant pipe
in the original gun. For the 40 mm AA guns, I only found barrels for the
earlier model from WW 2. After some filling with CA glue and the addition of a
small piece of styrene stock, they looked enough alike to feel I could get away
with it.
Further additions
concerned the ship´s boats. I added leftover PE oars from my PE folder. I have a
normal A4 folder in which I collect the remains of any used PE sheet in clear
plastic binders, to store them safely and to easily find out what I can use for
a new project. In this case, I found some leftover PE combos of keel / propeller
/ rudder which fit nicely under the motor boats. I also replaced the PE
handrails atop the two windlasses by more delicate Saemann PE items. Saemann
also provided PE inclined ladders which were more detailed and delicate
than the kit PE items.
Most of the parts fit
quite well, and - as I already mentioned - the instructions were helpful and
user - friendly. The most tricky items were the complex inclined ladders aft the
bridge, especially how to bend them correctly. The PE gratings / walkways around
the aft funnel did not fit as I would have liked them to, and needed some
tweaking. The PE deflectors for the ASW rocket launchers were easily shaped
after some annealing. The parts are sturdy enough to withstand the heat, so this
was the easiest method for me.
The railing provided by
Naval Models was easy to work with and sufficient for my needs.
The model was primed with
solvent-based primer from the rattle can and then sprayed with appropriate
acrylic shades of, um, grey. A number of shades in the single digits did
suffice, though.
The model was given only limited
weathering, as reference images had showed well-maintained vessels throughout.
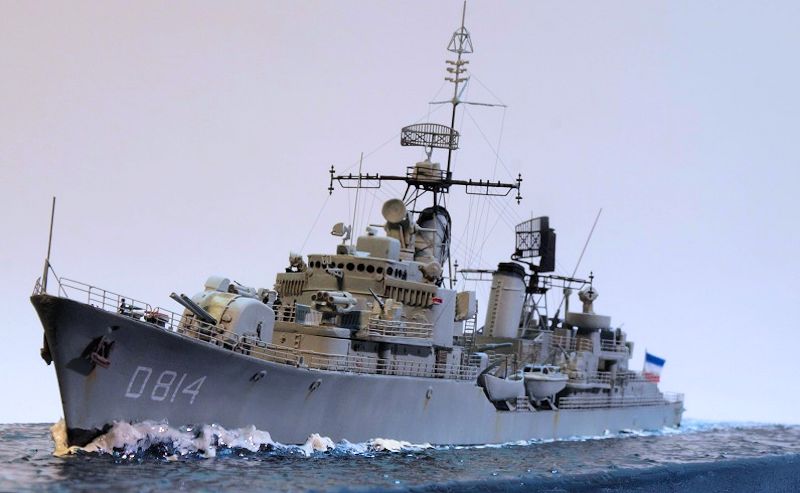
 I ran into trouble decaling, though.
The stern hull number folded and tore irreparably, so I was forced to rename my
model from D 812 Friesland to D 814 Limburg - luckily the decal sheet includes
markings for all eight vessels of the class. Despite the name, the project was
completed on time and within the projected budget
(look here).
I did not use the decals for the warning circles around the gunhouses. Instead,
I engraved circles and used white paint in the engraved lines.
I ran into trouble decaling, though.
The stern hull number folded and tore irreparably, so I was forced to rename my
model from D 812 Friesland to D 814 Limburg - luckily the decal sheet includes
markings for all eight vessels of the class. Despite the name, the project was
completed on time and within the projected budget
(look here).
I did not use the decals for the warning circles around the gunhouses. Instead,
I engraved circles and used white paint in the engraved lines.
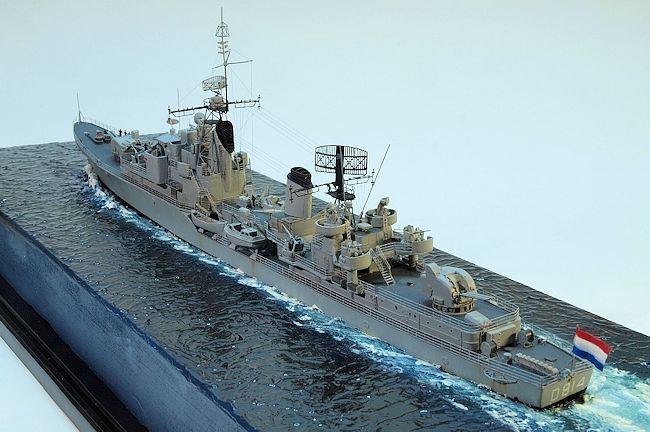
Limburg´s crew was
provided by the excellent 3D printed NorthStar sailors.
The model was rigged using
the trusty UNI Caenis 20 den monofilament line. Sadly, the tension was enough to
deform the rather flimsy topmasts and yards, so I had to try my hand at
correcting something I´d rather not touch more than once. A Dutch flag was
painted on cigarette paper and glued to the flagstaff with clear acrylic gel.
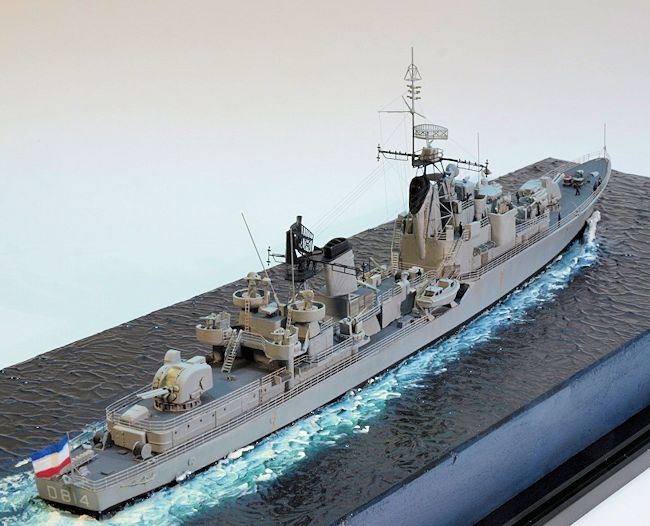
After a final flat coat to
hide as much embarrassment as possible, the model was placed into the cutout
prepared in the base. It fit well. Any remaining small gaps were closed with
clear gloss acrylic gel. The model was glued to the base using caulking
silicone.
 The
Friesland destroyers were the epitome of WW2 destroyer development, with
perfected radars and ASW equipment, but just before the momentous change the
advent of guided missiles would bring to warship design. Building this resin kit
had its challenges, but should be no problem for experienced modelers. The
resulting model depicts a ship with beautiful lines and a welcome example of a
vessel developed by one of the smaller navies during the cold war.
The
Friesland destroyers were the epitome of WW2 destroyer development, with
perfected radars and ASW equipment, but just before the momentous change the
advent of guided missiles would bring to warship design. Building this resin kit
had its challenges, but should be no problem for experienced modelers. The
resulting model depicts a ship with beautiful lines and a welcome example of a
vessel developed by one of the smaller navies during the cold war.
Frank Spahr
March 2015 If you would like your product reviewed fairly and fairly quickly, please contact the editor or see other details in the
Note to
Contributors.
Back to the Main Page
Back to the Review
Index Page