Revell 1/25 Batboat
|
KIT # |
6722 |
|
PRICE: |
@$10.00 |
|
DECALS: |
One option |
|
REVIEWER: |
George Oh |
|
NOTES: |
20 parts and a 3 piece stand |
|
HISTORY |
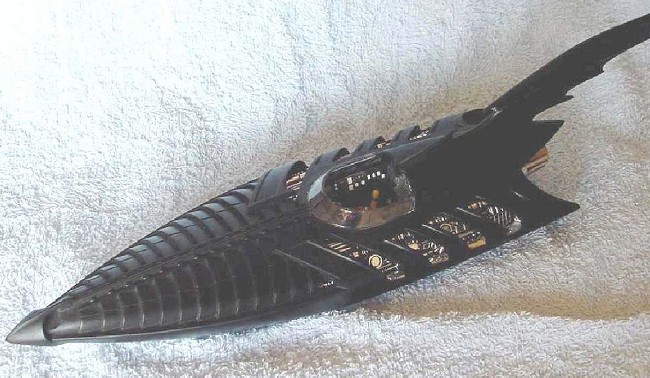
I am aware of several different versions of the Batboat – the two-seater speedboat from the 1960’s movie/TV series “Batman” (Polar Lights kit No. 6906), the Batski (sounds Russian) from the movie “Batman” (was available from AMT/Ertl, I believe) and the Batboat from the movie, “Batman Forever”. This latter is a single-seat, jet-propelled(?), organic-looking craft with a very Gothic feel about it.
I bought the Revell 1/25-scale Batboat quite some time ago because it was going for only $10-00 and I can’t resist a bargain (OK, so I’m weak). It languished in a carton for ages, but as soon as my model club announced the theme for our End of Year competition,
“A Model seen on TV”, I decided to build it. I chose it because, it fit the theme, and it should be easy to paint. It’s not easy to stuff-up an overall basic black colour scheme – even for me! But, like every other model I seem to have done (or am in the process of doing), it isn’t that easy. There were a couple of things that I had to fix-up to make me happy with the model.
|
THE KIT |
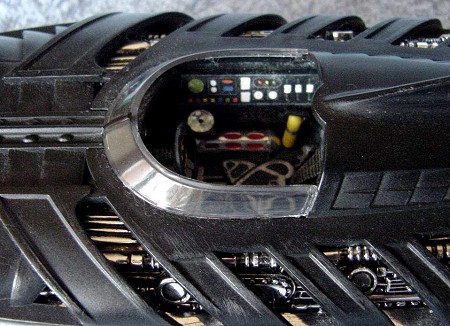
The model has a total of only 21 parts – 13 black plastic components (most are large), 6 chrome plated bits, 1 large clear piece and a 3-piece stand. And there’s only one decal – a large one for the stand. The chrome parts have chunky raised detail, so they look busy enough but at the same time, they looked very 2-dimensional (flat) because of the uniform colour of the chrome. The cockpit tub didn’t have enough inside to avoid a very bare appearance. The hull came in four main parts – lower half, top-front, top rear and transom (back-end plate) – six if you count the tall bat-fin. But it lacks a Batman figure and a rudder (or something).
|
CONSTRUCTION |
I tackled three areas simultaneously – the transom, the two large chrome pieces and the cockpit. The highly convoluted transom was glued to the lower hull half and the resulting deep wide seam was filled. For filler, I used stretched sprue, Milliput, Tamiya putty, Mr. Sufacer 500, then paint. After a dozen or so applications of filler, sanding sessions and primer paint, all wet-sanded, the lower seam was gone.
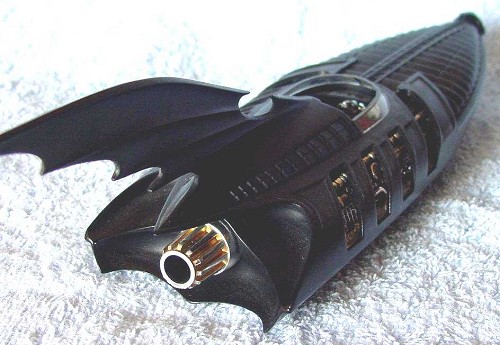 Down both sides of the
Batboat are a series of five ribs, which creates four slots that you can
see through to the inside of the Batboat, to two large, long, flashy,
nicely-detailed, chrome bits. Being 100% chrome, they lacked (in my
opinion) a realistic appearance. See, I’ve seen show-cars with lots of
chrome under the bonnet – but not everything is chromed. The background
and functional bits aren’t chromed. So, in the Batboat, I wanted to put
a black wash over the chrome, but I was afraid that either the paint
wouldn’t stick to the chrome or that I couldn’t get the paint off the
raised details without removing the chrome. Car modellers helped me.
They said to hit the chrome with slightly-thinned acrylic paint (I used
Tamiya flat black), wait 20 minutes, then wipe the raised details with a
rag moistened with General Purpose thinner. This worked a treat and all
the shiny bits now projected from a black background. But, I didn’t want
to spray the chrome bits I worked so hard on, so, I blocked the slots
between the ribs with plastic insulation tape placed on the inside, then
attached the chrome bits. Remember to scrape the chrome off the mating
surfaces. The tape would stay in place till I completed the Batboat. I
didn’t have time (or the inclination) to further detail the chrome bits,
‘cos I was busy elsewhere.
Down both sides of the
Batboat are a series of five ribs, which creates four slots that you can
see through to the inside of the Batboat, to two large, long, flashy,
nicely-detailed, chrome bits. Being 100% chrome, they lacked (in my
opinion) a realistic appearance. See, I’ve seen show-cars with lots of
chrome under the bonnet – but not everything is chromed. The background
and functional bits aren’t chromed. So, in the Batboat, I wanted to put
a black wash over the chrome, but I was afraid that either the paint
wouldn’t stick to the chrome or that I couldn’t get the paint off the
raised details without removing the chrome. Car modellers helped me.
They said to hit the chrome with slightly-thinned acrylic paint (I used
Tamiya flat black), wait 20 minutes, then wipe the raised details with a
rag moistened with General Purpose thinner. This worked a treat and all
the shiny bits now projected from a black background. But, I didn’t want
to spray the chrome bits I worked so hard on, so, I blocked the slots
between the ribs with plastic insulation tape placed on the inside, then
attached the chrome bits. Remember to scrape the chrome off the mating
surfaces. The tape would stay in place till I completed the Batboat. I
didn’t have time (or the inclination) to further detail the chrome bits,
‘cos I was busy elsewhere.
I was also working on the cockpit. It is almost as bare as a baby’s bum. Highlighting the raised details by drybrushing and painting-in colourful dials & switches didn’t do a lot. I had to dream-up a host of flashy, colourful details that won’t look out of place in a boat (and I stink without a plan to follow). Again, I checked-out the car-detailers. The Batboat is both hi-tech and functional, and I wanted the cockpit to reflect this. So I built a bright yellow fire extinguisher from yellow sprue and a chromed rack (from thin metal foil) holding six flares (white plastic rods). I laid some coloured rods (pipes, electrical conduit and push-rods?) on the floor & other places. To keep Batman’s Size-10 boots off them, I placed a piece of fine mesh (from a model railway shop) over the top of them. I also fashioned a couple of small speakers from balsa wood and glued them against the back wall beside Batman’s head. This way, he can hear the two-way radio. For more colour and for something different, I scratch-built a tray (from thin plastic card) with a CD (a sequin) on it. Lastly, I built a hand throttle out of a numbered chromed square from the sprue, a bit of bent wire to serve as the throttle lever and a push rod under it. More could have been done by adding lots of switches, knobs, buttons, a computer screen, head-up display ………...
Once the cockpit was finished, I fitted it into place under the upper hull, and joined upper hull to lower. Like in the lower hull, the gap between transom and upper hull had to be filled to blend it into the upper hull. Ditto the large bat-fin on the spine of the upper hull. Again, lots and lots of filler, sanding and priming. Luckily for me, the two hull halves went together almost seamlessly. I said almost – only Mr Surfacer 500 and paint was needed to fill the cracks.
|
COLORS & MARKINGS |
Painting
For six months, the slots
in the sides had the insulation tape stuck to their undersides. I didn’t
extract it till I’d absolutely finished the Batboat. I plugged the open
cockpit with lots of wet tissue, then I sprayed the whole model with
several light coats of Tamiya flat black acrylic paint. A week later, I
rubbed the black with a soft cotton cloth. This polished the paint on
the raised areas only, and gave the Batboat different textures of black –
matt, satin and gloss. This is how I got definition,
 contrast and
shading for the Batboat. The turbine, moulded on the transom, was
lightly drybrushed silver and the chromed tail-cone was brushed-painted
with Tamiya gold in its recesses, then attached over the turbine.
Remember to scrape the chrome off the mating surfaces.
contrast and
shading for the Batboat. The turbine, moulded on the transom, was
lightly drybrushed silver and the chromed tail-cone was brushed-painted
with Tamiya gold in its recesses, then attached over the turbine.
Remember to scrape the chrome off the mating surfaces.
Lastly, I stripped-out the tissue, and attached the U-shaped windshield with white glue, and brush-painted the single rib running up the middle. There was no rim on the top of the windscreen – I could have scratch-built one with a couple of bits of thin narrow plastic strip. It was with much pleasure that I wrestled the tape from under the ribs to reveal the shiny chrome bits. Now, there ‘aint no propeller, rudder or water-jet director under the hull, so I guess that the Batboat is jet-propelled. How do you steer such a craft? (Very carefully. Ed.) Well, I guess that a couple of flush spoiler plates under the back of the hull – one on the left and one on the right - could be could be slaved to the Batboat’s steering wheel and rigged to be lowered by hydraulic rams. When one is lowered, it would create drag on that side of the boat and turn it in that direction. So, I just scribed them on. If I was dedicated (ie, if I’d had more time), I’d have cut holes in the belly, blank them off, then installed the spoiler plates in the lowered position and hydraulic rams for raising and lowering them. Well, perhaps scribed one and lowered the other.
Decaling
I quickly assembled the 3-piece stand, ensuring that the two upright plates were vertical and parallel by gently squeezing the assembly between two books. It was unpainted so that it was a different black from the model. The one decal was quite thick and it was larger than the raised oval it was to cover. No problem. I slid it into position, then trimmed it to size by slowly running a sharp knife-blade against the edge of the raised oval. For the competition, the boat was tacked to the stand with white-glue.
|
CONCLUSIONS |
The simplicity and size aims the Batboat model at a young modeller, or the movie/Batman buff who wants the model. But with a bit of modelling effort, it can be built into a distinctive and attractive model that points-out the skill of the modeller. While I am happy with the Batboat, I would have liked to have done more in the cockpit and the sides. But I achieved the aims – I enjoyed building the model and I had a silver-level model in the club competition. And everyone liked the chrome bits!
June 2004
Copyright ModelingMadness.com
If you would like your product reviewed fairly and quickly, please contact the editor or see other details in the Note to Contributors.