Revell 1/547 USS Midway
| KIT #: | H-441 |
| PRICE: | $ Long out of production |
| DECALS: | One option |
| REVIEWER: | Tim Reynaga |
| NOTES: | 1974 Boxing |
| HISTORY |
Laid down about a year after
the Battle of Midway, the
Completed too late
for the Second World War, the Midway
nevertheless had a busy career including
annual
deployments in the  in
which she was fitted with an angled flight deck (as have all USN aircraft
carriers since). In addition, the ship received an enclosed “hurricane
bow”, a new deck edge elevator, steam catapults, mirror landing systems and
other modifications to allow the Midway
to operate larger, heavier jet aircraft.
in
which she was fitted with an angled flight deck (as have all USN aircraft
carriers since). In addition, the ship received an enclosed “hurricane
bow”, a new deck edge elevator, steam catapults, mirror landing systems and
other modifications to allow the Midway
to operate larger, heavier jet aircraft.
Following her refit the ship
began annual deployments with the 7th Fleet in the Pacific. The
carrier was on duty in the
In October 1973
Midway put into
In April 1975
Midway responded, along with her
sister Coral Sea and three other
carriers, when North Vietnamese forces finally succeeded in overrunning
their neighbor to the South. In this last act of the Vietnam War, hundreds
of American and Vietnamese personnel were evacuated by sea after the fall of
 Throughout
the 1970s and 1980s Midway served
almost continuously as a forward deployed contingency carrier in the Western
Pacific and
Throughout
the 1970s and 1980s Midway served
almost continuously as a forward deployed contingency carrier in the Western
Pacific and
In 1991,
Midway had her last wartime deployment as
one of the six aircraft carriers sent by the US against Saddam Hussein’s
Iraq as part of Operation Desert Shield
in the first Gulf War. Midway’s
airgroup participated as part of Operation Imminent
Thunder, a combined amphibious landing feint in
northeastern
A few months after
the war, the Midway was finally
decommissioned. After nearly 48 years of service spanning the
surrender of
| THE KIT |
This kit is one of the early
polystyrene plastic model ship kits, appearing just a year after the
granddaddy of them all, Revell’s 1/535 scale 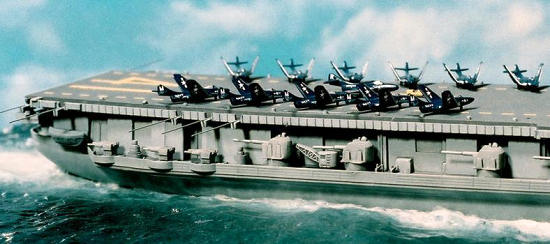 the motor
on the 1961
the motor
on the 1961
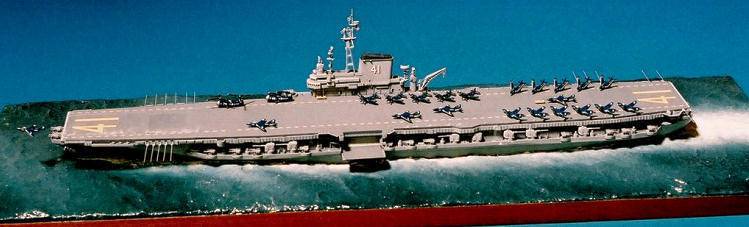
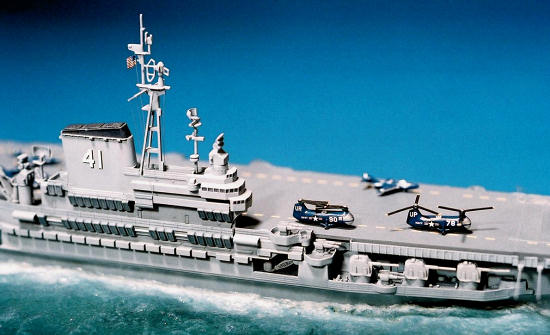
The kit represents the ship as she appeared not long after completion but with the original 40mm Bofors quads replaced with 3"/L50 twins. The Mk.37 directors are still fitted with the WWII-era Mk. 4 radars though, so I’m not certain of the precise date; somewhere in the early 1950s seems likely. It is definitely represents Midway before the ship’s major 1955-7 refit because of the open bow, straight flight deck, and numerous 20mm Oerlikon mounts. The kit comes with a small airgroup consisting of 16 Cougars, 6 Corsairs, 2 Skyraiders, and 2 helos.
As with most of the very earliest plastic ship kits, it is a “box scale” model—that is, scaled to fit a standard sized box on hobby shop shelves rather than to a constant scale. In this case it works out to about 1/547, an oddball size that makes swapping components from other kits or finding aftermarket upgrade parts a challenge. Another problematic aspect of this kit is that the Roosevelt/Midway/Coral Sea is one of Revell’s infamous “flat bottom boats”. In 1954 Revell had not yet decided whether their products were to be marketed as accurate scale models or as children’s toys, so they compromised and made the hulls mostly accurate but with flat bottoms so kids could play with them on the floor. Some of the plastic ship models of this time even had tiny wheels to make this easier! While appealing to kids (I remember preferring these to the rounded hull models that tended to roll over during combat ops in the back yard), they made these kits totally inaccurate as full hull models. Too bad, because the Midway’s hull above the waterline is pretty decent.
 While
I’m not nuts about the molded-to-the-deck solid railings and molded-in 20mm
guns, the shapes and dimensions above the waterline are accurate and
convincingly rendered. And although it is sometimes somewhat heavy,
there is quite a bit of detail. The 3” twins and 5"/L54 mk 39 guns are
covered in details which, if overdone, at least add interest. The
island sports both open and closed doors, sharply incised bridge windows,
life rafts, and flag bags. The hull and sponsons are festooned with
numerous molded in shapes which impart a general impression of complexity
while using only a few parts.
On the flight deck I was impressed
with the sharply molded catapult tracks, arrestor gear, accurately ribbed
gallery sides… even hundreds of tiny raised dots representing aircraft tie
down points. There
are also a number of very delicately sculpted smaller details like floater
net baskets (with floats visible inside), deck winches, cranes, and some
excellent canvas cover detail on the two lifeboats aft.
These well done touches may be from the hand of the
primary pattern maker for the kit, Anthony D. Bulone, a talented sculptor
best known as the creator of the face for the original Mattel Barbie doll.
While
I’m not nuts about the molded-to-the-deck solid railings and molded-in 20mm
guns, the shapes and dimensions above the waterline are accurate and
convincingly rendered. And although it is sometimes somewhat heavy,
there is quite a bit of detail. The 3” twins and 5"/L54 mk 39 guns are
covered in details which, if overdone, at least add interest. The
island sports both open and closed doors, sharply incised bridge windows,
life rafts, and flag bags. The hull and sponsons are festooned with
numerous molded in shapes which impart a general impression of complexity
while using only a few parts.
On the flight deck I was impressed
with the sharply molded catapult tracks, arrestor gear, accurately ribbed
gallery sides… even hundreds of tiny raised dots representing aircraft tie
down points. There
are also a number of very delicately sculpted smaller details like floater
net baskets (with floats visible inside), deck winches, cranes, and some
excellent canvas cover detail on the two lifeboats aft.
These well done touches may be from the hand of the
primary pattern maker for the kit, Anthony D. Bulone, a talented sculptor
best known as the creator of the face for the original Mattel Barbie doll.
| CONSTRUCTION |
I
had bought the Midway quite a while
ago but somehow never got started on it. Not that it was a bad kit; it just
wasn’t one of those “must builds” for me that push everything else aside.
Lack of references in my library, the odd scale, heavy detailing and lack
of aftermarket goodies for it had eventually relegated the kit to the bottom
of the model stash. More compelling projects always seemed to find
their way to my
 workbench…
but with a busy career, growing family and the increasing complexity of the
projects themselves I found myself finishing fewer and fewer kits!
With leisure time at a premium and my own ever-rising standards for build
quality, was it still even possible to complete a good-sized scale model?
Looking in my closet for a quick build, the relatively simple
Midway seemed like a good choice. I
resolved to put the model together right out of the box without worrying
about less than perfect details and with no scratchbuilding, replacement
parts, or photoetch allowed. It would be a straightforward, speedy
build like when I was a kid (but without the bb guns and firecrackers!)
workbench…
but with a busy career, growing family and the increasing complexity of the
projects themselves I found myself finishing fewer and fewer kits!
With leisure time at a premium and my own ever-rising standards for build
quality, was it still even possible to complete a good-sized scale model?
Looking in my closet for a quick build, the relatively simple
Midway seemed like a good choice. I
resolved to put the model together right out of the box without worrying
about less than perfect details and with no scratchbuilding, replacement
parts, or photoetch allowed. It would be a straightforward, speedy
build like when I was a kid (but without the bb guns and firecrackers!)
So I set to work. Just as aircraft builds
usually begin with the cockpit, so ships begin with the hull. And that
first step was also the first glitch in my plan. Revell’s rendition of
the hull is pretty nice… except for that flat hull bottom. It is
really very strange; this thing is not a true full hull, but it isn’t a
proper waterline either. It is as if some giant were lifting the ship
partially out of the sea, exposing about ¾ of the ship below the waterline
but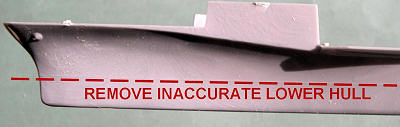 without taking it entirely from the water. No propellers or shafts are
provided, and the twin rudders are actually cut in half to match the flat
hull bottom. Even for a quick build, I just couldn’t live with that!
without taking it entirely from the water. No propellers or shafts are
provided, and the twin rudders are actually cut in half to match the flat
hull bottom. Even for a quick build, I just couldn’t live with that!
Waterlining the model was the easiest solution, so the first step was to cut away the underwater portion of the hull. Revell had thoughtfully included a raised waterline to assist painting, so I simply cut along this using my Dremel’s saw attachment. Ok, so the result was a little ragged, but that cut would be covered by the scratchbuilt ocean base to come later…Doh! There went my out of the box idea almost from the start! I guess if I kept it simple the base wouldn’t be that much more work…
With the hull thus summarily dealt with, the rest of the build went very fast. A mere eight parts built up the entirety of the exterior hangar deck bulkheads, with three more for the forecastle and aft main decks. These attached easily to the hull, quickly completing the structure up to flight deck level. No hangar deck is provided, but it didn’t matter since the various hangar doors are all depicted closed. The exception to this is at the portside elevator. On this one the hangar door is provided as a separate piece and the elevator includes a sliver of hangar deck about an inch deep. With an airplane outside on the elevator and the darkened space within you could probably get away with leaving the door open, but for simplicity I just left it closed.
In going for the simple build I had decided to
ignore the crude 20mm Oelrlikon mounts cast into the sponsons as well as the
 molded-in
railing along the edges of these parts, which I would have normally scraped
off and replaced with photoetched brass. Although making for a much
better scale appearance, this sort of thing also tends to bog down my
projects for weeks…. but not this time! I slid past, just taking time
to clean flash off the parts and glue them down. It was the same with
the island, where again I left the molded-in railing and took time only to
clean up the parts and conceal the seams. The tripod mast and radars
also went on without alteration. Man, this was modeling! I
couldn’t believe how much I was able to get done in a single afternoon!
molded-in
railing along the edges of these parts, which I would have normally scraped
off and replaced with photoetched brass. Although making for a much
better scale appearance, this sort of thing also tends to bog down my
projects for weeks…. but not this time! I slid past, just taking time
to clean flash off the parts and glue them down. It was the same with
the island, where again I left the molded-in railing and took time only to
clean up the parts and conceal the seams. The tripod mast and radars
also went on without alteration. Man, this was modeling! I
couldn’t believe how much I was able to get done in a single afternoon!
The flight deck came next. This big part comes molded as a single piece with the centerline elevators, arrestor gear, catapults, tie-down points and other details all crisply molded in. Sure, the tie down points are raised dots instead of depressions and the dashed aircraft guide lines are raised outlines, but the details still look reasonably good. Best of all, the various galleries are cast directly onto the deck edge so there is no need for any assembly—so it is just a matter of slapping it on and gluing it down.
Next came the smaller details. Assorted bits such as anchors, cranes, and sensors, though by no means perfect, went on without enhancement. The 5 inchers came molded as single pieces, and the 3 inch twins attached to bases already cast directly onto the sponsons. These parts look only generally like the real things, but I didn’t let myself fuss over improving them either. Basic flash clean up and paint was all these little beauties got from me before they went aboard!
| COLORS & MARKINGS |
U.S.
Navy ships of the 1950s were painted 5-H Haze Gray over all vertical
surfaces, with darker 20-B Deck Blue or 20 Deck Gray over the decks.
Aircraft carriers usually had 21 Flight Deck Stain (similar to Deck Blue)
over their flight decks, but since the Midway
class didn’t have wooden flight decks their armored steel flight decks were
Deck Gray as well. In the spirit of keeping things simple I used Model
Master (Testors) Dark Ghost Gray for Haze Gray and Model Master Gunship Gray
for the decks. These colors were reasonable matches for Haze and Deck
Gray right out of the bottle but, more importantly, I already had them on
hand! These were brush painted on, starting with the light gray
vertical surfaces followed by the darker decks. Recessed areas on the
lighter gray vertical surfaces were then given pin washes of Gunship Gray,
later drybrushed with the base color to tidy things up but still leave a bit
of depth. The flight deck received a coat of Gunship Gray with the
elevators receiving a slightly lightened color to help them stand out a
little. Small details of the arrestor gear and catapults were picked
out in the lighter gray. The aircraft guide lines on the flight deck
were painted Floquil SP Armor Yellow. The repetitive process of
painting these dozens of dashed
 lines
was made much easier by Revell’s decision to represent them with raised
outlines. All I had to do was to put a drop or two of thinned paint
within the little rectangles and capillary action filled them in neatly and
uniformly.
Apparently the model had been designed with brush painters in
mind!
lines
was made much easier by Revell’s decision to represent them with raised
outlines. All I had to do was to put a drop or two of thinned paint
within the little rectangles and capillary action filled them in neatly and
uniformly.
Apparently the model had been designed with brush painters in
mind!
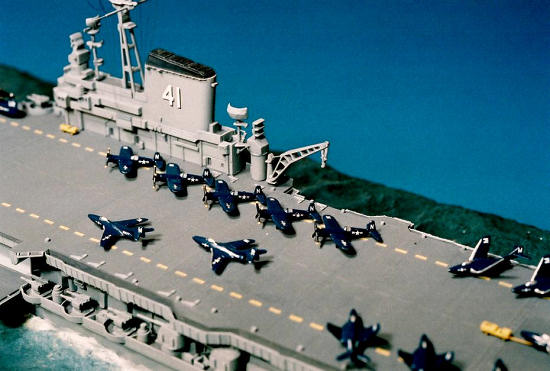
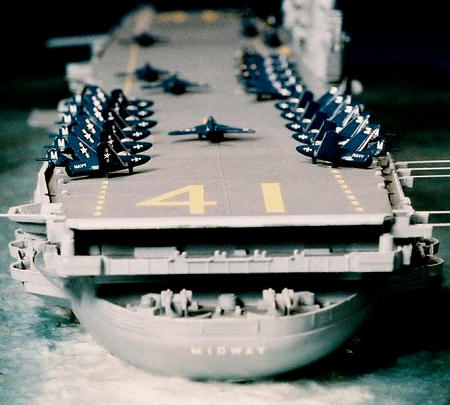
At this point I wished I had one of the early releases of the Franklin D. Roosevelt which had the hull number “42” in raised outline on the funnel and flight deck. This would have made painting in those markings as easy as the dashed lines had been. As it was my model was one of the later issues from 1974, by which time Revell had removed these numbers from the molds. So instead the kit had come with decals for these areas: a pair of large yellow “41”s for the flight deck, shaded white ones for the funnel, and “MIDWAY” in large black letters for the stern. Unfortunately, the 35 year old decals in the box must have at some point become damp, because they were stuck solid to the backing paper and were unusable.
Replacing the shaded “41”s for the funnel was no problem. The Gold Medal Models 1/350-1/400 scale Naval Ship Decals (set 350-1D) contains perfectly sized shaded USN style numbers—they are even a little sharper than Revell’s decals would have been. The white “M-I-D-W-A-Y” letters for the fantail were also Gold Medal Models, in this case aircraft codes cut individually from a decal sheet for 1/350 scale USN WWII aircraft (set 350-6D). Like the kit decals these were slightly too big, but accurately scaled letters would have been almost invisible in this location anyway, so they worked just fine. For the yellow “41”s on the flight deck I painted a swatch of AP Armor Yellow over some spare solid decal sheet. Then, using the yellow “4’ and “1” numbers cut from the ruined Revell sheet, I traced the outlines on the painted over sheet, cut them out, and presto—new decals for the flight deck!
I refrained from any weathering as the Midway class carriers were the pride of the U.S. Navy of the time and were carefully maintained. Besides, it would have slowed things down, and this build was really cookin’ along!
THE AIRGROUP
However well constructed the ship, it is the
airgroup that really makes or breaks an aircraft carrier model. This
kit comes with 26 aircraft including sixteen F9F-6 Cougars (eleven with
folded wings), six F4U Corsairs, two A-1 Skyraiders, and a pair of Piaseki
HUP-2 Retriever helicopters with folded rotors. The planes are
simplified but basically accurate, and there is even a modest
 amount of
raised detailing. Landing gear on the fixed wing aircraft is depicted
with solid pegs. No decals are provided for any of the planes.
amount of
raised detailing. Landing gear on the fixed wing aircraft is depicted
with solid pegs. No decals are provided for any of the planes.
I started by cleaning up the flash and mold lines and assembling the prop planes. It was nice to work with such uncomplicated planes after Trumpeter’s 1/350 scale multi-part masterpieces that seem to take forever to complete. Midway’s aircraft are all just single parts, except the Corsairs and Skyraiders which have their engines/propellers as separate pieces. They were prepped for painting in no time, except that my old kit was missing three of the engine/prop parts (so no Skyraiders and one less Corsair). Despite their simplicity they looked pretty decent, if a little plain.
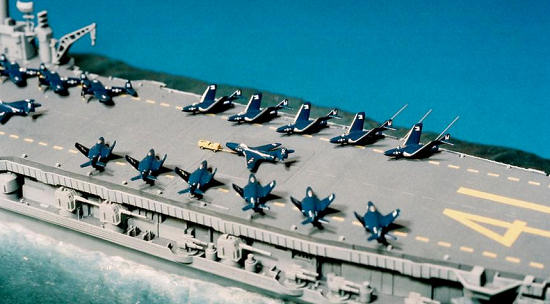
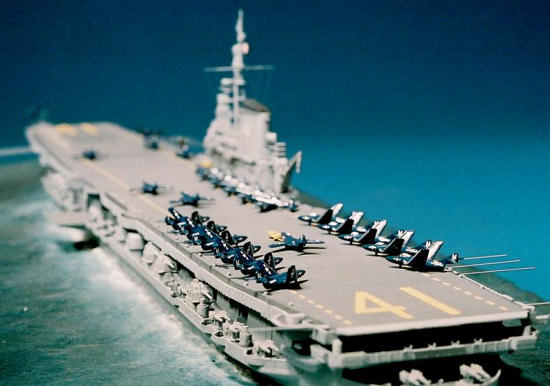
I brush
painted the first of the planes in gloss Sea Blue. Looking at them as
they dried, though, they didn’t seem quite right. The paint,
Testors Dark Sea Blue
(FS15042) was the correct color for USN planes of this era,
but it looked too dark, almost black on these tiny airplanes. I tried
lightening the Sea Blue with white for a better scale effect, but for some
reason that looked even worse! So using a little artistic license, I
repainted them with Testors Blue Ange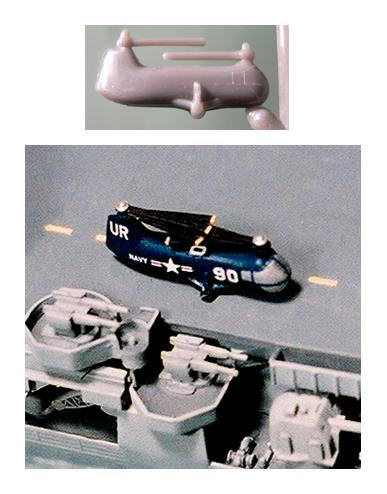 l
Blue (FS15050), a much lighter,
bluer shade. Although not the technically correct color, the effect
was much more convincing. The planes now actually
looked blue.
l
Blue (FS15050), a much lighter,
bluer shade. Although not the technically correct color, the effect
was much more convincing. The planes now actually
looked blue.
After painting the glazed areas silver and making my best attempt at canopy framing, the airgroup was ready for its markings. Since the kit provided no decals, I used some aftermarket stuff I had on hand. The national insignia on the Cougars and Corsairs came from Gold Medal Models 1/700 scale Naval Aircraft Insignia Decals (set 700-3D), as did the white “NAVY” and “MARINES” fuselage markings on the Cougars. As for the white “N”, “R”, and “M” codes on the wings and tails, these letters were borrowed from “MARINES” markings from the Gold Medal Models 1/350 WW2 USN Aircraft Decals (set 350-6D). Following a recommendation from a fellow IPMS club member I applied the decals a little differently than I usually do, placing each on a little pool of Future applied to the aircraft, followed by another brushed on coat of Future when dry. It worked just fine, and the hand brushing saved the need to deal with the airbrush. I hadn’t intended to use any aftermarket on this project, but the GMM decals went a long way toward dressing up those plain little birds!
My favorite aircraft were the two Piaseki HUP-2 Retriever helicopters. Molded as single pieces with folded rotors, I painted and decaled them along with the rest of the aircraft. They looked good mostly, but those heavily molded, pole-like rotors really bugged me. They looked less like folded rotors than a clumsy, over thick attempt at a single blade. When my twelve year old daughter actually asked me what had happened to the other blades, I finally gave in and replaced them with thin Evergreen sheet plastic strips. Yeah, I was disregarding my own “no scratchbuilding” rule, but it only took a few minutes and they looked SO much better!
| FINAL CONSTRUCTION |
Setting aside the completed airgroup, I turned my attention back to the
ship. Things looked good, but that jagged waterline demanded that it
be placed on some sort of sea.
I made a simple one from Celluclay paper
maché over a piece of scrap plywood. The sea base actually didn’t add
a lot of time to the project, and it made the model displa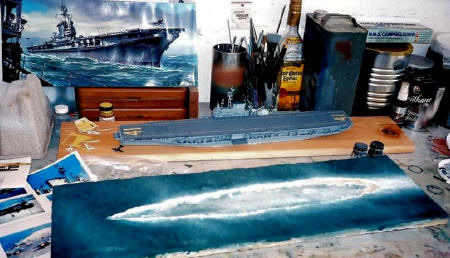 y
much more interesting.
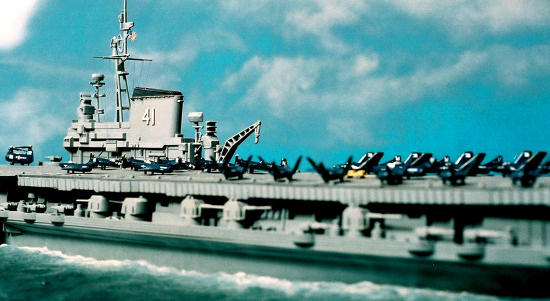
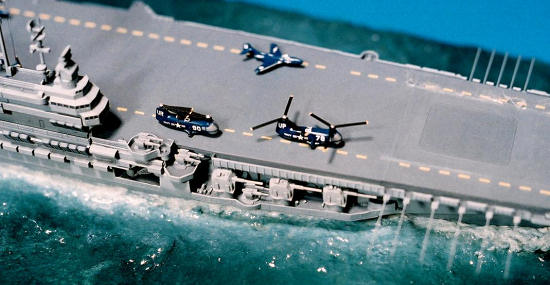
After painting it up and attaching the ship to it, I
couldn’t resist adding a few small extras, so the mast received a brass wire
yardarm with some rigging and little decal flag. A couple of “yellow
gear” tow mules borrowed from a 1/500 scale
Nimitz
and some horizontal brass wire antennas rounded out the detail on the flight
deck. Finally, I suspended one of the Cougars on a blue-painted wire
just off the bow as if it were just taking off.
y
much more interesting.
After painting it up and attaching the ship to it, I
couldn’t resist adding a few small extras, so the mast received a brass wire
yardarm with some rigging and little decal flag. A couple of “yellow
gear” tow mules borrowed from a 1/500 scale
Nimitz
and some horizontal brass wire antennas rounded out the detail on the flight
deck. Finally, I suspended one of the Cougars on a blue-painted wire
just off the bow as if it were just taking off.
And with that it was done—a finished model! Not only that, it was accomplished with only a few evenings of pleasant, intermittent effort among the demands of the job, wife, and four busy kids. It certainly isn’t the most detailed model I’ve ever done, but it was a quick, fun diversion from those more elaborate builds I so rarely seem to actually complete.
| CONCLUSIONS |
 Revell’s
Midway
is not the greatest kit ever produced, but considering the fact that it
first appeared in 1954, it really isn’t bad at all.
With the exception of that dopey underwater hull it
has “good bones”, and at 21½ inches in length it is eye-catching on the
shelf.
The basics are there for a impressive superdetailed replica
if you are inclined to make the effort, but if you are looking for something
more relaxing it can also be assembled without fuss into an attractive
display piece almost right out of the box.
Revell’s
Midway
is not the greatest kit ever produced, but considering the fact that it
first appeared in 1954, it really isn’t bad at all.
With the exception of that dopey underwater hull it
has “good bones”, and at 21½ inches in length it is eye-catching on the
shelf.
The basics are there for a impressive superdetailed replica
if you are inclined to make the effort, but if you are looking for something
more relaxing it can also be assembled without fuss into an attractive
display piece almost right out of the box.
This one was so
much fun my next project will likely be that old Revell box scale USS
Wasp
lurking in my closet.
Now if I can just get past the idea of improving the
hull and scratchbuilding a nice little hangar deck for it…
| REFERENCES |
USS Midway museum website http://www.midway.org/site/pp.asp?c=eeIGLLOrGpF&b=3038957
Pawlowski, Gareth
L., Flat-Tops and Fledglings : A History of American
Aircraft Carriers ; NY, Castle Books, 1971.
If you would like your product reviewed fairly and quickly, please contact me or see other details in the Note to Contributors.