| KIT #: | W-13 |
| PRICE: | Around $20.00 |
| DECALS: | Several ships in the class |
| REVIEWER: | Tim Reynaga |
| NOTES: | First issued in 1994 |
| HISTORY |
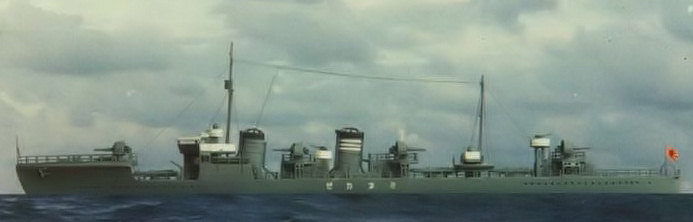
The destroyer
Minekaze ('Summit Wind') was a significant transitional design for the Imperial
Japanese Navy of the earlier part of the 20th Century. In contrast
to the the foreign-designed vessels which had predominated in the IJN
previously, Minekaze was an entirely Japanese effort. The ship incorporated a
number of distinctive design innovations including a lengthened forecastle with
 a semiprotected well deck for the forward torpedo tubes and high mounted main
guns for improved fields of fire. Armament consisted of four 4.7“ guns, six 21”
torpedo tubes, and two .303” machine guns as well as provision for up to 20
mines. Rated speed was an impressive 39 knots.
a semiprotected well deck for the forward torpedo tubes and high mounted main
guns for improved fields of fire. Armament consisted of four 4.7“ guns, six 21”
torpedo tubes, and two .303” machine guns as well as provision for up to 20
mines. Rated speed was an impressive 39 knots.
Mainstays of the Imperial Navy destroyer squadrons throughout the 1920s, the thirteen Minekaze class destroyers were obsolete by the beginning of the Pacific War. Relegated to secondary roles such as patrol vessels, high speed transports, target control ships, and even as Kaiten (human torpedo) carriers, most ultimately fell victim to submarines. Among these was Minekaze herself, sunk in February 1944 off Taiwan by the USS Pogy (SS-266).
| THE KIT |
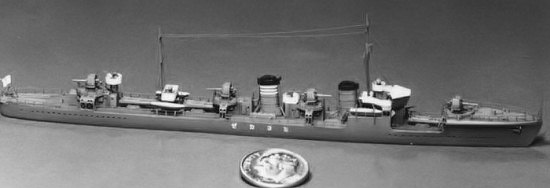
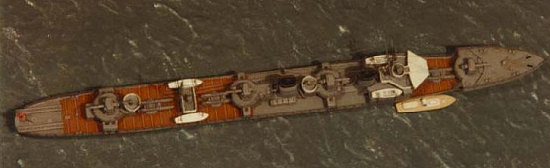
The 1/700 scale
Minekaze is typical of Skywave/Pit Road efforts, with accurate outline and
crisp, detailed moldings. At about the size of a ballpoint pen this model is
pretty small, but there is still plenty going on. I especially liked the fine
non-slip deck surfaces and the well-detailed weapons. Decals are unusually good
for a ship model including flotilla numbers and Minekaze class ship’s names for
the hull sides and stern as well as funnel stripes and naval ensigns. Another
plus is the inclusion of alternate funn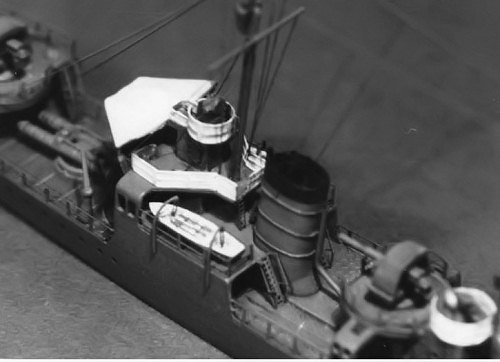 el caps, weapons, and other parts so you
can accurately depict Minekaze as she appeared at different points in her
career.
el caps, weapons, and other parts so you
can accurately depict Minekaze as she appeared at different points in her
career.
| CONSTRUCTION |
This kit would have been a nice build right out of the box, but I decided to make some improvements.
I started with the hull. Like most destroyers of the era, Minekaze had prominent portholes on both the superstructures and hull sides. Skywave/Pit Road faithfully represented these throughout the ship, but on the hull they were depicted only as faint depressions rather than sharp round openings. Also, some of the portholes on the kit deckhouses didn’t exactly match the locations indicated on my references. A simple fix was to redefine them with a #77 drill bit fitted into my X-Acto. This straightforward task turned out to be unexpectedly tedious; by the time I was finished I had drilled out over 100 of these little holes! Still, it did look better…
| COLORS & MARKINGS |
Another improvement to the hull was to add plating. This started with an overall coat of Testors Gunship Gray, which is a reasonable match for Japanese Imperial Navy gray. I then covered the hull with spaced strips of masking tape and appied a second coat. Removing the tape left a series of slightly raised bands along the hull sides to simulate the effect of hull plating. The linoleum covered decks were painted Humbrol HG15 Weinrot.
| CONSTRUCTION CONTINUES |
 The bridge
and deckhouses were next. They came suitably busy with delicate molded
surface detail including portholes, ladders, and doors. The problem was that
these details did not all match the photographs in my references, which showed
arrangements slightly different from those of the kit. The kit may well have
been accurate as Minekaze was repeatedly refitted over the course of her long
career, but I altered the model to conform with pictures from the early
1920s. This involved filling and redrilling some portholes and replacing the
ladders and doors with photoetched parts from Gold Medal Models sets. These
delicate parts are a quick improvement, and feature some incredibly small
details. The 2mm high watertight doors, for example, even have relief-etched
dogs and hinges!
The bridge
and deckhouses were next. They came suitably busy with delicate molded
surface detail including portholes, ladders, and doors. The problem was that
these details did not all match the photographs in my references, which showed
arrangements slightly different from those of the kit. The kit may well have
been accurate as Minekaze was repeatedly refitted over the course of her long
career, but I altered the model to conform with pictures from the early
1920s. This involved filling and redrilling some portholes and replacing the
ladders and doors with photoetched parts from Gold Medal Models sets. These
delicate parts are a quick improvement, and feature some incredibly small
details. The 2mm high watertight doors, for example, even have relief-etched
dogs and hinges!
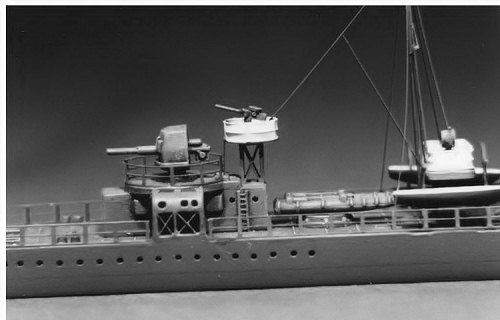
Another change on the deckhouses was to hollow out the flying buttress supports under the gun mounts, which were molded solid. This also afforded the opportunity to correct a small discrepancy in the large buttress supporting the aft gun mount, which the kit depicted as a symmetrical unit divided into two equal sections. This was correct for the similar Kamikaze and Mutsuki classes but not for the earlier Minekaze Class, which had a unique asymmetrical arrangement.
The kit bridge
assembly wasn’t bad, but I thinned the windbreak to a more scale thickness and
carved away the molded-in guard rails to make way for photoetch replacements.
Since Minekaze had an open canvas-covered bridge at the early point in her
career which I wished to portray, I also removed the bridge windows. Finally, I
filled the slots for the the over-scale kit davits on the bridge sides.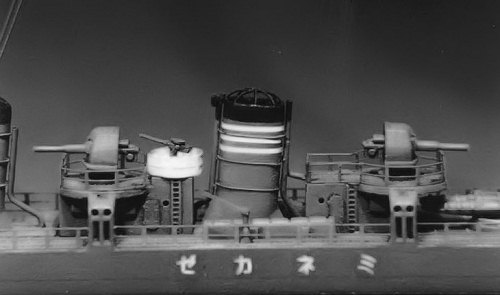
The funnels were probably the weakest aspect of the kit, being molded solid with surface detail that was both inaccurate and overscale. I hollowed out both funnels and sanded away the surface details. The funnels received new grab rails made from ultrafine copper wire taken from the coil of an old transistor radio (remember those?) wrapped around the stack and secured with white glue applied with a fine paintbrush. It was a simple but fiddly process to get it just right, which is why I like the slow setting white glue. The spidery wire funnel caps were fabricated from thin copper wire using the solid kit funnel caps as a guide. Vent tubes made from copper were were added to the ends of the stacks. Again, the kit parts sometimes differed from my references, so I used the photos as my guide. In the end those little funnels were comprised of a total of 35 parts!
The main guns and torpedo tubes came next, followed by the small .303” machine guns. I used the main gun parts provided in the kit with the muzzle ends hollowed out, and the .303” guns were improved by replacing the barrels with wire and adding circular ammo drums punched from .010” styrene stock. The little canvas-covered rail enclosures around the machine guns were simulated with photoetch rails coated with liquid Micro Mask. The slight shrinkage of the Micro Mask as it dries neatly simulates the look of canvas dodgers.
 The ship's
boats in the kit were well represented with delicate thwarts, keels, and even
scribed planking. Unfortunately, the motor whaleboats were marred by ugly
knockout pin marks right in the middle of them, so I filled them in with putty
to represent canvas covers. The forward whaleboats were ok, so I painted the
insides white and added tiny photoetched oars, painted gray. The boats were
attached to wire davits with photoetched pulleys.
The ship's
boats in the kit were well represented with delicate thwarts, keels, and even
scribed planking. Unfortunately, the motor whaleboats were marred by ugly
knockout pin marks right in the middle of them, so I filled them in with putty
to represent canvas covers. The forward whaleboats were ok, so I painted the
insides white and added tiny photoetched oars, painted gray. The boats were
attached to wire davits with photoetched pulleys.
The kit masts, though accurate, were too heavy for the scale so I built up the simple pole masts and yards with copper wire. The crow’s nest was cut from the kit part, hollowed out and attached to the new foremast along with a photoetched ladder. Safety rails surrounding the weather decks were aftermarket photoetch parts, with rigging made from fine wire painted gray. Finally, the Japanese naval ensign from the kit decal sheet added a touch of color.
| CONCLUSIONS |
This is an excellent little kit. You can build it right out of the box without need of any “fixes”, but any extra effort on this one just makes it better!
| REFERENCES |
February 2007
Copyright ModelingMadness.com
If you would like your product reviewed fairly and fairly quickly, please contact the editor or see other details in the Note to Contributors.