| KIT: | Academy 1/160 Cutty Sark |
| KIT #: | ? |
| PRICE: | $40.00 |
| DECALS: | One option |
| REVIEWER: | Len Roberto |
| NOTES: | new kit in 2002 |
| HISTORY |
One of the most famous sailing ships of all time, the Cutty Sark was launched in 1869 and was one of the last clipper ships to sail. She was built to sail fast and deliver cargo- period. She is preserved in England- see her site here:
http://204.119.244.226/World/Cutty_Sark/index.htm
| THE KIT |
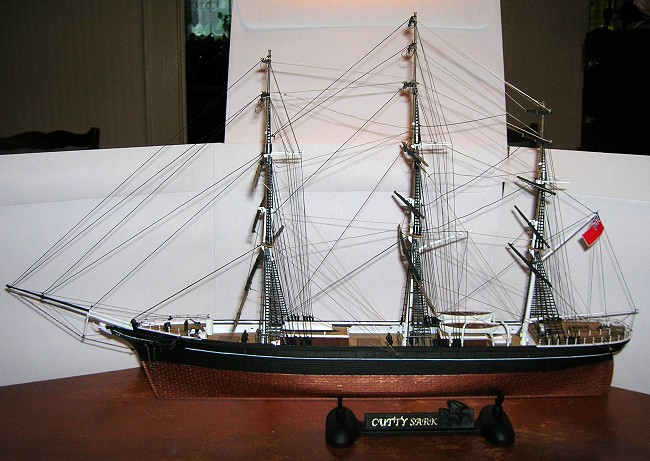
There are many kits out there on this famous ship. From the 1959 classic 1/96 scale from Revell to small 1/350 kits from IMAI to giant wood kits for hundreds of dollars. I have built the big Revell kit and seen the smaller IMAI in 1/350. Academy’s kit is in 1/160 scale- sizing out to a nice size of 22 inches from jib to stern. Not as massive as the old Revell but not tiny like the 1/350. It is perfectly molded with no flash anywhere. It is molded in 4 colors with the 2 hull halves and ratlines in black, the deck pieces in tan, the yards and deck furniture in brown, and the rest in white. It also comes with chain for the anchors, 3 sizes of rigging line, decals for the stern and flags, and the usual vac sails. One of the gems of this kit is the instructions! You get a tutorial on tying knots and the various ways to use them in rigging the model. It is wonderfully illustrative. The plastic is soft which does demand caution when rigging time comes but overall- the kit provides a perfect experience for the first time sailing ship modeler.
| CONSTRUCTION |
 I had no problems at
all during construction. The fit was Tamiya-like in its layout and in the
engineering. Of course, some shortcuts were taken to ease assembly and
when comparing the parts to the Revell kit and to pictures of the ship, you
will easily find the areas that are simplified. I added a few things to my
model to bring it a little more detail but as is- the kit provides all you
need for a great model.
I had no problems at
all during construction. The fit was Tamiya-like in its layout and in the
engineering. Of course, some shortcuts were taken to ease assembly and
when comparing the parts to the Revell kit and to pictures of the ship, you
will easily find the areas that are simplified. I added a few things to my
model to bring it a little more detail but as is- the kit provides all you
need for a great model.
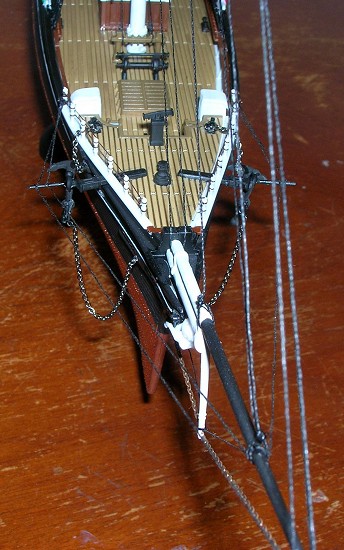
The two hull halves were clamped together and glued with no fuss and it fit nicely. Before any other construction was done it was on to the paint shop. I believe the best painting instructions are offered on the Cutty Sark official site so I followed them rather than the kit instructions:
Hull: Bottom sheathed with Muntz metal, a mixture of copper and zinc, having a golden shade when polished, and oxidizing to a greenish tinge.
Topsides: Black. No boot topping. Edge of covering board white. No other white lines, and no gold stripe.
Lower masts (iron), Doublings and caps, Bowsprit, Dolphin striker, Figurehead, Tops and spreaders, inside of the Bulwarks, davits and stancions: White.
Jib boom, Whisker booms, yards, all deck fittings: Black
Topmasts & Topgallant masts: Wood. Vancouver spars, varnished.
Various shades of teak were used in the following areas: Deckhouses and sides of monkey poop: Varnished teak. Tops of deckhouses bare teak with white cove. Monkey poop bare teak with margin plank in varnished teak. Pinrail & topgallant rail: Varnished teak. Decks: Scrubbed teak.
Boats: White with teak gunwale strake.
So here are the steps I took to paint the hull: Spray bottom of hull with copper- mask off when dry. Then do the inner bulwarks (sides) with white- mask off when dry. Next do the upper hull in black. Finally I used a white paint pen for the white line around the hull
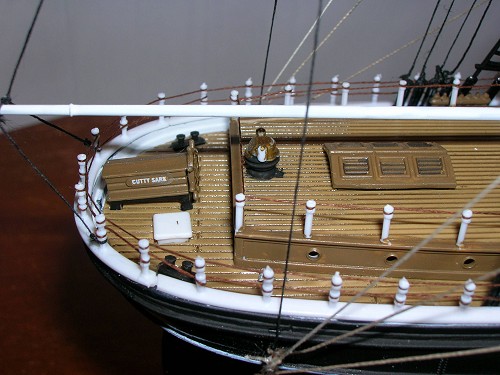
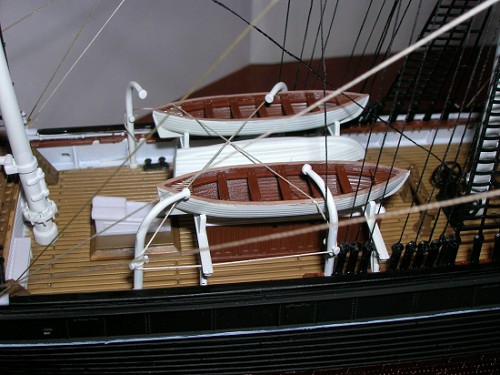 DECKS: The main deck
is one piece and is molded in a nice tan/ beige. The tops of the
deckhouses and stern are the same. I decided to leave as is but flowed in
a brownish/ black heavy wash to fill the lines and darken areas of the
deck. Same for the other parts. When dry these parts fit into the hull
with ease and a line of cement was flowed around with no trouble providing
a solid bond.
DECKS: The main deck
is one piece and is molded in a nice tan/ beige. The tops of the
deckhouses and stern are the same. I decided to leave as is but flowed in
a brownish/ black heavy wash to fill the lines and darken areas of the
deck. Same for the other parts. When dry these parts fit into the hull
with ease and a line of cement was flowed around with no trouble providing
a solid bond.
The remaining parts were the same: trouble free and easy to paint and place on the deck. The winches, pumps, pinrails, etc were painted and added to the deck. The stanchions were easily rigged with some brown line on bow and stern
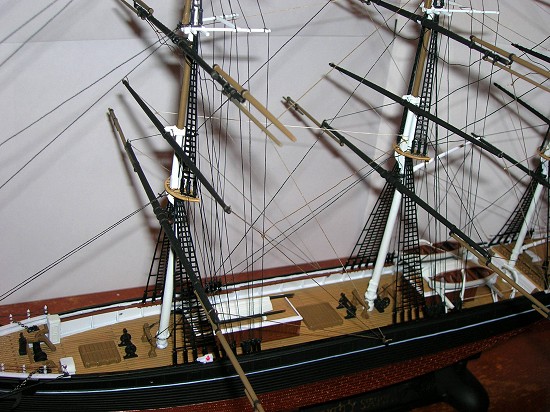
Next up were the masts. Academy molded them in one long piece and the modeler just adds on the yards, crosstrees, tops, and bottom pinrail hoops. One thing that I wish was done differently was that they molded the stunsail booms in extended position. Without sails, this looks a little odd as they are usually lashed to the yards when not under heavy sail. I could have cut them up and done this but lazily left them as is. This also makes the main yards very long and increases the width of any case you want to put this model in.
Masts were sprayed white and then paint dark brown for uppers. Yards were black with brown stunsail booms.
When the yards were ready – they were glued into the hull and it was on to rigging.
 First to rig are the
anchors using the chain provided. I then followed the path I used for the
other big sailing ships I have done. This method makes it easy to access
and reach the areas you need to reach with the least hassle and
acrobatics. The procedure goes like this:
First to rig are the
anchors using the chain provided. I then followed the path I used for the
other big sailing ships I have done. This method makes it easy to access
and reach the areas you need to reach with the least hassle and
acrobatics. The procedure goes like this:
1. Rig head gear (bow lines) first- lighter black line.
2. Rig Forestays next- these are the lines from mast to mast and down to the bowsprit- heavier black line for these.
3. Rig Backstays next- these go from side to side and cross over and through masts to deadeyes. Black line for these.
4. Next attach or rig the shrouds and ratlines. Most kits supply you with these and they are a weak point because they are too thick. This kit has them as well. I have tried rigging them one by one with line but decided to use the kit ones here. They attach securely into slots on the tops and crosstrees.
5. Next you rig the working lines that lift and move yards and sails. I decided to add braces all around but nothing else. I used 3 different colors of tan line for these.
I made the lines as tight as I could but the flexibility of the plastic meant it was really easy to bend something to much and overtighten. Take it easy and you will be fine. Again here I used the Revell instructions for rigging. I think they are easier to follow and understand than the Academy instructions. I also added in a few lines not mentioned in the Academy notes. Every line was ran through a stick of beeswax to coat it and remove the fuzzies.
| COLORS & MARKINGS |
 Touch-up painting was
done around the model but 99% of the painting is done before rigging is
started. You only need basic colors to make this model - another reason
it is perfect for a first time ship builder: black, white, brown, and
copper are your foundation.
Touch-up painting was
done around the model but 99% of the painting is done before rigging is
started. You only need basic colors to make this model - another reason
it is perfect for a first time ship builder: black, white, brown, and
copper are your foundation.
I decided not to weather the model except for the deck. The copper sheathing turns a greenish color but I have not figured out how to make this look right so I left it as is.
| FINAL CONSTRUCTION |
Tiny drops of CA glue on all the knots is the final step after checking the tightness of each. Then I applied the stern decal and the flag to the halyard. It would have been nice if the ornate stern decoration was molded in but so be it. I used a gold paint pen to highlight the bow decorations and I was done.
| CONCLUSIONS |
I have built a good number of sailing ships so far and have many more to do. I have to say that for the cost, ease of assembly, size of the model, and parts breakdown- this kit is a perfect choice for a first time sailing ship modeler. It also helps that the ship is one of the most famous and beautiful clipper ships in history. I can’t recommend it any higher than that!
October 2005
| REFERENCES |
http://www.naplak.com/modeling/articles/cutty_sark.htm
If you would like your product reviewed fairly and quickly by a site that has around 300,000 visitors a month, please contact me or see other details in the Note to Contributors.