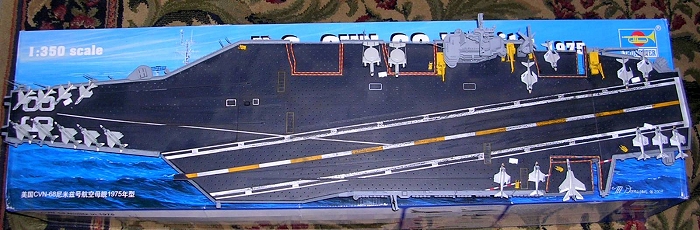
Trumpeter 1/350 USS Nimitz
| KIT #: | ? |
| PRICE: | $199.95 MSRP |
| DECALS: | one option with air wing |
| REVIEWER: | Len Roberto |
| NOTES: | GMM and Eduard brass sets used. |
| HISTORY |
 There are hundreds of
sites out there on the history of the ship and the class. Rather than go
into it here, I would refer anyone to start here:
There are hundreds of
sites out there on the history of the ship and the class. Rather than go
into it here, I would refer anyone to start here:
http://www.fas.org/man/dod-101/sys/ship/cvn-68.htm
I chose to model the ship as she was in her first deployment after shakedown: July 7, 1976 to February 7, 1977- in the Med. This is how Trumpeter molded the ship so no major surgery was required. The air wing was CVW 8 with tail codes of AJ consisting of:
VF-74 and VMFA-333 (F-4J) 12 aircraft each squadron
VA-35 (A-6E and KA-6D) 12-16 aircraft
VA-82 and VA-86 (A-7E) 12 aircraft each squadron
RVAH-9 (RA-5C) , VAW-116 (E-2C), VAQ-130 (EA-6B), HC-2 (SH-3G); all with 4 aircraft in each det
| THE KIT |
This is a mammoth kit. About the same size as the Tamiya CVN-65 USS Enterprise, Trumpeter goes many steps further by including a hangar deck in 3 pieces complete with molded-in tie downs and the option of full- hull or waterline- eliminating the need to saw off the lower hull of the Tamiya Enterprise. The kit is very well packaged, heavy, and contains north of 800 parts (most of which are from the air wing!)
Speaking of the aircraft- the air wing supplied in the kit includes one SH-3H Sea King, one RA-5C Vigilante, six F-4J Phantom II, one E-2C Hawkeye, two A-3 Skywarriors, three A-6 Intruder, six A-7 Corsair II, and two S-3 Viking. Extra sets can be purchased of usually 6 per box of SH-3H Sea Kings, RA-5C Vigilantes, F-4J Phantom IIs, F-14D Tomcats, F/A-18E Super Hornets, E-2C Hawkeyes, A-3 Skywarriors, A-6 Intruders, A-7 Corsair IIs and S-3 Vikings.
 Continuing their trend,
Trumpeter molds the airframes in gray styrene, the details are black, and
the canopies are clear. In the case of the SH-3H Sea King, the whole
airframe is clear so you can realistically mask the windows before
painting. Each aircraft is on one sprue.
Continuing their trend,
Trumpeter molds the airframes in gray styrene, the details are black, and
the canopies are clear. In the case of the SH-3H Sea King, the whole
airframe is clear so you can realistically mask the windows before
painting. Each aircraft is on one sprue.
Two sets of decals are included in the kit. The first contains all of the hull and superstructure identification markings as well as a wide range of deck striping. The second sheet contains markings for each of the aircraft included in the kit representing Air Wing 8 (CVW-8). A full complement of deck equipment is also included.
I have read and heard from shop owners that this kit did not sell very well. In my local shop, the owner received 2 - 1 of which I purchased. The other is still up on the shelf. A 1/700 version is forthcoming which will probably sell a bit better.
You can easily spend over $300.00 on tricking out this kit. With only 22 aircraft in the kit, you need to purchase another 60 or so to have a full air wing. Here is what I spent:
Kit= $149; Gold Medal Models PE basic set=$42; Extra sets of aircraft E2C, A7E, A6E= $15.00 Squadron Sale!;Eduard figures set=$15.00; Total= $221.00
For a look at the parts as they come in the box, please visit this preview.
| CONSTRUCTION |
 The kit was built up
rather easily. You first add details around and inside the hull. Then
proceed to flight deck trimmings before attaching to deck. Next up is the
island and finally the air wing. Building, painting and decaling the air
wing took the same amount of time as the ship. More on this later.
The kit was built up
rather easily. You first add details around and inside the hull. Then
proceed to flight deck trimmings before attaching to deck. Next up is the
island and finally the air wing. Building, painting and decaling the air
wing took the same amount of time as the ship. More on this later.
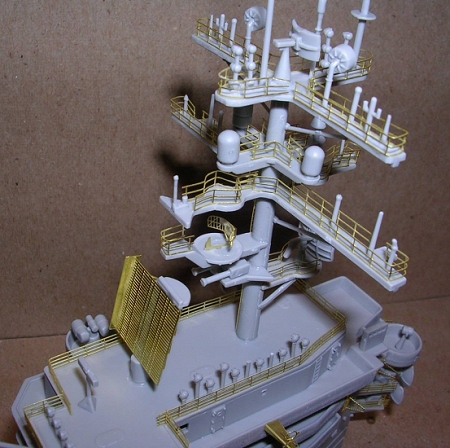
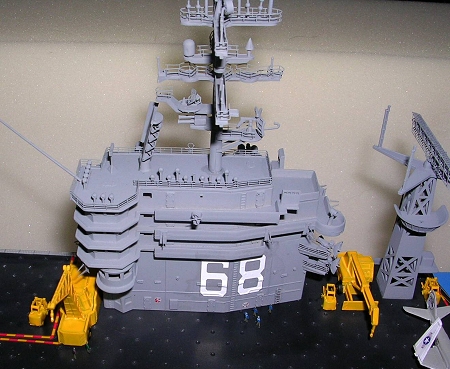
I started with the island. It went together very well and I added photoetch as I went along. Adding railings to the mast and extensions was very delicate and tricky because there is not a lot of room to work with. There were no bridge window railings on the first cruise. NOTE: use clear acetate from a 3 ring binder sheet or some other clear plastic for the bridge windows. The GMM set also includes individual wiper blades for each window! I knew I would make a mess of that so those stayed on the brass fret!
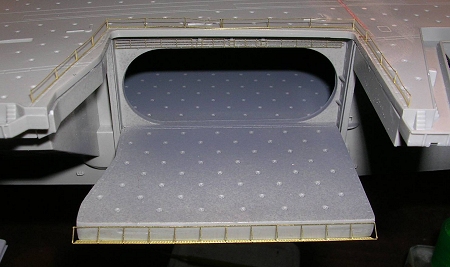
Next it was on to the hull. Metal braces with tiny screws and nuts are provided to stabilize the hull. All other details were added with little trouble and PE railings added where indicated on the excellent GMM instructions. You have a choice of open or closed hangar doors and I chose open. This lets you look into the hangar bay where I planned to use the less detailed Tamiya 1/350 aircraft to add more to my model. I know a lot of modelers plan to install lighting, which will make for an incredible detailing possibility inside the hangar.
 FLIGHT DECK:
Once the hull was built up all around, it was on to the flight deck in 3 parts. Trumpeter molded in the flight deck safety netting around the edges. Not a bad job of it but this is one of the areas where photoetched parts shine (no pun intended). After slicing off and sanding the plastic, the PE netting was carefully folded and attached as per instructions. These are worth the price of the set alone and look great. The PE set also contains parts to dress up the whip antennas attached around the ship.
Attaching the 3 massive deck pieces was easier than I thought. They fit down over the hull nicely and mated up to each other with just a small seam I had to fill. The only problem, which may of course be my fault, was that in the center piece- where it attaches to the stern deck piece, there was a sag and I could not get it to come up and mate level with the stern piece. I filled it in and sanded as best I could.
I left the island and radar mast off until after painting and decaling the deck.
| COLORS & MARKINGS |
Overall Ship: Testors MM Neutral Grey 36270 is I believe the FS number. Other folks use a different grey or mix their own but this works for me.
Non-skid Deck: this is roughly textured dark grey/ blackish color that gets heavily stained during operations. I mixed 50/50 Gunship grey and black, thinned and brushed on the deck. Light sanding picked out the tie-downs a bit.
Life raft canisters
around the deck were dry-brushed light ghost grey.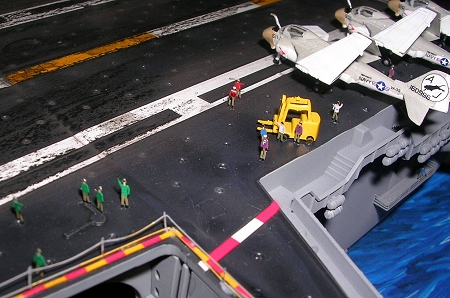
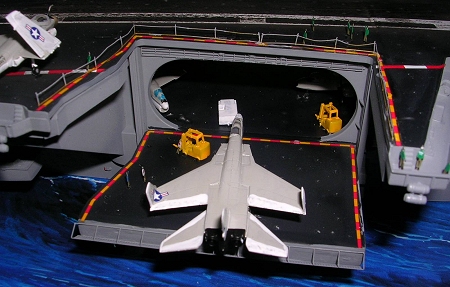
The deck landing stripes and all the other deck decals went down great. No breaking or ripping. The deck had raised details sol you can see where to lay the decals. The stripes were split up into 3-4 pieces each side and lined up perfectly.
I chose to do the waterline version and wanted to show the ship not under flight ops but just in transit. I looked at hundreds of pics to see how the deck looked while in operation. Basically, those nice white deck decals become barely visible after a while. I tried pastel chalk. It weathers the paint well but does not do a good job of darkening the white decals. I tried pencil lead- a little better. Then I tried my daughter’s huge black crayon and using a paper towel, managed to smudge up the deck even more. I guess my model is early in the cruise!
AIR WING:
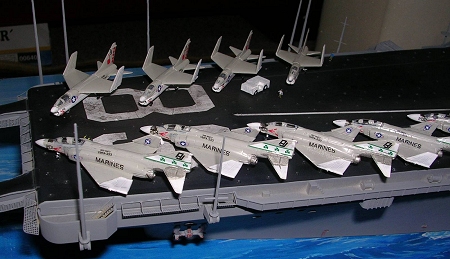
Each aircraft is a kit in itself. Each has about 12 pieces…and recessed panel lines! This is my gripe only because I am lazy and lose interest in tedious tasks. How would I get through 30-50 aircraft let alone the full wing of around 80? I had to break it up and stop after a while. I through together some of the old Tamiya planes and figured I would stick them below in the hangar where they would not be easily seen.
The Trump planes do allow you to build with wings folded, which is cool. They are just very fiddly and I don’t think they need to be so intricate. Each plane usually consists of: 2 fuse halves, 2 horiz stabilizers, wing section, 2 wing tips, 3 landing gear, and canopy. Some, like the S-3 and E-2C have separate engine halves! To me, that is just way to tedious. I can’t imagine adding PE details to these like flaps, gear doors and tail hooks! My hats off to anyone who does this!
Anyway, I managed to complete: 5 Trump F-4’s, 5 Tamiya F-4’s below, 3 E-2C’s, 9 A-6E’s, 11 A-7E’s, 2 S-3’s and a few more Tamiya’s to stick in the hangar. All needed to be painted gull grey over white and then about 6 decals added to each…I used CA to attach to tack them to the decks.
| CONCLUSIONS |
 A friend is cutting a
board for me to use as a base for the model. I will use my trusty modeling
paste to make the water and float her in. The kit is well done in almost
all regards- it fits pretty good the size, parts are well molded, and it is
impressive in its detail and features. For some reason though it was not
as enjoyable of a build as I thought it would be. Perhaps it is due to the
cost involved. More likely for me it was the tedium of building the air
wing. I have built many Trumpeter kits and have come to my own conclusion
that in some cases they deliberately try to make assembly difficult or at
least overly complex. The brass hinges on the aircraft kits and the
cylinder halves come to mind. I just don’t see any reason 1/350 aircraft
need to be 12-16 pieces! Others may think it’s great. To me, I burned out
on this once I got to the aircraft and just wanted to get it done and over
with. Still, if you have the space, the money, and the patience- you can
get a stunning and large model of one of the most complex war-fighting
systems ever built.
A friend is cutting a
board for me to use as a base for the model. I will use my trusty modeling
paste to make the water and float her in. The kit is well done in almost
all regards- it fits pretty good the size, parts are well molded, and it is
impressive in its detail and features. For some reason though it was not
as enjoyable of a build as I thought it would be. Perhaps it is due to the
cost involved. More likely for me it was the tedium of building the air
wing. I have built many Trumpeter kits and have come to my own conclusion
that in some cases they deliberately try to make assembly difficult or at
least overly complex. The brass hinges on the aircraft kits and the
cylinder halves come to mind. I just don’t see any reason 1/350 aircraft
need to be 12-16 pieces! Others may think it’s great. To me, I burned out
on this once I got to the aircraft and just wanted to get it done and over
with. Still, if you have the space, the money, and the patience- you can
get a stunning and large model of one of the most complex war-fighting
systems ever built.
April 2005
| REFERENCES |
http://navysite.de/cvn/cvn68deploy.htm
http://www.cybermodeler.com/hobby/reviews/kit/kit_tru_cvn-68.shtml
http://hsfeatures.com/features04/nimitztt_1.htm
http://www.modelshipgallery.com/gallery/cv/cvn-76/350-km/km-index.html
http://www.modelshipgallery.com/gallery/cv/cvn-68/350-sh/sh-index.html
If you would like your product reviewed fairly and quickly, please contact me or see other details in the Note to Contributors.