| KIT: | Revell AG 1/400 Queen Mary II |
| KIT #: | 5223 |
| PRICE: | $70.00 from Hannants |
| DECALS: | |
| REVIEWER: | Len Roberto |
| NOTES: |
| HISTORY |
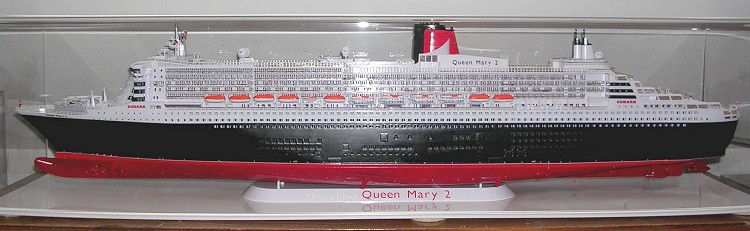
The Cunard Line’s new flagship, Queen Mary II, is the world’s largest ocean liner. In the grandest tradition of the trans-atlantic liners of the 20th century, this ship raises the bar in opulent travel on the waves. Some may think the design of the ship is unattractive but no one can doubt the technical marvels used in its construction.
| THE KIT |
 The model comes in
a very sturdy box that is exactly the same dimensions as the 1/72 U-Boat
box. Comprising 550 parts in finely molded white plastic, the parts were
flash free. A large number of parts are clear sprues for the hundreds of
windows and skylights, etc and these are also very well done. All of the
ship’s railings are also very thinly done in plastic- many will wait for
Photo-etch sets or use spares but I think Revell did a great job on the
railings and used them throughout. A huge decal sheet completes the kit.
The decals are excellent and provide many details to make the model stand
out. All of the pools have their own decals (more on how I changed these
later) and the boot stripe is provided in decals as well. The lower hull
is a different color from the upper and Revell provides the modeler a
choice in decals if you do not want to paint the 2 reds. The decal also
has the very thin white line that marks the waterline. I knew I could not
do this in paint so I did use the decals and they worked perfectly.
The model comes in
a very sturdy box that is exactly the same dimensions as the 1/72 U-Boat
box. Comprising 550 parts in finely molded white plastic, the parts were
flash free. A large number of parts are clear sprues for the hundreds of
windows and skylights, etc and these are also very well done. All of the
ship’s railings are also very thinly done in plastic- many will wait for
Photo-etch sets or use spares but I think Revell did a great job on the
railings and used them throughout. A huge decal sheet completes the kit.
The decals are excellent and provide many details to make the model stand
out. All of the pools have their own decals (more on how I changed these
later) and the boot stripe is provided in decals as well. The lower hull
is a different color from the upper and Revell provides the modeler a
choice in decals if you do not want to paint the 2 reds. The decal also
has the very thin white line that marks the waterline. I knew I could not
do this in paint so I did use the decals and they worked perfectly.
The instruction booklet is clear and easily followed with excellent drawings to help in the build. It comprises 90 steps!
| CONSTRUCTION |
 As you would guess,
construction starts with the basic hull in two halves after adding the bow
thrusters to each half. Two hull supports/ stiffeners stabilize the
assembly and are also used for upper deck support later on. The hull
measures 35 inches long and fit wonderfully- no putty needed just some
sanding to smooth things out.
As you would guess,
construction starts with the basic hull in two halves after adding the bow
thrusters to each half. Two hull supports/ stiffeners stabilize the
assembly and are also used for upper deck support later on. The hull
measures 35 inches long and fit wonderfully- no putty needed just some
sanding to smooth things out.
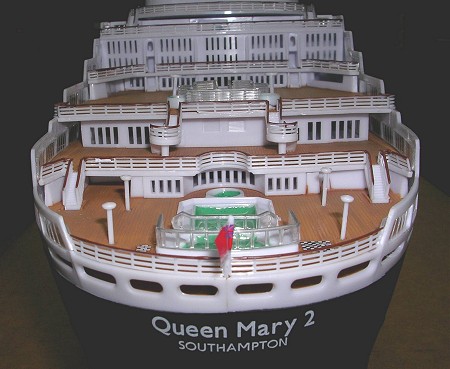
After the basic hull is assembled- the instructions call for painting. I thought a while about how to paint this model because gloss white is a major portion of the ship. I am not good at painting white and could not see how I would be able to get a good looking white with all of the wood decking that needed to be done. So I tried not painting the white and using the plastic. All upper white portions of the hull were masked off- outer and inner! At this point, I painted the lower hull using a spray can color called “Colonial Red” from Rustoleum. This was masked off and now I turned to the mid-section which is supposed to be a very dark grey- not quite black. I had a can of Rustoleum that says is satin black but I always thought looked toned down and this is what I used.
After the hull was painted, the hull waterline decals were applied along with scores of little white markings that are scattered all around the lower hull. The waterline decals were split into 4 pieces per side and went down nicely. There was a raised line on the hull to guide you.
The rest of the
construction went very smoothly. Despite some rather large pieces, there
was no warping. The long deck pieces fit in perfectly. Most parts went in
so cleanly and firmly during dryfitting that I just left them and ran a
line of liquid cement in joints to secure them in place.
A few areas gave a little trouble and care should be taken in attaching the bridge pieces later in construction.
Obviously, the large number of clear parts gives you plenty of chances to screw up and I had my share. They are very clear but more brittle as you know so take care when removing from sprues and during cleanup.
Railings:
 The last 10 steps
or so have you attach the many railings around the ship. These parts were
very well done and even though photo-etch would have looked better, I felt
a challenge to try the plastic parts. Again, care in removing railings
from sprues is essential as these parts are so thin, it is easy to snap or
break off a section. I did this too but the nice part is thicker glues can
form a new link between a broken piece and you can also in most cases flip
the part over and use the unmarred side! All the railing fit just
perfectly with just a few requiring careful bending to fit a curve or 90
degree joint. These parts are a marvel of delicate engineering.
The last 10 steps
or so have you attach the many railings around the ship. These parts were
very well done and even though photo-etch would have looked better, I felt
a challenge to try the plastic parts. Again, care in removing railings
from sprues is essential as these parts are so thin, it is easy to snap or
break off a section. I did this too but the nice part is thicker glues can
form a new link between a broken piece and you can also in most cases flip
the part over and use the unmarred side! All the railing fit just
perfectly with just a few requiring careful bending to fit a curve or 90
degree joint. These parts are a marvel of delicate engineering.
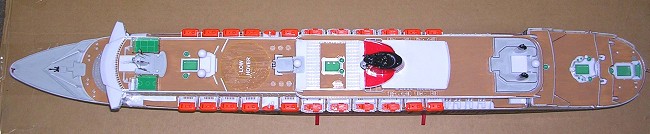
Pools: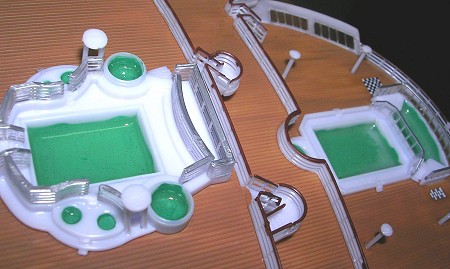
Instead of using the decals to simulate the many pools on the model, I mixed up a batch of blue and green watercolor paint into a nice deep aqua color and carefully painted the pools. The thick paint provided a little texture. When dry, I used a dropper to drip Future over the paint to provide a little depth and shine. Looks cool!
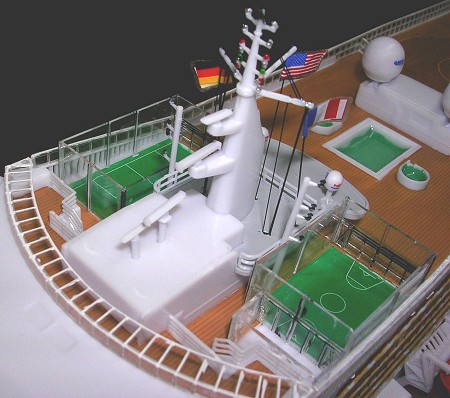
Mast:
Instructions call for thread to rig the flag halyards but this part is quite small and delicate so I used black stretched sprue.
| COLORS & MARKINGS |
This is one of those models where painting will make it look fantastic or look sloppy. My decision to not paint the white portions turned out pretty well. In the cases where I got another color on a white area, I used a new Exacto blade to carefully “slice” off the offending color. Not painting the white also allowed for easy and strong glue bonds.
Here is what I did for other painted areas:
Decks:
I looked up pics online and the decks seemed to be a natural wood color slightly darker than I had thought they would look. This is a subjective area to paint so I mixed Testors Wood and Military Brown with some thinner to get the deck color. This was brushed on at every step. Painting over white was good because it allowed the wood color shade to vary and from 2 feet away- looks good to me and not a monotone. Care was taken to paint around the various white deck obstacles.
 Light Ghost Grey
used for other deck areas that were not wood.
Light Ghost Grey
used for other deck areas that were not wood.
Stack:
Guards red used for the stack- black pinstripe decals provided for the rings around the stack.
Railings:
Some of the railings are all white but the majorities have a mahogany top rail. I used Testors Brown in the small bottle. Using the side of the paintbrush, these were slowly painted and mistakes were scraped off or a thinned white acrylic paint was used to touch-up.
Stern pool area has glassed in railings and I used a silver Sharpie marker to paint the top handrail.
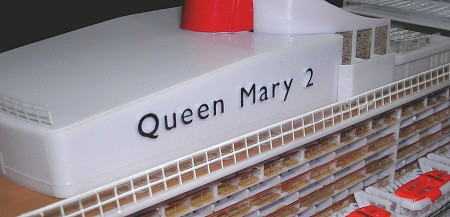
Lettering:
The large “Queen Mary2” aft of the stack was blackened with a Sharpie marker as well. It takes 2 or 3 passes but is very neat and easy to control.
Skylights and Top Deck Rails:
A white paint marker was used to paint the lattice structure of the large skylight openings that cover one of the large pools up top. The same was used for the top rail of the glass railing running along the top deck edge.
| CONCLUSIONS |
 I have to say this
kit was hugely satisfying. I have never done a liner before and this model
for some reason captivated me so much that I had to order from Hannant’s in
the UK as soon as I saw it was available. For around $70.00, you get a
superbly designed, impressively sized, and intricately detailed kit with
550 parts. I love Trumpeter but I ask you how much would this kit cost in
a Trumpeter box? Revell of Germany has released a fantastic kit that will
keep you busy for a quite a while. It fit better than I ever expected and
the quality of the details is excellent. A lot of folks may not like the
design of these huge liners but the QMII is attractive to me- and this kit
is equally attractive.
I have to say this
kit was hugely satisfying. I have never done a liner before and this model
for some reason captivated me so much that I had to order from Hannant’s in
the UK as soon as I saw it was available. For around $70.00, you get a
superbly designed, impressively sized, and intricately detailed kit with
550 parts. I love Trumpeter but I ask you how much would this kit cost in
a Trumpeter box? Revell of Germany has released a fantastic kit that will
keep you busy for a quite a while. It fit better than I ever expected and
the quality of the details is excellent. A lot of folks may not like the
design of these huge liners but the QMII is attractive to me- and this kit
is equally attractive.
January 2005
| REFERENCES |
http://www.cunard.com/QM2/home.asp
http://www.cruiseweb.com/CUNARD-QUEEN-MARY-2.HTM
http://www.roblightbody.com/liners/qm2/
If you would like your product reviewed fairly and quickly by a site that has nearly 300,000 visitors a month, please contact me or see other details in the Note to Contributors.