Revell AG 1/72 Type VIIc U-boat
| KIT #: | 5015 |
| PRICE: | $50.00 MSRP |
| DECALS: | Five options |
| REVIEWER: | Len Roberto |
| NOTES: | Nautilus Models Wood Upgrade set $40 |
| HISTORY |
There is a
fantastic website (www.uboat.net)
that is the place to go for any and all information on U-Boats. My
knowledge is limited but I do know that this kit represents the most
prolific type VIIc that was the workhorse of the U-Boat fleet. The type
was built at various shipyards throughout the war and as a result, no two
boats are exactly the same.
This was certainly not the branch of service you would want to be in if you wanted to live very long. The statistic that sticks in my mind is that of the total number of U-Boats built during the war (somewhere around 900) the overwhelming majority of them (not sure but I think well over 700) were sunk by the Allies.
Suffice it to say that the U-Boat was one of the most important tools of war in both World Wars and nearly brought England to its knees by sinking merchant ships at a startling rate. The U-Boat threat lasted years and the amount of men and material mobilized to overcome it was massive.
| THE KIT |
Revell
of Germany is one of the most dynamic model companies producing kits
today. This kit was long awaited and does not disappoint. For only around
$50.00-$60.00 (now at $68.00 MSRP, Ed), a bargain in today’s market, you
get a very large model that is crisply molded and has great detail. 2
large hull halves, 2 different conning tower designs, rigging line, and a
sturdy display stand are included. Many recipients of this kit
complained of broken parts especially the thin conning
 tower railings.
Mine arrived unscathed fortunately. The kit provides parts and decals
to make 4 different boats (1 of them you can do in an early or late war
configuration so actually you have 5 choices.)
tower railings.
Mine arrived unscathed fortunately. The kit provides parts and decals
to make 4 different boats (1 of them you can do in an early or late war
configuration so actually you have 5 choices.)
The aftermarket fell over themselves to produce detail sets for this popular kit including 2-3 different brass sets, a wealth of decal choices, turned metal fittings, crewmember kits, and a wood detail set. I read about the wood set from Nautilus Models and it looked really nice so I ordered it. The main reason I got it was the laser-cut basswood replaced the entire deck of the boat as well as the conning tower’s deck and had all the holes perfectly drilled out. This I thought would look much better than blackening each hole, which I know, would have come out looking messy. The set also comes with resin hatches and bollards.
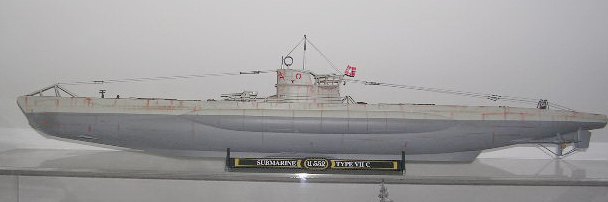
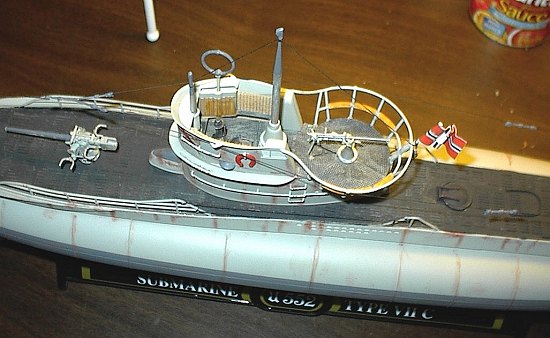
My original thought, inspired by my friend Jeff Herne, was to do something different and build the kit as HMS Graph. U-552 was captured intact by the British and later entered service with the Royal Navy renamed as HMS Graph. But after reading about one of the choices the kit offers, I changed my mind. The U-552 is a popular choice because of the cool red devil markings on the conning tower and also because this boat was one of the very few to survive the entire war. I could not resist-- so U-552 it would be. I also chose the early war version because I liked the look of the bow arrangement with the sinister looking cable cutter teeth up front. (Editor's note: Readers have informed me that the HMS Graph was actually the ex-U-570)
| CONSTRUCTION |
As big as this kit is, it is not a difficult model to assemble. Even the 2 hull halves (it comes out around 31 inches long) went together very precisely after adding 2 hull supports. You have the choice of showing the forward torpedo doors open or closed. I did mine closed and have heard that there is a fit issue if you choose to show them open so be careful there.
After the hull is together, the next few steps involve adding the rudders and propeller bits. Fit was fine all around here- no problems and no filler needed. Then it was up to the bow for dive planes, which are movable.
 The kit
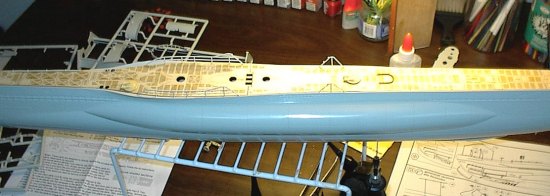
deck comes in three pieces. This was replaced with the 2 pieces supplied
in the Nautilus Models set. I had to sand off a little of the sides of the
wood at the stern for a nice tight fit but other than that, the wood
dropped in perfectly with CA glue. I learned that some of the U-Boats,
especially later in the war, were built with wood decks due to shortages of
other materials. It was very hard to find info on whether a particular
boat had wood or not- but as I said, added this set due to the pre-drilled
holes on deck. I just don’t know whether U-552 had wood decks or not- I
searched for a few hours online and in a book or 2 with no luck….
The kit
deck comes in three pieces. This was replaced with the 2 pieces supplied
in the Nautilus Models set. I had to sand off a little of the sides of the
wood at the stern for a nice tight fit but other than that, the wood
dropped in perfectly with CA glue. I learned that some of the U-Boats,
especially later in the war, were built with wood decks due to shortages of
other materials. It was very hard to find info on whether a particular
boat had wood or not- but as I said, added this set due to the pre-drilled
holes on deck. I just don’t know whether U-552 had wood decks or not- I
searched for a few hours online and in a book or 2 with no luck….
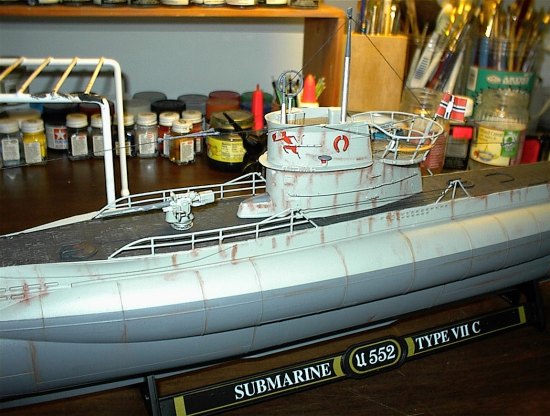
 With
the deck in it was on to the conning tower. Here is where the differences
between boats is really evident so you must decide which boat you are doing
before you get to this step. Everything went smoothly here as well and the
replacement deck fit perfectly into the plastic slots- it really is a well
done set and very easy for anyone to use. The wrap-around railing was a
little tricky but with CA glue to the rescue, it was one leg of the railing
at a time and matched up to the wood holes nicely. I also used the wood
panels on the inside of the conning tower supplied in the Nautilus set.
With
the deck in it was on to the conning tower. Here is where the differences
between boats is really evident so you must decide which boat you are doing
before you get to this step. Everything went smoothly here as well and the
replacement deck fit perfectly into the plastic slots- it really is a well
done set and very easy for anyone to use. The wrap-around railing was a
little tricky but with CA glue to the rescue, it was one leg of the railing
at a time and matched up to the wood holes nicely. I also used the wood
panels on the inside of the conning tower supplied in the Nautilus set.
I set aside the Conning Tower and then added all the deck details. 2 resin hatches were glued onto the wood deck. The resin bollards were tricky. I should have added them BEFORE gluing the deck down but as always- I do something in every build that makes me call myself an impatient ass.
So I had to cut them down and carefully guide them into place and hit them with a quick shot of CA. I only dropped 2 into the hull but after vigorous shaking they dropped out of the larger periscope hole in the wood deck. Railings and stanchions had to be drilled into the wood- there were no indicators on the wood. I used the plastic decks as a guide for placement- drilled them out and CA glued them to the deck.
Conning tower was installed next and it fit perfectly onto the deck.
Rigging was next and it was not difficult. After the Revell Constitution, this was a snap! The tensioners were very delicate so care is needed when stringing them but if you take your time, it is not that hard. I used CA glue to secure each knot and don’t forget to run the line through beeswax to coat them and repel dust.
| COLORS & MARKINGS |
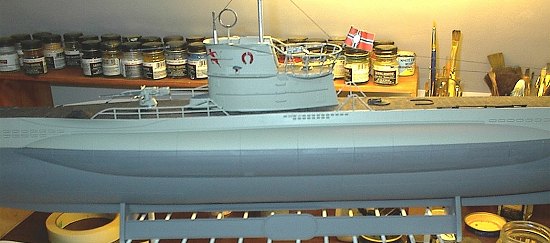 Painting was relatively simple. Upper hull is a lighter, neutral grey.
Lower hull is a dark grey. Deck is a very dark grey almost black which was
a preservative type of paint.
Painting was relatively simple. Upper hull is a lighter, neutral grey.
Lower hull is a dark grey. Deck is a very dark grey almost black which was
a preservative type of paint.
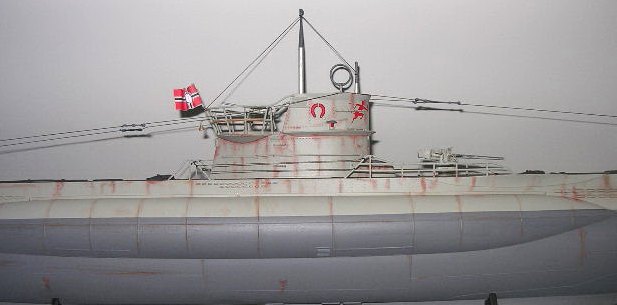
I don’t get hung up on colors especially since I was going to weather this model and the effects of salt water means that almost anything close would be fine with me. Therefore I used what I had: Light Sea Grey upper hull. Gunship Grey lower hull. For the deck color I used a water based mix from model Shipways- Iron Cannon Black which is a very dark grey color that soaked into the wood very nicely. Red life preservers on the sides of the conning tower. Wood paneling and steps on the railing were painted using Testors Wood- then dry brushed with flat brown.
Decals consist of the 2 red devils on conning tower and a paper flag (coated with Elmer’s glue and water).
| WEATHERING |
After looking at lots of pics, it was apparent that in service, these boats sprouted rust like a garden and looked very grimy and worn after a cruise. I know I wanted to weather this model up good to try and show a worn, end-of-cruise look.
 I have
tried lots of methods for showing rust but have settled on a combination of
a colored pencil and pastel chalk. I use the colored pencil on the areas
of heavy rust and streaking. Then I scrape off into a pile of pastel dust
a deep red, browns, crimson, etc and use an old stiff brush to smudge in
the streaks of rust. This took a long time and I hope I did not overdo
it. Some of the pics I used as reference had a lot of rust on the upper
hull and tower so I think it looks OK.
I have
tried lots of methods for showing rust but have settled on a combination of
a colored pencil and pastel chalk. I use the colored pencil on the areas
of heavy rust and streaking. Then I scrape off into a pile of pastel dust
a deep red, browns, crimson, etc and use an old stiff brush to smudge in
the streaks of rust. This took a long time and I hope I did not overdo
it. Some of the pics I used as reference had a lot of rust on the upper
hull and tower so I think it looks OK.
| CONCLUSIONS |
This is an impressive kit and a great modeling bargain. It is easy to assemble for most modelers with the rigging perhaps being a bit fiddly if you are not used to it but overall not a problem. Hope you have an empty shelf space for this baby or better yet- I free mantle to display it!
| REFERENCES |
The German Navy in WWII, Naval Inst Press
August 2004
Copyright Modeling Madness.com
If you would like your product reviewed fairly and quickly, please contact the editor or see other details in the Note to Contributors.