Trumpeter 1/350 SS. John W. Brown
| KIT: | Trumpeter 1/350 SS. John W. Brown |
| KIT #: | 05308 |
| PRICE: | $52.95 DSRP |
| DECALS: | Enough for one ship |
| REVIEWER: | Bruno Schielzeth |
| NOTES: | Tom's Modelworks PE set 3546 used |
| HISTORY |
Trumpeter’s new Liberty ship model is basically the original Jeremiah O’Brien with extra parts to build a mid to late war Liberty ship with a larger deckhouse and more guns. You can read my in the box preview of the John Brown here.
The Liberty ships were a desperate American effort to supply our WWII allies with the vital supplies and equipment they needed in the shortest time and at the lowest possible cost. The Liberty ship’s standard design, welded construction, and modular pieces filled the need but not with any elegance. The major Axis powers of Germany, Italy, and Japan fell, in time, to the overwhelming flood of war material the United States produced. The slow, cheap, ugly and very effective Liberty ship transported that war material from our factories to every theater of war from the Aleutians to New Zealand and from Russia to China. Without the Liberty ship the war would have ended much differently than it did.
The Liberty ships served in many different roles. The basic hull could be modified to be an oil tanker, a collier, a hospital ship, troop transport, and floating machine shop, but most Liberty ships served in the role they were intended to fill; freighters.
Hundreds of thousands of men served on them, sailing the dangerous war-torn seas to deliver the goods of war in every theater of the war. Thousands died serving their country when a Liberty ship was in the wrong place at the wrong time. Death in wartime is expected but some deaths were more cruel and senseless then others. With that thought, let’s get to the history of the ship I have chosen to model.
The S.S. Jean Nicolet
 The Oregon Shipbuilding
Corporation of Portland, Oregon was one of many yards that built Liberty ships.
In October 1943 hull #2069 was christened and launched as the S.S. Jean Nicolet
in honor of the famous French trapper, trader, and explorer of the northern
Great Lakes and the area of the U.S. I call home, Wisconsin.
The Oregon Shipbuilding
Corporation of Portland, Oregon was one of many yards that built Liberty ships.
In October 1943 hull #2069 was christened and launched as the S.S. Jean Nicolet
in honor of the famous French trapper, trader, and explorer of the northern
Great Lakes and the area of the U.S. I call home, Wisconsin.
While steaming alone towards Colombo, Ceylon with a load of heavy machinery, trucks, landing barges, and other wartime cargo, the Nicolet and her crew ran out of luck.
The time was 1907, 7:07 PM civilian time, on July 2, 1944 and the Nicolet was steaming north at 10 knots approximately 700 miles from Ceylon. Without warning the nighttime silence was shattered. The first torpedo caught her under the mast between holds #2 and #3. The second torpedo hit #4 hold.
Captain David Marin Nilsson ordered, “Abandon ship!” as the heavily loaded Nicolet quickly developed a heavy list to starboard. Radioman Augustus Tilden managed to get off a distress call and received an acknowledgement from stations in Calcutta and Ceylon before he abandoned his post. His actions and determination to do his job saved the lives of 23 men that night. Sadly his own wasn’t one of them.
Those on board the Nicolet that night included 41 crewmen, 28 Naval men whom were the gun crews, and 31 passengers including 12 enlisted Army men, 8 Navy technicians, 4 civilians, and an Army Medical Corpsman. They abandoned ship in an orderly fashion and no lives were lost.
Shortly after the rafts and lifeboats left the Nicolet the Japanese submarine I-8 surfaced in the midst of them and swept the area with searchlights. A Japanese crewman, using perfect English, ordered the survivors to board the submarine. Several men tried to hide behind a raft but were seen and ordered to come aboard the submarine or they would be shot. Five others escaped detection. They were the only lucky ones that night.
As the survivors climbed aboard the I-8 they were searched, stripped of all belongings including their dog tags, lifejackets, and shoes, and had their hands tied behind their backs.
Moments later the first act of cold-blooded murder occurred. One of the first sailors to come aboard was 17-year-old William Musser, a Messman on his first voyage. He was one of the crewmen that tried to hide behind the raft. He was escorted towards the conning tower of the submarine with his hands bound behind him. The Japanese sailor suddenly hit William over the head with a piece of steel pipe. As the young sailor staggered and fell to the deck the Japanese sailor took out his pistol and coldly shot him in the head, and then casually kicked his body over the side.
19-year-old Ordinary Seaman Richard L. Kean was next. As he was being led forward his guard suddenly spun him around and plunged a bayonet into youth’s stomach. As he collapsed the guard clubbed him over the head with his rifle butt and then pushed his body over the side.
Each of the 93 remaining survivors was stripped, beaten, and forced to sit on the deck with their heads bowed and their hands tied behind them while Capt Ariizumi harangued his prisoners;” You are now my prisoners. Let this be a lesson to you that Americans are weak. You must realize that Japan will rule the world. You are stupid for letting your leaders take you to war. The American war fleet is at the bottom of the Pacific. The mighty Japanese Empire will win this war you have started.”
 Anyone that
raised their head or spoke was beaten or stabbed. The deck of the I-8 soon ran
red with their blood.
Anyone that
raised their head or spoke was beaten or stabbed. The deck of the I-8 soon ran
red with their blood.
Captain Nilsson, Radioman Tilden, and Ship’s Purser Francis J. O’Gara were taken below. Only O’Gara was ever seen again, but not until late 1945 when he was released by Allied forces from Ofuna Prison near Yokahama. Radioman Tilden was last seen as a prisoner aboard I-8. He was never seen or heard from again and no records were ever found concerning his fate. O’Gara last saw Captain Nilsson alive as a prisoner in Panang but his final fate will remain forever unknown. He may have been a prisoner on a Japanese submarine sunk on its way to Japan. O’Gara became the only living person to have a Liberty ship named after him as he was declared dead by the U.S. Navy at the end of 1944. His experiences aboard the I-8 and his year in a Japanese prisoner of war camp are a story all its own.
Three injured and bound men were swept overboard by a wave as the I-8 began shelling the listing Nicolet. The Japanese crew made no effort to save them. The reason would become all too clear in a few minutes.
A group of 10 to 15 Japanese sailors formed a gauntlet line on the aft deck out of sight of the survivors at the bow. One by one the men were led aft and forced to run the gauntlet. The screams of the dying man were the only indication to the others that something horrible was occurring out of their sight on the dark aft deck.
The Japanese sailors were armed with pipes, knives, rifles, and bayonets. At the end of the gauntlet stood a massive Japanese sailor holding two rifles with bayonets mounted. Any prisoner that survived the gauntlet was bayoneted by this monster and heaved over the side of the submarine like a side of beef. Several men threw themselves into the ocean with their hands bound rather than die in the gauntlet, but more than 60 men were slaughtered before an inbound aircraft was spotted on radar. O’Gara’s radio message had brought out search aircraft and one of them was approaching.
Capt Tetsunosuke Ariizumi ordered a crash dive, leaving the survivors of the slaughter, their hands still bound behind them, on the bloody deck as his submarine slid to safety below the surface.
Of the 30 or so survivors on deck only 18 lived to be rescued by the HMIS Hoxa two days later. The rest died from drowning, their wounds, or from sharks. The five men that had hidden were found in a raft near the site of the Jean Nicolet’s sinking. 23 men out of 100 lived to tell of the brutality of Ariizumi and his crew.
This was not the first time “The Butcher”, as the British called Ariizumi, had slaughtered the entire crew of a ship he had sunk. In March 1944 he sank the Dutch merchant ship S.S. Tjisalak. The scenario of their deaths was basically the same as the crew from the Jean Nicolet. Of the 103 crewmen of the Tjisalak only 5 survived to tell their tale.
It is believed that Ariizumi was responsible for the disappearance of several other merchant ships, but he left no survivors to tell the tale of their slaughter. Sadly the logbook he had kept for the entire war was dumped into the Pacific when the I-401 was ordered to surrender, so the names of the ships and the fate of their crews will never be known.
Ariizumi would end his career, and probably his life, as commander of the Japanese super submarine, the I-401.[i]
 There
were rumors for many years after the war the Ariizumi didn’t die in his cabin of
the I-401 by his own hand, but that he had been spirited to the Japanese
mainland by his loyal officers as his submarine neared the home islands.
There
were rumors for many years after the war the Ariizumi didn’t die in his cabin of
the I-401 by his own hand, but that he had been spirited to the Japanese
mainland by his loyal officers as his submarine neared the home islands.
O’Gara was one of several survivors of his atrocities that spent many years trying to find this devil, but Ariizumi was never seen or heard from again. He may have died in his cabin within sight of his homeland and had his body slipped over the side of the submarine by his officers or he may have spent his waning years hiding in Japan and being honored as a war hero. The world will never know for sure.
Several of the officers and men of the I-401 that had served with Ariizumi on the I-8 were tried for war crimes and sent to prison but all of them were set free by the Japanese government a few years later when the Allied forces left Japan.
Yes, I have a habit of finding interesting stories to inspire my models. It breathes a little life and realism into them. They become more than just plastic, brass, paint, and glue. They become a tribute to the men that served on them or in them. In this case I am paying tribute to all the brave men that served on the S.S. Jean Nicolet, and other Liberty ships like her, and those that died needlessly at the hands of Ariizumi and his crew of the I-8.
| THE KIT |
I built Trumpeter’s S.S. Jeremiah O’Brien as the S.S. Richard Bland last year, so I figured I had a good chance to build this one a little quicker and a little better.
| CONSTRUCTION |
The first thing I did was to join the upper and lower hulls together. Why Trumpeter tells you to do it last is beyond me as it is a guaranteed way to destroy an almost finished model. However this time I didn’t add the bow and stern decks before joining them. Last time I found it impossible to eliminate the warpage in the lower hull and had to resort to layers of putty and sanding compound curves. That is an exercise only for the masochistic! I may be many things, but being masochistic isn’t one of them! Of course I could be wrong since I build models for pleasure and relaxation. My therapist is still undecided on the whole issue.
This time I used finger pressure from the inside of the hull and thin, quick setting cement to join the upper and lower hulls together one section at a time. I still had a small area I had to put a thin layer of putty on, but nothing like I had last time! Of course you could eliminate the entire problem by building the ship as a waterline model, but I like my ships to have a proper hull. It’s the Navy blood in my veins I suppose.
With careful fitting I was able to get the bow and stern decks down with minimal gaps. I still have to deal with those two ugly joints in the mid-deck but maybe I can mount boxes of cargo there? It’s a thought at least.
Knowing I was using Tom’s PE sheet # 3546 in the build I cut the recessed gangway openings out of the upper hull. I puttied a few small dips in the hull and sanded it down. In less time than I had spent just applying putty to the first Liberty ship I had a smooth hull ready for paint! I guess experience does help!
It was at this moment, flush with success that reality set in. I actually read the instructions and realized I had forgotten to open up six holes in the decking shown in the first step! Luckily it was a bright sunny day and I hadn’t painted the hull yet, so I was able to faintly see the thin plastic over the holes by holding the hull up to the sun lit window. I managed to find and drill out all six hidden holes. Note to self: READ THE INSTRUCTIONS STUPID!!
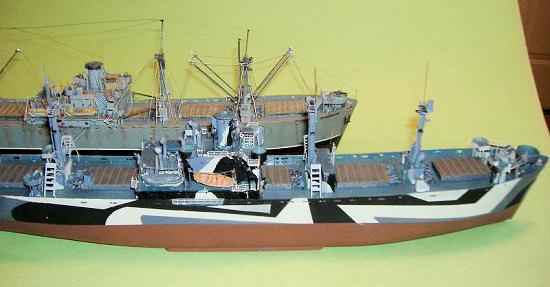
Normally I would start with the main deckhouse, but I knew that the masts, winches, and vents would be more difficult to do with the deckhouse in place. This time I was adding the PE as I went, so I started at both ends of the main deck.
 The
main deck and most other decks on the sprues were air brushed with Deck Blue.
Which Deck Blue? Well, I didn’t have any in my paint stash, at least none I
could find (I moved twice in the last 6 months!) so I used MM Dark Sea Blue,
Classic White, and Dark Gull Gray to mix up my own. Amazingly it actually sort
of matches the paint chip chart! Luckily Deck Blue was a somewhat variable color
and faded quickly, so I think I’m safe.
The
main deck and most other decks on the sprues were air brushed with Deck Blue.
Which Deck Blue? Well, I didn’t have any in my paint stash, at least none I
could find (I moved twice in the last 6 months!) so I used MM Dark Sea Blue,
Classic White, and Dark Gull Gray to mix up my own. Amazingly it actually sort
of matches the paint chip chart! Luckily Deck Blue was a somewhat variable color
and faded quickly, so I think I’m safe.
I added Tom’s PE walkway and railing to the forward gun tub. I left the original plastic and just laminated the PE onto it. Tom’s instructions indicate you could cut off the walkways to the outer gun tubs but I felt that cutting the plastic off would make Tom’s soft PE bend too easily, and it looked far too thin to be realistic. The railings were painted MM Camouflage Gray and the deck painted MM Flat Dark Sea Blue to imitate the darker anti-slip paint generally used on walkways, etc.
Two access housings were added to the forward main deck after cleaning them up. All the housings have an annoying seam that runs from front to back right through the hatch. I scraped the housings down to eliminate the seam and painted the upper and angled sections in Deck Blue. I added new hatches from my GMM PE sheet of hatches and access doors.
Assembling the four freestanding 20mm gun tubs went per the directions. I
avoided the thrill of adding Tom’s PE gussets to them. Although I’m sure they
would add some scale detail to the area, I just couldn’t see spending the time
and effort to remove the kit’s gussets and replacing them with the brass bits.
The gussets are all but invisible anyway. Don’t worry; they didn’t go to waste!
I found a much bett er use for
them a little later in the build!
er use for
them a little later in the build!
I noticed that Trumpeter has now added ammo ready boxes for most of the large guns, something they missed on the first issue. I wish they had included another eight of part E46, as they would work very nicely for the 20mm ready boxes. Instead I spent a minute cutting ready ammo lockers out of rectangular styrene rod and adding them to the 20mm gun tubs.
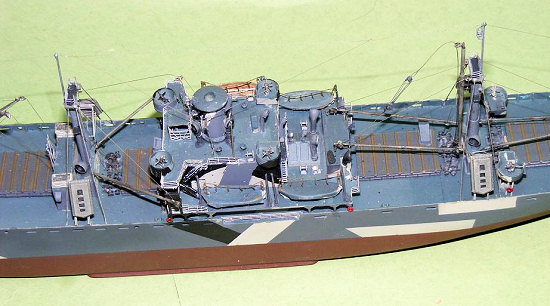
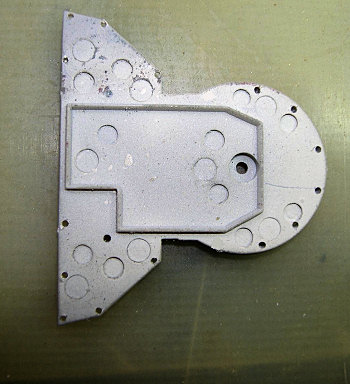
Part B36 needs to have the original 20mm gun tubs removed and the area sanded smooth. I also added detail to the aft gun deck as I did on my S.S. Richard Bland. I drilled 15 .030 holes along the edges of the decking for the steel support posts that were missed by Trumpeter. Done properly the holes under the 5-inch gun tub will be just inside the splinter shield. The picture of the bottom of the gun deck shows the holes and their locations. After the aft deckhouse was installed I slipped .030-styrene rod into the holes until they touched the main deck, glued them in, and sliced them off flush with the gun deck. It beats the heck out of trying to cut 15 pieces of rod to just exactly the right length! A coat of Deck Blue made the holes disappear.
Remember the brass gussets for the 20mm gun tubs I didn’t use earlier? Well, I found they worked perfectly for the aft deckhouse supports under the gun deck! It was much easier using Tom’s PE supports this time instead of cutting a dozen tiny triangles from card stock!
The
emergency steering gear was added to the gun deck. The upper 3-inch gun deck was
assembled per the instructions and mounted to the aft deckhouse. Tom’s PE sheet
supplies the ladders and railings need to dress up the aft deckhouse properly. I
also added a ready ammo locker for the 5”/38 gun although I’m not sure it’s
entirely accurate.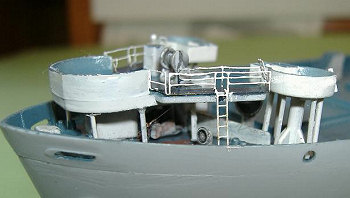
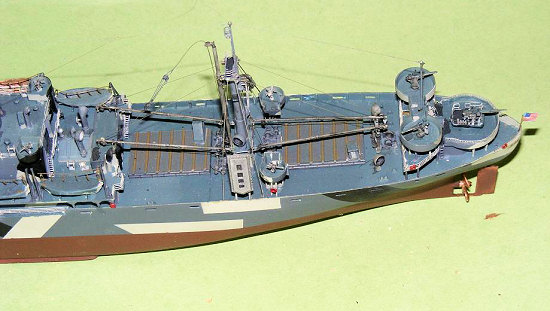
The main deckhouse was assembled and detailed on the bench. I trimmed off the back walls of parts B11 and B12, the bridge wings, as they are too wide by the thickness of the walls. Besides I wanted to add PE railings to them. I folded Tom’s fair weather bridge into shape, added the engine telegraph, compass, and ship’s wheel to the kit’s decking and then glued the bridge cage to the deck. The inclined ladders were added from the upper deck to the bridge wings and from the bridge wings to the main deck. The PE railings went down on the forward deck edge and around the bridge wing overheads.
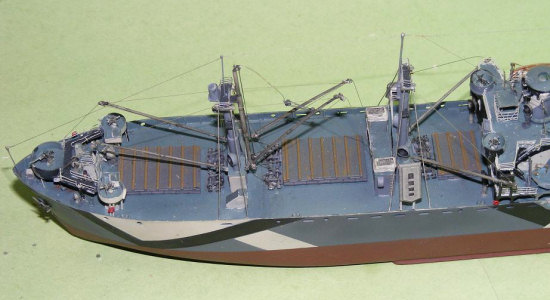
I used the kit lifeboat davits and Tom’s PE block and tackle. I reversed one set of davits on the starboard side to allow the lifeboat to be shown in the ‘ready’ position, as was common practice while the ship was underway. Three of the lifeboats were draped with tissue paper soaked in a mixture of white glue and water as canvas weather covers and the Captain’s boat was left open and oars from GMM’s PE sheet were added along with a length of .020 rod for the sail mast.
I sanded the insides of both smoke stack parts to give it a more oval shape, glued them together, and filled the over-sized opening at the top with a short piece of thick walled styrene tube. A touch of putty and a little sanding gave me a closer representation of the actual Liberty ship stack. The GMM sheet supplied the whistle and lookout stations on the stack. I added a few steam lines from thin stretched sprue and a ladder from Tom’s PE sheet. I added the various kit vent stacks and glued some Grant line HO gauge nut and bolt castings to the upper deck for the smaller vents that were present there.
On the main
hull I used the last half of my old Gold Medal Models PE sheet No. 350-31 for
the Liberty ship to supply the late war lifeboat racks and all the various
winches, vents, and fire stations around the main deck as Tom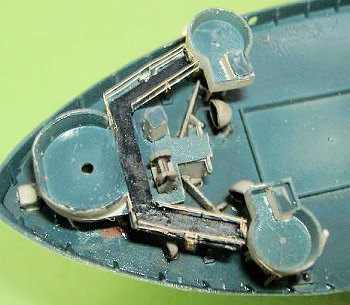 ’s sheet doesn’t
supply them. I had already used half the sheet on my first Liberty ship and
there were enough left over for this ship. Almost! I ended up having to splice
several railing pieces together to complete the upper stations on the masts, but
it wasn’t that bad. I can say that now that I’m done and my eyes have
un-crossed! Basically I ended up with very little left from GMM’s sheet after
two Liberty ships other than some hatches, doorways, and tackle blocks.
’s sheet doesn’t
supply them. I had already used half the sheet on my first Liberty ship and
there were enough left over for this ship. Almost! I ended up having to splice
several railing pieces together to complete the upper stations on the masts, but
it wasn’t that bad. I can say that now that I’m done and my eyes have
un-crossed! Basically I ended up with very little left from GMM’s sheet after
two Liberty ships other than some hatches, doorways, and tackle blocks.
All three masts were assembled and detailed before installation. The plastic antennas on the masts were replaced with brass rod. I drilled deep holes into the mounts and used CA glue to mount them. The molded on ladders were shaved off and replaced with PE stock. Once the masts were done it was a lot easier to mount them straight and square since you could use the upper lookout decks as a reference to get them square to the ship’s centerline.
The 5” gun was detailed with parts from the GMM sheet including sights, railings, and gunner’s seats. The 3” guns were detailed with bits and pieces of PE to fake sights and seats. The eight 20mm guns were detailed with sights, shields, and shoulder rests from Tom’s PE sheet. That was an exercise in major eyestrain! I was amazed when I completed all eight of them without loosing any PE parts! They look much better with the PE details, but my eyes still hurt!!
All the cargo booms and heavy lift booms were cut from the sprues and cleaned up without damage. I added boom rests from the GMM sheet to the deckhouse, the forward gun deck, and the aft deckhouse.
Rigging the booms is a very time consuming and delicate job, but it has to be done to make a proper looking Liberty ship. This time I decided to use ‘invisible’ nylon thread for the rigging. I found that taking several lengths of it and running them under hot tap water while pulling them straight removed the natural curl they have off the spool.
I built up all 10 light lift cargo booms on the bench. I added the blocks from Tom’s sheet with CA glue and then bent them into shape, added the nylon cargo lines with CA and then mounted the booms one at a time to the ship. The heavy lift booms were detailed with the heavy block and tackle from the GMM sheet and rigged with two nylon lines.
Running the cargo boom lines to the winches was done from the centerline out, as there just isn’t any room to work! Still, with time, patience, and a few naughty words, I finally had all the booms rigged and mounted. Yes, I do have a therapy session scheduled!
The final bit of work was to add the heavy support cables for the masts to the main deck. I used .010-styrene rod for them.
I know that my rigging isn’t accurate, but it gives the Nicolet a cluttered, busy look. I will be adding some landing craft and trucks to the cargo deck, but I don’t have any in the stash at the moment.
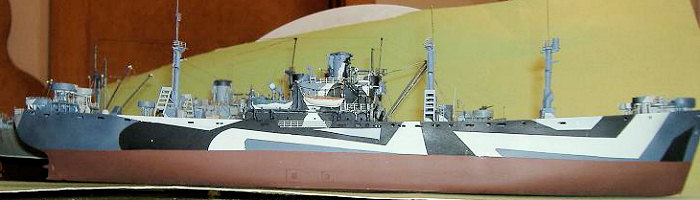
| COLORS & MARKINGS |
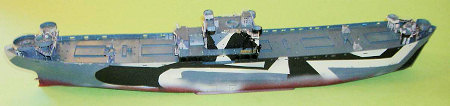
I wanted something different on this build. Well, at least something beyond the gray on gray on gray Liberty ship.
By 1944 many different
camouflage schemes were in use in the Pacific theater. One of them was Measure
32. It was a blocky ‘dazzle’ type camouflage of Light Gray, Flat Black, and Dark
Ocean Gray on the hull and superstructure and Deck Blue on all
 horizontal
surfaces. Some Liberty ships were painted this way and I chose to paint the S.S.
Jean Nicolet in those colors. Was the Nicolet ever painted in Measure 32? I
don’t know, but the time frame and theater are right so I was willing to take
the chance to have a unique model in the display case.
horizontal
surfaces. Some Liberty ships were painted this way and I chose to paint the S.S.
Jean Nicolet in those colors. Was the Nicolet ever painted in Measure 32? I
don’t know, but the time frame and theater are right so I was willing to take
the chance to have a unique model in the display case.
I painted the hull before I mounted the main deck house or any of the masts, however the bow and stern gun decks were already mounted when I decided to go with Measure 32. OK, I’m not great at pre-planning at times. I can live with it but it does make for more work.
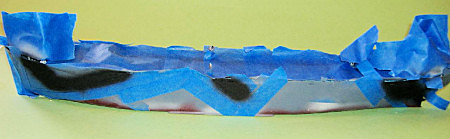 I used Blue Tac to fill in
the holes in the upper weather rail. I then used a LOT of 3M Blue Painter’s tape
to cover the main deck and the superstructure I had already glued down. I loaded
up my Badger 100 airbrush and painted the hull MM Camouflage Gray. I masked off
the areas that would remain Light Gray and then shot AeroMaster’s Extra Dark Sea
Gray from my dwindling stock. The areas to remain Dark Sea Gray were then masked
off and MM Flat Black was laid down. Once everything had dried I removed the
masks and touched up the inevitable seepage and over spray.
I used Blue Tac to fill in
the holes in the upper weather rail. I then used a LOT of 3M Blue Painter’s tape
to cover the main deck and the superstructure I had already glued down. I loaded
up my Badger 100 airbrush and painted the hull MM Camouflage Gray. I masked off
the areas that would remain Light Gray and then shot AeroMaster’s Extra Dark Sea
Gray from my dwindling stock. The areas to remain Dark Sea Gray were then masked
off and MM Flat Black was laid down. Once everything had dried I removed the
masks and touched up the inevitable seepage and over spray.
The superstructure and main deckhouse were masked with thin strips of masking tape where I could and the colors were hand painted with a brush.
The last task was to mask off the upper hull and shoot the lower hull in Floquil’s Hull Red.
I used the kit decals for the draft markings and printed up the other decals on my computer printer.
| CONCLUSIONS |
Trumpeter has expanded on the original Liberty ship with this model. It’s the same, yet different. The two models side by side display just enough variations to be noticeable. The build, except for the rigging, went easily and the PE sheets turned the model into a real eye catcher. I still don’t understand why Trumpeter didn’t divide the upper deck so the seams would be hidden at the front and back of the main deckhouse, but you get what you get. All in all it was a very enjoyable build.
I’m not one to build multiples of the same kit, but I do have an urge to build up a tanker or machine shop version of a Liberty. I could end up with my own little convoy of Liberty ships! Ahh, maybe not. So many models, so little time.
 To be
honest I wasn’t particularly impressed with Tom’s Modelworks PE. The price is
good but the brass it too thin and too soft for my tastes. I spent more time
straightening railings then I did installing them! Some railings were just
beyond repair and I was forced to leave them ‘as is’. Call it battle damage?
To be
honest I wasn’t particularly impressed with Tom’s Modelworks PE. The price is
good but the brass it too thin and too soft for my tastes. I spent more time
straightening railings then I did installing them! Some railings were just
beyond repair and I was forced to leave them ‘as is’. Call it battle damage?
GMM’s PE is substantially thicker and the brass is harder, so damage during installation is less likely and more easily repaired. The GMM sheet also supplies far more ‘bits and pieces’ for the Liberty ship. As a counter to that, the GMM sheet also costs substantially more than Tom’s. I guess you make your choice based on what is important to you and how deep your wallet is. I’m just glad I had the chance to use both sheets in this build because between them I ended up with two nice looking Liberty ships with a lot of extra detail.
The total build time was probably around 100 hours spread over three or four weeks. Most of the time was enjoyable but building and rigging a dozen cargo booms was tedious at best.
| REFERENCES |
If you would like your product reviewed fairly and quickly, please contact me or see other details in the Note to Contributors.