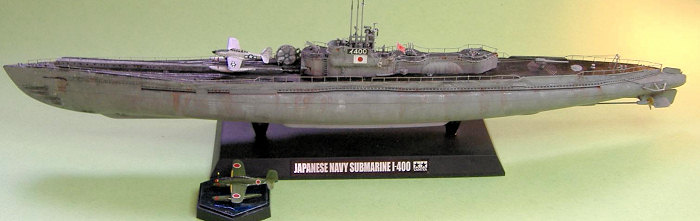
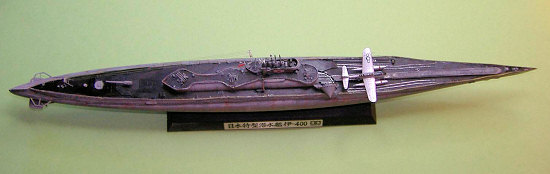
Tamiya 1/350 I-400 Submarine
| KIT #: | 78019 |
| PRICE: | $69.00 MSRP |
| DECALS: | One option |
| REVIEWER: | Bruno Schielzeth |
| NOTES: | Tom’s Modelworks PE set #3517 IJN Submarine was used in the build. |
| HISTORY |
I would like to amend my statement in the first part of the history about Japanese success with their submarines. Tom Cleaver mentioned to me that I failed to give them credit for the sinking of the USS Wasp (CV-7) by I-19 and the damage to the USS Enterprise (CV-6) that forced it to withdraw from battle at a critical time in the war. The Japanese submarine forces also sank several cruisers and Allied submarines. Despite several successes, the majority of the Japanese submarine fleet never sank a ship during the war.
The I-400 was completed at the Kure Dock Yards on December 30, 1944. The I-401 followed a few months later from the Sasebo Docks. The third boat, I-402, was completed on July 24, 1945 at Sasebo but never put to sea.1 Thus the projected class of 18 subs came down to only two operational units and one that never entered the war. I-403 to I-406 were still under construction at Kure and Sasebo at the end of the war.
The I-400s were
originally intended to strike both the East and West coasts of the United
States, but they never fulfilled a single war mission. The first mission planned
for the I-400 and I-401, along with I-13 and I-14, was to bomb the Panama Canal
to slow the transfer of U.S. naval units from the European theater to the
Pacific theater. Japan knew that even the destruction of the
 Panama Canal could
not stop the flow, but it was hoped that it might slow it down enough to give
Japan time to finish their defense of the home islands from the invasion they
knew was coming.
Panama Canal could
not stop the flow, but it was hoped that it might slow it down enough to give
Japan time to finish their defense of the home islands from the invasion they
knew was coming.
The plan to attack the Panama Canal changed from an attack to a suicide mission. The Serians and their pilots would destroy themselves by diving into the locks of the Canal, insuring their eternal glory to the Emperor and hopefully putting the Canal out of operation for several months. Despite objections from the pilots, the Seirans had been painted in silver dope and carried brush painted U.S. insignia while the submarines were resupplyed in Maizuru Harbor. The pilots felt that dying for the Emperor while flying a plane carrying the enemy’s markings was dishonorable. It was also against international law.1 The plan may have worked, as the Seiran was unknown to the Allies and it could easily have been mistaken for an American plane.
Before the Panama Canal mission even began the mission was changed again. The new mission was to attack Allied naval forces gathering at Ulithi Atoll. Operation Hikari had the I-13 and I-14 launching their Nakajima C6N Saiun (code named Myrt) observation planes to give last minute intelligence on the Allied fleet gathering at Ulithi. Operation Arashi had I-400 and I-401 arm and launch their six Seirans without floats for a Kamikaze attack on the carriers and any other capital ships at Ulithi. All four submarines were then to proceed to Malaysia to load supplies and new aircraft for another attack.
The submarines left Japanese waters in early August 1945 and took separate routes to a planned rendezvous point off Ulithi Atoll.
An Avenger from the carrier USS Anzio (CVE-57) damaged I-13 while it was running on the surface and the USS Lawrence C. Taylor (DE-415) sank I-13 with Hedgehog depth charges the next day. The remaining three submarines failed to rendezvous as planned due to communications difficulties and on August 15, 1945 they received the surrender order from Emperor Hirohito. The war was over.
The I-400 and I-401 quickly assembled and launched their unmanned U.S. marked Seirans, knowing they violated international law. The Seirans flew a short distance and then plunged into the waters of the Pacific. All secret communications, logs, boat schematics, and other vital papers were collected in burlap bags, weighted with handguns and ammunition and dropped into the Pacific as well. All the submarines except I-401 then hoisted the black flag of surrender and began their voyages home. 1
 The
destroyer USS Blue (DD-744) captured I-400 on August 27, 1945 as she sailed
towards Kure. The destroyers USS Murry (DD-576) and USS Dashiell (DD-659)
captured the I-14 the same day.
The
destroyer USS Blue (DD-744) captured I-400 on August 27, 1945 as she sailed
towards Kure. The destroyers USS Murry (DD-576) and USS Dashiell (DD-659)
captured the I-14 the same day.
The USS Segundo (SS-398) spotted I-401 on August 29, 1945 as it sailed at full speed, still flying the Japanese flag, toward Yokosuka. Capt Ariizumi had no intentions of surrendering to US forces but an engine failure allowed the U.S. submarine to capture and board the I-401 late the next day. Early in the morning of August 31, as his submarine neared the home islands and the U.S. prize crew was raising the American flag over his boat, Capt Ariizumi locked himself in his cabin and shot himself. His officers quickly wrapped his body in a Japanese naval flag and slipped his body overboard without the American prize crew’s knowledge.1 For years many people believed that Ariizumi did not commit suicide but was secretly transported to Japan where he lived for many years in seclusion. No proof was ever found for his death or his possible survival.
Capt Ariizumi, a fanatical warrior, may have committed hara-kiri to save face but more than likely he knew he would be charged with war crimes for his involvement in the slaughter of Allied ship crews earlier in the war. As commander of I-8 he had ordered the slaughter of 98 survivors of the Dutch freighter Tjisalak. In another incident, 96 survivors of the Liberty ship Jean Nicolet had their hands tied behind their backs and then Ariizumi ordered his crew to bayonet, shoot, and club them to death. When an approaching aircraft was sighted Ariizumi ordered a crash dive with the dead and wounded prisoners still on the deck. Amazingly 23 men survived the slaughter. The Royal Indian Navy picked them up a day or two later.1 Capt Ariizumi surely knew the only thing waiting for him in Japan was the hangman’s noose.
All three submarines sailed to Sagami Wan Japan and then to Yokosuka Harbor. The US crews fumigated and aired out the submarines and then filled the submarines with war booty and sailed to Pearl Harbor.
The I-400
class came as a huge surprise to naval personnel in Pearl. The I-400s were as
large as a destroyer! They had not even guessed that such a submarine existed!
It was found that the Seiran aircraft could be preheated in the hanger by
tapping into hot water and oil lines of the submarine even while submerged. The
aircraft’s engines could be run up at the same time if
 necessary. The first two Seirans could be assembled and launched within 7 minutes after surfacing and the
third one only 10 minutes later. It was also found that there was only one
toilet for the entire crew of 200!1
necessary. The first two Seirans could be assembled and launched within 7 minutes after surfacing and the
third one only 10 minutes later. It was also found that there was only one
toilet for the entire crew of 200!1
The US Navy sailed the I-400 and her sister ship around the Pacific, including another run to Sasebo Japan, until January, 1946 when they entered Pearl Harbor for the last time. They were put on public display but the political fighting was just beginning
The Soviets demanded them as a war prize. The US Navy had no intention of giving the Soviets such an advanced submarine and the decision was reached that all Japanese submarines would be sunk.
The I-402 was scuttled in the Sea of Japan in April 1946. On May 31, 1946 two torpedoes fired by the USS Cabezon sank the I-401. On June 4, 1946 the USS Trumpetfish sent the I-400 to join her sister at the bottom of the Pacific with three torpedoes, one of which detonated before striking the last Japanese super submarine. The wreckage of both the I-400 and I-401 has since been found over 2,000 feet below the surface of the Pacific. They are still in amazingly good condition.
For those interested in the full history of the I-400 class submarine you can’t do any better than reading I-400. Japan’s Secret Aircraft-Carrying Strike Submarine by authors Henry Sakaida, Gary Nila, and Koji Takaki and published by Hikoki Publications. It is a gripping and photograph filled book that covers the boat and the Seiran aircraft in amazing detail. The crew and pilots of the super-submarines fill it with first hand reports. There is a large section by the U.S. crews that captured them and sailed them back to the U.S. I got my copy from Amazon.com for less than $40.
| THE KIT |
See my preview for the first part of the history of the I-400 class submarine and a look at what is in the box.
| CONSTRUCTION |
After moving twice in 5 months, suffering the loss of a family member, and going 7 months without a modeling bench I am finally back to throwing glue and paint at a model! It feels good; let me tell you! What better way to break in the bench than the new Tamiya I-400?
After building the Revell Gato I learned the hard way to build the stand first. The round hull of a submarine makes it amazingly unstable on the bench!
Following the kit’s instructions, I assembled the stand and lower hull to have a stable base to build the rest of the kit. The only problem encountered was that I couldn’t find the rear dive plane shaft in my kit. Was it there? Probably but I suppose the carpet monster was hungry after such a long fast? I don’t remember moving the carpet monster, but apparently he found a way to come along? A short piece of brass rod will replace the missing shaft.
 I completed steps #1 through
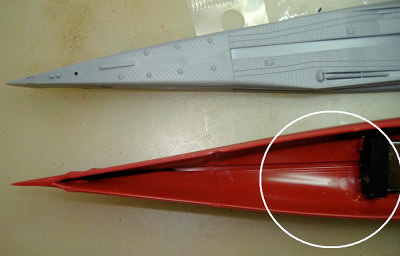
#8, minus the PE details, and found my first and only fit problem. The bow of
the lower hull just aft of the bow planes is about 1mm too narrow. OK, maybe
less than a millimeter, but it left a small step between the upper and lower
hull at that point. The entire upper hull basically snaps into place without a
seam except at the point circled in the picture. I was going to spread the area
with a piece of sprue but the compound curves defeated me In the end I just
grabbed the lower hull and gently bent the sides out just a hair. If all else
fails, brute force works! If you are careful with the ‘tweaking’ it is possible
to achieve a perfect join without a step. I almost got it right! Still, it is
close enough not to need any putty.
I completed steps #1 through
#8, minus the PE details, and found my first and only fit problem. The bow of
the lower hull just aft of the bow planes is about 1mm too narrow. OK, maybe
less than a millimeter, but it left a small step between the upper and lower
hull at that point. The entire upper hull basically snaps into place without a
seam except at the point circled in the picture. I was going to spread the area
with a piece of sprue but the compound curves defeated me In the end I just
grabbed the lower hull and gently bent the sides out just a hair. If all else
fails, brute force works! If you are careful with the ‘tweaking’ it is possible
to achieve a perfect join without a step. I almost got it right! Still, it is
close enough not to need any putty.
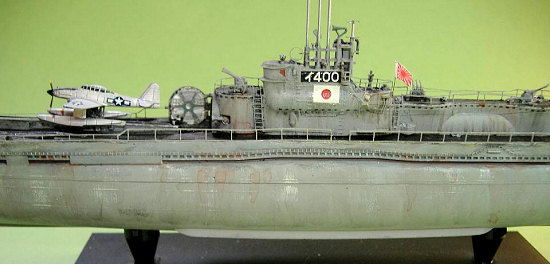
Pictures of the I-400 in dry
dock at Pearl Harbor, after the marine growth had been cleaned off, show a more
or less uniform color of the upper and lower
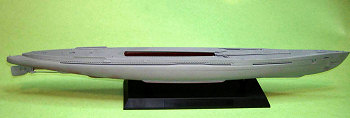 hulls and it appears to be basic Kure gray.1
Trying to duplicate the lumpy and deteriorating acoustic coating seemed to be an
exercise in futility, so I decided to go for a solid base color of gray.
hulls and it appears to be basic Kure gray.1
Trying to duplicate the lumpy and deteriorating acoustic coating seemed to be an
exercise in futility, so I decided to go for a solid base color of gray.
I loaded up my Badger 100 LG and laid down the first color coat using Pollyscale’s British Sea Gray Medium F505258. It’s not Kure Gray, but it’s close enough and it was on the bench. The props were painted Model Master’s Bronze and glued to the supports, and the pre-painted stern planes were added.
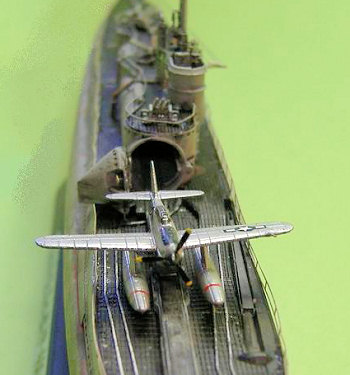
After
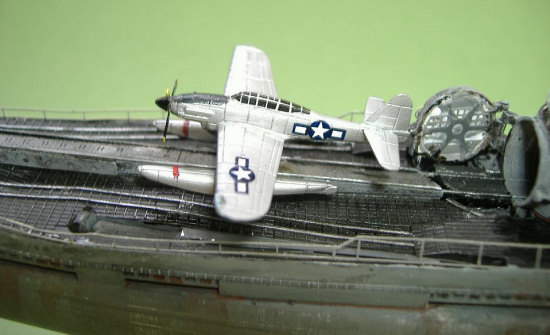
bolting the assembled hull to the stand I began on the aircraft so I could
assemble the sail/hanger unit. I built one of the full planes and painted it
silver. I mounted it on the floats for display purposes only, since all the
final missions proposed were Kamikaze missions. As a Kamikaze the floats were
not fitted and the bomb was actually bolted to the plane! Since the Seirans had
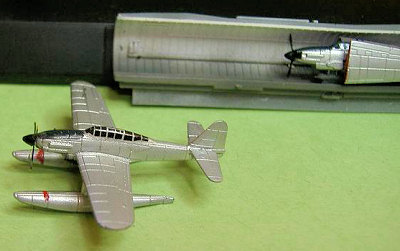 no other landing gear, the trip was definitely one way!
Although other sources, including the Tamiya painting guide, mention that the Seirans ‘might’ have been painted silver with false U.S. markings, my reading and research clearly showed that the submarines left Japan with the Seirans already painted silver with false markings. There is very little doubt of this according to first person reports from the pilots and crew of the I-400 and I-401.1 For the sake of historical accuracy I painted most of my Seirans with Testor’s Silver in the rattle can and only one in standard Japanese colors and markings, that one will be mounted on the supplied display stand.
In step #11 I chose to use
the two plane mounting rail so I could display one Seiran on the catapult. The
first Seiran on the hanger rail had the canopy area painted MM Dark Sea Blue and
the spinner and PE  prop black. A tiny touch of yellow was placed on the tips of
the prop blades. The last Seiran was painted silver…. period. Face it, no one
was going to see it buried in the depths of the hanger. You could leave that one
out completely and no one would know, but what do you do with a folded up Seiran?
I didn’t use the PE dollies on the planes in the hanger, as there is no way to
see them.
prop black. A tiny touch of yellow was placed on the tips of
the prop blades. The last Seiran was painted silver…. period. Face it, no one
was going to see it buried in the depths of the hanger. You could leave that one
out completely and no one would know, but what do you do with a folded up Seiran?
I didn’t use the PE dollies on the planes in the hanger, as there is no way to
see them.
The inside upper half of the hanger was sprayed MM Classic White and the lower half was sprayed MM Euro 1 Gray, the two Seirans mounted on the rail were glued in, and the sail halves closed up.
Now seems to be a good time to bring up the Tom’s Modelworks PE set #3517 since I started to add it at this time. The set is nicely etched although I feel the gauge of the brass could be just a little heavier for my tastes. Still, it includes all the railings needed to finish the I-400 in proper style, plus it gives you other parts for the I-1 or your spares box.
 If I have
one real complaint about Tom’s Modelworks PE it is that the instructions are
pretty poor. The pictures are blurry and look like something off our old
mimeograph in high school (yeah, that dates me! I actually remember the smell of
those fresh mimeograph pages!) and it takes a lot of looking to figure out what
part is supposed to go where. Other references are mandatory to get the PE down
properly. Still, for the price, it’s a good addition to the kit
If I have
one real complaint about Tom’s Modelworks PE it is that the instructions are
pretty poor. The pictures are blurry and look like something off our old
mimeograph in high school (yeah, that dates me! I actually remember the smell of
those fresh mimeograph pages!) and it takes a lot of looking to figure out what
part is supposed to go where. Other references are mandatory to get the PE down
properly. Still, for the price, it’s a good addition to the kit
After carefully cleaning the PE sheet with acetone I sprayed the sheet with MM Primer and then the base color of gray. Yes, the paint will chip during the installation but at least some of the paint will remain on the PE, and touching up is quick and easy.
I first added the hanger ladder at the port side just forward of the bridge, since its location would determine the placement of all the rest of the railings on the hanger deck.
My
technique for adding PE railings works for me, but may not work for everyone. I
put a small drop of thick CA on a scrap piece of tape and use a sharp toothpick
to add a very thin line of it along the very edge of the deck for an 1/8th
inch or so. Using a pair of fine pointed surgical tweezers I gently set the
first railing in place on the glue and then press the lower railing down to the
 deck with a toothpick to hold it in position until the glue sets. I then gently
bend and shape the rail until it fits the curves of the deck and glue down
another short section. Of course the use of a magnified light and other aids is
pretty much required in this scale! It might be a good idea to lay off the
fourth cup of coffee too!
deck with a toothpick to hold it in position until the glue sets. I then gently
bend and shape the rail until it fits the curves of the deck and glue down
another short section. Of course the use of a magnified light and other aids is
pretty much required in this scale! It might be a good idea to lay off the
fourth cup of coffee too!
If you dislike using PE railings, then don’t buy any for the I-400! If you look at the hanger deck you will see the I-400 has dozens of odd curves and sharp corners. Bending and shaping the PE to fit was truly a trial in microsurgery!
I found the first section of railing, labeled ‘forward gun platform rails’, came up short of the ladder on the starboard side about mid-ship. One thing to remember is to cut a gap in the lower railing at the bracket on the starboard side of the hanger deck where the exhaust pipe, part #A1 goes. Don’t ask me how I found out about that. I continued on with the hanger bay rails from the other side of the ladder until I reached the bridge structure again. I ended up with a piece of extra railing about ¾ inch long. Did I screw up somehow? It’s certainly possible. I just took a short section of the ‘extra’ railing and cut it to fill in the missing part on the other side. The ladders on the aft part of the hanger deck had no PE replacements so I pulled some spare ladder stock out of my stash and added them.
I added the
small pieces of railings to the bridge and lookout station from Tom’s PE sheet
and assembled the periscope sheers. Luckily Tamiya, in their infinite wisdom,
supplied multiple antennas and lookout saf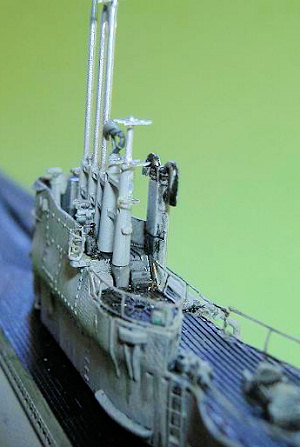 ety
rings on their PE sheet. Tom’s sheet also supplies multiple versions of the same
parts, so you should be able to save enough to complete the sheers. Working with
the near microscopic parts is almost guaranteed to drive you insane, but the
final result is worth the gray hairs and crossed eyes! I used the extended
periscope sheers on my sub, but you can also use the lowered periscope sheers if
you want to. I painted the extended scopes silver with dark gray upper portions.
ety
rings on their PE sheet. Tom’s sheet also supplies multiple versions of the same
parts, so you should be able to save enough to complete the sheers. Working with
the near microscopic parts is almost guaranteed to drive you insane, but the
final result is worth the gray hairs and crossed eyes! I used the extended
periscope sheers on my sub, but you can also use the lowered periscope sheers if
you want to. I painted the extended scopes silver with dark gray upper portions.
I added all the ammo ready lockers (cleverly hidden on the two aircraft sprues!) and other small bits and pieces to the upper decks to complete the sail/hanger unit. The completed part literally snaps into place!
I assembled the launch catapult and added the PE top from the Tamiya sheet. I then cut the PE sides from Tom’s sheet. Tom’s parts add some nice extra detail to the sides of the rail. The only problem is that there are absolutely no instructions showing exactly where they go or which way they face! I tried them every which way and finally settled on putting the wider end even with the forward end of the rails on the catapult. I’m not sure it’s correct, but it worked for me. Be very careful not to let the sides extend below the bottom of the catapult or it will not fit the deck properly!
Adding the last of the plastic bits to the main deck only took a few minutes to complete. I used the kit prop guards as I felt Tom’s PE pieces were just too flat. The kit parts are delicate and not terribly out of scale and looked better to me. I used Tom’s hand wheels for the hanger door since they were better detailed than the kit parts.
I added the
25mm antiaircraft guns and the main deck gun and glued the silver Seiran to the
catapult. I tried to use Tom’s antenna mount for the bridge but it was too soft
to survive the tension of the antenna lines so I built a new one out of .010
solid 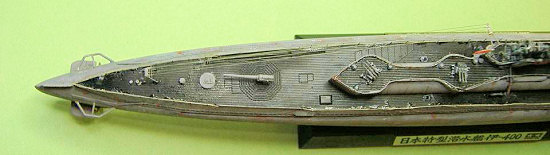 brass rod. I CA glued four antenna lines made from smoke colored invisible
thread to the kit’s stern antenna mount and secured the other end to my new
mount. I chose the kit’s stern antenna mount because the etched steel mount is
stronger than Tom’s softer brass one.
brass rod. I CA glued four antenna lines made from smoke colored invisible
thread to the kit’s stern antenna mount and secured the other end to my new
mount. I chose the kit’s stern antenna mount because the etched steel mount is
stronger than Tom’s softer brass one.
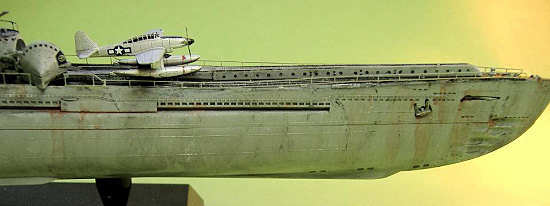
The last thing to do was mount the main deck railings. I had to use my reference books to determine where the railings went and I found that the railings forward of the hanger opening were lower than the railings used on the rest of the main deck, probably to clear the aircraft’s wings. Luckily Tom’s PE sheet included the proper railings although they were labeled as being used on the I-1. The I-1 railings were added to the bow and then the rest of the deck was railed with the specified railings from the sheet. The only problem I encountered was cutting the railings to clear the splinter shields near the 5.5-inch gun position.
| COLORS & MARKINGS |
There really isn’t much
to say about the painting. The hull and all vertical surfaces were done in
Pollyscale’s British Sea Gray Medium. The decks were painted with thinned Tamiya
acrylic flat b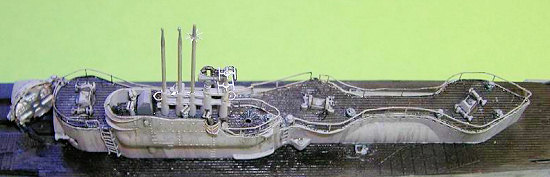 lack. I used my
bottle of standard dark ‘sludge wash’, a combination of water, soap, and cheap
acrylic black paint from Hobby Lobby to darken the flooding, vent, and drainage
holes on the hull. Wiping the excess off of the flat MM paint with a wet cotton
bud left streaks and discoloration, which was just what I wanted. I added random
streaks of black and rust colors to the hull and bridge/hanger areas and then
dry brushed those areas again with Sea Gray to blend the colors. I did a final
dry brushing with Light Gull Gray to highlight the structure and hint at salt
crusting.
lack. I used my
bottle of standard dark ‘sludge wash’, a combination of water, soap, and cheap
acrylic black paint from Hobby Lobby to darken the flooding, vent, and drainage
holes on the hull. Wiping the excess off of the flat MM paint with a wet cotton
bud left streaks and discoloration, which was just what I wanted. I added random
streaks of black and rust colors to the hull and bridge/hanger areas and then
dry brushed those areas again with Sea Gray to blend the colors. I did a final
dry brushing with Light Gull Gray to highlight the structure and hint at salt
crusting.
The two I-400 submarines were in pretty rough shape when they were captured and I hope I’ve managed to show something similar to that with the weathering.
| CONCLUSIONS |
I am firmly convinced
that there has never been a ‘perfect model’, but Tamiya has produced a
beautifully detailed model of an unusual subject that comes within a ha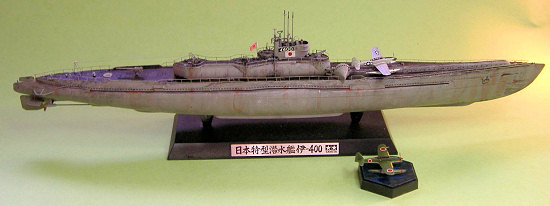 ir’s
breath of being perfect! The fit and detail is superb. I couldn’t find any
glaring omissions or errors on the kit. This is the first kit I have ever built
were my list of problems consisted of a single easily corrected item! Tom’s Modelworks PE adds the extra dash of detail the kit needs to look stunning. The
model was fun to build and will display well. Is it worth the asking price? I
guess that’s up to the buyer. If Tamiya had included a full PE sheet with
railings I would be happier with the cost of the kit. As it is the kit supplied
me with about 25 hours of modeling fun with no tedious clean up or fit problems.
I guess you can’t ask for much more than that.
ir’s
breath of being perfect! The fit and detail is superb. I couldn’t find any
glaring omissions or errors on the kit. This is the first kit I have ever built
were my list of problems consisted of a single easily corrected item! Tom’s Modelworks PE adds the extra dash of detail the kit needs to look stunning. The
model was fun to build and will display well. Is it worth the asking price? I
guess that’s up to the buyer. If Tamiya had included a full PE sheet with
railings I would be happier with the cost of the kit. As it is the kit supplied
me with about 25 hours of modeling fun with no tedious clean up or fit problems.
I guess you can’t ask for much more than that.
Review kit courtesy of HobbyLink Japan; get yours at Japanese prices at www.hlj.com
Thank you Tom Cleaver for your faith in my building and writing skills and for sending the kit to me for review.
In Memory.
I dedicate this model to my stepfather, Dr. Albin J. Schleper M.D., who passed from this world on 7/30/2007 at the respectable age of 87. He was a gentle, quiet man and is deeply missed by all that knew and loved him.
| REFERENCES |
Hikoki Publications. I-400. Japan’s Secret Aircraft-Carrying Strike Submarine.
Osprey Publishing. Imperial Japanese Navy Submarines 1941-45.
Also of interest is this web site: http://www.pacerfarm.org/i-400/ for a dry but accurate report on the I-400 after its capture.
The story of Capt Ariizumi’s atrocities can be found here: http://www.armedguard.com/ag87.html
November 2007
Copyright ModelingMadness.com
If you would like your product reviewed fairly and quickly, please contact me or see other details in the Note to Contributors.