Revell Mini-ship IJN Yamato
| KIT #: | 06803 |
| PRICE: | $5.50 MSRP (Approximately) |
| DECALS: | None |
| REVIEWER: | Jeff Simpson |
| NOTES: | Sold as a toy but a great value for the money. |
| HISTORY |
The Yamato and its close sister Musashi and the related Shinano aircraft carrier are well documented in print and on the web. Even so there is considerable dispute about what their precise configuration and colour scheme was at various points in WW2.
| THE KIT |
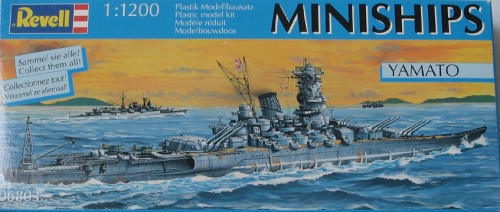 A Revell (Germany) plastic kit, it is 220 mm (8.7 inches) overall length,
the scale is thus 1-1195, it looks very "toy like" out of the box. The ship
is depicted encrusted with light AA guns, as it would have appeared in
1944/5. The general shape of the ship is well represented although there
are five basic rectifications required. This kit first appeared as "Casadio"
brand in 1973 and has since been re-issued by ESCI and, in the 1990s by
Revell.
A Revell (Germany) plastic kit, it is 220 mm (8.7 inches) overall length,
the scale is thus 1-1195, it looks very "toy like" out of the box. The ship
is depicted encrusted with light AA guns, as it would have appeared in
1944/5. The general shape of the ship is well represented although there
are five basic rectifications required. This kit first appeared as "Casadio"
brand in 1973 and has since been re-issued by ESCI and, in the 1990s by
Revell.
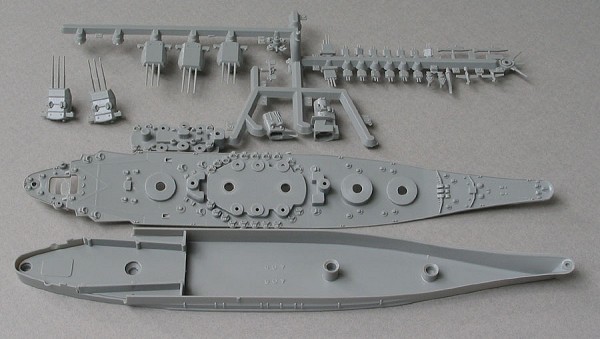 The kit comes in an end-opening box with a small assembly diagram and
instructions on the bottom. The parts, in grey plastic, are all sealed in a
plastic bag. Oddly the kit includes two spare main gun turrets (with extra
AA on the roofs). There are no decals.
The kit comes in an end-opening box with a small assembly diagram and
instructions on the bottom. The parts, in grey plastic, are all sealed in a
plastic bag. Oddly the kit includes two spare main gun turrets (with extra
AA on the roofs). There are no decals.
Revell market this same kit as Musashi in a different box, which is wrong
as the two ships were never identical.
As an aside, it is nice to have a plastic kit in this scale. Worldwide,
there are a large number of "cottage" manufacturers of metal and resin
waterline ship kits, only Revell and "Lee" in China currently produce
plastic kits in, or close to 1/1200 scale.
| CONSTRUCTION |
The plastic is flash-free the deck includes moulded in bollards, winches
and light AA guns, which looks clumsy but is quite acceptable for a "wargame"
model and entirely appropriate for a snap together toy. I found that the
parts do not fit particularly well and it is necessary to trim them,
including trimming the locating pins until they fitted snugly. It is
possible that a bit of "brute force" could have persuaded them to "snaptite",
I was not prepared to take the chance. I used liquid plastic glue applied
with a brush.
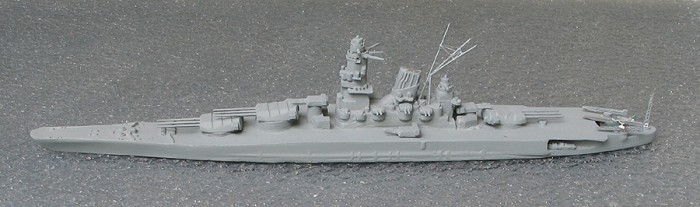
I decided not to make the kit "out-of-box" but to model the ship as it
appeared in 1941 and to improve the appearance to display model standard.
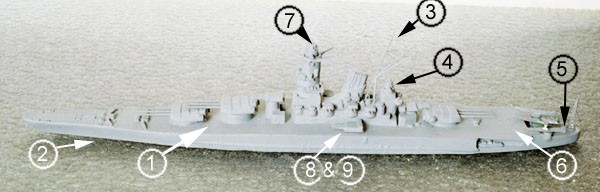
Basic Rectifications
1. Scrape or sand off the moulded in
deck "planks" which are quite ridiculous at 1/1200 scale.
2. Reduce the hull freeboard (this step would not be necessary if you
wanted to embed the hull in a "sea" diorama, however I prefer to display my
models on a flat shelf and the kit sits far too high). Cut the bottom off
the hull with a saw and trim and sand the hull sides down to 6mm at the bow
and 4mm at the stern. It is a good idea to reinforce the hull with
bulkheads made from scrap plastic, and to brace these to the deck with
filler.
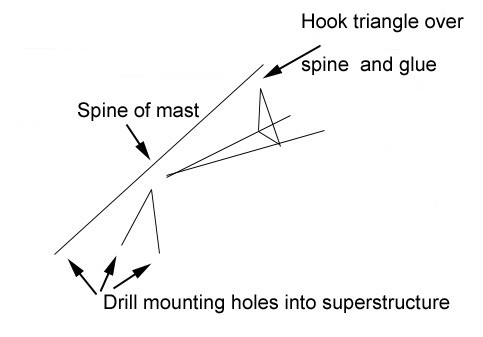 3. Make a main mast. It is quite a complex structure and it is a glaring
omission from the kit, I have done a sketch to indicate how the main
components fit together. I glued on the mast when the model was just about
finished, so that it would not be handled too much.
3. Make a main mast. It is quite a complex structure and it is a glaring
omission from the kit, I have done a sketch to indicate how the main
components fit together. I glued on the mast when the model was just about
finished, so that it would not be handled too much.
I made the mast from thick (.6mm) wire. Drill three holes in the top of the
superstructure so that the angles converge below funnel top height. Cut two
short bits and glue them with superglue so that the pins are vertical in
side view but meet at the top on the centreline of the ship. Then glue a
long length of wire from the superstructure to the apex of the two short
pins, this wire is the "spine" of the mast structure.
Cut other wires and glue them together with cross pieces so that they form
a triangle. Then glue this assembly to the main mast, simultaneously fixing
a "vee" shape of supporting wires, hooking them over the "spine" as in the
diagram. Then glue in the rest of the bracing made out of cut pieces of
toothbrush bristle and trim off any excess.
4. The rear superstructure needs to be modified so that the range finder is
well above the AA gun mountings.
5. Make a jib for the rear aircraft handling crane
1941 Modifications
I decided to modify the kit to
represent the Yamato as completed in 1941. There are plans and photos of
the ship with 12 x 6” secondary armament and a very modest AA battery of 12
x 5” and 24 x 25mm guns.
 Note: the book I used seemed to imply that both Yamato and Musashi had an
identical appearance, but I suspect that Musashi never had the planned 6"
side turrets fitted.
Note: the book I used seemed to imply that both Yamato and Musashi had an
identical appearance, but I suspect that Musashi never had the planned 6"
side turrets fitted.
6. Scrape or sand off the large
number of light AA barrels moulded into the deck.
7. Remove the plastic radar antennae from the main rangefinder.
8. Cut back the superstructure and built up the deck amidships. Smooth it
all off before drilling mounting holes for the side turrets.
9. Obtain an extra pair of triple 6" gun turrets. Revell do not include
spare 6” turrets, so my project involves making an extra pair. I cast
duplicate turrets from the kit ones using resin material in a two-part
mould in silicone rubber. This is not a recommended procedure for the
novice to resin casting. The turrets have only a narrow “stalk” which is
too narrow for the resin to flow down. Having said that the kit is
sufficiently cheap that you could buy another one just for the turrets.
I made up one of the "Rufe" seaplanes included in the kit and made little
tip floats out of plasticard - of course the Rufe is unlikely to have been
seen on Yamato in 1941....
| COLORS & MARKINGS |
I used acrylic paints, applied with a brush. The instructions suggest
"ochre" for the decks. I painted the decks Neutral Grey and the hull and
s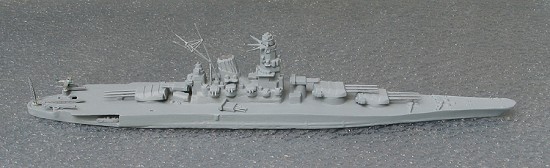 uperstructure Ocean Grey. The anachronistic "Rufe" provides a spash of
colour in green and light grey, with red markings.
uperstructure Ocean Grey. The anachronistic "Rufe" provides a spash of
colour in green and light grey, with red markings.
Enhancements:
If you model the ship at any time in the 1942-45 period you can have lots
of fun with extra light AA and radars. Making a hundred plus triple
barrelled 25mm AA guns could be quite therapeutic! I have also seen
suggestions that the decks should be black which would look quite dramatic.
There are aftermarket Japanese seaplanes in 1/1200 scale under the brand
name "CAP Aero" that would probably look better than the kit seaplanes.
| CONCLUSIONS |
Out-of-box the kit would assemble into a robust yet presentable looking
wargame model or toy.
I can also recommend it for adult modellers. A slight amount of proficiency
is required if you want to improve the appearance to a display standard and
a bit of research is needed to depict a particular ship on a particular
date.
Value for money: Tops, Enjoyment: High, Ease of assembly: Medium.
| REFERENCES |
Warships of the Imperial Japanese Navy 1869-1945 by Hansgeorg Jentschura
and Jung and Mickel, 1999, Arms and Armour Press
Review copy: courtesy of the small change in my wallet.
Sources:
It is worth noting that the "Miniships" series are not normally seen in
hobby shops. They are more easily found in Maritime Museum shops, Toy shops
and the Toy section of department stores or supermarkets: so if you want
one keep your eyes open (actually it is a good excuse to go and have a look
at toys).
If you would like your product reviewed fairly and quickly by a site that has nearly 300,000 visitors a month, please contact me or see other details in the Note to Contributors.
September 2005