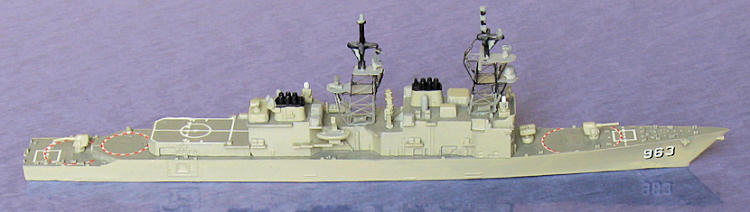
Hobby Boss 1/1250 USS Spruance DD-963
| KIT #: | 82504 |
| PRICE: | £3.99 |
| DECALS: | Included |
| REVIEWER: | Jeff Simpson |
| NOTES: |
Built as a waterline model, with aftermarket "Gwylan" Photo-Etched masts |
| HISTORY |
 USS
Spruance (1975-2006) was the first of its class of Gas Turbine powered
destroyers in the
USS
Spruance (1975-2006) was the first of its class of Gas Turbine powered
destroyers in the
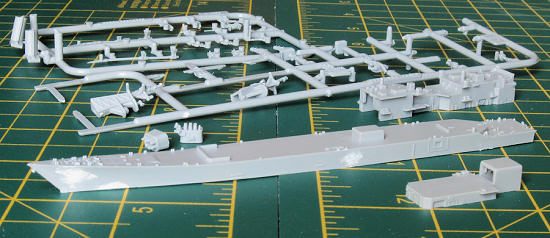
| THE KIT |
 For an idea
of what the kit is like in the (end-opening) box see the Modelling Madness
preview and builds of near sister ship kits - Hobby Boss USS Princeton and Hobby
Boss Ticonderoga 1:1250 scale.
For an idea
of what the kit is like in the (end-opening) box see the Modelling Madness
preview and builds of near sister ship kits - Hobby Boss USS Princeton and Hobby
Boss Ticonderoga 1:1250 scale.
The Spruance and four similar missile destroyers have been released by Hobby
Boss, with appropriate extra/ different sprues and decals, they all seem to use
the same hull, deck and basic superstructure, some of the
The instructions are basic: two or three exploded diagrams with the relevant
part numbers shown. However the box lid colour plan and profile views helped me
to resolve any doubts about where the parts were supposed to be located. The
instructions do not highlight the sealed hole that needs to be punched or
drilled out for the Asroc mount. Nor do they explain that some of the "ex
| CONSTRUCTION |
I tested my acrylic paints on this kit and I didn't find any need to degrease at
all.
Since I wanted to make a waterline model I trimmed off the sprues and also the
locating sockets inside the upper hull.
 I missed
the sealed hole in the forward deck for the missile launcher, it was easy for me
to drill this through, afterwards, using the marked location underneath the
deck. If I had glued the hull bottom on this would, no doubt, have led to some
gnashing of teeth.
I missed
the sealed hole in the forward deck for the missile launcher, it was easy for me
to drill this through, afterwards, using the marked location underneath the
deck. If I had glued the hull bottom on this would, no doubt, have led to some
gnashing of teeth.
I painted the decks and most of the parts before assembly. I put the kit masts
to one side, to be replaced with the photo etch (except for some plastic
details).
I decided to fill the slight flaws in the hull, especially the "dimple" (sink
mark?) in the hull at the bow. I used fine grain Milliput (white tube), which is
easily sanded once set. I painted the filler with neutral grey just to check it
looked ok, as a sort of primer.
I built the model, assembling parts from the deck up being careful to paint and
apply decals to the main deck before the gun mounts were attached. I used
polystyrene glue, with no need to use superglue, except for the photo-etch
masts.
Most parts fitted well, there was some need to sand down mould lines and no
other need for filler. The impression I got is that there is a little bit more
flash compared to the early
The boat with davits can be fitted after the superstructure, you just have to be
sure to hook the base of the davit outward to get a neat join, a fingernail or a
knife blade will do the job.
I 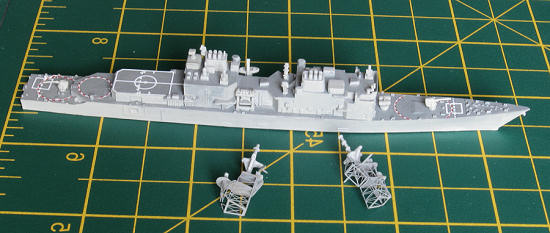 did not
remove the mounting lugs for the masts, but painted them neutral grey along with
the decks, the photo-etch masts do not locate tightly on these lugs and it would
probably be "better" to remove them first and smooth the decks before painting.
did not
remove the mounting lugs for the masts, but painted them neutral grey along with
the decks, the photo-etch masts do not locate tightly on these lugs and it would
probably be "better" to remove them first and smooth the decks before painting.
Photo etch.
Gwylan make a few photo etch parts and decals for 1/1200 scale projects, a
specialised area indeed! The PE for the Spruance class comes in a small ziplock
plastic bag with a slip of paper advising you to go to their website.
Full instructions can be downloaded from the website at
www.gwylanmodels.co.uk/downloads
. Sensibly Gwylan suggest that one finishes the rest of the model, including
painting and decals, before fitting the very fragile masts. I will not repeat
the instructions here. I did depart slightly from the suggestions: I painted the
brass neutral grey first, no adhesion problem was noticed. They suggest two
sharp knives are required (use the back of one blade as a former). A lot of
patience is required to assemble the parts, after the first few bends I found a
small stiff piece of card was just as effective as a former. I tried to bend the
parts "too far" and then ease them back to reduce the spring tension on the
joins, Gwylan caution against this, but I found it worked and it saves
continually holding the parts together until the superglue sets enough to hold
the joins under the internal tension.
When cutting antennae and radar domes off the plastic masts, I tried to cut into
the mast to give the maximum amount of height to the part, filing the cut end
flat to glue to the PE mast with superglue.
| COLORS & MARKINGS |
I used Hannants Xtracolour acrylic paints (which are gloss), applied with a
brush. I painted the small parts before detaching them from the sprues and then
touching up after assembly. I
painted the decks "Neutral grey" and the sides "Light Gull grey". Matt
Aeromodeller acrylics were used for: small antennae - light grey, the mast and
funnel (exhausts) - black and the Phalanx tops - white.
As an aside on naval greys, I see various warships, from various nations,
including 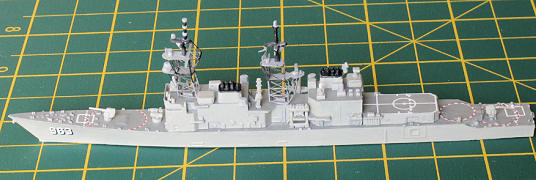 colour
depends on the lighting conditions at the time of day. In my opinion the colours
I chose are a reasonable approximation to USN colours (and are probably better
than the Ghost Grey I used for the
colour
depends on the lighting conditions at the time of day. In my opinion the colours
I chose are a reasonable approximation to USN colours (and are probably better
than the Ghost Grey I used for the
Decals:
The provided decal sheet has the wrong ship name but the hull number and the
deck markings are actually correct for Spruance DD963.
They have a large film surround and the flight deck markings need to be trimmed
very closely to avoid having the film projecting over the edge of the deck.
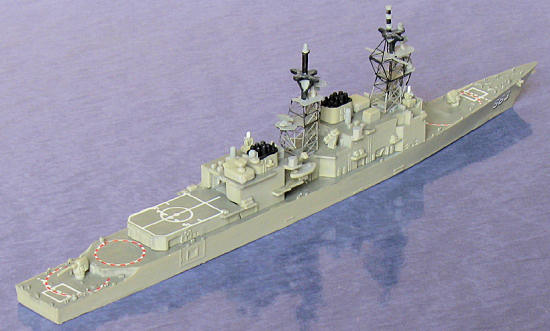
| CONCLUSIONS |
This kit was a straightforward built, the photo-etched mast is a time-consuming
challenge but it improves the appearance compared to the plastic mast (see the
photo comparing with the
Kit provided courtesy of my wallet, both kit and photo-etch obtained from waterline-ships.co.uk
May 2009
If you would like your product reviewed fairly and quickly, please contact me or see other details in the Note to Contributors.