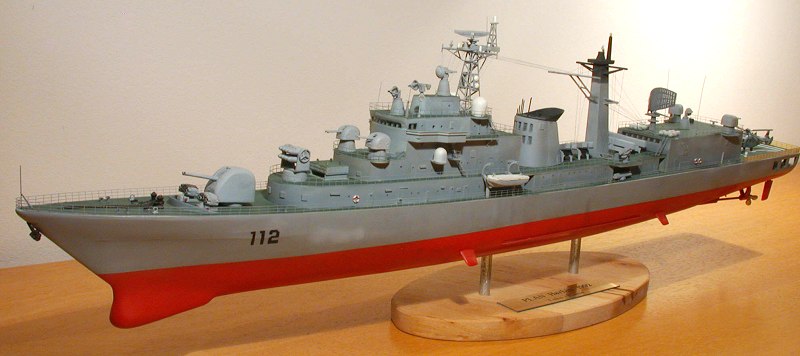
Trumpeter 1/200 Harbin Destroyer
| KIT #: | ? |
| PRICE: | 20-30 Euros |
| DECALS: | options |
| REVIEWER: | Frank Spahr |
| NOTES: |
| HISTORY |
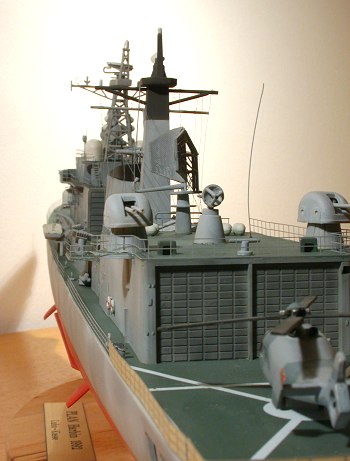
Hi all, my name is Frank and I´m a ship modeler by heart (collective gasp). I´ve built lots of aircraft and I love them, but ships intrigue me in a special way. I´ve only built a few of them over the last years, mostly due to space constraints and my intent to get practice in all the various techniques I´d like to master and am slow to learn. But such a complex thing as a ship has a very special appeal to me. I still possess Revell´s 1/96th USS Constitution and Alabama, built when I was 17 and 28 respectively, and the new kits and techniques I´ve discovered on the net over the years have made me itch for building a modern warship even more. (Editor's Note: Typical of ship builders, Frank sent in a ton of images, but only one of the overall ship! What I've done is give a stem to stern tour of the port side of the ship in the larger images and put the build stuff into thumbnails. I hope that you are as impressed as I with the work that went into this build.)
| THE KIT |
 The introduction of
Trumpeter´s Sovremenny class destroyer and WEM´s etch parts for it made
that itch even worse, and I decided to do something, in spite of the
backlog of kits in the cellar. So one day I happened upon the older
Trumpeter 1/200th scale kit of a Chinese destroyer, offered for
little more than a song on Ebay. I got it and decided to use it as a
testbed for techniques of improving a kit before progressing to the
Sovremenny (which I still intend to do). I got the kit in August of 2003,
wrote a preview and got started a little later. Being rather lazy in these
matters I didn´t write a building log, which I now regret, as I can only go
by my photos taken during the build to retrace what I did.
The introduction of
Trumpeter´s Sovremenny class destroyer and WEM´s etch parts for it made
that itch even worse, and I decided to do something, in spite of the
backlog of kits in the cellar. So one day I happened upon the older
Trumpeter 1/200th scale kit of a Chinese destroyer, offered for
little more than a song on Ebay. I got it and decided to use it as a
testbed for techniques of improving a kit before progressing to the
Sovremenny (which I still intend to do). I got the kit in August of 2003,
wrote a preview and got started a little later. Being rather lazy in these
matters I didn´t write a building log, which I now regret, as I can only go
by my photos taken during the build to retrace what I did.
Now modern warship modelers include some of the most gifted guys I can imagine. If you want to see their work, look into the specialized sites like modelwarships.com. It will take your breath away! Some of these guys rig tiny ships in 1/700th scale with dozens of gossamer-like thread and even man them with figures, which must be about a millimetre tall. Now that is far beyond my abilities, so I felt happy with the larger scale. I did some googling on the Harbin and found a set of pictures, mostly taken during a fleet visit to U.S. Waters. But there wasn´t really a lot of references readily available. But you could see some details, and man what a lot of detail a modern ship has! I quickly realized how simplified this kit was and easily envisioned the Chinese dad with his son sailing this model with a simple remote control on a pond (the pond probably populated by ducks destined to become crispy #54 one day). The instructions showed how to install a simple R/C. Much was simplified in order to get the thing to float and make it more sturdy in handling. So the stern bay was only hinted at and sealed with transparent styrene, and the railings were way oversized. I decided to improve whatever came into my mind and see where it took me.
| CONSTRUCTION |
 So I started with
c
So I started with
c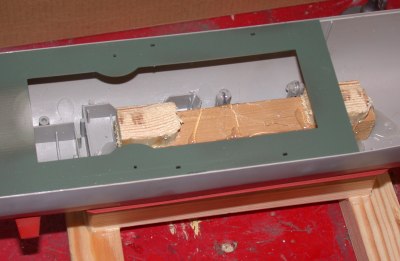 leaning up the hull. It had rather prominent mold seams, and I sanded
those away. I also gave thoughts to a new stand. The one from the kit
didn´t appeal to me that much. In the end, I hotglued a sturdy piece of
wood into the hull and drilled two 8 m/m holes through the entire assembly.
Into those I fit pieces of aluminum tubing and mounted them on a stand that
I hotglued from wood. So I could handle the model quite easily and
securely. During the end of construction I took a piece of birchwood (a
breakfast plate from IKEA) and sawed an oval shape out of it, drilled
fitting holes into that, sanded it and applied wood oil. That gave me a
nice stand and I had a nameplate made at a shop specialized on trophies and
signs.
leaning up the hull. It had rather prominent mold seams, and I sanded
those away. I also gave thoughts to a new stand. The one from the kit
didn´t appeal to me that much. In the end, I hotglued a sturdy piece of
wood into the hull and drilled two 8 m/m holes through the entire assembly.
Into those I fit pieces of aluminum tubing and mounted them on a stand that
I hotglued from wood. So I could handle the model quite easily and
securely. During the end of construction I took a piece of birchwood (a
breakfast plate from IKEA) and sawed an oval shape out of it, drilled
fitting holes into that, sanded it and applied wood oil. That gave me a
nice stand and I had a nameplate made at a shop specialized on trophies and
signs.
Work on the hull continued with attempts at bringing some structure into it. A ship´s hull will always show the framework below the hull plates, just like the stressed-skin surface of an airplane. So I used my modeling knife to produce some patterned grooves and dimples in the surface. The effect didn´t satisfy me, but I couldn´t come up with a better way at the time, so I played around a bit during painting the hull with shadings. I had decided to use Revell 76 for the shade of grey (I´ve no idea which exact shade the People´s Liberation Army´s Navy uses, and frankly I´m heretic enough not to care) and used several lighter and darker shades to bring some more definition to the hull. I also decided to paint the decks green (as per instructions), and I used Humbrol 30 on them. The reference pictures showed the decks to be rather dark grey than green, but I used the green paint nonetheless because I liked the looks better – that´s just me, folks. The numerous holes for the kit railings were filled at this stage, too – prior to painting.
 The rudder and propeller
assemblies were cleaned up (the propellers are made from some non-styrene
plastic and were a bit tough to work on), mounted under the hull, filled
and sanded. Then I looked up whether the original ship has a waterline
marking or not, and the pics seemed to indicate to me that it hadn´t, so I
only used red and grey on the hull. I still have no idea how to weather a
hull below the waterline, so I didn´t. Will have to look up pics of ships
in drydock to determine the best way.
The rudder and propeller
assemblies were cleaned up (the propellers are made from some non-styrene
plastic and were a bit tough to work on), mounted under the hull, filled
and sanded. Then I looked up whether the original ship has a waterline
marking or not, and the pics seemed to indicate to me that it hadn´t, so I
only used red and grey on the hull. I still have no idea how to weather a
hull below the waterline, so I didn´t. Will have to look up pics of ships
in drydock to determine the best way.
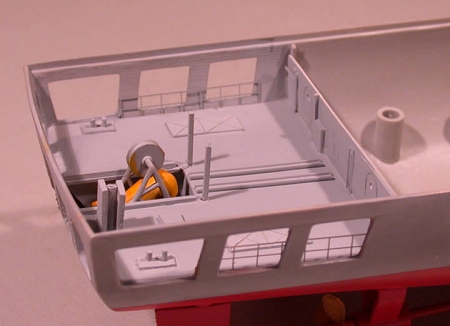
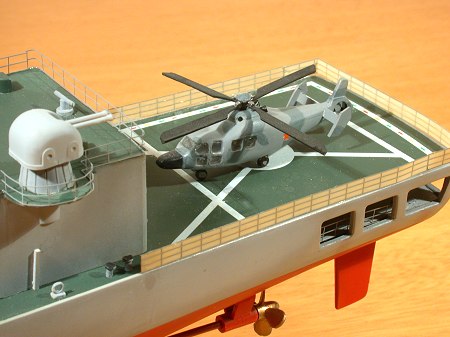
Next came the stern bay. In the original ship it houses a towed sonar device called a VDS (Variable Depth Sonar), a thing looking like a blimp airship or a barrage balloon. That was present, but not the deck and surroundings. So I made those from evergreen styrene and mounted it into the ship´s stern. That done, I mounted the deck pieces which I had painted beforehand.
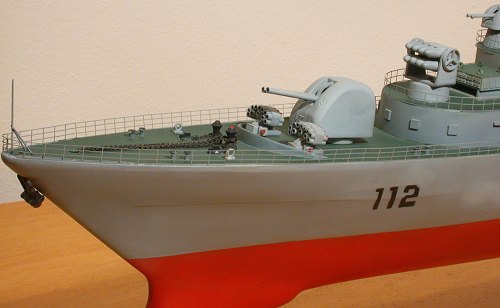
The fit was generally OK and didn´t pose big issues. So now the hull with the deck was nearly done. I used the kit decals for the helipad, but not the hull number decals, as those were white instead of black as in the references (you see, I can also heed references if I´m in the right mind...) So I used the decals as templates and cut a paint mask for the numbers which I then sprayed. I used the leftovers of some clear adhesive sheet I had obtained years ago. The stuff is sturdy and a bit forgiving. The anchors were weathered modestly and mounted at that stage. I still haven´t decided if I´ll make them rusty with a new 2-component stuff from the Armor scene I´ve bought. It´s probably like some other products in that you have a paint that contains iron particles and a second component that will corrode the iron in the paint. You have to paint the appropriate areas with #1 component, let it dry for ten hours, and then apply #2 component and let the acid in it work. I´ve seen very nice results and will keep you posted on my next (cough!) armor project.
The hull done, I started with the various deckhouses and radars and gun turrets and the dozens of other subassemblies. I decided for each separate thing how far I had a mind to go and tried my best.
 It was at that point
that I began using the PE sets I had bought for this kit. Now there is no
dedicated PE set for this kit. I also didn´t mean to cannibalize the very
expensive WEM set for the Sovremenny, and I found nothing much else in
1/200th scale. Most ship models are either in 1/350th
or even 1/700th. After some searching I found PE in 1/250th
made for cardboard models by the german company HMV. They had generic
railings and also some generic fittings including ladders and handwheels
and lots of other tiny stuff. I decided to use this stuff as it would be a
bit too small in the worst case and be affordable. Measurements on the kit
railings showed them to be 6 mm tall whereas the 1:250 ones are 5 mm. I can
live with that, and I hope that not too many kit sailors go overboard ...
It was at that point
that I began using the PE sets I had bought for this kit. Now there is no
dedicated PE set for this kit. I also didn´t mean to cannibalize the very
expensive WEM set for the Sovremenny, and I found nothing much else in
1/200th scale. Most ship models are either in 1/350th
or even 1/700th. After some searching I found PE in 1/250th
made for cardboard models by the german company HMV. They had generic
railings and also some generic fittings including ladders and handwheels
and lots of other tiny stuff. I decided to use this stuff as it would be a
bit too small in the worst case and be affordable. Measurements on the kit
railings showed them to be 6 mm tall whereas the 1:250 ones are 5 mm. I can
live with that, and I hope that not too many kit sailors go overboard ...

 And yet in buying them
I easily spent twice what I paid for the kit originally (it´s even worse
with the Revell S-100 Schnellboot, as I´ve bought WEM stuff there ...) I
used the PE here and there in detailing, where I found it handy, but most work was done with hobby knife, drill bit, dremel, stretched sprue and
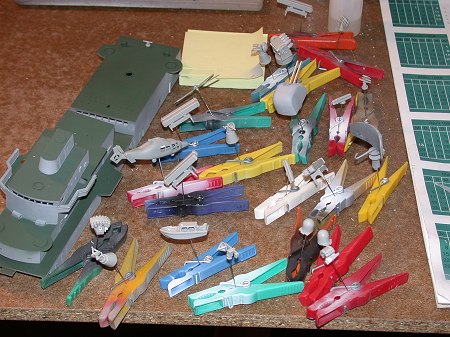
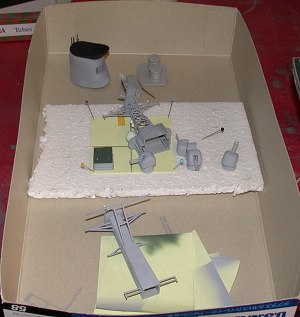
Evergreen. At times I had several dozens of subassemblies lying in a box in
various stages of progress. I replaced the barrels of the main guns (130
mm) by aluminum tubing and opened the other barrels with a hot needle.
Quite a lot
And yet in buying them
I easily spent twice what I paid for the kit originally (it´s even worse
with the Revell S-100 Schnellboot, as I´ve bought WEM stuff there ...) I
used the PE here and there in detailing, where I found it handy, but most work was done with hobby knife, drill bit, dremel, stretched sprue and
Evergreen. At times I had several dozens of subassemblies lying in a box in
various stages of progress. I replaced the barrels of the main guns (130
mm) by aluminum tubing and opened the other barrels with a hot needle.
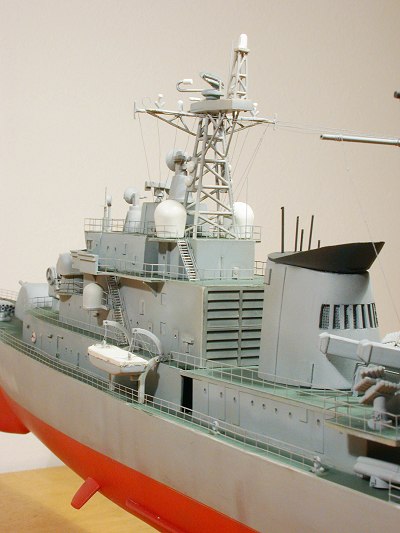
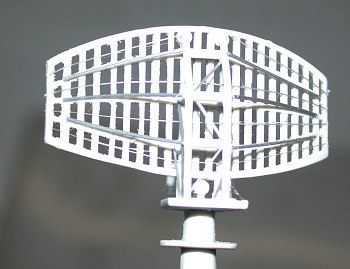
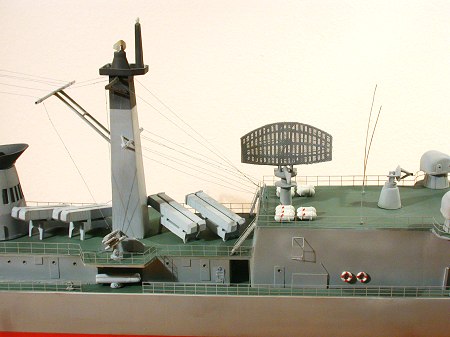
Quite a lot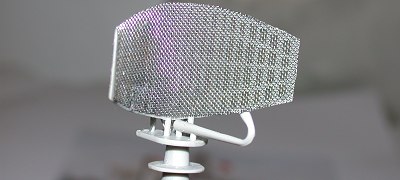 of work went into the radars, first by cleaning them up and trying to make
them more realistic. I added some stretched sprue framework at the main
radar and tried to
of work went into the radars, first by cleaning them up and trying to make
them more realistic. I added some stretched sprue framework at the main
radar and tried to
 duplicate
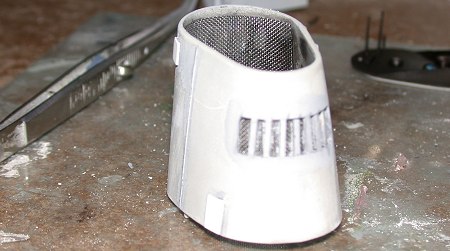
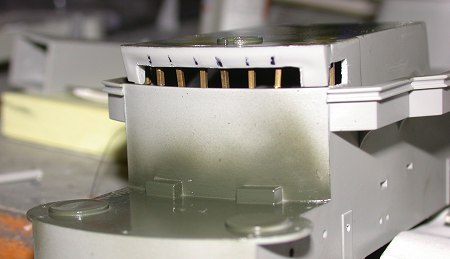
the radar dish with wire mesh. Another challenge was the funnel: I
improved the exhausts and replaced them with metal tubing; the very
prominent cooling grills were sawed out and replicated with wire mesh. I
also added some wire antennas – in the end the funnel took some hours of
work.
duplicate
the radar dish with wire mesh. Another challenge was the funnel: I
improved the exhausts and replaced them with metal tubing; the very
prominent cooling grills were sawed out and replicated with wire mesh. I
also added some wire antennas – in the end the funnel took some hours of
work.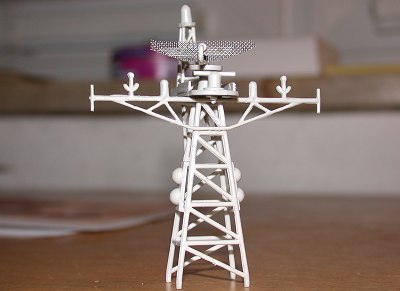
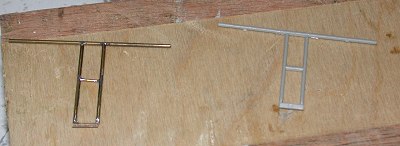 I´m
always concerned about styrene masts and yards stabilitywise, and try to
replace them wherever it makes sense to me. So I remade the prominent yard
in front of the ship´s aft mast from brass rods which I soldered together.
I´m
always concerned about styrene masts and yards stabilitywise, and try to
replace them wherever it makes sense to me. So I remade the prominent yard
in front of the ship´s aft mast from brass rods which I soldered together.
 The various bulleyes
and windows are only hinted at in the kit, so I drilled out the first and
sawed out the latter, adding new frames from brass or styrene where
possible. To me the bridge windows of a ship are its „face“, and when I
opened them up the ship started coming to life.
The various bulleyes
and windows are only hinted at in the kit, so I drilled out the first and
sawed out the latter, adding new frames from brass or styrene where
possible. To me the bridge windows of a ship are its „face“, and when I
opened them up the ship started coming to life.
 There´s also a row of
windows at the bow side of the hangar which I tackled at that point.
There´s also a row of
windows at the bow side of the hangar which I tackled at that point.
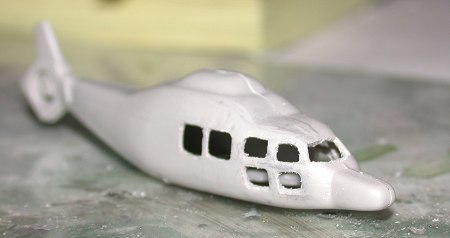
I had looked up pics of the ship´s helicopter and detailed mine accordingly. I drilled out all the windows and filled them with Kristal Kleer after painting. I also made new rotor blades from thin styrene, thinned out the stabilizers and added exhausts from metal tubing. I added some scrap decals and I was done.
| COLORS & MARKINGS |
Painting the superstructures involved several back-and-forthing due to overspray, but in the end I was where I had wanted to arrive at. I completed the deckhouses separate from the kit as far as made sense to me and only assembled when I felt it was OK.
 All this took place
over the entire year 2004 with many interruptions. My modeling room was
cleaned out when a new heating was installed, that alone took some six
weeks in all – but now I´ve got much more space to clutter! I also built
some other smaller projects in between. And I had to obtain brass anchor
chain. The PE chain in my generic PE set wasn´t the real deal. So it took
several months and some trips to the only shop in Kassel that could provide
the stuff until I had it. Meanwhile I know another shop, thankfully. But
the lack of the chain was of course a great (and lame) excuse not to
continue on the project – ever played those little cowardly games yourself,
anyone?
All this took place
over the entire year 2004 with many interruptions. My modeling room was
cleaned out when a new heating was installed, that alone took some six
weeks in all – but now I´ve got much more space to clutter! I also built
some other smaller projects in between. And I had to obtain brass anchor
chain. The PE chain in my generic PE set wasn´t the real deal. So it took
several months and some trips to the only shop in Kassel that could provide
the stuff until I had it. Meanwhile I know another shop, thankfully. But
the lack of the chain was of course a great (and lame) excuse not to
continue on the project – ever played those little cowardly games yourself,
anyone?
 All the while, the
Harbin sat on the shelf, gathered dust and waited for me to summon my guts
to continue on her. My main concern were the PE railings. I had asked
questions on the modelwarships.com forum and other places and got good
advice (thanks Guido, Frank and Rick!) but was really scared of the process
– I know I have a talent of buggering things on the very final leg of a
project.
All the while, the
Harbin sat on the shelf, gathered dust and waited for me to summon my guts
to continue on her. My main concern were the PE railings. I had asked
questions on the modelwarships.com forum and other places and got good
advice (thanks Guido, Frank and Rick!) but was really scared of the process
– I know I have a talent of buggering things on the very final leg of a
project.
 In the end (in
December) I actually got started and the whole process went nearly like a
breeze. I had bought a big magnifying light in spring. Without that, I just
can´t model any more, and surely it wouldn´t have been possible for me to
work with the PE without it. I could actually see what I was doing at any
given moment and felt I had some control on the process.
In the end (in
December) I actually got started and the whole process went nearly like a
breeze. I had bought a big magnifying light in spring. Without that, I just
can´t model any more, and surely it wouldn´t have been possible for me to
work with the PE without it. I could actually see what I was doing at any
given moment and felt I had some control on the process.
The HMV PE is very fine and easy to work with. I used both more and less viscous CA glue, but in the end, the less viscous sufficed. I had found some CA applicators in my practice from the time I used a CA-based dental material, and they were just great for applying the CA.
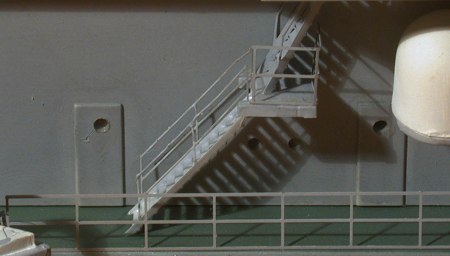
I attached the piece of railing at a point and worked from that on, applying droplets of the stuff until everything was firm. Clipping was done with a 9X X-ACTO on a glass plate and with small bent and straight scissors. The whole affair had been sprayed grey prior to working with it, and I used tweezers and appropriately rounded pencils or knives as templates for curving and bending it. There are some curves and bends in the railing, and although not perfect, I was rather happy with the results in the end. I also rigged the ship at that stage. I just felt overwhelmed by the pics with those myriads of lines runing hither and thither. In the end, I looked at several pics of other models and rigged what I thought looked nice and might even make some sense. For rigging, I used ultra-fine copper wire from model railroad wires. The single copper strands are very thin - yet much tougher than sprue. I could even make knots and otherwise secured them with CA. Later on they were painted.
 Murphy´s law struck
when I was nearly through: I had started with the 2-bar railing on the
superstructures and intended to use the 3-bar only on the main deck level
(it might just as well be correct the other way round ...). So far so
stupid. In the end, I lacked about two pieces of 2-bar railing to complete
the tour around the ship on the first floor, so to speak. So I had to order
another PE fret at another 23 EURO. I should have measured better in the
first place, and now I might build yet another destroyer, railingwise.
Murphy´s law struck
when I was nearly through: I had started with the 2-bar railing on the
superstructures and intended to use the 3-bar only on the main deck level
(it might just as well be correct the other way round ...). So far so
stupid. In the end, I lacked about two pieces of 2-bar railing to complete
the tour around the ship on the first floor, so to speak. So I had to order
another PE fret at another 23 EURO. I should have measured better in the
first place, and now I might build yet another destroyer, railingwise.
When the additional fret had arrived, I completed work on the upper levels. On the main deck, I used the 3-bar railing. To simulate the netting or canvas or whatever is sewed to the railing around the helipad, I used Kristal Kleer. It might just as well look completely different in reality, but I fashioned it somehow the way the kit parts were, just finer.
After drying I sprayed it lightly with Humbrol radome tan from the inboard side, so that the color shone through and you could still see the grey railing frames from the outside. Installing the remaining railing (once around the ship) took about an hour.
Then it was time to do a tour around the ship for paint touchups this way and that. After that I used Flat Future (Future and Tamiya Acrylic Clear Flat Base) to give the ship a flat coat and hide the gloss areas from the CA glue. Now this works really very fine for me and it´s my favorite final coat currently. And really, really finally I filled the windows and bulleyes with Kristal Kleer and let that dry to give the impression of glass windows.
| CONCLUSIONS |
 Now what are my
conclusions from this build? My perception is that I learned more than just
two or three things in this process. I´m pretty sure the number of hours
spent on that build is more than 100. So you´re bound to improve, to find
out new techniques, to feel more confident and even sometimes experience
the „flow“ when what you do runs smooth – a very positive feeling. I ran
into trouble now and then, too, but was able to fix most of what I felt was
necessary to. I now feel more up to tackling more expensive kits I would
previously feel very sorry to ruin by clumsiness, and I just like the
feeling of improving something by myself and not only by some aftermarket
stuff. A ship is a big playground for creating things ...
Now what are my
conclusions from this build? My perception is that I learned more than just
two or three things in this process. I´m pretty sure the number of hours
spent on that build is more than 100. So you´re bound to improve, to find
out new techniques, to feel more confident and even sometimes experience
the „flow“ when what you do runs smooth – a very positive feeling. I ran
into trouble now and then, too, but was able to fix most of what I felt was
necessary to. I now feel more up to tackling more expensive kits I would
previously feel very sorry to ruin by clumsiness, and I just like the
feeling of improving something by myself and not only by some aftermarket
stuff. A ship is a big playground for creating things ...
I personally recommend this kit for people who would like to have fun improving it. It´s no shake and bake and it´s not correct, but that´s not where my objectives were. I don´t have a meager share of the vast knowledge of many great modelers, but I´m happy with what I do at this point in my life. After all life´s a journey, and why not travel part of it by boat.
| REFERENCES |
I only found one webpage of a built-up model of this kit, by a german R/C modeler who did a great job: http://www.military-rc.com/modelle/112/112index.html
And here´s a very nice model of the Harbin´s successor, the Zhenzhen, built for nearly the same reason as I built mine: http://www.steelnavy.com/TrumpShenzhenHallet.htm
February 2005
Copyright ModelingMadness.com
If you would like your product reviewed fairly and fairly quickly, please contact the editor or see other details in the Note to Contributors.