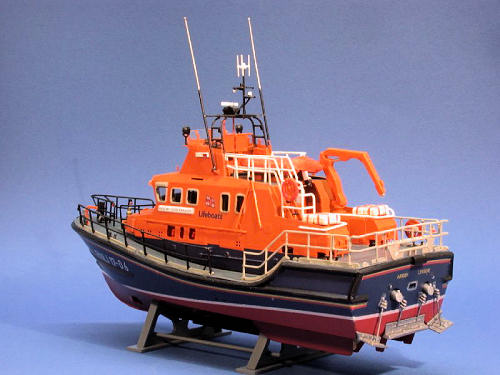
Airfix 1/72 Severn Class Lifeboat
| KIT #: | 07280 |
| PRICE: | Around €20.00 |
| DECALS: | Several options |
| REVIEWER: | Frank Spahr |
| NOTES: |
| HISTORY |
I won´t enter any discussions on the actual length of the
British coast
here. Benoit Mandelbrot has shown that the answer is
far more complex
than us mere ordinary minds would ever dream of. Suffice it to say that it is
-
very long,
especially for an island that size
-
very scenic and
beautiful and
-
very dangerous for
ships and boats,
-
especially in foul
weather (which is rarer than prejudice has it, but not uncommon either)
 fibre reinforced composite hull, the Severns sport many
improvements and refinements learned from their predecessors, and from crews´
experiences. They can stay afloat with two of their five compartments flooded,
they have comprehensive navigational and communications equipment, their hull
form eases taking survivors on board, they are equipped with an inflatable boat
for operations in shallow waters, and their propulsion systems are designed for
exceptional ruggedness and maneouvrability. Their successors, the Tamar class,
have been designed for similar performance, yet slightly smaller to operate from
slipways.
fibre reinforced composite hull, the Severns sport many
improvements and refinements learned from their predecessors, and from crews´
experiences. They can stay afloat with two of their five compartments flooded,
they have comprehensive navigational and communications equipment, their hull
form eases taking survivors on board, they are equipped with an inflatable boat
for operations in shallow waters, and their propulsion systems are designed for
exceptional ruggedness and maneouvrability. Their successors, the Tamar class,
have been designed for similar performance, yet slightly smaller to operate from
slipways.
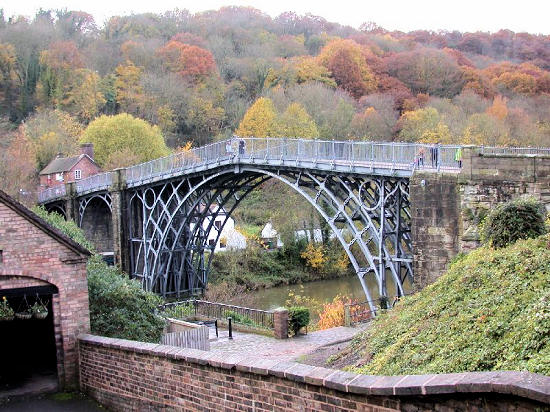
The class´ namesake, the river
Severn,
is the UK´s longest river at 220 miles. Its source is in Wales at Plynlimon, and
its mouth is the Severn Estuary at the Bristol Channel. The considerable tidal
range results in tidal waves occasionally strong enough to surf on – the
so-called
Severn Bore
. Amongst other points of interest, Ironbridge, a World Heritage Site and the
world´s first cast iron arched bridge, spans the Severn and is well worth
visiting.
Technical data
(Wikipedia)
|
Length |
55 ft 9
in (17 m) |
|
Beam |
18 ft 1 in
(5,5 m) |
|
Draught |
4 ft 6 in
(1,38 m) |
|
Displacement |
40 tons
(36,3 t) |
|
Propulsion |
2 × Caterpillar 3412 TA diesel engines, 1,250 hp (932 kW) each
|
|
Top speed |
25 kn (45
km/h) |
|
Range |
250 sm (460
km) |
|
Crew |
6 |
|
Capacity
when self righting /not self righting |
47 / 185 survivors |
| THE KIT |
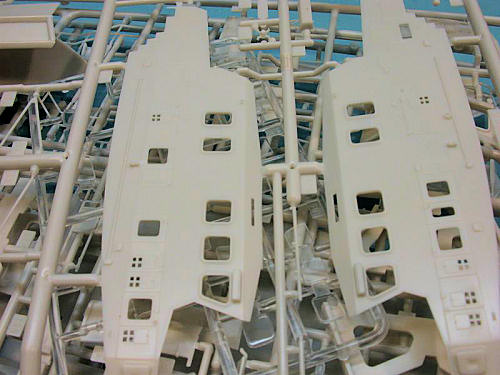 The sturdy box is
packed tightly with four sprues of light grey and one of clear styrene. A
comprehensive instruction booklet with the cover page printed in colour and a
decal sheet (uncommonly in register) complete the contents. Sadly, the clear
parts are not packed separately and hence arrived with scratches. Apart from
that, they are basically clear and usable, yet a bit on the thick side.
Generally speaking, the styrene parts are well-molded, yet not free from some
annoying ejector pin marks, and not without sink marks in visible areas.
Compared with other recent kits, they do lack the crispness and fine detail
nowadays found in top manufacturers´ kits. Some parts suffer fro
The sturdy box is
packed tightly with four sprues of light grey and one of clear styrene. A
comprehensive instruction booklet with the cover page printed in colour and a
decal sheet (uncommonly in register) complete the contents. Sadly, the clear
parts are not packed separately and hence arrived with scratches. Apart from
that, they are basically clear and usable, yet a bit on the thick side.
Generally speaking, the styrene parts are well-molded, yet not free from some
annoying ejector pin marks, and not without sink marks in visible areas.
Compared with other recent kits, they do lack the crispness and fine detail
nowadays found in top manufacturers´ kits. Some parts suffer fro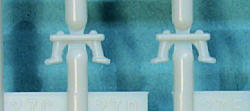 m unwieldy sprue
gates that make them hard to remove without damage. Another annoying feature is
that the parts are spread among the sprues virtually as arbitrarily as possible.
Due to this lack of foresight, the modeler will spend considerable time hunting
through the sprues for the next part needed. A more logical layout would be very
beneficial.
m unwieldy sprue
gates that make them hard to remove without damage. Another annoying feature is
that the parts are spread among the sprues virtually as arbitrarily as possible.
Due to this lack of foresight, the modeler will spend considerable time hunting
through the sprues for the next part needed. A more logical layout would be very
beneficial.
Speaking of logic,
the instructions should be taken with a sizable pinch of salt. Even though very
well done graphically, they are not always unambigious, and – most important to
me – the assembly sequence given is not what I would recommend. There are
several steps where sticking to the instructions will lead to frustration and
extra work. The idea of including some photos of
 actual vessels into the
instructions is a good one. All colour callouts are given in Humbrol numbers
only, without any colour descriptions. That could be improved, both in giving
colour names as in giving equivalents for other manufacturers, as Humbrol is not
that widely available.
actual vessels into the
instructions is a good one. All colour callouts are given in Humbrol numbers
only, without any colour descriptions. That could be improved, both in giving
colour names as in giving equivalents for other manufacturers, as Humbrol is not
that widely available.
The decal set
contains code letters and station names for all active boats, yet no boat names,
just a generic nameplate decal with an “RNLB”. I learned that Airfix omitted the
names so as not to unduly privilege any one donor, as the boats are commonly
named after those who donated the money needed for their construction. Bottom
line is probably that inserting all the names would have resulted in an even
larger decal sheet as it is, so it looks like a cost-cutting measure to me.
Luckily, the decal sheet contains all the red-and-yellow trim plus extra
material – masking and spraying those lines would be a serious piece of work.
All in all, Airfix fans like me tend to have a different outlook on Airfix kits than most other modelers, with considerably more tolerance towards their flaws. To me, this is a very fine kit of an interesting subject, and I was more than happy when it appeared. The fact that Hornby/Airfix produces new kits is a hint at a prolonged lease of life for the company, and hence a promise of an ongoing supply of their not perfect, but always enjoyable kits to me.
| CONSTRUCTION |
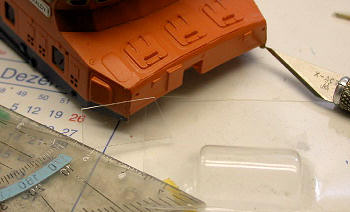
Construction began
with looking for and receiving some useful hints on the Airfix Tribute Forum, a
place for hopeless Airfix addicts like me. The first issue was how to assemble
the multi-part hull as efficiently as possible. I was advised to divert from the
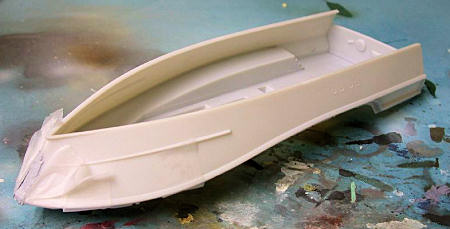 instructions
and first to assemble hull sides with the deck, and only then add
the bottom, but only after adding the bow thruster. That did work fine, yet
despite adding a stabilizing piece of sheet I ended up with a noticeable
instructions
and first to assemble hull sides with the deck, and only then add
the bottom, but only after adding the bow thruster. That did work fine, yet
despite adding a stabilizing piece of sheet I ended up with a noticeable
 seam
running across the transom, needing careful filling and sanding. Generally
speaking, you will need to build this kit very cleanly, as the original vessels
are well-maintained and very clean – no weathering, at the utmost some little
signs of use are tolerable.
seam
running across the transom, needing careful filling and sanding. Generally
speaking, you will need to build this kit very cleanly, as the original vessels
are well-maintained and very clean – no weathering, at the utmost some little
signs of use are tolerable.
Another issue with
the hull is the waterline option. There are cut markings on the inside to
produce a waterline hull, but I would rather not recommend using them. Firstly,
because they make hull construction even fiddlier, as you end up with some very
iffy and finely tapered parts. Secondly,
 because you will need a real waterline
hull only for a harbour diorama with absolutely calm water, and even then only
if the water base does not allow for cutting a recess to hide the hull in. Any
boat under way will show some part of the underwater hull, and the model´s
draught is not too excessive to be hid in a normal base plate. For those wanting
to build the vessel waterline the way Airfix suggests, there is a detailed
how-to on the Airfix Tribute Forum. Assembling the entire hull and only then
cutting away
because you will need a real waterline
hull only for a harbour diorama with absolutely calm water, and even then only
if the water base does not allow for cutting a recess to hide the hull in. Any
boat under way will show some part of the underwater hull, and the model´s
draught is not too excessive to be hid in a normal base plate. For those wanting
to build the vessel waterline the way Airfix suggests, there is a detailed
how-to on the Airfix Tribute Forum. Assembling the entire hull and only then
cutting away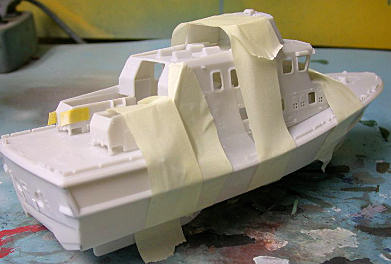
The next step after
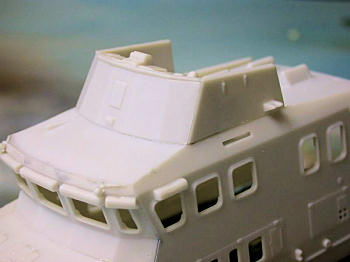
assembling the hull was a diversion from instructions - I built the complete
outer shell of the superstructure as a subassembly, instead of building part of
it together with the interior. That enabled me to achieve a good fit of the
superstructure - both in itself and to the hull. Careful as I was in aligning
the parts, I needed quite some filling and sanding, which was done much more
easily on an empty shell than on a nearly completed model with clear parts in
place.
| COLORS & MARKINGS |
Having completed the
build so far, it was time for painting. I looked for the required colour shades
both in the instructions and while looking through images of actual vessels, and
ended up with a hodgepodge of both enamels and acrylics from my stocks. So my
underwater hull is painted WEM Antifouling Red, the rest of the hull is Revell
satin enamel Lufthansa blue, whilst the superstructure was painted Gunze Sangyo
Alert Orange from their Soya set. The deck was painted Xtracrylix RAF Dark Sea
Grey, 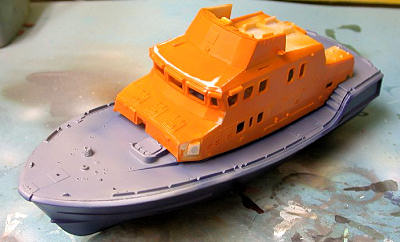 with the light grey railings and trimmings in JPS USAF Light Grey.
After the usual
priming and checking for flaws I used blue as the first coat on the hull. The
superstructure was “primed” in orange so as to render the paint as bright as
possible. I then masked the waterline, added the red hull paint, and then
applied several gloss coats using Future – essential for decaling.
The red and yellow trim decals worked rather nicely, even though they
might have benefited from a white underground. Sadly, I goofed on the next step,
as I used the white waterline decal instead of masking and painting. The decal
turned out to be not opaque enough, and the hull´s chine left a kink in the nice
waterline.
I had to repair that by masking and
painting – what I should have done in the first place. In hindsight, the best
approach would have been to paint the approximate area of the waterline white
first, then mask it using tape of appropriate width (with some corrections
around the chine), and then add the blue and red respectively. Having already
applied the red and yellow trim, that was not an option anymore. Well, you live
to learn.
 The next goof had
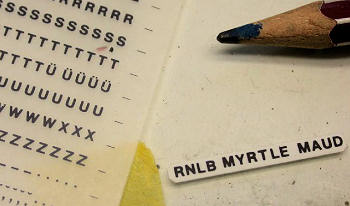
already happened without my realizing it. I had sifted through the boat names
and numbers and had decided to call my Severn RNLB Myrtle Maud, as that reminded
me of Moaning Myrtle, a character from the Harry Potter novels. That vessel was
stationed at Arranmore. So, all the required hull and superstructure decals were
applied and sealed with Future. The nameplate was done using dry transfers and
looked quite nice to me. That is, until a friendly M2 regular informed me that I
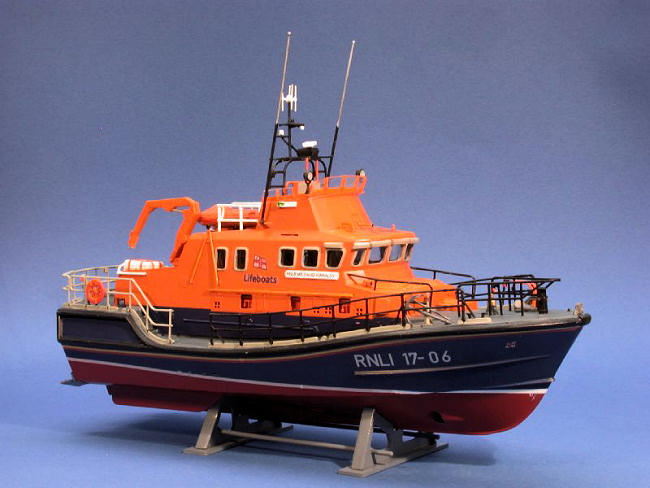
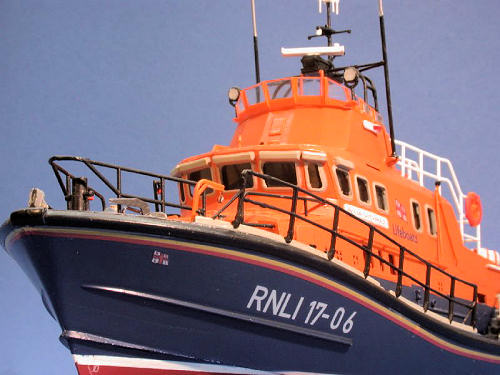
had confused the boat´s code number. I had used 17-06, where it should have been
17-22. A short while and some colourful language later I started thinking hard.
I felt I would most surely botch the job of overpainting and replacing the ID
number on the hull, so I checked which boat was coded 17-06. Luckily, that boat
was stationed at Arran, so I would only have to overpaint part of the station
name, which looked much more attractive to me. The name, on the other hand, was
considerably longer, and could simple not be done with the dry transfers. So I
printed “RNLB Mr David Kirkaldy” in 5 point on my laser printer, cut it out and
glued the paper on the styrene plate. The hull and superstructure were then
sealed with clear satin acrylic, and the deck remaining in clear flat acrylic.
The next goof had
already happened without my realizing it. I had sifted through the boat names
and numbers and had decided to call my Severn RNLB Myrtle Maud, as that reminded
me of Moaning Myrtle, a character from the Harry Potter novels. That vessel was
stationed at Arranmore. So, all the required hull and superstructure decals were
applied and sealed with Future. The nameplate was done using dry transfers and
looked quite nice to me. That is, until a friendly M2 regular informed me that I
had confused the boat´s code number. I had used 17-06, where it should have been
17-22. A short while and some colourful language later I started thinking hard.
I felt I would most surely botch the job of overpainting and replacing the ID
number on the hull, so I checked which boat was coded 17-06. Luckily, that boat
was stationed at Arran, so I would only have to overpaint part of the station
name, which looked much more attractive to me. The name, on the other hand, was
considerably longer, and could simple not be done with the dry transfers. So I
printed “RNLB Mr David Kirkaldy” in 5 point on my laser printer, cut it out and
glued the paper on the styrene plate. The hull and superstructure were then
sealed with clear satin acrylic, and the deck remaining in clear flat acrylic.
| FINAL CONSTRUCTION |
As the nice interior can hardly be viewed after assembly, I did not go
overboard in detailing it, just painted the pieces in appropriate colours and
tried to make sure the superstructure would later fit over the interior. That
involved some sanding and still resulted in some gaps that had to be closed. The
kit transparencies also turned out to be an issue, as they were too thick for a
 good fit of the superstructure to the hull. So they were replaced by pieces of
clear plastic cut from blister packs, glued with white glue. The final marriage
of hull and superstructure proved to be pretty exciting, and involved the use of
heavy tools to apply enough
pressure for an acceptable fit. Nonetheless some gaps had to be filled and
painted. Given the amount of work needed to fit the superstructure parts, I
would nonetheless proceed likewise in a
good fit of the superstructure to the hull. So they were replaced by pieces of
clear plastic cut from blister packs, glued with white glue. The final marriage
of hull and superstructure proved to be pretty exciting, and involved the use of
heavy tools to apply enough
pressure for an acceptable fit. Nonetheless some gaps had to be filled and
painted. Given the amount of work needed to fit the superstructure parts, I
would nonetheless proceed likewise in a future build - I would only leave out a
LOT of the interior parts.
future build - I would only leave out a
LOT of the interior parts.
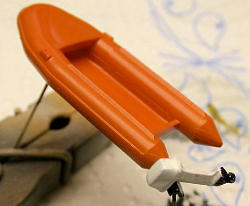
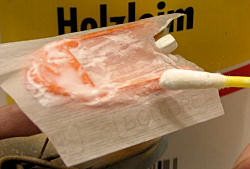
These major steps
done, it was time to do the numerous small parts and subassemblies. The most
prominent of them, the inflatable boat and the crane, had their own issues. The
crane is molded in one piece, so it would need some major scratchbuilding to
depict it operative. So it was just cleaned up and painted. The inflatable lacks
detail and looks pretty clunky and empty. Having seen enough images of these
boats covered with a tarpaulin, I decided to use just that to avoid both any
further effort and embarrassment. After cleaning up and gluing the boat´s
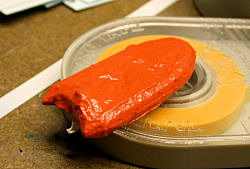
engine, I made a cover using cigarette paper soaked in white glue. Painted in
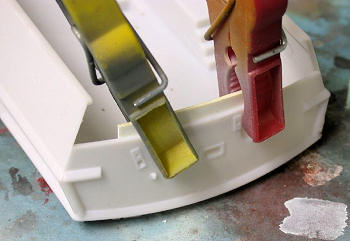
orange, that looked good enough for me. The life raft canisters received straps
made from strips of Tamiya tape painted JPS dayglo orange. That was very easy
and looked pretty sharp. Tamiya tape also helped a lot on masking the bridge
windshield.
 |
 |
 |
Getting the numerous
railings from their sprues was a major undertaking, and it did not end without
damage. But I was able to repair the parts and glue them to the boat, together
with the various other deck fittings. Some gaps in the railings were closed
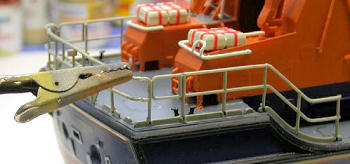 using white glue. I should note that the painting guide is wrong re the
railings. Those at the stern are light grey, those on
using white glue. I should note that the painting guide is wrong re the
railings. Those at the stern are light grey, those on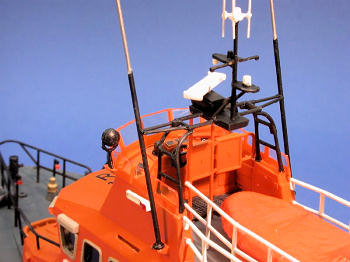 the superstructure are
white, and the rest is black, as the mast. Up there I digressed from building
OOB by replacing the clunky quadruple antenna with .4 mm brass wire. As for
construction sequence, I built from the center to the sides in order to minimize damage from handling. I also digressed from instructions as I first attached the
railings and only then the inflatable boat – it is much easier that way. The
searchlights were drilled out, painted silver inside and then covered with white
glue to simulate the lenses.
the superstructure are
white, and the rest is black, as the mast. Up there I digressed from building
OOB by replacing the clunky quadruple antenna with .4 mm brass wire. As for
construction sequence, I built from the center to the sides in order to minimize damage from handling. I also digressed from instructions as I first attached the
railings and only then the inflatable boat – it is much easier that way. The
searchlights were drilled out, painted silver inside and then covered with white
glue to simulate the lenses.
As always, the use of acrylics speeded up the build. Metalizer paints were used on the anchor and the pretty cool looking washboards at the transom; these were the last parts added before correcting any readily visible flaws and calling the project quits.
| CONCLUSIONS |
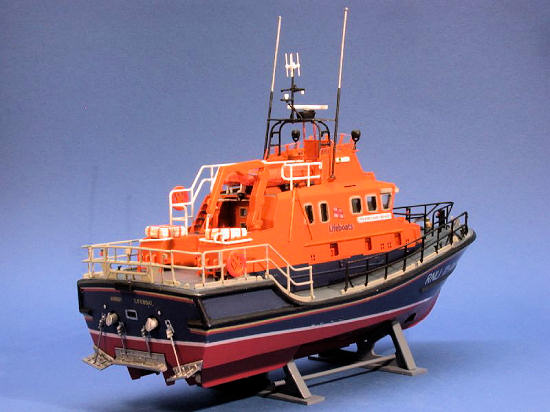
I did have fun
building it, and can recommend the kit to more experienced builders, though not
to beginners. You´ll need to judge yourself where to follow the instructions and
where not, and you have to be aware that this is not “shake and bake”, and
you´ll have to apply some modeling skills.
Already from the box, you´ll end up with a nice (and colourful!) model, and any scratchbuilders will have a great starting point for conversions and refinements. Some very exciting diorama possibilities spring to mind effortlessly, too!
| REFERENCES |
http://en.wikipedia.org/wiki/Severn_class_lifeboat
http://airfixtributeforum.myfastforum.org/index.php
December 2008
Copyright ModelingMadness.com
If you would like your product reviewed fairly and quickly, please contact the editor or see other details in the Note to Contributors.