Airfix 1/72 Vosper MTB
| KIT: | Airfix 1/72 Vosper MTB |
| KIT #: | 05280 |
| PRICE: |
19€ |
| DECALS: | One option |
| REVIEWER: | Frank Spahr |
| NOTES: |
| HISTORY |
I belong to those that rejoiced upon the latest Airfix “rebirth”; this brand has accompanied my entire modeler´s life and despite all their shortcomings Airfix kits still hold a lot of fun for me – and that´s an important aspect of modeling to me.
 Airfix´
„rescue“ has made a number of kits available at normal prices again, and now I
am able to build some of my childhood favorites again to my current standards.
Some of these projects have already been completed, and this started at last
year´s Hamburg modeling show upon sighting a pile of these kits. I had built a
Vosper MTB at age 13, painted in various colours and floating in the bathtub. It
had been one of my models I liked best and, alas, lost like nearly everything I
built then.
Airfix´
„rescue“ has made a number of kits available at normal prices again, and now I
am able to build some of my childhood favorites again to my current standards.
Some of these projects have already been completed, and this started at last
year´s Hamburg modeling show upon sighting a pile of these kits. I had built a
Vosper MTB at age 13, painted in various colours and floating in the bathtub. It
had been one of my models I liked best and, alas, lost like nearly everything I
built then.
As regards the historical background, I refer to T. Garth Connelly´s model on this site at http://modelingmadness.com/reviews/misc/ships/connellymtb.htm ; his website on PT boats and his books on them, published by Squadron, are highly recommended, too.
Specifications:
|
Length |
73 ft |
|
Propulsion |
3 x Packard 12 M ; 4,200 hp in total |
|
Top speed |
40 kn |
|
Endurance |
470 nm @20 kn |
|
Displacement |
47 t |
|
Armament |
4 x 18in TT / 1 twin 20mm Oerlikon / 2 twin .0303 Lewis MG |
|
Crew |
13 |
| THE KIT |
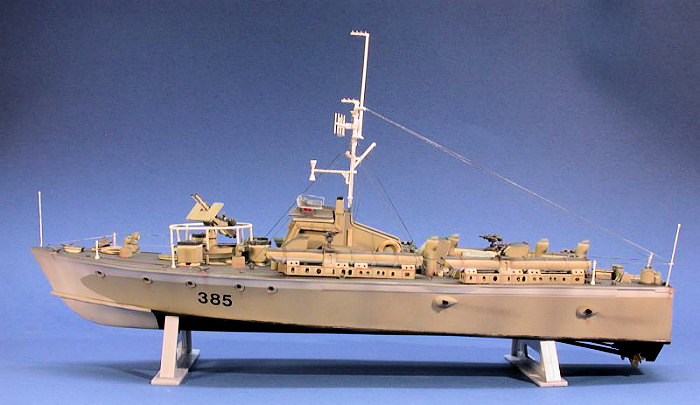
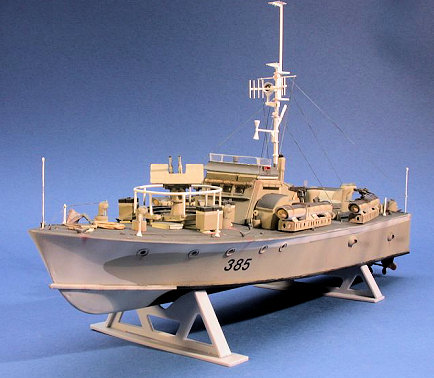
The kit is copyrighted in 1972 and represents the so-called 73ft Type I Vosper MTB, a common type later in the war. As opposed, the kit marketed by Revell as a Vosper MTB was originally produced as merchandise for the TV show “McHale´s Navy”. It is based upon a Vosper export design, mainly for the Soviet navy, which was built in the USA, so does not represent a common RN Coastal Forces vessel.
Upon examining the kit I found some amounts of flash, some serious sink marks and loads of ejector pin marks, some bent parts yet no short shots. The kit contains a lot of parts of adequate yet limited detailing.
So the kit landed atop the kit stash and things might have remained that way, had it not been for the Airfix Tribute Forum I had joined at about the time, a nice place for hopeless Airfix aficionados like me. Being a bit stuck with my current project, I jumped at the prospect of joining one of their group builds, which by chance was the Vosper which I had in my stash. I decided to build largely OOB and to make it quick yet enjoyable, which I managed to.
| REFERENCES |
I started looking for references on the net as I was eager to start and determined to make do with what I had in hand already – no book or aftermarket goodies purchased for this one! Dave, the Airfix Tribute Forum´s owner, had provided some links already. He is in the laborious process of scanning and providing as PDF´s the old issue of Airfix Magazine; apart from Garth´s site, Wikipedia and a Google image search, this was my starting point. Moreover I looked up the paint scheme and the required colours in the very instructive essay on British camo naval schemes by Alan Raven that is to be found at www.shipcamouflage.com. Raven´s books on British naval camouflage in the Warships Perspective series provided line drawings.
 Here
is a list of the links used:
Here
is a list of the links used:
Airfix-Magazine
Motorising the Airfix Vosper Motor Torpedo Boat - September 1972
Twin-Screw Motorised Airfix Vosper Motor Torpedo Boat - October 1972
Royal Naval Coastal Forces (Part Four) - November 1978
Vosper MTB - January 1991
Alan Raven´s essay:
http://www.shipcamouflage.com/3_10.htm
A very nice image of MTB #285 clearly showing the light underwater hull at the bow:
http://www.davecov.com/ships/britain/pictures/mtbs_mgbs/vosper_mtb_385.jpg
My conclusions from these sources were as follows:
I would:
- trim the gunplatform supports
- scratchbuild the oversize radar dipoles
- replace the bent and soft flagpoles with wire
- Add exhausts to the hull openings
And leave the rest “as is”. As the vessel is scheduled to be added to a diorama setting in the future, I decided not to use the crew figures or flags yet. My idea would be a real smart dio depicting the vessel at full speed, and I know I´m as yet unable to build such a dio convincingly. But I´ll try some day!
| COLORS AND MARKINGS |
 Alan Raven´s camo
specifications gave me some good yet not complete idea how to do the camo
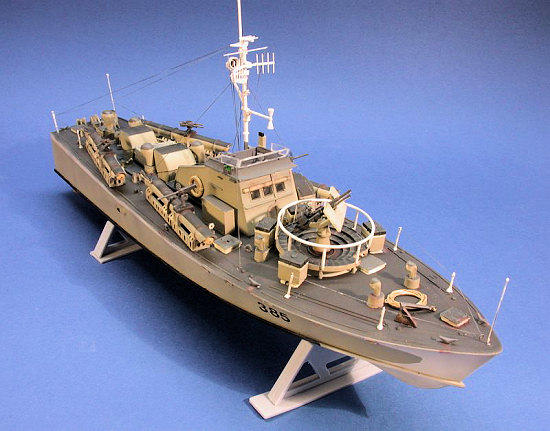
scheme. This camo´s basic idea was to make the boat look dark grey when viewed
from above and light grey from the sides. To achieve this, shaded area visible
from athwart had to be painted white in order to reduce the shadow and render
them lighter, hence the term “countershading”. So the upper third of the torpedo
tubes had to be painted dark grey, the middle third light grey and the lower
third white.
Alan Raven´s camo
specifications gave me some good yet not complete idea how to do the camo
scheme. This camo´s basic idea was to make the boat look dark grey when viewed
from above and light grey from the sides. To achieve this, shaded area visible
from athwart had to be painted white in order to reduce the shadow and render
them lighter, hence the term “countershading”. So the upper third of the torpedo
tubes had to be painted dark grey, the middle third light grey and the lower
third white.
The basic paints used were B15, G45 and white. Yet, the better part of the deck (everything save the area above the machinery spaces) was coated with a rubber compound for which I could not find a definite colour. The correct paints are available (though as enamels only) from White Ensign Models from their Colourcoat line of paints. When using these, best results are obtained using Xtracolor´s thinners; other thinners render inferior results. Lacking B15, I used G10 instead which is quite close, and with all the shading I did, it didn´t matter that much anyway. The steel decks were painted AP507A. The white hull areas were sprayed deliberately lightly in order to render a more lively and convincing result.
| CONSTRUCTION |
Building
the vessel OOB went fairly smooth and fast. The exhausts were added using pieces
of aluminium tubing cut obliquely to length, the gun platform supports were
removed using a razor saw and motor tool. The superstructure and torpedo tubes
were build as subassemblies and attached to the hull only later to ease painting
and handling. Some filling and sanding was needed on
 the
hull seams, Mr Surfacer 500 was used. The transparent parts for portholes and
bridge windows were omitted and these openings later filled with Kristal Kleer.
As much painting as possible was done by airbrush, masking was done using Tamiya
tape. Most deck fittings were brush painted. The hull area around the hull
numbers was sprayed with Future to achieve a high gloss. After drying, the
decals were applied. As they ended up very matte, they were coated with Future,
and after drying the area received a good flat coat; this ended up with a result
close to a painted-on look.
the
hull seams, Mr Surfacer 500 was used. The transparent parts for portholes and
bridge windows were omitted and these openings later filled with Kristal Kleer.
As much painting as possible was done by airbrush, masking was done using Tamiya
tape. Most deck fittings were brush painted. The hull area around the hull
numbers was sprayed with Future to achieve a high gloss. After drying, the
decals were applied. As they ended up very matte, they were coated with Future,
and after drying the area received a good flat coat; this ended up with a result
close to a painted-on look.
The
torpedo tubes needed some filling and sanding; the openings had to be enlarged
using my motor tool as they were too narrow for the “torpedo heads”. Trying to
fit them in might easily result in a popped seam otherwise. The came was painted
as follows: After priming the parts to check for flaws, the entire part was
sprayed white. 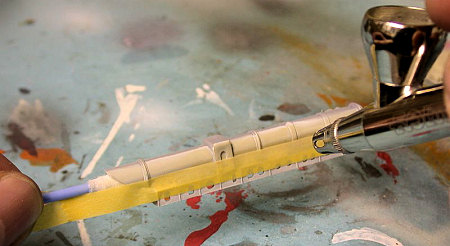 After drying,
the lower third was lightly masked with Tamiya tape and the middle part
carefully sprayed G45. After drying, that in turn was lightly masked and the
upper part sprayed dark grey. After removing the masks, the supports could be
hand-painted with G45. The torpedo warheads were painted Vallejo acrylic dark
sand, with the contact fuse picked out in silver.
After drying,
the lower third was lightly masked with Tamiya tape and the middle part
carefully sprayed G45. After drying, that in turn was lightly masked and the
upper part sprayed dark grey. After removing the masks, the supports could be
hand-painted with G45. The torpedo warheads were painted Vallejo acrylic dark
sand, with the contact fuse picked out in silver.
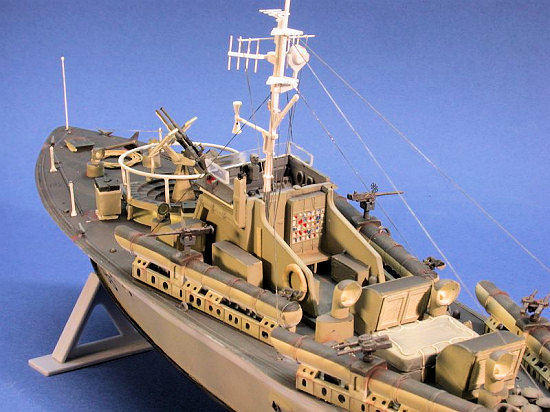
The various guns
were cleaned up, painted dark grey (with the underside of the Oerlikon painted
white) and drybrushed with Testor´s Titanium Metalizer. Gun sights were taken
from cable reel 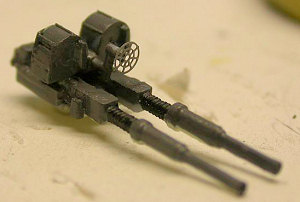 parts from a
generic 1:250 PE set by Scheuer + Strüver. Both Oerlikon and Lewis guns might be
replaced with aftermarket parts, for instance from Great Little Ships,
nonetheless I stuck to my decision of not ordering any goodies and used them as
is. As always, it´s anyone´s business how far they take their detailing and
determination. The front “MG´s” were Holman flare projectors in the real vessel
and
parts from a
generic 1:250 PE set by Scheuer + Strüver. Both Oerlikon and Lewis guns might be
replaced with aftermarket parts, for instance from Great Little Ships,
nonetheless I stuck to my decision of not ordering any goodies and used them as
is. As always, it´s anyone´s business how far they take their detailing and
determination. The front “MG´s” were Holman flare projectors in the real vessel
and  might benefit from adding
larger barrels, but as I had no tubing of appropriate size, I left them as is
for the time being, too. Yet they are not glued to their mounts and easy to
replace.
might benefit from adding
larger barrels, but as I had no tubing of appropriate size, I left them as is
for the time being, too. Yet they are not glued to their mounts and easy to
replace.
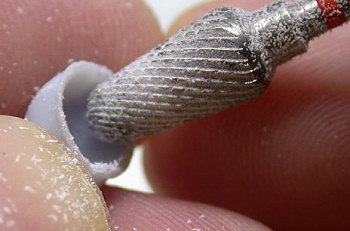
The numerous vents were assembled, filled, sanded and carefully drilled out with my motor tool. After that they were primed in G45 and the came applied by brush.
The upper part of the mast and the signal halyard were replaced with wire; the radar dipoles were rebuilt using .5 mm square styrene stock and .4 mm brass wire, glued with CA. I used steel wire from a wire brush for the signal halyard – such a brush could easily last for a modeler´s life of masts and halyards of appropriate size, and the steel wire is straight and very strong. Machined brass parts, for instance from BMK, are a useful alternative if conical parts are needed.
Painting the
model was completed by adding the white countershading in all appropriate areas,
such as below the gun platform,
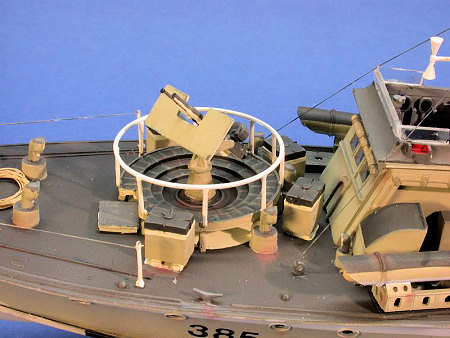 ready ammo lockers, air vents
and the bridge wind deflectors. I did not use pure white but RAF White from JPS
Modell which looked more convincing to me. Pure white was used on stanchions,
mast and hull sides, yet never applied too strongly.
ready ammo lockers, air vents
and the bridge wind deflectors. I did not use pure white but RAF White from JPS
Modell which looked more convincing to me. Pure white was used on stanchions,
mast and hull sides, yet never applied too strongly.
The only colourful spots around the vessel are the navigation lights and the flag locker that received numerous red, white and blue spots to simulate stocked signal flags.
Finally the various subassemblies came together. Seams remaining after attaching the wheelhouse were filled with white glue. Only now were the shafts, props and rudders added. The props needed a lot of work to remove ejector pin marks and other blemishes. They were painted a mixture of gold and black to get close to the required shade of bronze. The props for smaller British vessels were produced by bell foundries during the war.
The anchor was
painted similarly to the guns, I just added baking soda to the fresh grey paint
to simulat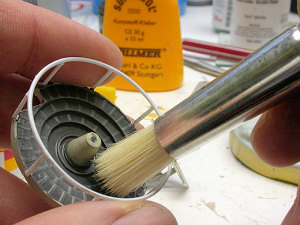 e corrosion and
marine growth. An eye from brass wire and a length of thread completed the
assembly.
e corrosion and
marine growth. An eye from brass wire and a length of thread completed the
assembly.
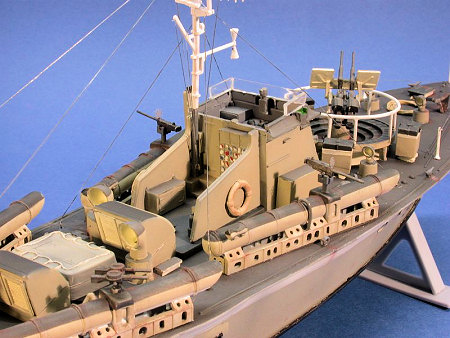
After adding all the stanchions, flagpoles, fairleads, eyebolts (some homemade items included) and the mast I checked the paintjob for flaws and made corrections where necessary. After that, the model received a good flat coat. After drying I did some weathering. Some edges were highlighted using a pencil, some drybrushing was done using oil paint, and I used pastel chalks. As always, the weathering looked more pronounced in the images I took afterwards than in reality, so I toned it down a bit.
Elastic wire from my girl friend´s sewing kit was liberated for rigging; it was glued using CA and hand painted medium grey. Finally the portholes and bridge windows were filled with Kristal Kleer.
| CONCLUSIONS |
 After a bit less then two
weeks I could conclude this project for the time being – it was a fun time and
a nice group build. Now I wonder when I´ll tackle the dio at full speed!
After a bit less then two
weeks I could conclude this project for the time being – it was a fun time and
a nice group build. Now I wonder when I´ll tackle the dio at full speed!
March 2008
If you would like your product reviewed fairly and quickly, please contact me or see other details in the Note to Contributors.