Trumpeter 1/350 USS
San Francisco (1942)
|
KIT #: |
05309 |
|
PRICE: |
$75.00 MSRP
|
|
DECALS: |
One option |
|
REVIEWER: |
Tom
Cleaver |
|
NOTES: |
Tom’s Modelworks and White Ensign Models
photoetch.
Starfighter Decals. |
The “New
Orleans” class, which were built between 1930-36, were the
last class of the “second-generation Treaty heavy cruisers” built.
Armor protection was increased over earlier “Treaty”
heavy cruisers.
Main armament centered around nine 8-inch/55 caliber Mark 14 guns
with a range of approximately 18 miles, mounted in triple turrets.
Secondary armament was eight 5-inch/25 caliber
dual-purpose guns in open mounts.
Observing the experience of the Royal Navy in combating
air attack, 1.1-inch anti-aircraft weapons in quad mounts were added during
1940-41, which were replaced by 40mm and 20mm weapons in 1941-42 when these
became available.
The seven New Orleans
class heavy cruisers earned a combined total of 63 Battle Stars, all for action
in the Pacific against the Japanese.
U.S.S. San
Francisco (CA-38) was laid down at the Mare Island Naval
Shipyard on September 9, 1931, and launched on March 9, 1933.
The ship went on to become the most highly-decorated
U.S. Navy cruiser of World War II with 17 Battle Stars and a Presidential Unit
Citation, and the second most-decorated U.S. Navy ship of the war, after the
carrier U.S.S. Enterprise.
 “A
Bar-Room Brawl After The Lights Were Shot Out”
“A
Bar-Room Brawl After The Lights Were Shot Out”
If the Battle of Midway stopped
further Japanese expansion, it was the Battle of Guadalcanal that broke the back
of the Japanese armed forces.
Between August 2, 1942 and February 12, 1943, the U.S.
Navy fought the most difficult campaign it ever fought. The height of this came
on the nights of November 12/13 and November 13/14, 1942, with the bloodiest
surface actions in U.S. Naval history, known as The Naval Battle of Guadalcanal.
On the morning of November 12,
1942, the Japanese were winning the struggle for Guadalcanal on points.
In three naval battles, the Japanese had come out ahead,
while the U.S. Navy had lost four cruisers in a fight with Japanese cruisers on
the first day of the invasion of Guadalcanal, with the carrier Wasp sunk the
following month by a submarine and the carrier Hornet sunk by Japanese aircraft
at the Battle of Santa Cruz three weeks earlier.
The carriers Saratoga and Enterprise were both damaged,
and only Enterprise remained in the South Pacific, unable to fight.
The Americans were outnumbered in total ships, and
outweighed in terms of ships available.
The Marines who had landed on Guadalcanal on August 7
had been largely abandoned by the Navy, due to the local Japanese threat to the
limited and shrinking number of assets the Navy had left.
Convoys sneaked into Ironbottom Sound to offload cargo,
under the constant threat of Japanese air or naval attack.
Knowing that the Japanese planned a
major assault in November to retake Guadalcanal, Task Force 67 - a large
reinforcement and resupply convoy commanded by RADM Richmond K. Turner - arrived
in Ironbottom Sound on November 11. The supply ships were protected by two task
groups, commanded by RADM Daniel J. Callaghan and RADM Norman Scott, with cover
by
aircraft from Henderson Field. The convoy was attacked twice on November
11 by Japanese aircraft based at Bougainville.
Overnight, most ships were unloaded, but the convoy
would not be able to complete unloading before the evening of November 13.
Throughout the day of November 13, the fleet was a
battle stations as waves of Japanese airplanes swept in to attack.
That afternoon, San Francisco
and Buchanan were both hit, with 30
deaths and 50 wounded.
San Francisco’s gunners hit a
Kate, which crashed on her after machine gun platform.
Boatswain’s Mate 1st
Class Reinhardt Keppler took charge of the scene, caring for the wounded and
supervising the removal of the dead, saving several lives in the process. In the
two days the fleet was there, 12 Japanese aircraft were shot down by
anti-aircraft fire from the ships or by fighters from Henderson Field.
 Late that afternoon, ComSoPac
warned of the sighting of a large Japanese task force headed down the Slot,
which would arrive that night.
RADM Turner combined his heavy surface forces into Task
Group 67.4 under the command of RADM Daniel J. Callaghan.
This was unfortunate, since it was RADM Norman Scott who
had been the victor at the Battle of Cape Esperance in October and had the
experience to command such a fight as was foreseen.
However, Callaghan was senior in rank by two days,
though inexperienced in combat.
Task Group 67.4 was composed of Callaghan’s flagship the
heavy cruiser San Francisco with
Portland, the light cruisers
Helena, Atlanta, and Juneau
(which was Scott’s flagship), covered by the
destroyers Aaron Ward, Barton,
Cushing, Fletcher, Laffey, Monssen, O'Bannon, and
Sterett.
Late that afternoon, ComSoPac
warned of the sighting of a large Japanese task force headed down the Slot,
which would arrive that night.
RADM Turner combined his heavy surface forces into Task
Group 67.4 under the command of RADM Daniel J. Callaghan.
This was unfortunate, since it was RADM Norman Scott who
had been the victor at the Battle of Cape Esperance in October and had the
experience to command such a fight as was foreseen.
However, Callaghan was senior in rank by two days,
though inexperienced in combat.
Task Group 67.4 was composed of Callaghan’s flagship the
heavy cruiser San Francisco with
Portland, the light cruisers
Helena, Atlanta, and Juneau
(which was Scott’s flagship), covered by the
destroyers Aaron Ward, Barton,
Cushing, Fletcher, Laffey, Monssen, O'Bannon, and
Sterett.
The
threat posed by the oncoming Japanese was serious. A month earlier, two Japanese
battleships had shelled Henderson Field with nearly catastrophic results,
completely destroying half the aircraft there, damaging most others and leaving
the field inoperable for 36 hours.
Allied intelligence knew this was the opening move of
the major Japanese operation to retake Guadalcanal.
If Henderson was knocked out this time, they might just
do it.
Task Group 67.4 was ordered to stop
the Japanese at all costs.
The oncoming Japanese force was
centered around Battleship Division 11, with the dreadnoughts Hiei and Kirishima,
supported by the light cruiser Nagara,
and the destroyers Inazuma,
Ikazuchi, and Akatsuki,
under the command of VADM Hiroshi Abe.
 Following behind Abe’s force was a
Japanese convoy carrying 7,000 troops of the 38th
Division, which were to be landed on Guadalcanal the morning of November 14,
following the successful neutralization of Henderson Field.
Following behind Abe’s force was a
Japanese convoy carrying 7,000 troops of the 38th
Division, which were to be landed on Guadalcanal the morning of November 14,
following the successful neutralization of Henderson Field.
The night of November 12/13 was
perfect for what the Japanese planned, being the dark of the moon with rain
squalls in all quadrants. Unfortunately, the inexperienced Callaghan put the two
ships of the task group with the newest SG radar - Helena
and Fletcher - at the rear of the
formation. The oldest destroyers led the formation, while
San Francisco led Portland,
followed by Norman Scott’s two anti-aircraft light cruisers,
Juneau and Atlanta;
all were equipped with the temperamental SC radar.
At 0124, US radar picked up the
Japanese fleet.
Callaghan ordered a turn north to
cross the Japanese “T” as Scott had done at Cape Esperance.
Both formations stumbled into rain squalls, which kept
Callaghan from being certain of his fleet’s positions when
Cushing confirmed the radar contacts as Japanese.
Cushing requested permission to
open fire, but Callaghan delayed due to uncertainty.
Suddenly both formations emerged
from the squalls, with Admiral Abe surprised to find an unexpected American
fleet practically within point blank range.
Fortunately for the Americans, the
Japanese were even less prepared for a surface engagement.
Their mission was to shell Henderson Field, and thus the
battleships were armed with HE shells full of sub-munitions, rather than the AP,
while the ships were not in battle formation.
Unfortunately for the Americans, the thirteen Japanese
destroyers were all armed with the Long Lance torpedo and all the Japanese ships
were better-versed in night fighting than were the Americans.
Almost all the American losses in the battle would come
from this weapon.
The Japanese illuminated the
Americans with searchlights that were quickly shot out.
Realizing his force was nearly surrounded by the
Japanese, Callaghan ordered, "Odd ships fire to starboard, even ships fire to
port."
What happened next was described by
one of the surviving officers on Monssen
as "a barroom brawl after the lights had been shot out".
Laffey passed 20 feet from
Hiei, narrowly missing collision. The
Japanese battleship couldn’t depress her batteries low enough to hit
Laffey, though the destroyer rake
Hiei’s superstructure with 5-inch and machine gun
fire, damaging Hiei’s bridge, wounding
Admiral Abe, and killing his chief of staff.
Sterett and
O'Bannon also hit Hiei from close range. San Francisco then
passed 2,500 yards away and Hiei
concentrated on her, along with Kirishima,
Inazuma, and
Ikazuchi.
In a matter of minutes, San Francisco
took 15 major shell hits and 25 lesser, disabling her steering and killing
Admiral Callaghan, Captain Cassin Young, and most of the bridge staff.
Fortunately, the first salvos from Hiei
and Kirishima were the special
fragmentation bombardment shells,
 which have
saved San Francisco being sunk
outright.
which have
saved San Francisco being sunk
outright.
While the other American ships
fought desperate battles for survival, the crew of San
Francisco immediately began a fight for her life that would
be memorialized by the award of three Medals of Honor - all for actions taken by
crew members to save their ship.
Command of the ship had devolved
within five minutes to LCDR Herb Schonland, the Damage Control Officer.
His MOH citation reads:
For
extreme heroism and courage above and beyond the call of duty as damage control
officer of the U.S.S. San Francisco in action against greatly superior enemy
forces in the battle off Savo Island, 12-13 November 1942. In the same violent
night engagement in which all of his superior officers were killed or wounded,
Lt. Comdr. Schonland was fighting valiantly to free the San Francisco of large
quantities of water flooding the second deck compartments through numerous shell
holes caused by enemy fire. Upon being informed that he was commanding officer,
he ascertained that the conning of the ship was being efficiently handled, then
directed the officer who had taken over that task to continue while he himself
resumed the vitally important work of maintaining the stability of the ship. In
water waist deep, he carried on his efforts in darkness illuminated only by hand
lanterns until water in flooded compartments had been drained or pumped off and
watertight integrity had again been restored to the San Francisco. His great
personal valor and gallant devotion to duty at great peril to his own life were
instrumental in bringing his ship back to port under her own power, saved to
fight again in the service of her country.
A wounded Marine Gunnery Sergeant,
Tom MacGuire, climbed down from his battle station on the signal bridge and
entered the navigating bridge.
As he told me 50 years later, “There was blood
everywhere, the bulkheads looked like swiss cheese.
The Admiral died as I touched him.
Then I saw someone stir, and I went to him.”
MacGuire had found LCDR Bruce McCandless, the Communications Officer,
who had been thrown against a bulkhead by an explosion and rendered unconscious.
McCandless recovered and sent MacGuire to ascertain the
situation, since all internal communications were knocked out.
McCandless’ MOH citation reads as follows:
For
conspicuous gallantry and exceptionally distinguished service above and beyond
the call of duty as communication officer of the U.S.S. San Francisco in combat
with enemy Japanese forces in the battle off Savo Island, 12/13 November 1942.
In the midst of a violent night engagement, the fire of a determined and
desperate enemy seriously wounded Lt. Comdr. McCandless and rendered him
unconscious, killed or wounded the admiral in command, his staff, the captain of
the ship, the navigator, and all other personnel on the navigating and signal
bridges. Faced with the lack of superior command upon his recovery, and
displaying superb initiative, he promptly assumed command of the ship and
ordered her course and gunfire against an overwhelmingly powerful force. With
his superiors in other vessels unaware of the loss of their admiral, and
challenged by his great responsibility, Lt. Comdr. McCandless boldly continued
to engage the enemy and to lead our column of following vessels to a great
victory. Largely through his brilliant seamanship and great courage, the San
Francisco was brought back to port, saved to fight again in the service of her
country.
As San
Francisco continued her death ride through the Japanese
fleet, Boatswain’s Mate Keppler - who had led the fight to put out the fire
caused by the crash of the Kate earlier that day - continued his heroic actions,
as detailed in the citation for his posthumous MOH:
For
extraordinary heroism and distinguished courage above and beyond the call of
duty while serving aboard the U.S.S. San Francisco during action against enemy
Japanese forces in the Solomon Islands, 12/13 November 1942. When a hostile
torpedo 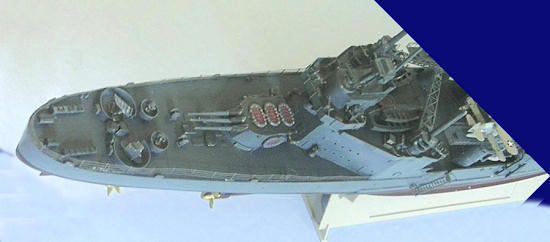 plane,
during a daylight air raid, crashed on the after machine-gun platform, Keppler
promptly assisted in removal of the dead and, by his capable supervision of the
wounded, undoubtedly helped save the lives of several shipmates who otherwise
might have perished. That night, when the ship's hangar was set afire during the
great battle off Savo Island, he bravely led a hose into the starboard side of
the stricken area and there, without assistance and despite frequent hits from
terrific enemy bombardment, eventually brought the fire under control. Later,
although mortally wounded, he labored valiantly in the midst of bursting shells,
persistently directing fire-fighting operations and administering to wounded
personnel until he finally collapsed from loss of blood. His great personal
valor, maintained with utter disregard of personal safety, was in keeping with
the highest traditions of the U.S. Naval Service. He gallantly gave his life for
his country.
plane,
during a daylight air raid, crashed on the after machine-gun platform, Keppler
promptly assisted in removal of the dead and, by his capable supervision of the
wounded, undoubtedly helped save the lives of several shipmates who otherwise
might have perished. That night, when the ship's hangar was set afire during the
great battle off Savo Island, he bravely led a hose into the starboard side of
the stricken area and there, without assistance and despite frequent hits from
terrific enemy bombardment, eventually brought the fire under control. Later,
although mortally wounded, he labored valiantly in the midst of bursting shells,
persistently directing fire-fighting operations and administering to wounded
personnel until he finally collapsed from loss of blood. His great personal
valor, maintained with utter disregard of personal safety, was in keeping with
the highest traditions of the U.S. Naval Service. He gallantly gave his life for
his country.
Robert Leckie, a Marine
private on Guadalcanal who would later write several excellent accounts of his
experiences in the Pacific War, described the battle as he saw it from a hill
above Henderson Field:
“The
star shells rose, terrible and red. Giant tracers flashed across the night in
orange arches. ... the sea seemed a sheet of polished obsidian on which the
warships seemed to have been dropped and were immobilized, centered amid
concentric circles like shock waves that form around a stone dropped in mud.”
After almost 40 minutes
of the kind of brutal, close-quarters fighting that hadn’t been seen since the
Age of Sail, the American and Japanese fleets broke contact and ceased fire at
02:26, with Captain Gilbert Hoover of Helena
and senior surviving U.S. officer at this point ordering disengagement.
At this point, Admiral Abe had the
battleship Kirishima, the light cruiser
Nagara, and four destroyers -
Asagumo, Teruzuki,
Yukikaze, and
Harusame - only lightly damaged, with
four others - Inazuma,
Ikazuchi, Murasame,
and Samidare - damaged enough to impair
fighting ability somewhat.
On the American side, only the
light cruiser Helena
and destroyer Fletcher could still
offer resistance.
The way was now clear for Abe to
continue on to bombard Henderson Field and finish off the U.S. naval forces in
the area, thus clearing the way for troops and supplies to be landed safely on
Guadalcanal. In a decision as stunning as that made by Admiral Kurita at the
Battle Leyte Gulf, where the entire US invasion fleet lay defenseless before
him, Abe ordered a retirement.
After the battle, the Navy believed
that they had sunk as many as seven Japanese ships. Coupled with the
otherwise-unexplainable Japanese retreat, the Naval Battle of Guadalcanal was
seen as a significant victory. It was only after the war when the Imperial Navy
records became available that the Navy discovered t they had suffered a crushing
tactical defeat.
However, the fact is that the Naval
Battle of Guadalcanal was a stunning strategic
victory that is outshone only by the Battle of Midway in importance during the
Pacific War. Historian Eric Hammel sums up the significance of the battle this
way:
 On
November 12, 1942, the Imperial Navy had the better ships and the better
tactics. After November 15, 1942, its leaders lost heart and it lacked the
strategic depth to face the burgeoning U.S. Navy and its vastly improving
weapons and tactics. The Japanese never got better while, after November 1942,
the U.S. Navy never stopped getting better.
On
November 12, 1942, the Imperial Navy had the better ships and the better
tactics. After November 15, 1942, its leaders lost heart and it lacked the
strategic depth to face the burgeoning U.S. Navy and its vastly improving
weapons and tactics. The Japanese never got better while, after November 1942,
the U.S. Navy never stopped getting better.
After San
Francisco returned to Mare Island, her wrecked bridge was
removed and placed on display at Fort Miley in San Francisco. Back when I was a
young sailor at Treasure Island, I once took the Geary bus out to Land’s End to
see the bridge. Standing on the same deck where Daniel Callaghan and Cassin
Young and the others had died, and where Bruce McCandless saved his ship, was an
experience that has stayed with me in the years since.
In 1975, when I worked as an administrative assistant to
a member of the San Francisco Board of Supervisors, I was astounded to visit the
memorial and see that it had fallen into disrepair.
I’ve always been proud that I found some money in that
year’s budget to give the bridge a coat of paint and preserve it.
Today, it is a well-preserved memorial to those who
fought and died in the Pacific, and you, too, can stand on that once-bloody deck
and consider the sacrifice of the USS San Francisco.
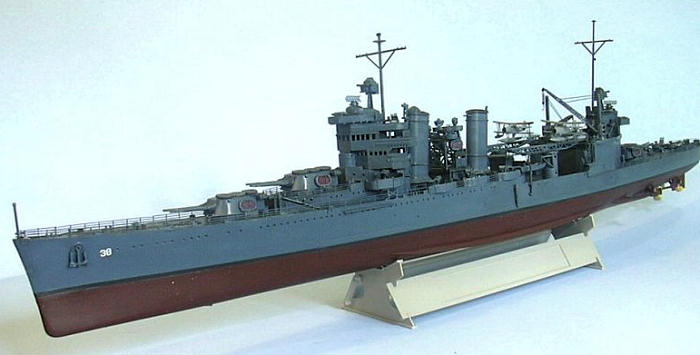
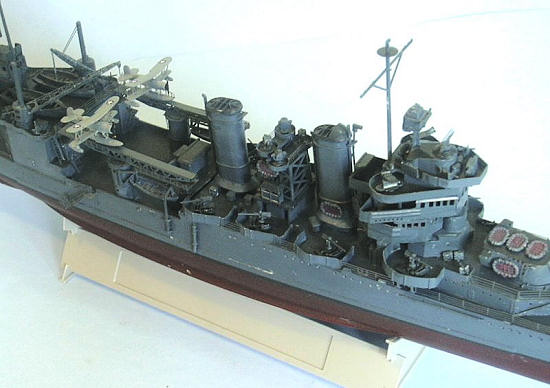
The USS San Francisco was released
by Trumpeter earlier this year.
To my mind, it is the best of the Trumpeter ship kits I
have built to date.
All parts are crisp and flash-free.
I did note that several of the sprues are “generic” to
ship models, and thus one can end up with extra parts.
As with airplanes, I am now compiling a box of spares
for ships.
I particularly liked that the splinter shields for the 20mm
cannon are in plastic and thin enough to look good when assembled; they are much
easier to use than the photo-etch splinter shields I used on the USS
Massachusetts project.
I started with the hull.
Trumpeter would have you attach the upper and lower
hulls as the last step after completing all the other assembly.
DO NOT DO THIS!
The upper and lower hull fit together better than other
Trumpeter kits, but you are still going to need to be able to work that joint
from inside and out, and you are still going to need filler to smooth the hull.
Personally, I wish they would just do the hulls in two
parts divided vertically, but then all those ship guys who go for the “action
pose” of putting the model in a simulated ocean would complain.
Once I had the hull together, I
attached the decks.
I have found that if one builds a ship model in sub
assemblies and paints as they go along, things seem easier, which is what I did
here.
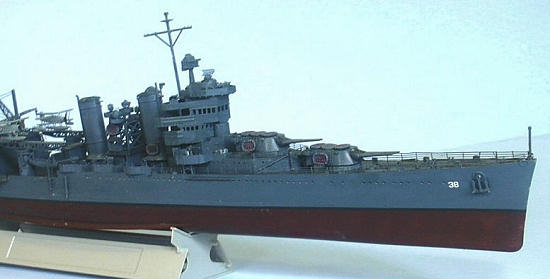
Painting:
I used Tamiya Hull Red.
I mixed my own “Measure 21" sea blue using Xtracrylix
paints from a chip provided at the site “USN Camouflage: 1941-45" -
- which is a very useful research site for ship modelers.
The metal decks were painted with Xtracrylix Extra Dark
Sea Grey, while the wooden decks were painted with Gunze-Sangyo “Navy Blue.”
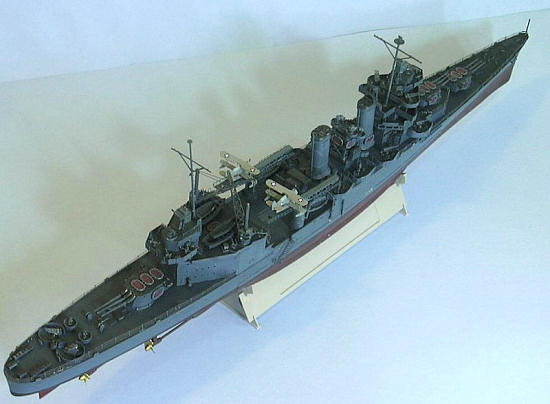
Sub-assembly
construction:
 I built in sub-assemblies, broken
down into the major subdivisions of forward superstructure, aft superstructure,
and turrets.
The good thing about using Xtracrylix paint is that one can mix
airbrushing and hand brushing, with no different in final color tone.
Additionally, Xtracrylix dries smooth when brushed, so
it does not look different from the areas that were airbrushed.
I built in sub-assemblies, broken
down into the major subdivisions of forward superstructure, aft superstructure,
and turrets.
The good thing about using Xtracrylix paint is that one can mix
airbrushing and hand brushing, with no different in final color tone.
Additionally, Xtracrylix dries smooth when brushed, so
it does not look different from the areas that were airbrushed.
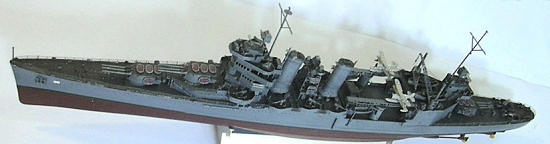
So far as assembly was concerned, I
encountered no problems as regards fit, since the parts are all well-molded.
The main thing to do is to take one’s time.
Ship modeling involves the use of patience and an
extended attention span, but if you do that nothing is particularly difficult.
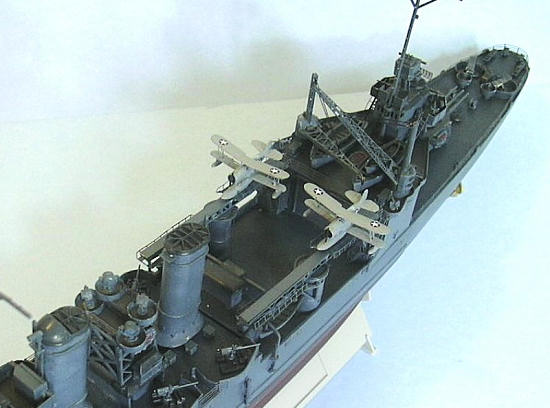
The cranes and catapults were done
with Tom’s Modelworks photo-etch, as were all the deck rails.
All photoetch assembly was done with Gator Glue, which
works perfectly without gluing the parts to your fingers.
The Curtiss SOC Seagulls are
relatively accurate, other than the walls masquerading as interplane struts.
I had the White Ensign Models photoetch set, which
provides struts for main pontoon and wing floats, and the interplane and cabane
“N” struts.
I learned how not to do the assembly with the first airplane, and
did the second in about half the time taken for the first.
I think I now know what the proper construction
procedure will be for the 24 biplanes that will go on the deck of USS Saratoga
(though I am also certain that will be a slow and laborious process).
With the use of Starfighter decals for the national
insignia, the end result looks good.
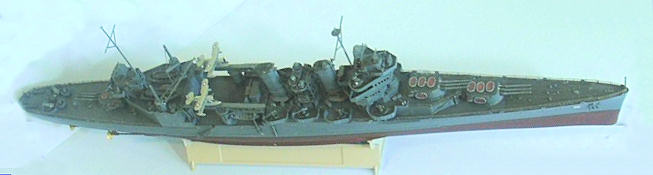
I gave the model an overall coat of
Xtracrylix Flat Varnish, and attached the four screws.
I have wanted a model of the USS
San Francisco for at least 40 years.
Not having the $400 necessary for a full resin kit, I am
particularly happy that Trumpeter did this in injection plastic, and at a price
- $75 - that is very reasonable indeed.
The model looks great sitting next to HMS
Hood and US Massachusetts.
She’ll soon be joined by her battle mate, USS Buchanan.
Perhaps someday Trumpeter will also do
Juneau, Helena and Portland.
Review kit courtesy of
Stevens International.
Tom Cleaver
August 2008
Copyright ModelingMadness.com. If you would like your product reviewed fairly and
fairly quickly, please
contact
the editor or see other details in the
Note to
Contributors.
Back to the Main Page
Back to the Review
Index Page 2018