| KIT #: | EC85001 |
| PRICE: | $99.95 SRP |
| DECALS: | One option |
| REVIEWER: | Mark Hiott |
| NOTES: | Premium edition |
| HISTORY |
USS
Olympia (C-6/CA-15/CL-15/IX-40) is a protected cruiser lauched on
 The
primary armament is four 8 in (200 mm)/35 caliber guns in two twin Mark 6 gun
turrets, one forward and one aft of the superstructure. These guns could fire
260 lb (120 kg) projectiles, either armor-piercing or high explosive, at a
muzzle velocity of 2,100 ft (640 m) per second.
The
primary armament is four 8 in (200 mm)/35 caliber guns in two twin Mark 6 gun
turrets, one forward and one aft of the superstructure. These guns could fire
260 lb (120 kg) projectiles, either armor-piercing or high explosive, at a
muzzle velocity of 2,100 ft (640 m) per second.
The
secondary battery is ten 5 in (130 mm)/40 caliber guns mounted in casemates,
five on each side of the ship. These guns fired 50 lb (23 kg) armor-piercing
shells at a muzzle velocity of 2,300 ft (700 m) per second. Fourteen 6-pounder
(57 mm (2.24 in) anti-torpedo boat guns are mounted in casemates. Six 1-pounder
guns are mounted on deck, along with six 18 in (46 cm) above-water torpedo
tubes.
Olympia became famous as the flagship of Commodore George Dewey at the Battle of
Manila Bay during the Spanish-American War in 1898. The ship was decommissioned
after returning to the U.S. in 1899, but was returned to active service in 1902.
She served until World War I as a training ship for naval cadets and as a
floating barracks in Charleston, South Carolina. In 1917, she was mobilized
again for war service, patrolling the American coast and escorting transport
ships.
In
1957, the U.S. Navy ceded title to the Cruiser Olympia Association, which
restored the ship to its 1898 configuration. Since then, Olympia has been a
museum ship in Philadelphia, Pennsylvania, which is now part of the Independence
Seaport Museum. It is the oldest steel US warship still afloat. However, the
Museum has been unable to fund essential maintenance for the old ship, and
attempts to secure outside funding have failed. Therefore the current steward,
under direction of the U.S. Navy has put the ship up for availability to new
stewards. It will take an estimated ten million dollars to put the Olympia in a
stable condition.
Olympia was designated a National Historic Landmark in 1966.
| THE KIT |
Encore is much like Glencoe in that they take older kits and
reissue them. Where Encore differs is that they add upgraded parts to enhance
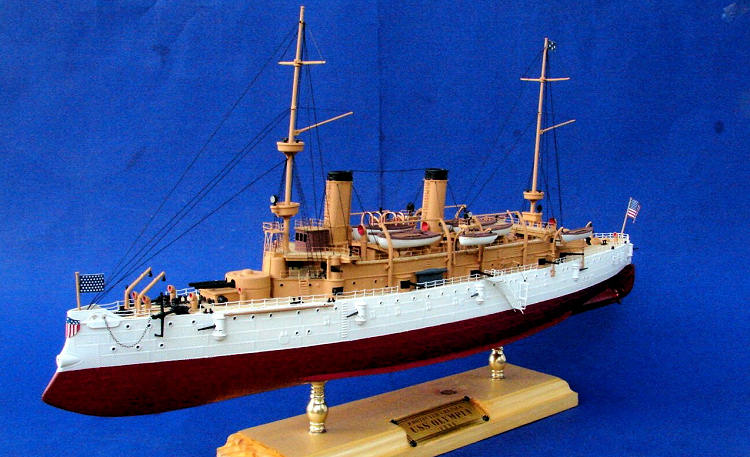
the kit. The particular kit is the "Premium Edition" of their U.S.S. Olympia.
The Premium kit gives you 2 photo etch s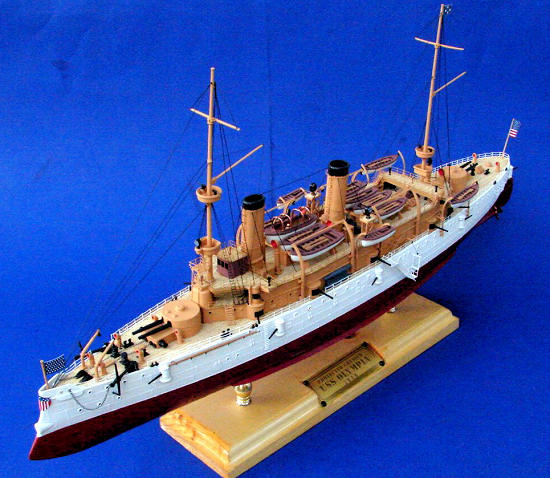 heets,
anchor chain, resin parts, brass barrels, laser etched wood decks, wood base,
brass nameplate and brass pedestals. The kit is also available in a "standard"
edition (kit #EC80001) that costs less (MSRP 59.95us), but still provides the
photo etch, anchor chain and resin bits.
heets,
anchor chain, resin parts, brass barrels, laser etched wood decks, wood base,
brass nameplate and brass pedestals. The kit is also available in a "standard"
edition (kit #EC80001) that costs less (MSRP 59.95us), but still provides the
photo etch, anchor chain and resin bits.
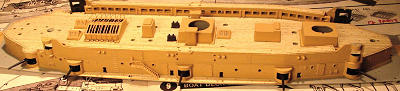
Molded in light gray, the plastic
base in my kit was stamped 1982, but you wouldn't know by looking at the kit.
The molding is very crisp and there is very little flash and what there is, will
clean up very quickly. Detail is nice, given the time period when it was first
made.
The instructions are hit and miss.
Encore used the old Revell instructions but added some new photos and steps to
aid construction. The basic instructions are quite nice and easy to follow.
However, the placement of some parts is rather cluttered, but with a bit of
investigation you can figure it out. The real letdown is the photo etch
"picture" placement guides. They are next to useless unless you have used ship
p/e in the past. Some of the p/e parts were shown, but had no numbers to tell
you what they were or how to assemble them.
On the subject of the photo etch... I have built many ships and used p/e from a wide variety of companies, and the p/e in this kit is some of the best I've seen. It is finely etched, delicate and easy to use. In fact, some of it is too finely etched and is easily broken. Normally, you can bend a p/e part 2 or 3 times before you risked snapping it apart. With these parts you get 2 chances, tops, to get it right. The aft ratlines in one of the sheets had come lose and was a bit mangled as a result.
| CONSTRUCTION |
 I
jumped around the instructions during assembly, as I saw that it would be easier
for me after looking at the instructions. Since painting a ship is easier as a
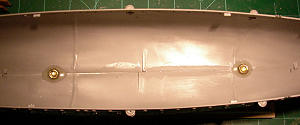
whole, I started with the hull. After gluing the 2 halves together, I added the
fore and aft decks from step 3. Since this has a wooden base with brass
pedestals, I drilled the holes and attached the pedestals to the hull. The
molded on pins for the kit base will need to be removed doing this. I installed
the pedestals and 5 minute epoxy was applied to the inside, around the nuts
holding the pedestals in place. I allowed the epoxy to dry overnight, with the
pedestals in place, then remove the pedestals. Installing the photo-etch bilge
keels is nerve racking as they are very long and quite flimsy. Getting them
straight takes a lot of patience. Even then I managed to break one of them. I
didn't use the resin bow torpedo tube, as personally I think the kit one looks
just fine. Nor did I modify the rudder. Th
I
jumped around the instructions during assembly, as I saw that it would be easier
for me after looking at the instructions. Since painting a ship is easier as a
whole, I started with the hull. After gluing the 2 halves together, I added the
fore and aft decks from step 3. Since this has a wooden base with brass
pedestals, I drilled the holes and attached the pedestals to the hull. The
molded on pins for the kit base will need to be removed doing this. I installed
the pedestals and 5 minute epoxy was applied to the inside, around the nuts
holding the pedestals in place. I allowed the epoxy to dry overnight, with the
pedestals in place, then remove the pedestals. Installing the photo-etch bilge
keels is nerve racking as they are very long and quite flimsy. Getting them
straight takes a lot of patience. Even then I managed to break one of them. I
didn't use the resin bow torpedo tube, as personally I think the kit one looks
just fine. Nor did I modify the rudder. Th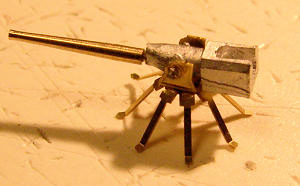 e
amount of damage that would be done to the detail on the hull to use these 2
parts was just not worth it to me. I did, however, use the resin stern torpedo
tube, as it was missing.
e
amount of damage that would be done to the detail on the hull to use these 2
parts was just not worth it to me. I did, however, use the resin stern torpedo
tube, as it was missing.
I didn't care for the way the name
plate just sat on the base, so I carved out a small area and mounted it at an
angle. The base was then given a cost of clear polyurethane and mounted, alone
with the pedestals, on the hull. This way it provides a nice way to handle the
ship during building.
I built the entire superstructure off the hull until it was almost
complete. Again, less apt to break things this way. In step 2 I left off parts
14 until later. They will just be in the way
 and risk
getting broken. I also added wood decks #D05, #D06 and #D07 in this step. The
white metal 6-pounder guns are difficult to build as you have to drill a hole in
the tip of MP5 to mount the brass barrel. I then jumped to step 5 and add the
walkways and wood decks. Also in step 5, I attached the funnel rigging to parts
#32 and #35. I just folded them under and tape them to the bottom of the
superstructure until later.
and risk
getting broken. I also added wood decks #D05, #D06 and #D07 in this step. The
white metal 6-pounder guns are difficult to build as you have to drill a hole in
the tip of MP5 to mount the brass barrel. I then jumped to step 5 and add the
walkways and wood decks. Also in step 5, I attached the funnel rigging to parts
#32 and #35. I just folded them under and tape them to the bottom of the
superstructure until later.
 I
followed the rest of the steps assembling the superstructure up to Step 10. In
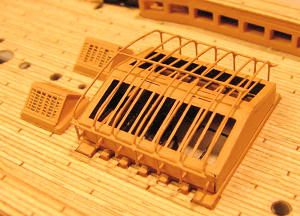
step 8, I left off the search light platforms. The skylight is installed in Step
8 as well and it is a thing of beauty. Consisting of 12 parts, it goes together
with little trouble and looks fantastic! Once I finished Step 9, I went back to
Step 3 and installed the superstructure on the hull. (don't forget to untape the
stack rigging lines) In Step 3, I also planned the rigging. There are several
holes that will have to be drilled and this step is the most logical time to do
it.
I
followed the rest of the steps assembling the superstructure up to Step 10. In
step 8, I left off the search light platforms. The skylight is installed in Step
8 as well and it is a thing of beauty. Consisting of 12 parts, it goes together
with little trouble and looks fantastic! Once I finished Step 9, I went back to
Step 3 and installed the superstructure on the hull. (don't forget to untape the
stack rigging lines) In Step 3, I also planned the rigging. There are several
holes that will have to be drilled and this step is the most logical time to do
it.
In between doing all this, I started
to work on the subassemblies; main guns, smoke stacks, ships boats and the
masts. The smoke stacks require a lot of work as one has to remove the molded on
detail in order to install the p/e detail. I glued them together and remove the
small pipes for reuse later. I then removed all the molded detail with snips and
files. Once removed, the stacks were sanded and a coat of Mr. Surfacer was
brushed on and sanded smooth. I also opened up the top of the stacks with a
Dremel, as Encore provides screens for the tops. The p/e parts were the added,
the pipes reinstalled and the stacks painted.
 In
Step 11, I installed the
In
Step 11, I installed the
At this point, most of the hull is
finished, now it's time to get down to the nitty gritty. I installed the smoke
stacks and threaded the rigging line through the holes I had drilled and out the
top. CA glue was used to anchor them, the excess was cut off and the p/e stack
screens installed. I didn't install the masts in this step, as they will be one
of the last things I install. In Step 15, I installed the anchors and cranes but
left off the rest. I also skipped Step 16... we'll come back to that later.
Next I installed the ships boats.
Remember Part #14 from step 2? I installed those at this time as well. I also
install Parts 117 and 118 from Step 17 and the searchlight platforms. The only
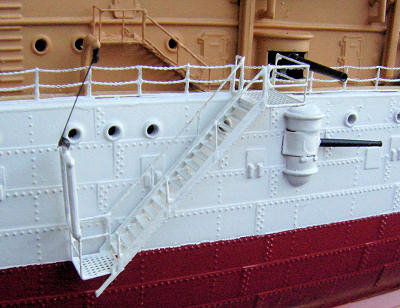
thing left now are the masts and the parts from Step 15 and Step 16.
 By
now the ship is 90% finished and it's time to do the rails. I started at the
front and worked my way back, doing one side at a time. Again, the installation
pictures are not real clear and it took me a while to understand just where
everything went. I also installed the fore and aft hull badges as well. Shown in
the pictures is the flying bridge, but there are no numbers. The flying bridge
is part B13 and the rail is part A17. The instructions never mention this part
or when/how to install it. This was also the only part I had trouble with. The
rail does not fit the flying bridge. I had to cut the rail and cobble up the
front rails with some left over pieces.
By
now the ship is 90% finished and it's time to do the rails. I started at the
front and worked my way back, doing one side at a time. Again, the installation
pictures are not real clear and it took me a while to understand just where
everything went. I also installed the fore and aft hull badges as well. Shown in
the pictures is the flying bridge, but there are no numbers. The flying bridge
is part B13 and the rail is part A17. The instructions never mention this part
or when/how to install it. This was also the only part I had trouble with. The
rail does not fit the flying bridge. I had to cut the rail and cobble up the
front rails with some left over pieces.
Once the rails were installed, I
went back to Step 15 and 16 and installed the last boats.
RIGGING: I installed the masts and got ready to do the rigging. Now I'll
admit, I hate doing rigging, but on ships it's kind of a necessary evil... kinda
like biplanes. I use 2 types of line; 8lb transparent monofilament for the
standing rigging and .005 Nylon for the running
 rigging.
These can be found at the local craft store. Both of them can be tightened by
applying a heat source and, for that, I use a pencil type soldiering iron.
rigging.
These can be found at the local craft store. Both of them can be tightened by
applying a heat source and, for that, I use a pencil type soldiering iron.
There really is no set way to do rigging. I start at the bottom and go up. I attached the line to the masts with an applicator and CA glue. For the bow lines, I trapped them under part #119. I then measured out how long they need to be, added about an 1/8 inch and anchored them in place with a drop of CA. Once all the rigging is in place, I applied the heat. Care must be taken here so, that as the lines tighten, they don't snap or bend the masts. It's best to go slow, it sometimes takes 2 or 3 applications of heat to get them just right. Once everything was tight, I painted the rigging. I also installed the photo etch ratlines at this time. The front ones didn't fit as well as the aft ones. Even the placement guide shows them poorly installed. When I pulled the bottoms in to fit properly, they ended up bowing outwards. Not much I could do about it, so they were left as is.
| COLORS & MARKINGS |
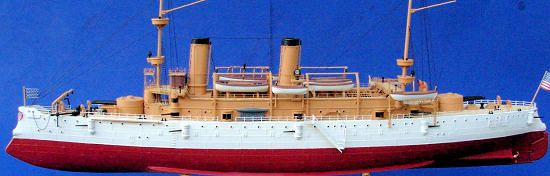 I
chose to model the ship as she appeared in September 1899. I followed the
painting callouts in the instructions. I first painted the lower part of the
hull flat red, masked that off and painted the upper hull flat white. The entire
superstructure was brush painted with White Ensign "Buff". Even though White
Ensign paints are made to be airbrushed, you can apply them with a brush, it
just takes more then one coat. The parts that called for Mahogany I painted with
Humbrol #70. Various deck fittings, the anchors, the guns, the tops of the
funnels and the rigging were painted flat black. The photo etch was painted on
the fret, and touched up after installation. I debated whether to paint the main
deck rails white or buff. The common consensus seemed spilt 50/50, so I decided
to go with white. After everything was done, the paint was touched up and a coat
of Floquil flat clear was used to even out the finish.
I
chose to model the ship as she appeared in September 1899. I followed the
painting callouts in the instructions. I first painted the lower part of the
hull flat red, masked that off and painted the upper hull flat white. The entire
superstructure was brush painted with White Ensign "Buff". Even though White
Ensign paints are made to be airbrushed, you can apply them with a brush, it
just takes more then one coat. The parts that called for Mahogany I painted with
Humbrol #70. Various deck fittings, the anchors, the guns, the tops of the
funnels and the rigging were painted flat black. The photo etch was painted on
the fret, and touched up after installation. I debated whether to paint the main
deck rails white or buff. The common consensus seemed spilt 50/50, so I decided
to go with white. After everything was done, the paint was touched up and a coat
of Floquil flat clear was used to even out the finish.
| CONCLUSIONS |
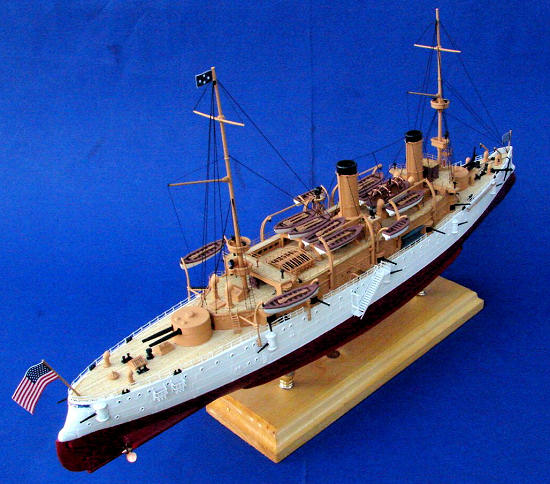
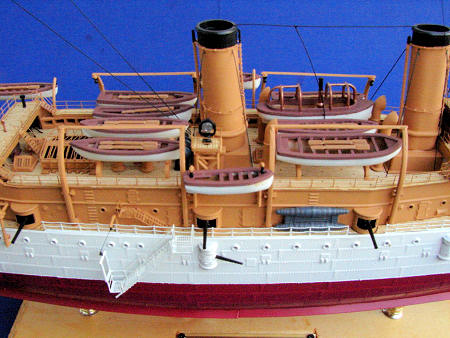
 Highly
recommended, I love this kit! Once you get past the fiddly parts and the dubious
placement guides, it builds into a beautiful replica of the Olympia. The amount
of detail is staggering and it looks great in my case next to the rest of my
ships.
Highly
recommended, I love this kit! Once you get past the fiddly parts and the dubious
placement guides, it builds into a beautiful replica of the Olympia. The amount
of detail is staggering and it looks great in my case next to the rest of my
ships.
Yes, the kit is showing it's age and some of the parts are a bit fiddly,
but the additions by Encore go a long way in enhancing the kit. However, as nice
as the premium kit is, unless you really
want the wood decks and brass barrels, I would suggest looking for the standard
kit. This was my first time using wood decks and I have my doubts about them.
How will they look in 5 or 6 years? Will they start to lift? If so, repairing
them could be a problem. They do help hide the nasty deck seams though.
Not recommended for beginners due to
the amount of added details, but someone that has used ship p/e in the past
should have no problem adding this to their collection.
| REFERENCES |
The internet for photos and the
history.
August 2012
Thanks to Squadron Products via your editor for the review kit. This one
is still available at your local retailer.
If you would like your product reviewed fairly and fairly quickly, please contact the editor
or see other details in the
Note to
Contributors.