Pit Road 1/700 USS Duluth
|
KIT #: |
W 23 |
|
PRICE: |
$30.00 SRP
|
|
DECALS: |
Ship names and flags |
|
REVIEWER: |
Tim
Reynaga |
|
NOTES: |
|
The
USS Duluth
(CL-87) was a Cleveland class light
cruiser launched on January 13, 1944 and
placed in commission on September 18, 1944.
The ship was destined to win two battle stars for action against the Imperial
Japanese Navy, but the greatest threat she would face would prove to be that
perennial danger facing all mariners–the restless sea.
During shakedown
the
Duluth
had her first encounter with difficult seas when the ship entered a gale with 60
knot (69 mile per hour) winds which carried away her port motor whale boat.
After completing shakedown the ship served as a training cruiser at the
U.S. Naval Training Station
Newport, Rhode Island. This
consisted of embarking 200-300 men from a cruiser or carrier crew taking
pre-commissioning training and making five-day training cruises in Long Island
Sound. During her stay in
Newport,
crews from the cruisers
Dayton,
Amsterdam,
Bremerton,
Saint Paul
and the
carriers
Lake
Champlain
and Boxer
were trained aboard the
Duluth.
 After
overhaul and a period of extended availability, she sailed for the Pacific in
April 1945, rendezvousing with the fast carriers of the 5th
Fleet on May 27. She joined Task
Force 58, which was providing air support for the invasion of
Okinawa.
Operating as part of Task Group 58.1 (screening group), the
Duluth
suffered no combat damage despite intense enemy air attacks. However, in the
early morning of
June 5, 1945,
task force encountered a typhoon which wrought considerable havoc to the fleet,
including the
Duluth.
Typhoon Connie’s 122 knot (140 mph) winds and 60 foot seas buckled
Duluth’s
bow upward, ruptured shell plating & several 2nd deck longitudinal stringers,
and reduced her maximum safe calm sea speed from 33 to 25 knots. It could well
have been worse: the heavy cruiser USS
Pittsburgh
had her bow section torn away entirely. Another cruiser, a destroyer, and four
carriers were also damaged, and six sailors and 76 aircraft were lost to the
tempest. As a result of this storm damage, the
Duluth
sailed to Guam
where she remained until July 1945 undergoing permanent repairs to her bow. In
late July 1945 the ship rejoined the carrier task forces
screen during the final air strikes on
Japan
which continued until the end of the war. After the collapse of the Japanese
Empire, Duluth operated with TF 38
which provided radar picket and combat air patrol for aircraft flying occupation
forces into Japan. The Duluth’s
war ended on October 1, 1945,
as she
sailed for home.
After
the war, the Duluth was based at San
Pedro, California, serving again in the Far East for most of 1946. During this
time she visited Melbourne and Sydney, Australia, Truk, Guam, and Manila. She
patrolled the China coast between September 1947 and May 1948, after which she
returned to her new home port of Long Beach, California. Her final duties
included carrying NROTC midshipmen on a training cruise to British Columbia in
the summer of 1948, and in February 1949 she joined in cold-weather operations
off Kodiak, Alaska. During these North Pacific winter exercises the
Duluth encountered
seas so heavy that at one point she actually took water into her forward funnel
severe enough that it shut down one of her boilers. Shaken but undamaged, the
cruiser steamed to
San Francisco
at the conclusion of the exercise to be inactivated. Despite being a state of
the art light cruiser less than five years in service, the war for which she was
built was over and USS
Duluth
was no longer needed. She was decommissioned June 25, 1949 and sold for scrap on
November 14, 1960.
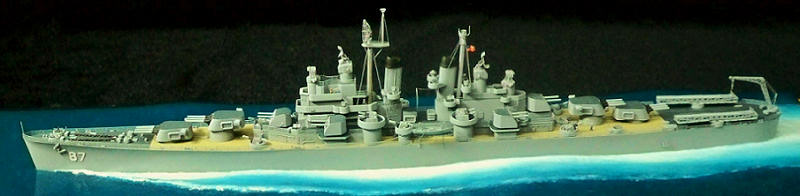
My USS
Duluth was
built using Pit-Road’s 1/700 scale USS
Miami kit,
first released in the late 1990s. Just over 10 inches in length, the Pit-Road
Cleveland
class models were among the better injected plastic waterline kits then
available. They still build easily into attractive replicas with sharp molding
and accurate details. The
Cleveland
class cruisers were built in round and square bridge variants, and Pit-Road
released two separate kits to reflect the two types. The USS
Cleveland
(kit W-22) represents the earlier round bridge design, and USS
Miami (kit
W-23) represents the later square bridge variant.
Round Bridge
Cleveland
Class Ships
that can be built using Pit-Road’s USS
Cleveland
kit (W-22):
CL-55
Cleveland.
CL-56 Columbia,
CL-57
Montpelier,
CL-58 Denver,
CL-59
Santa Fe,
CL-62
Birmingham &
CL-63 Mobile
Square
Bridge
Cleveland
Class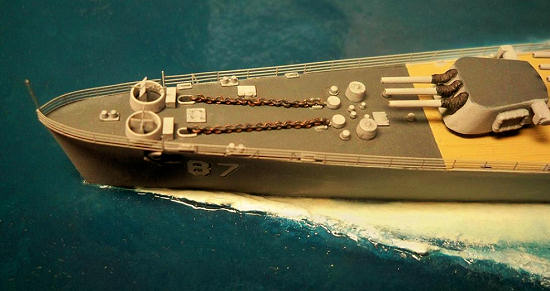 Ships that can be built using Pit-Road’s USS
Miami
kit (W-23):
Ships that can be built using Pit-Road’s USS
Miami
kit (W-23):
CL-64
Vincennes,
CL-65
Pasadena, CL-66
Springfield,
CL-67
Topeka, CL-80
Biloxi,
CL-81
Houston,
CL-82
Providence, CL-83
Manchester,
CL-86 Vicksburg,
CL-87
Duluth, CL-89
Miami,
CL-90
Astoria,
CL-91
Oaklahoma City,
CL-92 Little Rock,
CL-101 Amsterdam,
CL-102 Portsmouth,
CL-103
Wilkes Barre,
CL-104 Atlanta
&
CL-105 Dayton
Pit-Road’s
kit instructions
have Japanese language text, but
the
exploded-view diagrams are simple and clear. There are also camouflage design
drawings showing dramatic multi-color dazzle schemes for
CL-89
Miami, CL-67
Topeka,
CL-103
Wilkes Barre,
and CL-87
Duluth. In
addition, there is a color rendering of the scheme for the
Miami on the back of the box.
The hull
is crisply molded with convincing overall proportions, although the model is
reputed to be a bit undersize in both length and width. I didn’t actually
measure it for myself, but I found any discrepancy to be unnoticeable.
Delicate lines representing the wood deck are scribed into the horizontal
surface, and chocks, bitts, capstans, anchor chains and other fittings are
cleanly molded to the deck.
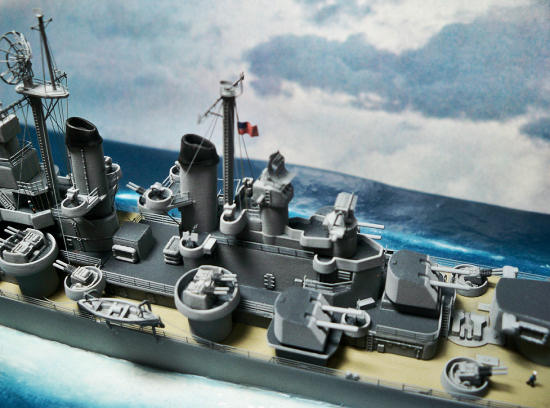
Superstructure
parts are good too, with ladders, doors, scuttles, and other details molded on
the surfaces. These details are heavier than scale, but they are clearly defined
and look good under paint. The splinter shields are also molded on, although
they are less successful. These features are reasonably thin, but the draw (the
narrowing towards the top of plastic parts to allow them to be pulled from the
molds) is noticeable in this small scale. Fortunately, they can be improved with
a little careful trimming.
For the guns, directors, rafts, boats and
other fittings Pit-Road provided two of the Skywave E9 “Weapons for US Navy
Ships-WW2 (set II)” sprues. These are generic for USN WWII-era ships
and include MUCH more than you will need to complete a
single ship, so there’s a ton of stuff left for the parts box. Very cool.
Finally, the kit includes a generalized
USN decal sheet with hull numbers plus the flags of
numerous countries. There is also a sheet of US aircraft
national markings for the floatplanes. As with the weapons/fittings set, there
is much more here than you will need for this project, to the benefit of your
spares box.
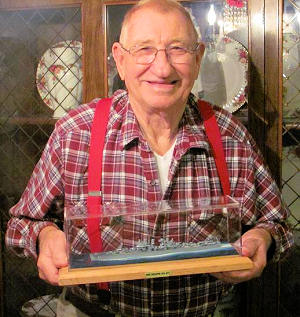
I
had decided to build a USS
Duluth model as a gift for my stepdad’s 80th
birthday, and since
Duluth was a typical square bridge
Cleveland
class cruiser, the 1/700 scale Pit-Road
Miami kit
was a natural choice. Not only was the basic kit excellent, but the
Miami
(CL-89) and the Duluth
(CL-87) were very similar, differing from each other only in minor details. This
would be a
straightforward build, requiring only minimal alterations and
some additional photoetch details.
I began
with the hull, attaching the forecastle deck and baseplate as per the
instructions. I liked the fine details molded on the foredeck which included
chocks, bitts, hatches, and some very nicely rendered ground tackle including
capstans, deck hawsepipe collars, and anchor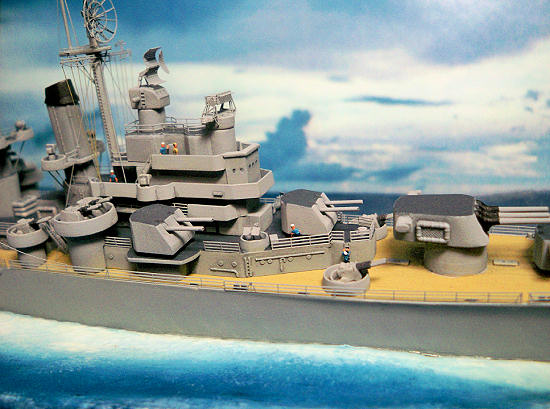 chains. These last were accurate, sharply molded, and would have looked fine
without alteration, but I scraped them away to make room for some very fine
chain I would install later. I had decided to make this a quick build, but using
real chains to represent anchor chains is one of those small upgrades that make
a big difference.
chains. These last were accurate, sharply molded, and would have looked fine
without alteration, but I scraped them away to make room for some very fine
chain I would install later. I had decided to make this a quick build, but using
real chains to represent anchor chains is one of those small upgrades that make
a big difference.
Next came
the superstructures. Pit-Road designed them logically to build up level by
level, and they fit well. I assembled them bulkhead and overhead/deck above, but
I didn’t attach the bulkheads to the decks below to ease painting later since
the bulkheads and decks were different colors. The only deviation from the kit
instructions here was to leave off the smaller details such as searchlights and
gun directors until later, again to facilitate painting.
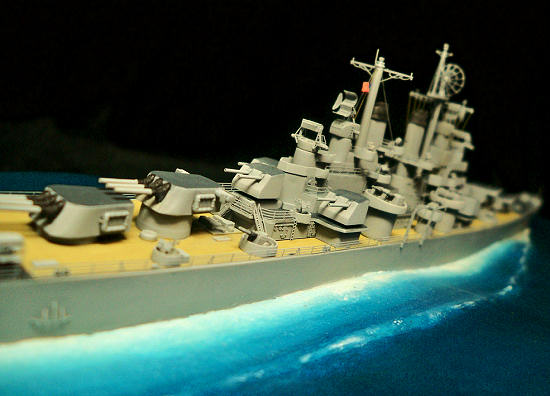
Turning to
the armament, the four main 6 inch/47 cal Mk.16 triple gun turrets assembled
easily with the separate barrels (with blast bags) and rangefinder hoods all
fitting perfectly. The only thing to watch here was to make sure the individual
barrels were mounted straight. Also, the instructions would have the rangefinder
hoods on all four turrets, but my references indicate that the aftermost turret
did not have them, so I left them off. In addition, I replaced the oval rafts on
the turret sides with square ones as shown in photos of the
Duluth. The
only other change I made here was to gingerly hollow out the tips of the barrels
with a No. 11 X-acto knife. Next came the six 5 inch/38 cal Mk. 32 twin mount
gunhouses. These too went together without a hitch, the only change being to
hollow the barrel ends. The 40mm twin and quad mounts went together easily also,
but with these smaller weapons I didn’t bother to hollow out the barrels. The
weakest guns in the kit were the injection molded plastic 20mm single mounts,
which were a little chunky. No problem here, though, as I replaced these with
stainless steel photoetch parts from Gold Medal Models (set 700-21), which were
far superior.
Along with
the weapons came the gun tubs. These simple parts merely required some minor
clean up and slight reshaping to reduce the mold draw and bring them more
closely to the vertical. Also, one of the differences between the
Duluth and
the Miami
involved exchanging four of the double 20mm positions in oval tubs on the main
deck for twin 40mm positions in round gun tubs. This was easy since the
additional 40mm twin mounts and tubs needed were supplied among the numerous
spare parts provided in the kit.
 The
gun directors were well represented, but they did require some modest
modifications to accommodate the photoetch upgrades. The Mk. 34 directors (above
the bridge and abaft the mainmast) required removing the support arms and
discarding the Mk.8 radar units, which would be replaced with more delicate
photoetch parts. Similarly, the two Mk. 37 directors required only junking the
plastic Mk. 12 radars and supports (kit parts C42 and C47) in favor of the
photoetch upgrades to come. I used the kit provided plastic Mk. 51 directors
unchanged.
The
gun directors were well represented, but they did require some modest
modifications to accommodate the photoetch upgrades. The Mk. 34 directors (above
the bridge and abaft the mainmast) required removing the support arms and
discarding the Mk.8 radar units, which would be replaced with more delicate
photoetch parts. Similarly, the two Mk. 37 directors required only junking the
plastic Mk. 12 radars and supports (kit parts C42 and C47) in favor of the
photoetch upgrades to come. I used the kit provided plastic Mk. 51 directors
unchanged.
Among the
more visible differences between the
Duluth and
the Miami
were the masts and radars. The foremasts were the same, but the mainmast behind
the funnel on the Duluth
did not have the platform of the
Miami as
depicted in the kit, so I left it off. Also, the
Miami had
the square CAXM-1 air search radar on the foremast where the
Duluth had
the round
SK-2. These differences were simple to achieve as the kit contained all the
necessary parts, although I opted instead to use aftermarket replacements. The
photoetch of choice was
Gold Medal Models 1/700 scale World War
Two USN Cruiser/Destroyer (GMM 700-8), a fantastic etched stainless steel set
which would contribute an absolute wealth of additional details to the build.
During the
Pacific War the Duluth
wore a spectacular
Measure
32, Design 11a multi-color dazzle camouflage
scheme designed to confuse enemy surface ships and submarines. I was initially
looking forward to taking on that elaborate scheme, but my stepdad had been part
of the postwar crew. To replicate the ship he knew, I had to forego the
elaborate camouflage for the more placid peacetime scheme of overall haze gray
with black funnel caps and natural wood decks. I began with the wood decks.
During the war the wood covered main deck was painted over with matt blue stain
to reduce visibility from the air, but postwar this was scraped off and the
bright wood uncovered. To simulate this I used a coat of slightly lightened
Model Master Armor Sand enamel. I didn’t attempt to indicate any color variation
among the individual planks because of the small scale; at normal viewing
distances the planks would blend into a unified color anyway. The bland armor
sand simulates this well, and airbrushing it on gives a nice even finish. After
the wood deck was dry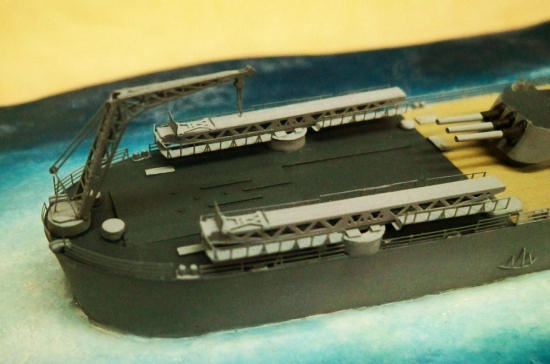 I masked it off, then proceeding to paint the hull and other vertical surfaces
of the ship Model Master (Testors) Dark Ghost Gray, which is a good stand in for
postwar USN gray.
I masked it off, then proceeding to paint the hull and other vertical surfaces
of the ship Model Master (Testors) Dark Ghost Gray, which is a good stand in for
postwar USN gray.
After the
gray hull and superstructure were dry I proceeded to the steel decks. As with
World War Two practice, these surfaces were deck blue or gray. I used
Model Master Gunship Gray. This dark color
contrasted strongly with the lighter gray vertical surfaces, making the
junctions between them very visible. Sharp, straight demarcations would be
essential for a neat looking model. Fortunately, the structure of the model lent
itself to easier painting. This is why I had waited to attach many of the
elements of the stacked superstructure to each other. In many cases the
contrasting colors on adjacent parts would make perfect lines when they were
bonded together. Other places (like the turret tops, gun tub floors and the
waterline of the ship’s boat) required a steady hand, but the Model Master
enamels are easy to work with and very forgiving if you work slowly with
appropriately thinned paint. Miscellaneous details included black for the
hollowed out gun muzzles, funnel caps, anchor chain, and the blast bags on the 6
inch guns.
I chose
not to weather the model as my stepdad remembered his ship as very clean (what
old sailor doesn’t?), but I did do pin washes of Gunship Gray to highlight the
doors, ladders, and other details molded on the vertical light gray surfaces.
For those unfamiliar with this technique, pin washes are simply applications of
highly thinned paint, usually in a darker color, to recessed or border areas of
raised details to mimic the shadows the eye sees on full sized objects. To do
this, just take small amounts of thinned paint on a small brush and apply it to
the edge of molded details. Capillary action will draw the paint around the
recessed edges, outlining the detail. Dab away any excess with a tissue and let
dry. Finally, dry brushing lightly over the part with the base color will
sharpen things up and make the detail pop.
Postwar
markings for the Duluth
required some fairly large “87”s for the hull, but despite the very extensive
decals provided in the kit, there weren’t any of the correct size. Fortunately
the Gold Medal Models 1/700 scale Naval Ship Decals (set 700-1D) had some
perfectly sized USN shaded style numbers which did the job nicely.
After the
basic components of the model were assembled and painted I turned to the more
fragile assemblies, most of which were upgraded with photoetched metal
replacement parts.
The masts were from the kit, but I
replaced the oval platform on the foremast and small round one atop the mainmast
with plastic card. The platform supports were wire, and th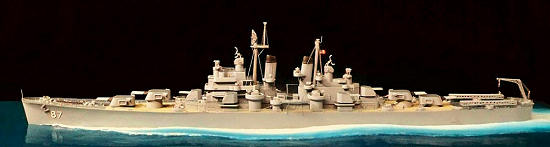 e
tiny safety rails were made from cut-down photoetch handrails. The elaborate
16-part SK-2
parabolic antenna with open work metal grating on the foremast was a photoetch
assembly from the GMM set. Though impressively
intricate, this tiny radar was actually fairly straightforward to build and is a
huge improvement over the simplified solid part supplied with the plastic kit.
The miniscule SG microwave
surface/low air search radars at the very tops of both masts were also from the
GMM set, as were the fighting lights on the sides of
the upper foremast. Yardarms (the cross pieces on the
masts) including foot ropes, anemometers and other details were photoetched
parts from the GMM set as well. Etched steel upgrades also improved the fire
directors, with the crude plastic Mk. 12 rectangular double curve and Mk. 22
“orange peel” fire control radars atop the Mk. 37 gun directors being replaced
with delicate photoetch screens. In addition to the
sensors, the set also supplied replacements for the plastic aircraft
crane, catapults, and
prop guards, as well as adding keel and rudder
detail to the 26 foot motor whale boat, photoetch boat davits, and of course
safety railing throughout the ship. Sailor figures are from Gold Medal Models
too, in this case photoetch brass set 700-17.
e
tiny safety rails were made from cut-down photoetch handrails. The elaborate
16-part SK-2
parabolic antenna with open work metal grating on the foremast was a photoetch
assembly from the GMM set. Though impressively
intricate, this tiny radar was actually fairly straightforward to build and is a
huge improvement over the simplified solid part supplied with the plastic kit.
The miniscule SG microwave
surface/low air search radars at the very tops of both masts were also from the
GMM set, as were the fighting lights on the sides of
the upper foremast. Yardarms (the cross pieces on the
masts) including foot ropes, anemometers and other details were photoetched
parts from the GMM set as well. Etched steel upgrades also improved the fire
directors, with the crude plastic Mk. 12 rectangular double curve and Mk. 22
“orange peel” fire control radars atop the Mk. 37 gun directors being replaced
with delicate photoetch screens. In addition to the
sensors, the set also supplied replacements for the plastic aircraft
crane, catapults, and
prop guards, as well as adding keel and rudder
detail to the 26 foot motor whale boat, photoetch boat davits, and of course
safety railing throughout the ship. Sailor figures are from Gold Medal Models
too, in this case photoetch brass set 700-17.
 Pit-Road’s
1/700 scale Miami
is a well designed and nicely detailed kit that builds easily into a convincing
square bridge Cleveland
class cruiser. The numerous alternate parts included make it simple to depict
other ships of the class as well. While the constraints of plastic injection
molding technology may limit the scale fidelity of some of the smaller parts,
the addition of aftermarket photoetch metal details can make this good kit even
better.
Pit-Road’s
1/700 scale Miami
is a well designed and nicely detailed kit that builds easily into a convincing
square bridge Cleveland
class cruiser. The numerous alternate parts included make it simple to depict
other ships of the class as well. While the constraints of plastic injection
molding technology may limit the scale fidelity of some of the smaller parts,
the addition of aftermarket photoetch metal details can make this good kit even
better.
Having
completed the model I placed it on a Das Pronto modeling clay ocean showing the
ship cruising briskly through a placid sea. Even though the harrowingly rough
waters off Alaska were among my stepdad’s most vivid memories of his time aboard
the Duluth,
I thought placing her in a calm sea would show off her graceful lines to better
advantage and perhaps remind him of more tranquil moments. Judging by the smile
on his face when I presented the model to him I think he may have agreed.
Conway's
All the World's Fighting Ships 1922-1946
Roger Chesneau (editor), Naval Institute Press,
Annapolis, 1980.
U.S.
Warships of World War II
Paul H.
Silverstone, Ian Allen Press, London, 1965.
Tim
Reynaga
July 2012
If you would like your product reviewed fairly and fairly quickly, please contact the editor or see other details in the
Note to
Contributors.
Back to the Main Page
Back to the Review
Index Page