Trumpeter 1/200 Scale USS
Arizona
| KIT #: | 3701 |
| PRICE: | $298.99 MSRP |
| DECALS: | Flags and name plate |
| REVIEWER: | Len Roberto |
| NOTES: |
Trumpeter extra detail PE set used as well as
leftover 1/200 Gold Medal Models parts |
| HISTORY |
USS Arizona (BB-39) was a
Pennsylvania-class battleship of the
I went to
| THE KIT |
Stunning, magnificent-
really just an overwhelming experience to open this massive box.
Everything was packed exquisitely to prevent any breakage.
| CONSTRUCTION |
The plan:
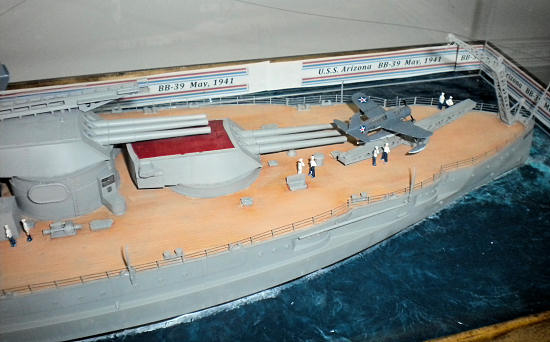
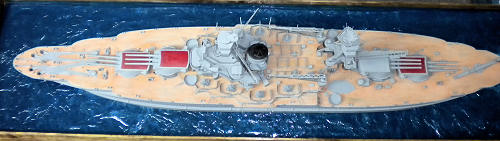
Build her as waterline model, underway, in the May 1941 time period.
This will allow me to paint her in the standard pre-war overall grey
scheme with a bare teakwood deck.
I
can use the crew figures and portray her in happier pre-war days…As the USS
Constitution build was back in 2004, this is an unequaled modeling challenge to
do this ship and model justice.
A Day-by-Day build log…
11/11/10:
ah the start…after a few days digesting this kit, gathering much info
online, and making copious notes on the instruction booklet, I started by
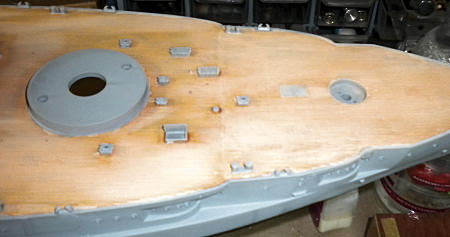
inserting the bow and stern deck pieces into the hull.
Fit was great with these very thick pieces.
I also proceeded to use Tamiya putty to work on these troublesome deck
seams.
I also filled in all deck
holes where the plastic ladders are to be used.
These will be replaced with photoectched brass so I needed to fill those
mounting holes.
Sanding was another
15 minutes.
I small start but every
journey begins with one step.
With
a project this complex, I really try to plan out each session and think hard
about how to construct the model while thinking ahead about how/ where to paint
and mask to best advantage.
Considering where to replace with photoetched parts is also a big consideration.
I am still awaiting the extra set of PE Trumpeter put out with this so I
do not want to do too much before I see what is included.
I think the extra set contains metal barrels for the 5 inch guns and many
other parts to be replaced.
11/13/10:
painted the hull and deck standard navy grey-
using….light grey primer!
It
looked too close to bother with the polly scale acrylics I have.
Makes the painting of this monster a whole lot easier.
11/14/10:
I decided to hand paint the wood deck using a mixture of radome tan mixed
with a little light tan.
It’s not a
perfectly uniform color but that’s OK.
I want it to look uneven.
When dry, I mixed a watery wash mix using burnt umber-
and painted this mixture onto the deck.
A few hours later I did another coat of wash.
It looks Ok but not as good I thought it would.
Next step is to use yellowish pastel chalk ground up and smudged into the
deck…
 11/15/10:
I scraped some yellow, tan and brown pastel chalk into a pile and using
an old brush-
smudged some in to
the deck.
I was not totally happy
with how it looked.
I tried using a
fine sanding block and this worked much better.
It smoothed out the look of the primer, paint and wash ai think very
nicely to give a more realistic look of teak wood.
It may look too “dirty” for some and I may go back over it with some dry
brushing of a lighter sand color to even it out.
11/15/10:
I scraped some yellow, tan and brown pastel chalk into a pile and using
an old brush-
smudged some in to
the deck.
I was not totally happy
with how it looked.
I tried using a
fine sanding block and this worked much better.
It smoothed out the look of the primer, paint and wash ai think very
nicely to give a more realistic look of teak wood.
It may look too “dirty” for some and I may go back over it with some dry
brushing of a lighter sand color to even it out.
11/16/10:
started work on the base.
A
friend gave me a very nice piece of wood to use.
I went to Home Depot and got a 10 foot piece of decorative pine crown
molding.
I am not so good with a
miter box but I managed to do a decent job of framing the wood.
The molding is taller than the base but I wanted this to provide an easy
way for the clear cover to fit onto the base securely.
11/17/10:
stained the base-
need to
get some clear coat sealant.
Added
a few more deck vents and hatches.
Also, worked on the lower superstructure.
Test fitted to see how they would slot into the deck.
Filled a couple more ladder holes.
I finally saw a picture of the enhanced PE set and luckily it does come
with PE ladders which I was hoping for.
Should be arriving any day now…
Weekend:
11/20 to 11/21
 Lots
of work done this weekend:
Lots
of work done this weekend:
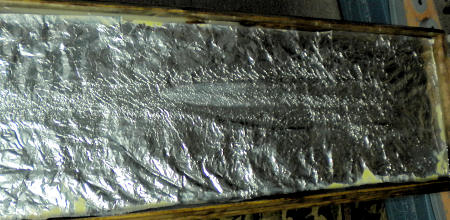
1.
Poured contact cement into my base to
try a new method for making water.
It uses crumpled up tin foil!
The
cement under the foil allows you to mold some waves and gives the foil some
variance in depth.
Looks pretty
good so far but taking a long time for the cement to dry.
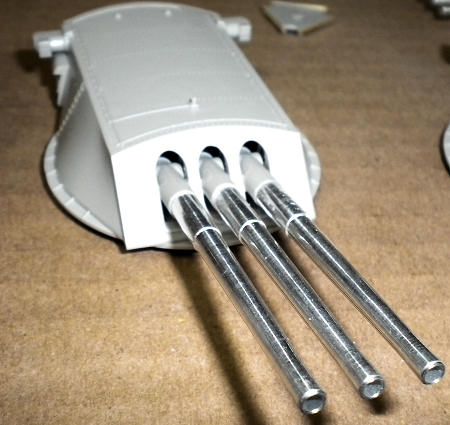 2.
Assembled the main gun
turrets.
I have read somewhere that
the main guns are too big!
Oh well-
they look pretty good.
2.
Assembled the main gun
turrets.
I have read somewhere that
the main guns are too big!
Oh well-
they look pretty good.
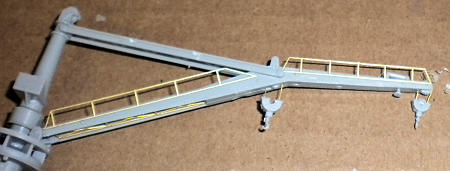 3.
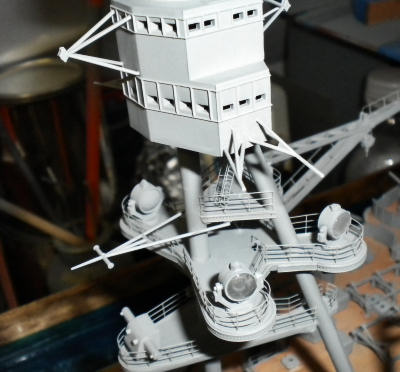
Assembled the aft crane
using some PE from the extra enhanced set.
3.
Assembled the aft crane
using some PE from the extra enhanced set.
4.
Assembled the other 2
cranes.
Here was the first finicky
part of the build.
Trumpeter wants
you to trap very small plastic pulleys in tiny PE rings for the hooks.
Very tough for me to get them right and into the hook pieces.
Bunch of PE used here for framing and handrails.
 5.
Various other assemblies
worked on-
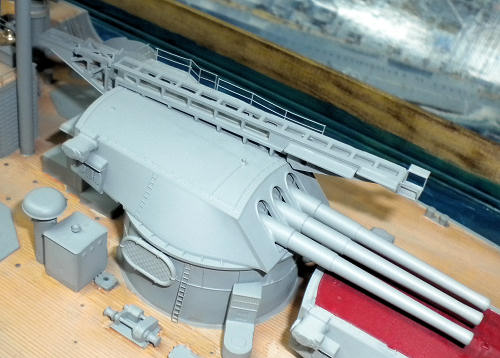
more deck houses,
directors, catapults, 5 inch AA guns (7 parts each!!) and a few boat cradles
which are also very delicate and frankly a pain in the butt to line up and frame
them without breaking the parts.
5.
Various other assemblies
worked on-
more deck houses,
directors, catapults, 5 inch AA guns (7 parts each!!) and a few boat cradles
which are also very delicate and frankly a pain in the butt to line up and frame
them without breaking the parts.
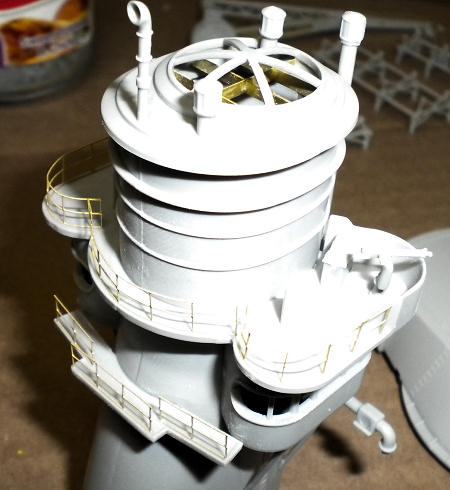
6.
Started work on the main
bridge superstructure.
Have to stop
before I get too much done so I can install PE railing.
Thanksgiving week 11/22 to 11/28
Lots of work done this week.
What struck me this week was how well all of this fit together.
I was worried about certain assemblies that always seem to cause
trouble on past
 Every
platform needed PE railing.
Getting the circular searchlight areas railed took a lot of test
fitting, bending, test fitting, bend some more…and finally CA glue.
Every
platform needed PE railing.
Getting the circular searchlight areas railed took a lot of test
fitting, bending, test fitting, bend some more…and finally CA glue.
 Another
point-
the
ladders included in Trumpeter’s extra set were nice but very flimsy-
every one required a soft touch after bending the handrails up to get
them back to being straight.
Slotting them up and into their openings requires a gentle tweezer
hand!
Another
point-
the
ladders included in Trumpeter’s extra set were nice but very flimsy-
every one required a soft touch after bending the handrails up to get
them back to being straight.
Slotting them up and into their openings requires a gentle tweezer
hand!
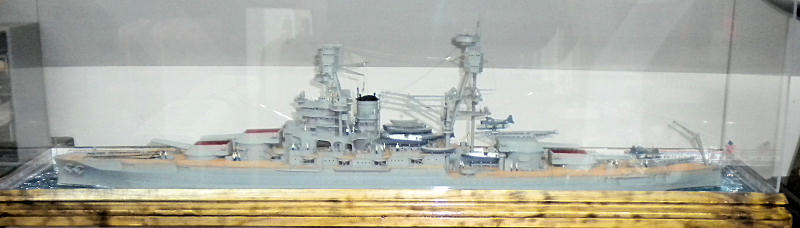
On Black Friday I was ready to attach the major sections: superstructure, stack, aft mast tripod and cranes. All went well except it took a little fiddling to get all the superstructure attach slots to stay down in their places. I had to keep a bit of pressure on the assembly and legs for a minute or two to get them to set.
With these major pieces in place, I turned to other steps.
 detail.
When that was dry I poured my new bottle of future floor wax onto the
base and let it run!
Much easier than brushing!
detail.
When that was dry I poured my new bottle of future floor wax onto the
base and let it run!
Much easier than brushing!
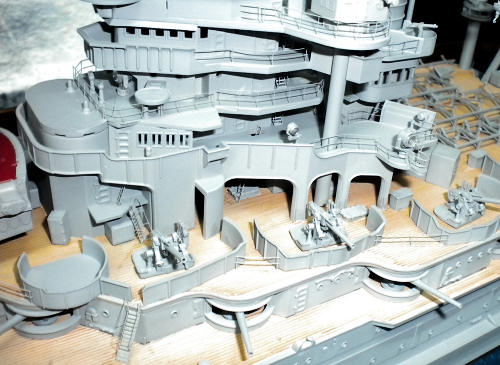
I then turned to some of the tedious assemblies I was putting off. Stuff like the boat cradles, ships boats and launches, vents, and a few other repetitive parts.
I also consulted some pics and added PE railing around the gun deck level. There was not much to do here and it went smoothly. I am leaving the railing around the main deck for last.
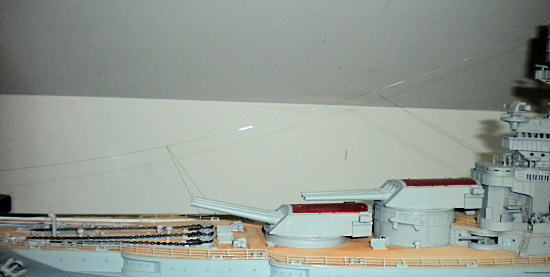
 Once
all that was done-
I glued the main turrets in place.
I had painted them earlier in the week but left them aside.
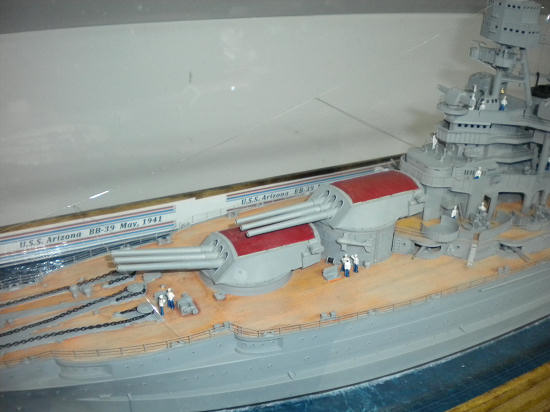
The top of turrets 1,2 and 4 were masked and sprayed red.
Each battleship division had different colors to help their aircraft
ID their ships for artillery spotting.
Since I was doing the ship in May 1941, I had to confirm whether the
turret tops were painted and I was able to verify this.
Once
all that was done-
I glued the main turrets in place.
I had painted them earlier in the week but left them aside.
The top of turrets 1,2 and 4 were masked and sprayed red.
Each battleship division had different colors to help their aircraft
ID their ships for artillery spotting.
Since I was doing the ship in May 1941, I had to confirm whether the
turret tops were painted and I was able to verify this.
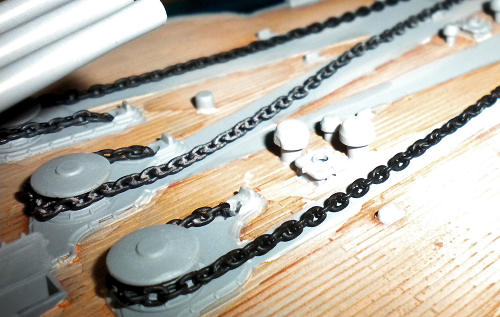 Anchors
and chain were then done-
Looks good wrapped around capstans then into hawsers.
Anchors
and chain were then done-
Looks good wrapped around capstans then into hawsers.
By later on Sunday 11/28, the ships boats were in their cradles and the only things left to assemble are the 2 Kingfishers. I also need to attach the deck edge railing all around the ship, do the rigging which I am apprehensive about, do some weathering, and paint and attach the crewmembers.
| COLORS & MARKINGS |
Some notes on what how I painted:
1. DECK: tan and radome tan mix over primer- then burnt umber wash, then pastel chalk smudging, then light sanding.
2. OVERALL STANDARD NAVY GREY- using light grey primer from Walmart! Looks very close to light grey and saved me money- I really don’t get nuts over these greys- with sun and salt water, etc- close enough is good for me…
3. STACK top was sprayed flat black.
4.
BOATS AND LAUNCHES-
could not find much info on these so I had to rely on
 other models as
well as a few B&W photos.
40’ launches looked to be the most colorful with white upper sections
over a navy blue deck-
darker grey hull.
I used Ocean Grey for the other boat hulls and used tan for the wood
sections inside the boats.
other models as
well as a few B&W photos.
40’ launches looked to be the most colorful with white upper sections
over a navy blue deck-
darker grey hull.
I used Ocean Grey for the other boat hulls and used tan for the wood
sections inside the boats.
5. BELLS ON MAST LEGS- gold
6. ANCHOR CHAIN- grey then black spray- wanted to spray rather than brush paint so the paint would not clog up inside each link.
7. SEARCHLIGHTS- primer grey with silver inside lights- clear covers look very nice.
8. DECK HOSES- touched up with light grey almost white paint.
11/29/10: Tonight’s task was to attach the
main deck PE railing all around the ship. The kit came with 2 large frets
full of 3 types of railing. The weird part is that nowhere in the
instructions does it mention the railings! Anyway, it’s not hard to figure
out which goes where and most of it is for the deck. The 2 bar railing is
used higher up the ship on the tripod mast platforms, etc. The PE is
pretty good but very thin- which looks great but is delicate to work with.
As soon as I cut it off the fret, it would start to curl! I used a dremel
sander to carefully sand down the burrs on the bottom of each piece.
Before this, all frets were sprayed with primer grey to match the hull.
I started at the stern and worked my way around.
I use a plastic toothpick to apply tiny drops to the ends where the
railing will go and in the middle. Once I get the PE piece where it should
go and those initial CA glue drops have held the piece in place, I go back and
using the toothpick, flow in more CA to anchor the whole PE piece down.
 I
try to cut and stop at bends and there were a few areas on the deck where I had
to do this. I try to use as long of a piece as I can but sometimes it’s
easy to make a mess. I would rather cut into smaller sections and be sure
I get it right.
I
try to cut and stop at bends and there were a few areas on the deck where I had
to do this. I try to use as long of a piece as I can but sometimes it’s
easy to make a mess. I would rather cut into smaller sections and be sure
I get it right.
I had no problems and it looks good- I will have
to go back over and touch up the paint - some brass always peaks through
when cutting and sanding!
Next up is rigging- which will take some thought
as to materials and planning. Then crew figures which I need more of ,
then touch up, then a bit of weathering…
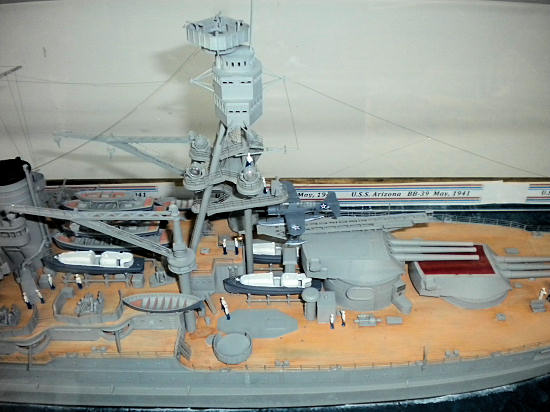
11/30/10: Tonight I decided to tackle the ships
Kingfisher aircraft. I saw another modeler’s enhancements to these
aircraft and decided to emulate him as best I could. These enhancements
included adding a radio mast and aerial wire to tail and adding extra bracing to
floats. These sprues are all clear plastic which helps with painting.
They were easy to assemble. My research was able to turn up a few options
for markings. I was able to confirm that by May 1941, the time I am
portraying the ship, the colorful yellow wings and red tails were long gone from
the float planes. I found a few pics that show an overall light grey
scheme was used sometime in early to mid-1941. I decided to go with the
standard blue over grey color to give some added color. The planes were
sprayed flat white
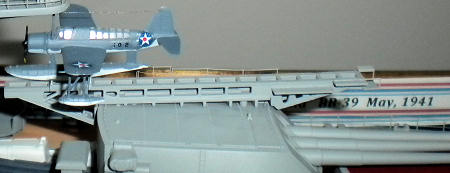 underside
then carefully brush painted Intermediate Blue topsides. Basic decals went
on easily. It was a bit finicky to get the stretched sprue braces and
radio mast added. Then a steel wire aerial was cut to size and CA glued.
I think this is a nice touch! Black prop and yellow tips completed each.
They fit quite tightly onto their launching cradles atop turret 3 and on the
stern catapult. Arizona carried 3 Kingfishers- I wish Trumpeter
would have included the third.
underside
then carefully brush painted Intermediate Blue topsides. Basic decals went
on easily. It was a bit finicky to get the stretched sprue braces and
radio mast added. Then a steel wire aerial was cut to size and CA glued.
I think this is a nice touch! Black prop and yellow tips completed each.
They fit quite tightly onto their launching cradles atop turret 3 and on the
stern catapult. Arizona carried 3 Kingfishers- I wish Trumpeter
would have included the third.
12/4/10: Rigging…Trumpeter included nothing on
rigging so the modeler is forced to turn to other sources. I had
accumulated quite a trove of photos so I have a decent idea of what to do.
My main concern was attachment points and how best to anchor and secure the
lines. I planned to use fine steel wire because it would have a mice
amount of sag in look quite realistic. I went over my friend Gene Madara’s
house Saturday morning for a consultation. In 2010, Gene had finished the
1/350 Academy Graf Spee and did a fantastic job on the rigging so I thought I
could pick his brain.
 We
decided to drill a few tiny holes for the longest lines- in the fighting
tops and stack for example. This would allow me to insert the end of the
wire, give it a bend if needed and with a drop of super glue, provide a pretty
strong anchor. The other concern was securing the wire to itself in a few
places. The idea here was to use clear flat droplets- this provided
a tiny pulley-like blob and allowed a bit of fiddle room unlike a drop of CA
glue. That night, I sat down and had at it. The pilot holes
were a great help and the natural droop of the lines look just right. I’m
sure I missed some lines but what was done I think looks very good. I
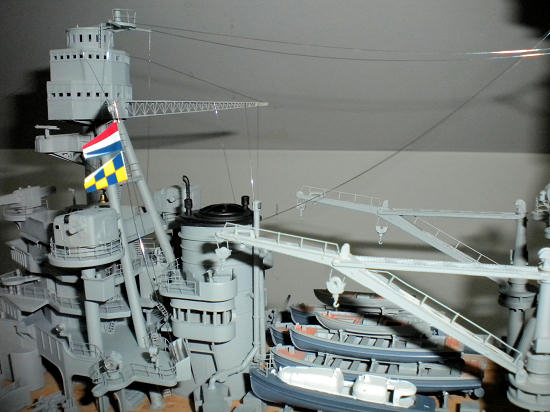
attached the stern US flag with a tiny piece of foil sandwiched between the
decal. I topped it off by attaching 2 signal flags- one for
FORMATION and one for DEPLOY….made sense to me!
We
decided to drill a few tiny holes for the longest lines- in the fighting
tops and stack for example. This would allow me to insert the end of the
wire, give it a bend if needed and with a drop of super glue, provide a pretty
strong anchor. The other concern was securing the wire to itself in a few
places. The idea here was to use clear flat droplets- this provided
a tiny pulley-like blob and allowed a bit of fiddle room unlike a drop of CA
glue. That night, I sat down and had at it. The pilot holes
were a great help and the natural droop of the lines look just right. I’m
sure I missed some lines but what was done I think looks very good. I
attached the stern US flag with a tiny piece of foil sandwiched between the
decal. I topped it off by attaching 2 signal flags- one for
FORMATION and one for DEPLOY….made sense to me!
12/5/10: Crew Figures: Trumpeter included
4 soft vinyl frets of crew figures in 3 poses. I cut them all off, stuck
them on piece of wood with tape and sprayed them flat white. I will use
blue for jeans and touch up with black for shoes and a cream color for face
 and
hands.
and
hands.
12/4/10: Rigging…Trumpeter included nothing on
rigging so the modeler is forced to turn to other sources. I had
accumulated quite a trove of photos so I have a decent idea of what to do.
My main concern was attachment points and how best to anchor and secure the
lines. I planned to use fine steel wire because it would have a mice
amount of sag in look quite realistic. I went over my friend Gene Madara’s
house Saturday morning for a consultation. In 2010, Gene had finished the
1/350 Academy Graf Spee and did a fantastic job on the rigging so I thought I
could pick his brain. We decided to drill a few tiny holes for the longest
lines- in the fighting tops and stack for example. This would allow
me to insert the end of the wire, give it a bend if needed and with a drop of
super glue, provide a pretty strong anchor. The other concern was securing
the wire to itself in a few places. The idea here was to use clear flat
droplets- this provided a tiny pulley-like blob and allowed a bit of
fiddle room unlike a drop of CA glue. That night, I sat down and had
at it. The pilot holes were a great help and the natural droop of the
lines look just right. I’m sure I missed some lines but what was done I
think looks very good. I attached the stern US flag with a tiny piece of
foil sandwiched between the decal. I topped it off by attaching 2 signal
flags- one for FORMATION and one for DEPLOY….made sense to me!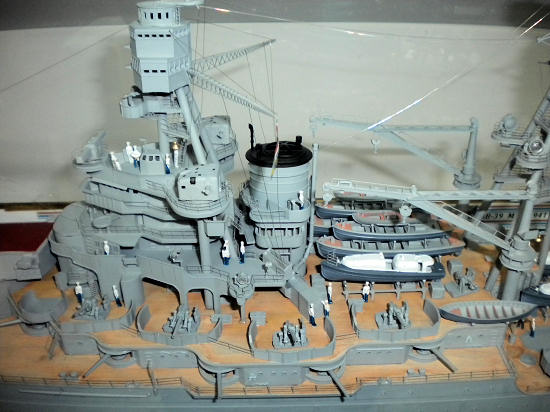
12/5/10: Crew Figures: Trumpeter included
4 soft vinyl frets of crew figures in 3 poses. I cut them all off, stuck
them on piece of wood with tape and sprayed them flat white. I will use
blue for jeans and touch up with black for shoes and a cream color for face and
hands.
12/7/10: painted the crew- sprayed all
flat white then painted dark blue on most for denim color. Left a few all
white- officers ya know. Dabbed faces and hands with a cream color
and also tried to add black and brown hair spots as well.
12/8/10: My display
case arrived safe and sound. Got a pretty good deal from
www.casesforcollectibles.com - $180 delivered
using 1/8 inch acrylic. It slots down perfectly over my base. I also
CA glued the crew figures in various spots around the model.
For now, unless I get more crew figures…she is done...
| CONCLUSIONS |
NITS TO PICK:
1.
Arizona carried 3
Kingfishers- why include only 2?
2.
Crew Figures- need
more and more poses as well.
3.
Would have been nice to
include a rigging diagram
4.
Would have been really nice
to show the modeler where to attach PE railings which are included in the kit.
| REFERENCES |
http://en.wikipedia.org
If you would like your product reviewed fairly and quickly, please
contact
me or see other details in the
Note to
Contributors.