| KIT #: | 1030 |
| PRICE: | $40.00 or so |
| DECALS: | One option |
| REVIEWER: | Frank Spahr |
| NOTES: | Includes photo etch parts |
| THE KIT |
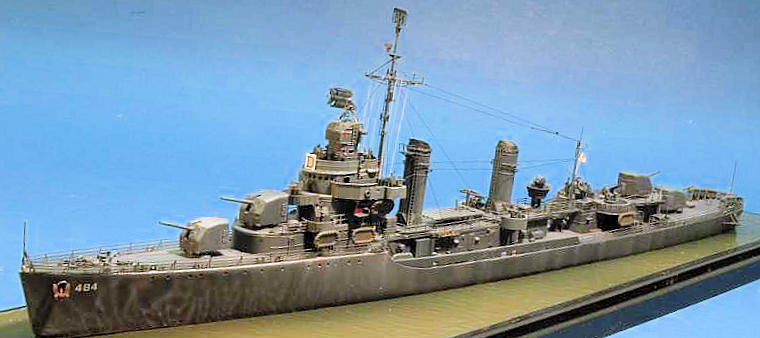
I would like to refer to the preview of the original kit available in these pages. This boxing is the late war version with modified AA and a tiny figure of Gen. MacArthur added, because this ship carried the General to the USS Missouri for the Japanese surrender ceremony. This kit is every bit as detailed and sophisticated as the original boxing.
| CONSTRUCTION |
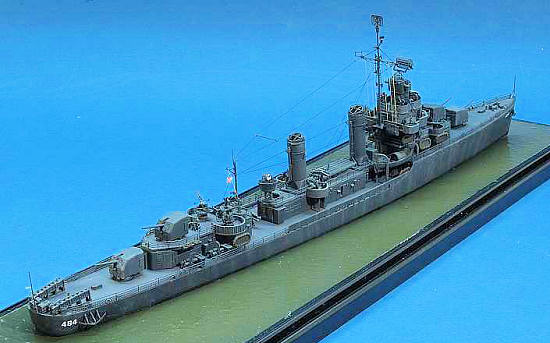
I wanted to depict Buchanan on the
historic day in September, 1945, slowly steaming through the muddy waters of
Tokyo Bay with the General occupying a prominent position and a lot of the crew
visible. So obviously I haven´t come this far yet, as I am still waiting for
affordable figures of good quality (any manufacturer listening here?)
 The base
was made in my usual method, applying wall paint to the Trumpeter display box
using a large brush so that the surface is slightly irregular, then spraying
acrylics to the desired hue, and then sealing with clear gloss lacquer.
The base
was made in my usual method, applying wall paint to the Trumpeter display box
using a large brush so that the surface is slightly irregular, then spraying
acrylics to the desired hue, and then sealing with clear gloss lacquer.
The ship needed hardly any
modifications, as the kit is truly one of the best ship kits around. I bought
the GMM PE set as it seems to be superior to Cyberhobby´s own set; not
everything was used, but I sure gave each choice some thoughts. The hull was
modified as the demarcation between upper and lower hull seems to be right at
the top end of the boot topping, and I wanted to
 show a
bit of it. Hence, 1 mm styrene was glued to the hull, trimmed and sanded. Four
screws were placed through holes drilled through the hull´s bottom and the base,
and secured with resin. The screws were ideal for fixing the model in my vise
and will finally secure it to the base. Sadly, despite all care, the base isn´t
entirely flat, so there is a gap between the bow and the base. It´ll be filled
with acrylig gel upon final construction.
show a
bit of it. Hence, 1 mm styrene was glued to the hull, trimmed and sanded. Four
screws were placed through holes drilled through the hull´s bottom and the base,
and secured with resin. The screws were ideal for fixing the model in my vise
and will finally secure it to the base. Sadly, despite all care, the base isn´t
entirely flat, so there is a gap between the bow and the base. It´ll be filled
with acrylig gel upon final construction.
The rest of the construction followed
the instructions, with most assemblies save one deck house fitting very well.
Even though I used the rather bland Ms. 21 overall blue scheme, I had to paint
before completing assembly, if only for the anti-skid area decals, which worked
so-so but yielded to Micro Sol and some careful cutting open of bubbles.
Despite the excellent kit, building
it took its time, and my motivation wasn´t always at its top. I often wondered
about it and upon discussing the experience with my friends, have this theory:
This kit is so perfect it doesn´t need much creativity and initiative. Instead,
you really
 need
to follow a very long list of tasks to be performed to specs, and you´ll end up
with a fine result. And that sounded a bit too much like work to me. I have the
deepest respect for Tim Dike and the Dragon engineers, and obviously upon seeing
the company´s latest releases, they produc
need
to follow a very long list of tasks to be performed to specs, and you´ll end up
with a fine result. And that sounded a bit too much like work to me. I have the
deepest respect for Tim Dike and the Dragon engineers, and obviously upon seeing
the company´s latest releases, they produc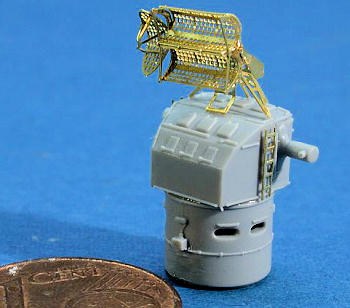 e
the finest ship model kits in injected plastic ever; but my personal rather
playful attitude feels more comfortable sawing and hacking merrily away at some
old kit.
e
the finest ship model kits in injected plastic ever; but my personal rather
playful attitude feels more comfortable sawing and hacking merrily away at some
old kit.
So it was quite some while that USS
Buchanan sat on my bench, with some parts being added here and there. The many
subassemblies simply take time and need consistent commitment to look OK, so I
saw no sense in hurrying through. So I built the various gun turrets, directors,
and the many AA guns using a mix of kit parts and GMM PE. The masts were
replaced with turned brass items as they needed to stand the strain of the
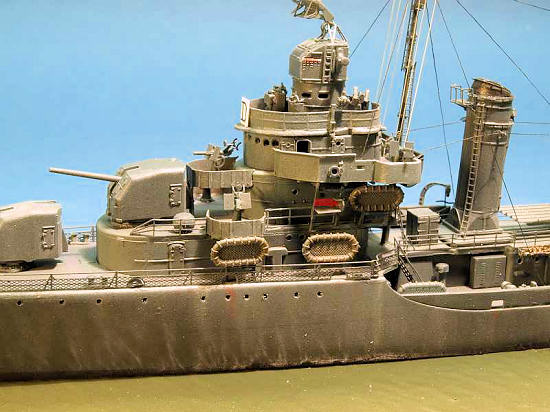
rigging. The bridge windows were drilled open, one of the very few modifications
I undertook. Something I really appreciate about the kit´s design is that many
fittings are provided as extra parts and not molded integral to the decks or
superstructures – this eases painting a lot as you can
 pre-paint
and then assemble and save a lot of tedious masking.
pre-paint
and then assemble and save a lot of tedious masking.
The most fun part of the project was
painting the kit and bringing the monochrome scheme to life. I used oil paints
in various manners of application and in various mixes of white, black, grey and
blue. In the end, I was quite satisfied with the outcome.
The model was rigged using
After everything came together, the
model was given a flat coat and screwed to the base. Now it is waiting for a
crew for the time being.
| CONCLUSIONS |
 An
excellent kit, especially in conjunction with the GMM set. Anyone being patient
and committed enough will be very happy with it and end up with a credible model
of this proud warship!
An
excellent kit, especially in conjunction with the GMM set. Anyone being patient
and committed enough will be very happy with it and end up with a credible model
of this proud warship!
August 2010
If you would like your product reviewed fairly and quickly, please contact me or see other details in the Note to Contributors.