| KIT #: | 05744 |
| PRICE: | @ 20 € in Germany |
| DECALS: | one option |
| REVIEWER: | Frank Spahr |
| NOTES: |
| HISTORY |
The last class of USN heavy cruisers
to follow the specifications of the Washington Naval Treaty, the seven vessels
of the New Orleans class embodied the inevitable compromises necessitated by
designing to a tonnage limit. Nonetheless, every new ship in the class received
some improvements as they became available -
and they would need all they could get. Completed in the mid-1930ies,
these vessels bore the brunt of fighting in the early years of war in the
Pacific. Three of the seven vessels in the class were lost in the Battle of Savo
Island, three others survived catastrophic battle damage due to excellent damage
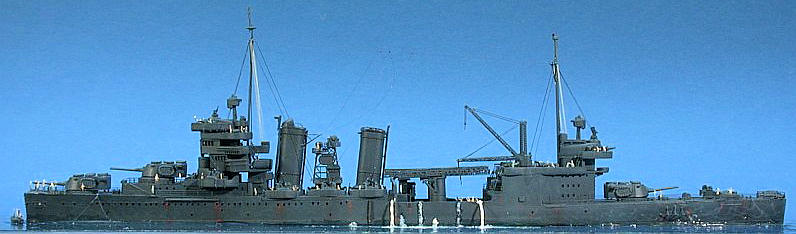
control and the bravery of their crews. USS Minneapolis at Tassafaronga
The succession of naval engagements
during the campaign for Guadalcanal 1942/43 was every bit as fierce and costly
as the fighting on the island. The sound between Guadalcanal´s north coast and
the islands of Savo and Florida was duly named Ironbottom Sound after the
numerous vessels lost there during the campaign.
Wikipedia has a most informative map
of the area listing the wrecks:
http://upload.wikimedia.org/wikipedia/commons/2/2a/Wrecks_in_the_Ironbottom_Sound.jpg
 You will find USS Minneapolis
listed there, and this is correct, as part of her still rests off Tulagi,
and is accessible to divers. Minneapolis belonged to TF 67 under Adm.
Carleton H. Wright, deployed into Ironbottom Sound on the night of 30 November,
1942. This force consisted of five cruisers and four destroyers, equipped with
radar and made aware by Allied intelligence that a Japanese supply convoy was
expected for that night.
You will find USS Minneapolis
listed there, and this is correct, as part of her still rests off Tulagi,
and is accessible to divers. Minneapolis belonged to TF 67 under Adm.
Carleton H. Wright, deployed into Ironbottom Sound on the night of 30 November,
1942. This force consisted of five cruisers and four destroyers, equipped with
radar and made aware by Allied intelligence that a Japanese supply convoy was
expected for that night.
The Japanese on Guadalcanal
experienced a serious supply crisis at the time. They resorted to convoys of
destroyers making nighttime round trips from their base at the Shortlands to
Guadalcanal and back, in order to avoid daytime
attacks by Allied planes based on Guadalcanal (the legendary CAF or
Cactus Air Force). That night, six destroyers towing oil drums filled with
urgent supplies took the trip, with two more destroyers escorting them. The oil
drums were to be cut loose off Guadalcanal and be retrieved by swimmers or small
craft.
The superior US force detected the
Japanese convoy with radar and prepared to engage them. Only six minutes later,
the Japanese visually detected the US ships and also prepared for battle.
Excellent optical equipment and expertly trained personnel sometimes made up for
the Japanese lack of radar in nighttime engagements. In the ensuing battle, the
US ships used both guns and torpedoes, whereas the Japanese solely relied on
their excellent Long Lance torpedoes, of which 44 were launched. The US ships
quickly sunk the nearest Japanese destroyer Takanami by gunfire, but the
24 US torpedoes either missed or malfunctioned.
The Japanese ships retreated a little
later after searching for the stricken Takanami; in the meantime, their
torpedoes wreaked havoc in the US line. In all, four cruisers were hit, with one
of them (Northampton) lost. New Orleans was hit by a torpedo near
her #1 turret. The catastrophic explosion of both the forward magazine and the
aviation fuel store severed her bow right at #2 turret´s barbette, killing
everybody in both front turrets and ahead of that point, all in all 183 men.
Pensacola lost 125 men after a torpedo hit her abreast her main mast.
Listing and burning and with her port drive shaft gone, she was also out of the
battle. Minneapolis received two torpedoes. Hitting her bow a bit ahead
from the point of impact on New Orleans, the explosion was slightly less
devastating, nonetheless 37 of her crew perished. Her bow collapsed and folded
down at an angle of 70°. A second torpedo hit
 her amidships,
knocking out three
of her four boiler rooms and leaving her dead in the water.
her amidships,
knocking out three
of her four boiler rooms and leaving her dead in the water.
As mentioned above, only utmost
bravery and excellent damage control work saved the three cruisers.
Minneapolis was towed to the nearby PT boat base of Tulagi on the coast of
Florida Island and moored there. Getting her away from this extremely dangerous
location was paramount, so emergency repairs were carried out immediately,
assisted by Tulagi ´s Seabees. The ship was camouflaged with palm fronds,
her folded bow was cut away and left to sink at the anchorage, where it remains
to this day. The open cross section of her bow right ahead of the chainpipes was
provisionally closed with steel girders and sections of palm trees. These
emergency repairs completed, she was withdrawn from the frontline. After her bow
had been plated over in a more orthodox manner, she sailed across the Pacific to
Pearl Harbour, where a new bow was fitted. From there she proceeded to Mare
Island Naval Yard for further repairs and a thorough refit.
By August, 1943 she returned to the front line and participated in virtually all major naval engagements that followed, including the Battle of the Philippine Sea, Guam, the Battle of Surigao Strait and the Okinawa campaign. After having her gun barrels relined at Bremerton Navy Yard in April 1945, she returned to the war zone. Minneapolis was the site of the surrender of Japanese forces in Korea; after the war, she took part in Operation Magic Carpet. In 1946, she was placed in reserve, the year after she was decommissioned finally. She was scrapped in 1959.
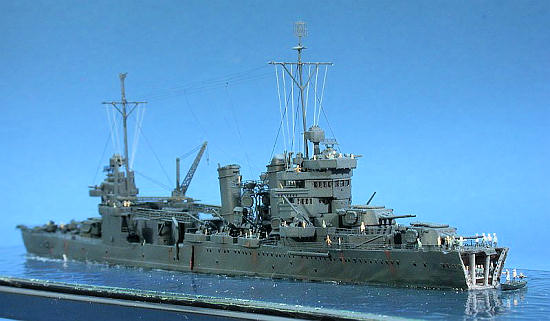
| THE KIT |
Trumpeter has produced several kits
of this class, both in 1:350 and 1:700. I have several of the small scale kits
and have compared them. They are so designed as to represent the individual
vessel rather accurately, with different main turrets, superstructures, boat and
float fits and the like. This kit is finely molded with credible detail in
Trumpeter´s usual way with a waterline plate and optional lower hull. Deck
planking detail is obviously exaggerated, yet looks correct nonetheless. We
should always bear in mind that a kit should primarily look right when viewed in
real life with the naked eye. Hence most close ups of 1:700 kits will look
disappointing, with imperfections showing up and effects overdone – at least as
far as my models are concerned ;-)
 The two float planes are molded in
clear styrene, not a favorite of mine and not really necessary with planes with
open cockpits. Frankly speaking, using brittle clear styrene for planes in that
scale makes little or no sense to me. I´d rather simulate a closed canopy with a
drop of white glue or just paint it.
The two float planes are molded in
clear styrene, not a favorite of mine and not really necessary with planes with
open cockpits. Frankly speaking, using brittle clear styrene for planes in that
scale makes little or no sense to me. I´d rather simulate a closed canopy with a
drop of white glue or just paint it.
The decals are nicely made yet do not
contain enough national insignia for the planes. The instructions in the usual
concise and clear Trumpeter style lack a decal placement guide for the planes.
The ridiculous idea of attaching the lower hull only in the last construction
step is present again – if you should build full hull, don´t even think about
following that sequence.
I bought the very finely detailed WEM
PE set for the class of ships, containing oodles of hyper-gossamery parts
designed for all the ships of the class in their various refits. It looks to me
like at least partly scaled down
from their 1:350 set, and many of the parts take very capable and very patient
modelers to be assembled successfully. There is an older yet updated GMM set
which is less detailed but may be easier to handle from the looks of it. Apart
from the PE set, I bought machined brass barrels from BMK for the main
artillery, and resin 5“/25 DP mounts from Loose Cannon, which are a bit finer
detailed than the kit parts but seem to be not the correct version of the
weapon. I of course only learned that after gluing them to the model –
where else would be the fun of it?
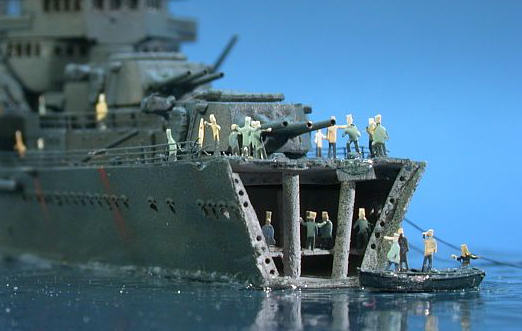
The dio idea
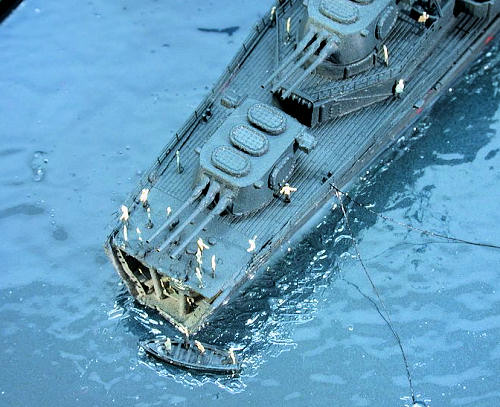
In researching this ship online, I happened upon several images of Minneapolis after the severe damage sustained at Tassafaronga. A friend scanned some more images from the Squadron book on US Heavy Cruisers for me, amongst them one showing crewmen standing inside the open cross section of the vessel after cutting away the bow. I soon decided I would try to depict this scene.
| CONSTRUCTION |
I started by determining where to
make the cut, orienting myself on the locations of the chainpipes. Hence, both
the deck and hull were sawed at this point. The styrene was then thinned with a
rotary tool to arrive at credible thickness. The plastic was then bent
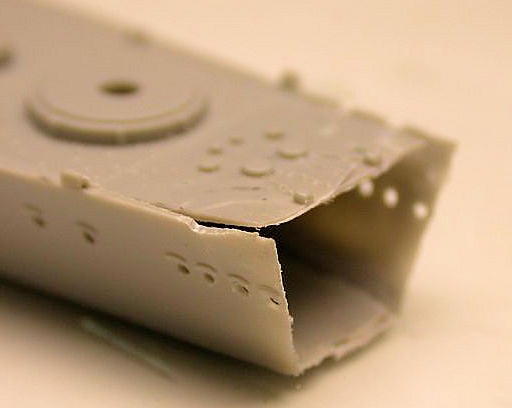 a bit.
The scuttles in that area were drilled open. Following the images, I built some
sort of interior from styrene and PE stock. Both L´Arsénal and Lion Roar offer
pretty useful structural parts for tasks like this. The PE was annealed to
resemble the bent and damaged look. The inside of the ship was then sprayed a
light grey.
a bit.
The scuttles in that area were drilled open. Following the images, I built some
sort of interior from styrene and PE stock. Both L´Arsénal and Lion Roar offer
pretty useful structural parts for tasks like this. The PE was annealed to
resemble the bent and damaged look. The inside of the ship was then sprayed a
light grey.
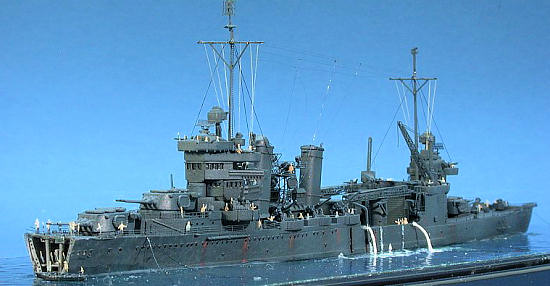
The images showed the vessel with a
slightly
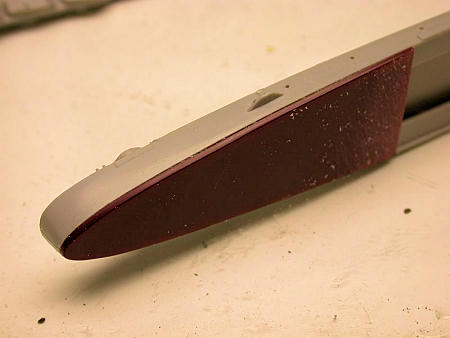 deeper draught at the bow, less than when the bow was still attached
but still noticeable. So I sawed the waterline plate two inches from the stern
and glued only this part to the hull. Square styrene stock was added ahead of
that, and the whole assembly was carefully sanded to a taper. Hence the stern
would stick out just a little.
deeper draught at the bow, less than when the bow was still attached
but still noticeable. So I sawed the waterline plate two inches from the stern
and glued only this part to the hull. Square styrene stock was added ahead of
that, and the whole assembly was carefully sanded to a taper. Hence the stern
would stick out just a little.
At this step, the base was prepared.
Using a standard Trumpeter display case, I applied coloured wall paint with a
large brush in a stippling motion after masking the borders. That resulted in
the desired slightly irregular surface. After letting the paint dry thoroughly
and sketching the vessel´s outline with a pencil, I sprayed the base in the
desired shade. I started with a rich blue and applied darker shades where I
assumed oil was leaking from the ship. After again letting the paint dry
thoroughly, I sealed the surface with several layers of solvent-based clear
gloss from a hardware supermarket rattle can. That resulted in a nice and rather
credible surface.
 Further assembly of the kit went
well, hardly any filler was needed. The usual task of cross-checking kit and PE
instructions complicated things a little, even though I marked all the
constructions steps pertinent t
Further assembly of the kit went
well, hardly any filler was needed. The usual task of cross-checking kit and PE
instructions complicated things a little, even though I marked all the
constructions steps pertinent t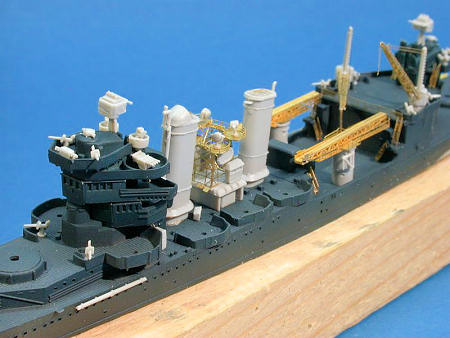 o my vessel in the PE instructions. The PE turned
out to be a veritable bugbear, with several parts simply beyond my skills, so I
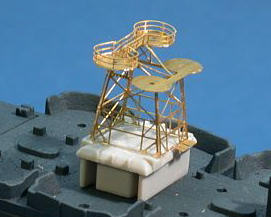
ended up using most of the kit AA. I fought my way through the most visible PE
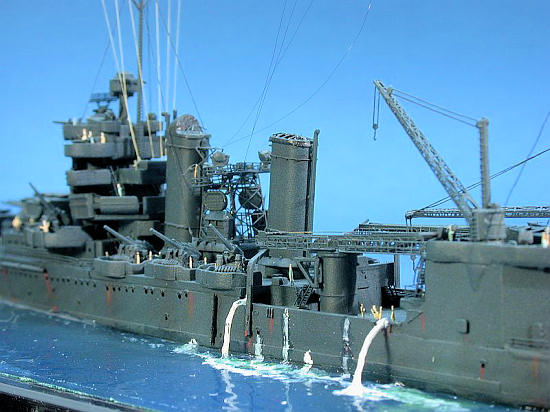
assemblies, namely the searchlight tower, the cranes and the catapults. The
latter almost gave me fits, as they are very, very iffy to construct and glue,
and I found the interior part with the machinery too high to fit with the
framework all around. The surrounding platforms with the gossamery railings also
taxed my skills and patience a lot. I was very happy when I called it quits and
attached the parts to the pre-painted hull. This is a serious case of YMMV – you
might like this PE much better than I did!
o my vessel in the PE instructions. The PE turned
out to be a veritable bugbear, with several parts simply beyond my skills, so I
ended up using most of the kit AA. I fought my way through the most visible PE
assemblies, namely the searchlight tower, the cranes and the catapults. The
latter almost gave me fits, as they are very, very iffy to construct and glue,
and I found the interior part with the machinery too high to fit with the
framework all around. The surrounding platforms with the gossamery railings also
taxed my skills and patience a lot. I was very happy when I called it quits and
attached the parts to the pre-painted hull. This is a serious case of YMMV – you
might like this PE much better than I did!
| COLORS & MARKINGS |
At the time, Minneapolis was painted in the rather bland scheme of Ms. 21, 5-N Navy Blue on all vertical surfaces and 20-B Deck Blue on the horizontal ones. That eased painting as I didn´t need to mask a thing, but it took some shading and washing and drybrushing to bring it to life. I used Vallejo acrylics as I couldn´t lay my hands on dedicated naval camouflage acrylic paints. For the washes, I used Humbrol thinners and artist´s oils.
| FINAL CONSTRUCTION |
The masts were substituted with
machined and tapered brass items from BMK, for the yards thin brass wire was
used. They were glued with CA glue. Having attached almost all the subassemblies
(I had painted the turrets and DP guns separately), I sprayed the vessel and
then completed the process of accentuating and weathering. Acrylics do a lot to
speed up a build, as they are almost immediately dry and ready for the next
step.
 I still have a fairly big number of
1:700 Lion Roar PE figures I painted for our Liverpool docks diorama but didn´t
use at the time; some of them were repainted and spread across the vessel, with
a number around the damaged bow, some on the superstructure, around the guns and
so on. When that was done, I applied Xtracrylix satin varnish to the model to
seal the paintjob and hide any glue spots.
I still have a fairly big number of
1:700 Lion Roar PE figures I painted for our Liverpool docks diorama but didn´t
use at the time; some of them were repainted and spread across the vessel, with
a number around the damaged bow, some on the superstructure, around the guns and
so on. When that was done, I applied Xtracrylix satin varnish to the model to
seal the paintjob and hide any glue spots.
Rigging a ship is always a very
tedious subject for me. I used tan stretched sprue for the signal halyards; it
was trimmed and glued with liquid plastic glue. The stays were made from
After touching up the inevitable
shiny glue spots with satin coat, I attached the model to the base using
artist´s heavy clear gloss acrylic gel, applied with spatulas and brushes.
Although it takes a long time to dry if applied in heavier layers, it works fine
nonetheless. The water spouts from the pumping going on amidships were made from
stretched clear sprue and acrylic gel, painted with white artist´s oil paint
after curing. The mooring lines are also 8/0
| CONCLUSIONS |
 Despite the serious amounts of bad
karma emanating from the kit while working on it, I´m pretty happy with the end
result. I would consider trying GMM´s plainer and simpler PE set if I built
another kit of this class, though, as I´m afraid that would better fit my
skills. As I pointed out above, your experience might be a lot more positive
than mine!
Despite the serious amounts of bad
karma emanating from the kit while working on it, I´m pretty happy with the end
result. I would consider trying GMM´s plainer and simpler PE set if I built
another kit of this class, though, as I´m afraid that would better fit my
skills. As I pointed out above, your experience might be a lot more positive
than mine!
December 2009
If you would like your product reviewed fairly and quickly, please contact me or see other details in the Note to Contributors.