Revell 1/400 T2 Tanker
| KIT #: | 05221 |
| PRICE: | $ |
| DECALS: | |
| REVIEWER: | Frank Spahr |
| NOTES: | Considerable additional work and bits required. |
| HISTORY |
 Editor's note: Frank recommended that I treat
this as two parts and frankly (no pun intended), I thought it a good idea so
here is the second part.
Editor's note: Frank recommended that I treat
this as two parts and frankly (no pun intended), I thought it a good idea so
here is the second part.
I have a deep-seated weakness for old model kits. Not necessarily for any old clunker, but I do enjoy the challenge of making something hopefully better and more detailed from a simple base. Add to that the limited availability of certain subjects in kit form. Quite often an old kit is (yet) the only game in town, if you want a model of a certain subject.
| THE KIT |
 I had built the historic Revell T2 kit before, and
knew what to expect. It is box scale, but about 1:400ish in scale. Its hull has
a flat bottom, no props and only a hint of a rudder. Well, that didn´t matter a
lot. More painful was the kit design with its thick molded-on railings, and the
superstructure parts meeting right at the portholes, with each deck level having
half of a porthole and a nasty big seam running around each deck level.
I had built the historic Revell T2 kit before, and
knew what to expect. It is box scale, but about 1:400ish in scale. Its hull has
a flat bottom, no props and only a hint of a rudder. Well, that didn´t matter a
lot. More painful was the kit design with its thick molded-on railings, and the
superstructure parts meeting right at the portholes, with each deck level having
half of a porthole and a nasty big seam running around each deck level.
| CONSTRUCTION |
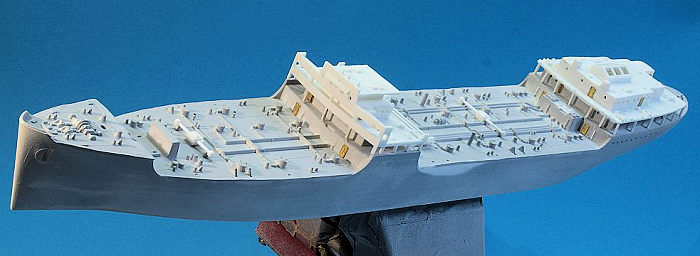
 So construction began with using the hull to
produce the two bases, the common and the individual one. Then it was a lot of
chopping, sawing, grinding, sanding, filling and sanding, until all the
offending railings were gone.
So construction began with using the hull to
produce the two bases, the common and the individual one. Then it was a lot of
chopping, sawing, grinding, sanding, filling and sanding, until all the
offending railings were gone.
A big problem was what to build at all. Should I
represent an individual vessel, and in which fit? I sifted through oodles of
websites on T2 tankers, saw how heavily armed these vessel had been, and was
amazed at what else the ships had transported on extensive frameworks over their
decks. Loads of cargo, vehicles of all descriptions, boats, PT boats, aircraft –
you name it. The weapons fit also differed widely. In the end I decided to b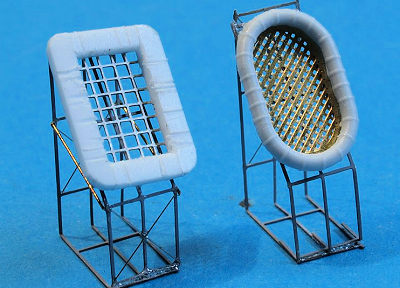 uild
a generic, nameless vessel, and to add some cargo framework, but not to overdo
it. So again I ordered with L´Arsénal to get the guns I needed, and some
directors. Some gun emplacements would be usable from the kit, albeit thinned
out. Quite a lot would need scratchbuilding. So I built a number of circular
emplacements of varying diameters, using discs of sheet styrene and bulwarks
made from CA-infused paper.
uild
a generic, nameless vessel, and to add some cargo framework, but not to overdo
it. So again I ordered with L´Arsénal to get the guns I needed, and some
directors. Some gun emplacements would be usable from the kit, albeit thinned
out. Quite a lot would need scratchbuilding. So I built a number of circular
emplacements of varying diameters, using discs of sheet styrene and bulwarks
made from CA-infused paper.
A quite visible feature of these vessels were huge racks for large liferafts. I scratchbuilt both the racks and the rafts using scrap PE, styrene stock and PE mesh.
The vessel´s masts were detailed and more added from metal, plus additional cargo booms.
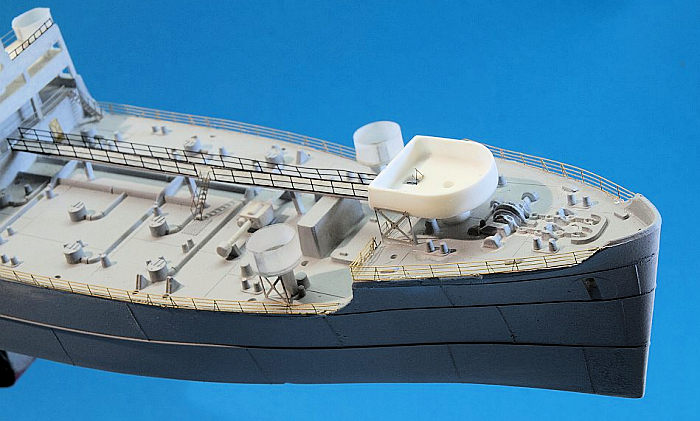
The long central raised walkways were scratchbuilt and extended to the cargo frames erected over the vessel´s deck.
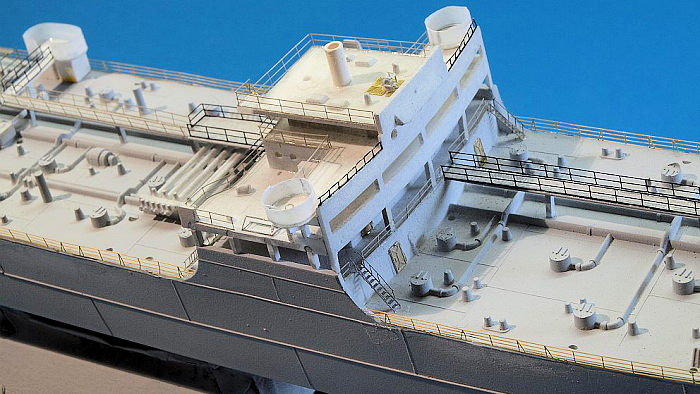
 In the superstructure, the seams were addressed to
the best of my limited abilities. PE doors and some other details were added.
The large skylight above the engine room received framing from PE railings. Some
floater net baskets were added. All the molded-on inclined aldders were removed
and replaced with generic PE items. The numerous deck supports were rebuilt from
styrene stock. On the open bridge, the steering position was detailed with PE
gratings and some styrene items.
In the superstructure, the seams were addressed to
the best of my limited abilities. PE doors and some other details were added.
The large skylight above the engine room received framing from PE railings. Some
floater net baskets were added. All the molded-on inclined aldders were removed
and replaced with generic PE items. The numerous deck supports were rebuilt from
styrene stock. On the open bridge, the steering position was detailed with PE
gratings and some styrene items.
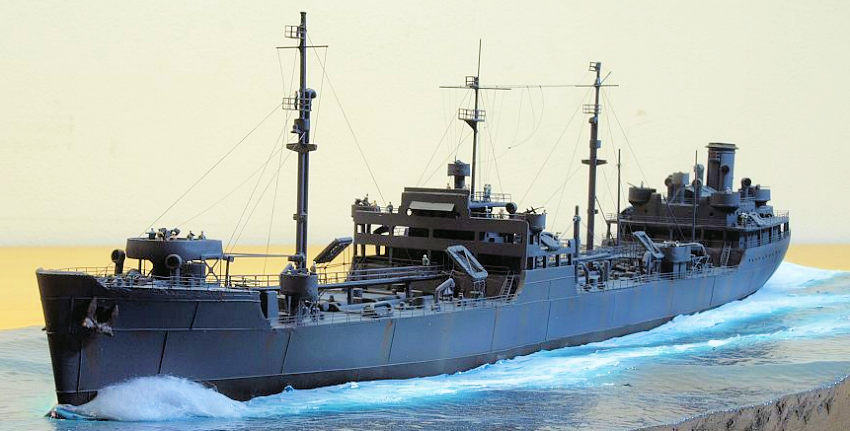
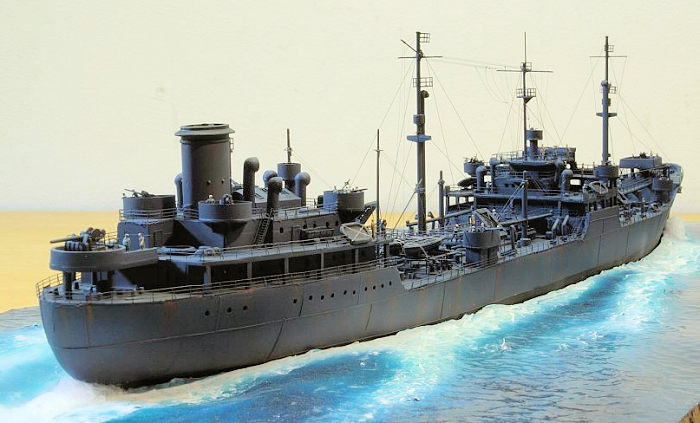
On the hull, I decided to enhance the hull plating. I sanded off the molded-on detail and replaced it by pieces of stretched sprue glued with Tamiya Extra Thin cement. That added several hours of work but improved the look of the vessel a lot, even though I know this detail is woefully out of scale.
| COLORS & MARKINGS |
After quite some time, things got together. As the
paint scheme was a simple Ms. 21, I added all the railings prior to painting.
With all the subassemblies done, I started painting with priming all the parts.
The hu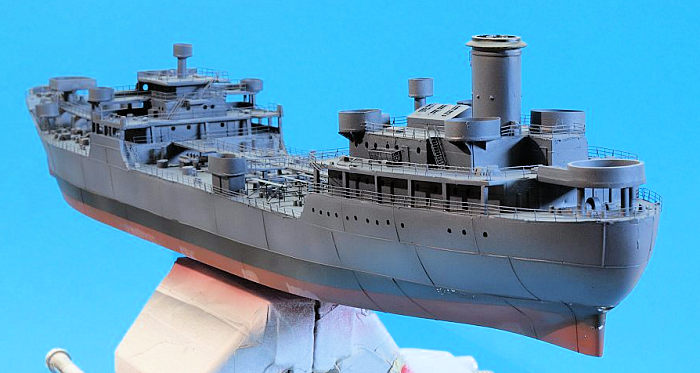 ll was then sprayed dark grey for the boot topping and the welding seams,
a kind of preshading for the latter. The boot topping was then masked off and
the lower hull sprayed hull red. That masked, the rest of the vessel was sprayed
in the selfsame three shades of blue and grey as the carrier to achieve a
pleasing and varied effect.
ll was then sprayed dark grey for the boot topping and the welding seams,
a kind of preshading for the latter. The boot topping was then masked off and
the lower hull sprayed hull red. That masked, the rest of the vessel was sprayed
in the selfsame three shades of blue and grey as the carrier to achieve a
pleasing and varied effect.
With the tanker, I did more weathering and application of rust, quite enjoying the process. That done, I started adding the numerous subassemblies until all were attached. Some cargo was placed on the frames, but not much. A number of crew figures livened things up on the vessel, this time they were oriented towards the carrier. Quite more rigging than for the carrier and a final flat coat completed the project.
| CONCLUSIONS |
I was quite happy with the outcome when I placed both vessels on their common base and viewed them from all angles.
Nonetheless, I´m quite happy with a number of smaller projects for the time being, thank you very much for asking.
10 October 2017
Copyright ModelingMadness.com
If you would like your product reviewed fairly and
fairly quickly, please
contact
the editor
or see other details in the
Note to
Contributors.
Back to the Main Page
Back to the Review
Index Page
Back to the Previews Index Page