Componenets:(all Tamyia 1/35)
Pak 40 Anti-Tank gun (TAM35047) $8.00
Sand Bag set (TAM35025) $4.10
German Soldiers at Rest (TAM35212) $10.00
German WWII Small Arms set (TAM35111) $4.10
Livestock set (TAM35128) $6.25
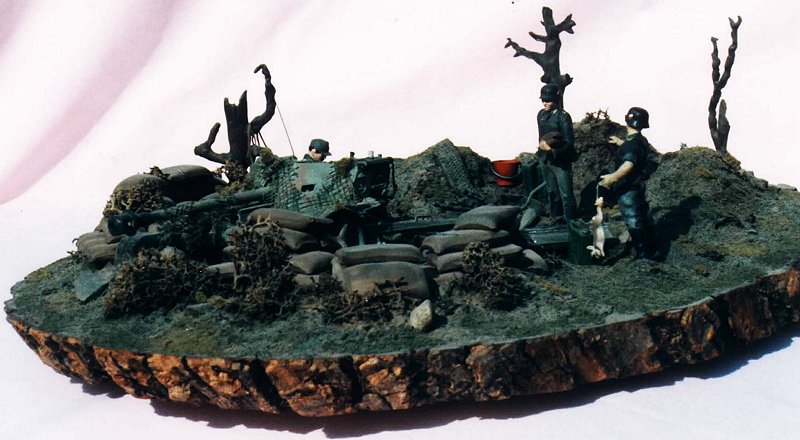
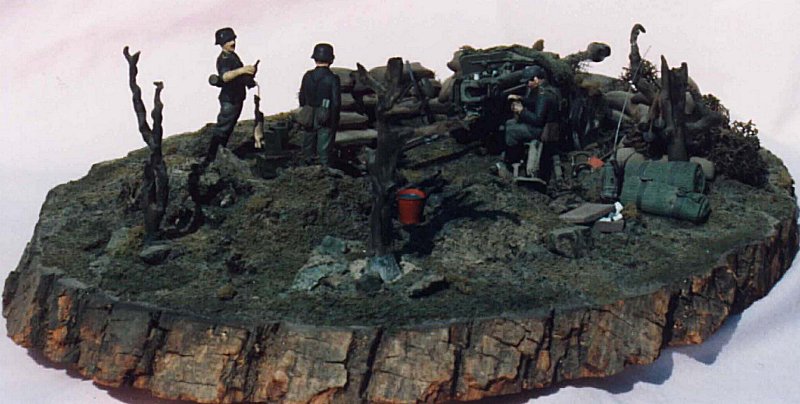
I enjoy doing an occaisonal armor related kit from time to time, though unlike aircraft or cars, tanks & artillery pieces to me just don't 'display' as well on the shelf by themselves. So when I do one of these, it usually is in the form of a diorama. If you don't build these often, you shouldn't let that discourage you from trying one. They don't have to take up a lot of space (no one says you have to recreate the Normandy beach head to display a Willy's Jeep), and can be put together in a short amount of time. This scene depicts a German 75mm PAK 40 anti-tank gun and its crew at rest, getting ready for a little 'Schnapps und Hossenpfeffer'.
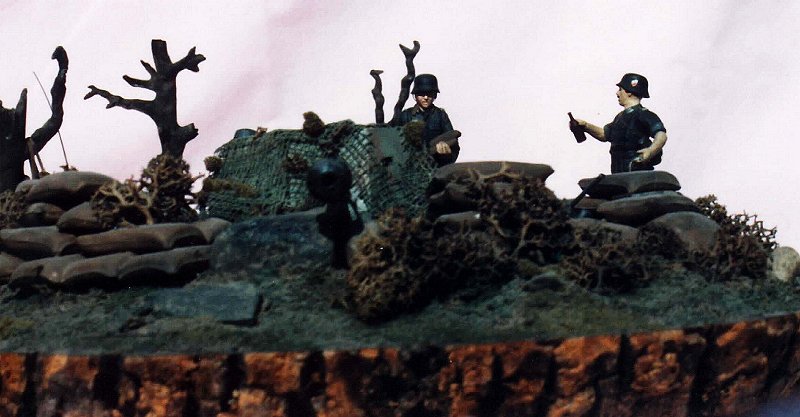
The gun itself was a snap to build. I don't think it had more than dozen or so pieces, and is able to be slightly traversed and elevated. The barrel itself comes in two pieces, split vertically, so a seam will be visible along the top edge of the gun, but it is easily fixed with a little sanding. I sprayed on a coat of light grey, did some minor camoflauge patterns of light brown and green by brush, then washed the whole thing with flat black. (That's the nice thing about most armour paint schemes: you really can 'wing-it' if you'd like..in real life, equipment in the field really gets filthy and in the end it can be difficult to tell exactly what color something truely is).
The crew were built 'as-is', with no major repositioning of limbs, and were painted standard Wermacht grey. It helps to do the trousers and coats or shirts in slightly different shades of base color, or else they will tend to look like 'green plastic soldiers' (or grey, or tan plastic soldiers...you get the point, I'm sure). I goofed sort-of and did the shoulder piping in yellow (Cavalry colors), instead of Artillery red, but at that time, I didn't know what color to use, and I wanted it to stand-out and provide some color-relief. The badges were the hardest part to do on the uniforms. They're SMALL!!! I painted only the largest ones that my abilities would allow and did them in silver. As far as the faces and arms go, I always make-up my own flesh-tone of a blend of flat white, tan & a little pink. Most brand name Flesh-tones have a nasty sheen to them which will make the figures look like Barbie-dolls, and they are very thick, which will goop-up in the eye sockets and ears, making painting of those areas most difficult. I do the whole face in one light coat of flesh-tone, then do the eyes by first painting the whole socket a slightly dulled white (Straight white will often give them a 'pop-eyed' look...something to avoid, unless your figure is looking straight into the barrel of an enemy tank!). Then I draw a line of black (pupil), bordered by blue or brown (iris) right where the eye is. When that's dry, I put on another coat of flesh-tone, painting right up to edges of the eye socket, covering up any 'eye' that's crept out onto the cheekbones. Then I paint the 'shadow areas', like inside the ears, under the neck and under the eye brows with a darked coat of flesh-tone. Conversely, raised areas such as the cheekbones and tips of the ears get a lightened coat (actually, a 'pink-ened' coat) of flesh-tone.
Once the gun and figures were done, I began on the base itself. It's a piece of pine with bark edges, usually used in burnt-wood projects, that I bought at a craft store. This particular piece is about 5/8ths of an inch thick, so I didn't worry about coating it with water sealant, prior to application of the terrain. You might consider this if your base is thin, or if you're laying-on a thick coat of terrain material (which is wet when applied, and can warp your base...BAD, I speak from experience here). The terrain material is Celluclay, which is a form of Plaster-of-Paris. When mixing this with water, it's easiest to remember it this way for the mixing ratio: Too Wet equals shrinking (which will move your figures and equipment around as it dries) & Too Dry equals flaking or cracking (which will not support your figures after it has dried). I really can't describe it better than that. I just mix small amounts and work it in bit by bit. Remember to 'hack-up' the board a bit before you lay the Celluclay down, so that it'll have something to bond to.
I built the terrain 'humps' out of small wads of wet paper, taped down with masking tape, then covered with Celluclay. While the clay was still wet, I inserted a few small rocks, the sand bags, figures and the trees, which are pewter model railroad items. The ground covering is standard model railroad 'grass', which I airbrused a greenish-brown. The small arms kit provided the rifles, radio, shells and shell case, and the anti-tank rifle (Imagine firing 20 rounds of 20mm AP throughone of those things! My shoulder aches at the thought of it).
The vegetation is standard model railroad stuff, painted flat dark greens and browns. I wasn't really happy with the look they provided, and next time would use something out of the gutter instead. Same thing for the cammo-net draped across the gun-shield, which is Cheese cloth, though I don't know what else I could've used for that. The rabbit that the bottle-weilding soldier is holding came from the live stock set and the bed rolls are rolled tissue, coated with diluted Elmers glue, which also served as the 'water in the fire bucket.
The whole project took me about 3 weeks for me to finish, which for me at least, is very quick. Celluclay drying time included, someone could probably knock out a diorama this size in about 8-10 days.
Copyright ModelingMadness.com. All rights reserved.