Revell 1/144 Lightship 'Trinity'
|
KIT # |
|
|
PRICE: |
@ $12.50 |
|
DECALS: |
|
|
REVIEW : |
|
|
NOTES: |
|
|
HISTORY |
First of all, I´d like to state that I really enjoyed building this model. Really. Having started with planes (my first three being a Starfighter, a Hunter (yes, already in 1969) and a Boomerang ( all of them by Airfix, since that little store in our village had no Revell articles and there was nothing else then), I built virtually all of the Airfix 1/600 ships later (even
that Townsend-Thoresen Ferry), followed by historical ships made from wood, copper and the like, until I rejoined the Polystyrene plane club.
I love building planes, but shipbuilding still has its own flair. I´ll just mention that I secured a reissue of Revell´s USS Olympia (my personal favorite plastic model ship that far) and packed each sprue into soft paper for the time being until I summon my guts to build what should be the definite Olympia for me.
Having just realized that it´s mainly this (vain) drive towards doing something definite for oneself is what keeps us buying kits, plus that those lofty ideals tend to be revisited farther and farther downwards, just as work progresses (speaking strictly for myself), I´ll humbly turn to lightships.
 The whole concept of establishing navigational aids needs some good reasons for really enforcing it. After all, poor, hard-working coastal people of all places and ages have relied on "gifts" from the sea for their survival. So anything that diminished the chances for shipwrecks would surely be considered by them as economically detrimental. IMHO, it was rather the respective ruler´s grasp of the advantages of free and possibly large-scale trade that made them order the installing and upkeep of beacons and even lightships, than humanitarian aspects. We know about sophisticated systems of navigational aids as well as a functioning signal corps using
semaphores in Imperial Rome. Afterwards, it took a while to re-establish a like system, in Great Britain it was in Henry VIII´s time.
The whole concept of establishing navigational aids needs some good reasons for really enforcing it. After all, poor, hard-working coastal people of all places and ages have relied on "gifts" from the sea for their survival. So anything that diminished the chances for shipwrecks would surely be considered by them as economically detrimental. IMHO, it was rather the respective ruler´s grasp of the advantages of free and possibly large-scale trade that made them order the installing and upkeep of beacons and even lightships, than humanitarian aspects. We know about sophisticated systems of navigational aids as well as a functioning signal corps using
semaphores in Imperial Rome. Afterwards, it took a while to re-establish a like system, in Great Britain it was in Henry VIII´s time.
Like many people of my age, I did some interrailing back in 1980/81. When we left Ireland for the continent via Britain, we took a night train from the ferry port of Holyhead to London. Using night trains saved you nights in youth hostels
and the like, so it was very popular with us. We shared the compartment with a huge man in what seemed a naval uniform to me, complete with a vast beard and a faint smell of booze from his farewell party. We got into talking after a while, first about the horrendous sandwiches plus the inimitable instant tea and coffee offered by British Rail, and then about his job. He turned out to be a senior lighthouse keeper, employed by Trinity House, the venerable corporation running the
British lighthouses. The following quote from TH´s website at http://www.trinityhouse.co.uk describes it more accurately:
"Constituted under a Royal Charter granted by Henry VIII in 1514, today the Corporation has three functions:
The General Lighthouse Authority for England, Wales, The Channel Islands and Gibraltar, providing aids to general navigation such as lighthouses, lightvessels, buoys and radio navigation systems.
A charitable organisation for the safety, welfare and training of mariners and relief of those in financial distress.
A Deep Sea Pilotage Authority.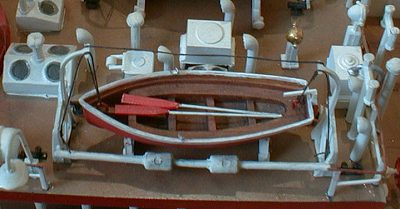
The Corporation is led by a Court of Elder Brethren under the Master, His Royal Highness The Duke of Edinburgh. Power is delegated from the Court to two separate Boards which control, respectively the charitable and Deep Sea Pilotage
activities of the Corporation, and the Lighthouse Service."
He was en route to a new assignment in the lighthouse at Gibraltar. It was a good conversation, he had a lot to tell about life on his previous posts and I was sorry we
didn't take the same route as he did when we parted in London early the next morning.
I heard the name Trinity House again in the classic book "The Ship" by Björn Landström in the chapter on the "Sovereign of the Seas", Trinity House having protested against building such a vast and immensely expensive ship. The next
time I encountered Trinity House was on the cover of a Revell kit, a re-issue of an old FROG kit from the early 60ies of a Lighthouse Ship.
|
THE KIT |
I gathered that the FROG tools had been sold to the Soviet Union in the 70's after the company went bankrupt and that they were marketed in the socialist countries from the USSR over the GDR to Romania, and that Revell had somehow reacquired this specific set of tools in the late 90ies. The low price (about 12.50$) and the comparatively large scale of somewhere about
1/144 made me put it on my Christmas gift list, a wish that was promptly fulfilled, albeit accompanied by the common mantra "where on earth do you want to put that stuff, you already have some two dozen kits in store in our attic?" Lee Kolosna hadn´t published his musings on kit collectors yet, so I was unable to point out the difference between my modest collection and those of people who really took things the serious way...
I can´t recall how many parts were housed on how many sprues, but there sure was quite some heap of them. I was impressed how much detail FROG had put into that kit back in the days just before I was born. The only things I really
didn´t like were the railings from some kind of soft, black plastic and the "railing" of the beacon mast which was crafted from a massive piece of clear styrene with engraved railing detail.
 I´m perfectly aware that that was (and is) about the only way of producing a mass-market compatible part that kids (weren´t we all kids back in the 60ies?) can handle. But having somewhat outgrown that era, I decided to take things the
harder way ...
Perhaps I should notice that I had no references beyond the kit artwork plus an illustration in Björn Landström´s "The Ship" of Calshot Spit Lightship. Bit meagre, but fun to work with - no chances for being nitpicky.
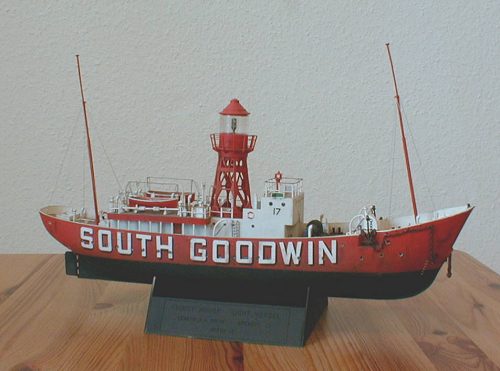
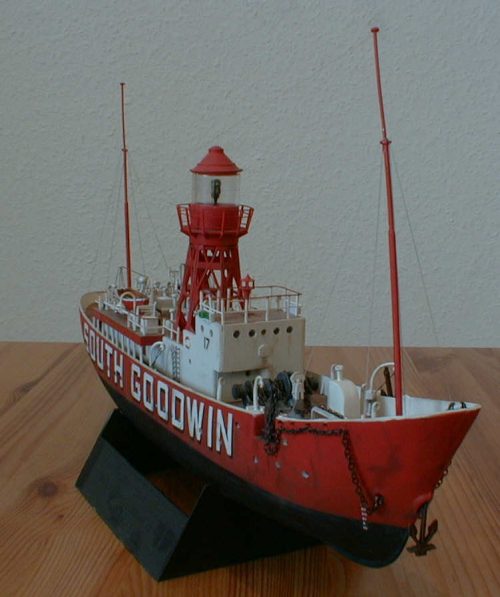
The subject of the kit was commissioned in the mid-30ies for service on the Goodwin Sands, situated in the
English Channel on a line roughly between Sandwich and Dunkirk. It was lost in the early 50ies with great loss of lives in a winter storm.
What perplexed me most when looking at the kit was the lack of any propellers. Well, strictly speaking, a lightship moored at a specific site doesn´t need engines and props to go anywhere, but – well, I wouldn´t feel quite comfortable sitting aboard a ship that´s designed to withstand the fiercest storms but is solely held by some anchors, without any means for adjusting its bearing or changing position. I visited a
German lightship once, and amongst the things I remembered were not only the delicious roast potatoes in the restaurant or the vast accumulator room with real acid vats of batteries, but also the engines and what the guide said about making trips with the ship under her own power.
The Calshot Spit Lightship in Mr. Landström´s illustration lacks a propeller as well, so I took it for granted.
|
CONSTRUCTION |
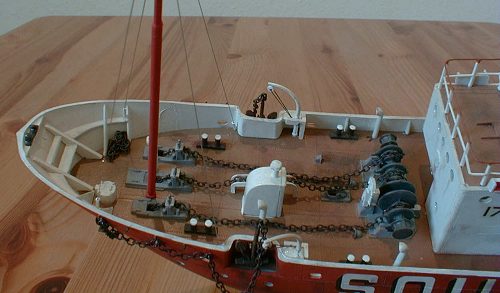 Construction started with mating the hull halves; I spray-painted the hull red and black and applied the really big name decals afterwards. Micro Set and Micro Sol did an impressive job in this case, too. After coating the hull with flat clear paint, I drilled open all the bulleyes with my household electric
drill, to fill them with Kristal Kleer. That worked really fine, as well as later with the bulleyes on the various skylights and deckhouses.
Construction started with mating the hull halves; I spray-painted the hull red and black and applied the really big name decals afterwards. Micro Set and Micro Sol did an impressive job in this case, too. After coating the hull with flat clear paint, I drilled open all the bulleyes with my household electric
drill, to fill them with Kristal Kleer. That worked really fine, as well as later with the bulleyes on the various skylights and deckhouses.
Concerning the use of Kristal Kleer for those who haven´t done it yet (if there be any): Take a convenient amount of the goo on a toothpick and work it around the bulleye´s perimeter so that it sticks there. Having completed a round, gently pull the toothpick out from the middle. A soft white film will form. After some hours, depending on the thickness of the film, it´ll dry
transparently. This material also works great in glueing airplane canopies. It won´t mar the canopy as cyanoacrylate might (no fumes) and it works as a filler as well. Moreover, it won´t bond with the styrene chemically, so you can remove excesses easily or even redo from start without harming your previous work. Hint: Painting the rim of the window-"hole" black helps the overall effect much!
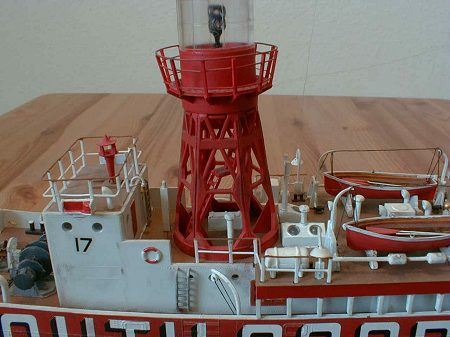
Next came the weathering with pastel chalks and artist´s oil paint (burnt siena). You can assume that a lightship will weather rather heavily, so I tried to do my best. Working with pastel chalks works best on a matte surface and has the advantage of being correctable, quite different from oil paint or washing. I also painted the upper inside of the hull white and weathered it at this stage. Thus, there was no problem with paint demarcation between the deck and the hull (why not take things easy just once?)
 Having completed the hull, I did not follow the instructions and assembled the deck and the superstructures separately, the idea being that I wanted as good an access to the deck/superstructure as possible. Special care should be given when mating the walls of the superstructures, but general fit was really very acceptable. Check the positioning holes in the deck and enlarge them, if necessary.
Attaching the deck plus the superstructure to the hull was tricky; it afforded some bending and use of force, so beware that the hull halves are glued together well. I did that when the deck was painted and the main parts of the superstructure had been glued on it.
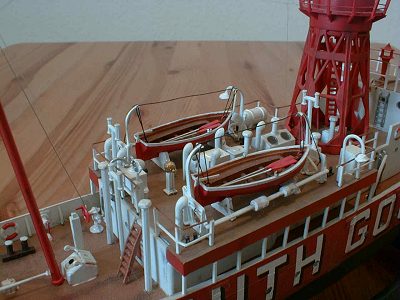
My modifications to the superstructures were:
--Opening bulleyes
--Fashioning railings from brass and styrene
--Adding oars and rudders to the lifeboats, made from brass wire and Evergreen sheet
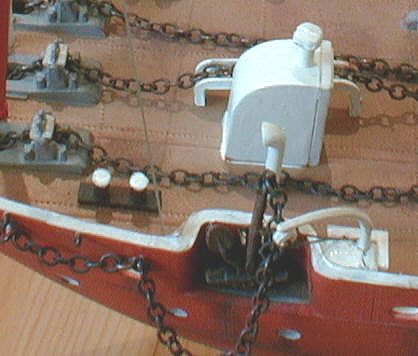
--Removing the molded-in anchor chains with a Dremel (very carefully) and replacing them with real chains, weathered with
oil paint, pastels and whatever came handy
--Adding "lamp-shades" made from thin aluminum (from tea-lights) to the lamps on the boatdeck lighting the ship´s name
--Replacing the posts under the boatdeck with Evergreeen 1x1 mm profiles because of poor fit and being
overdimensioned.
Building the railings, of course, was most of the work and most demanding, too. Working with Evergreeen was a joy, but one important tip should be heeded when working with brass wire: Glow it soft! Heating it over a spirit burner until it glows red will take away all elasticity from the material, so that it perfectly stays in the shape you bent it in. It behaves like soldering tin, but is available in thinner diameters.
I got some grey hairs when fashioning the railing on the beacon, in fact this is the second since the first was damaged beyond repair when the beacon (not yet glued to the deck) crashed on my workbench. The only round part about it is the
upper railing, the supports are from 1x1 mm styrene, the smaller railing parts are from stretched sprue. Compared with the kit part (clear styrene with molded railings), it´s an improvement.
The rigging was done in very thin stretched sprue after really everything was done.
|
CONCLUSIONS |
A nice kit that doesn´t take too much shelf space and gives you plenty of opportunity. I´m convinced that even installing lights and making it float shouldn´t be too great a problem.
|
REFERENCES |
PS: For further reading: I surfed into this page one of these days following the links from IPMS Stockholm´s site; I really love this witty essay on
British naval vessels´ names:
http://home1.swipnet.se/~w-11578/model_links.htm
Copyright ModelingMadness.com
Back to Reviews Page 2018