Revell AG 1/72 Vosper MTB
|
KIT # |
05084 |
|
PRICE: |
€7.99 |
|
DECALS: |
See review |
|
REVIEWER: |
|
|
NOTES: |
1993 issue, Difficulty Level 3 |
|
BACKGROUND |
Well, I´ve often read the term
„slippery slope“ in connection with succumbing to hence untrodden
pathways in modeling, be it cars, creepy crawly things with tracks,
figures or ships. Mine is like the slippery slopes in shipyards, and I
guess my interests are shifting towards ships again.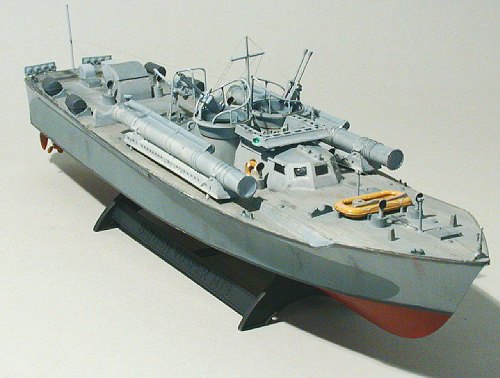
I recently (in fact, yesterday it has been two weeks) stepped into a model shop in order to buy flat white paint and thinner. Well, it happened as ever so often and I left silently grinning with this MTB in tow, figuratively speaking. It was during my Hase Emily´s final stages, and I needed a change – obviously one that none of my 45 kits in stock was at this point of my life able to offer.
|
THE KIT |
Your editor has previewed this kit last year, and I´ll skip any historic details into the bargain ;-) Be it sufficient that this is a fairly early version, opposite to the one kitted by Airfix in the 1960´s. There are differences in armament, notably that the later version has the main gun on the foredeck and is equipped with four torpedo tubes. My friend Rick Brownlee is currently building one, and I owe him thanks for supplying me with reference pics and general support.
|
CONSTRUCTION |
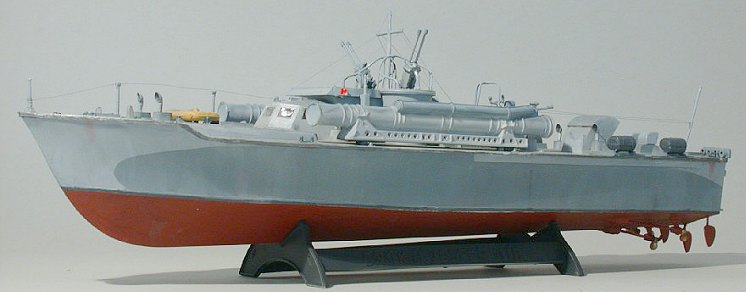
My first decision was to build this kit OOB and was trashed pretty soon afterwards. I first decided to use the paint scheme supplied by Revell, which consists of a red underwater hull and superstructures in two greys. The hull´s lower part is a darker grey, the upper above a curved demarcation line is lighter. The superstructures´ sides are lighter grey, whilst their upper sides are darker. The deck of the kit has nice engraved panel lines between the individual deck planks. Rick informed me that to his knowledge, the Vosper´s decks did not show panel lines – just as well as with the German e-boats, whose wooden decks were covered by sailcloth and overpainted. I also remember that the Airfix kit´s deck is plain. Nonetheless I decided against filling all those lines as they looked interesting to me. Moreover, I wanted to experiment with washes in this inexpensive project.
|
CAMOUFLAGE & MARKINGS |
So I sprayed and masked and sprayed the hull, using very narrow masking tape for the waterline stripe and Parafilm M for the rest. The stern assembly was glued to the hull prior to painting, only very limited filling was necessary. Meanwhile I was able to tackle the deck.
 I had originally intended to try the
Mr Bean masking method. There´s one sketch in which Bean paints his
apartment. First of all, he doesn´t clear the rooms, but masks literally
everything in them, including single grapes in the fruitbowl. Then he
places a big fat vat of paint right into the middle of the room and
inserts a big firecracker with a time fuse, so that upon the explosion
the paint will be dispersed everywhere save the masked areas. I had
intended to spray and then mask all the raised detail and do the deck
with its weathering and shading and washing afterwards. Silly idea. I
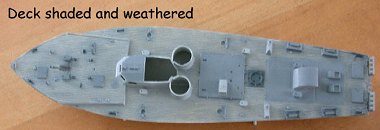
sprayed all the raised detail and did the deck by brushing in various
shades of grey until I felt satisfied. I had tried hard to get through
the painting instructions and finally thrown them overboard when they
failed to make sense to me, generally applying as noted above. I used
Humbrol 128 as the light grey and Revell 57 as the darker one. Yet darker
details were picked out in Revell 78. I used a watercolor wash with a
little bit of detergent, and I sprayed it from an old desodorizer bottle,
using a Kleenex to pick up the excess.
I had originally intended to try the
Mr Bean masking method. There´s one sketch in which Bean paints his
apartment. First of all, he doesn´t clear the rooms, but masks literally
everything in them, including single grapes in the fruitbowl. Then he
places a big fat vat of paint right into the middle of the room and
inserts a big firecracker with a time fuse, so that upon the explosion
the paint will be dispersed everywhere save the masked areas. I had
intended to spray and then mask all the raised detail and do the deck
with its weathering and shading and washing afterwards. Silly idea. I
sprayed all the raised detail and did the deck by brushing in various
shades of grey until I felt satisfied. I had tried hard to get through
the painting instructions and finally thrown them overboard when they
failed to make sense to me, generally applying as noted above. I used
Humbrol 128 as the light grey and Revell 57 as the darker one. Yet darker
details were picked out in Revell 78. I used a watercolor wash with a
little bit of detergent, and I sprayed it from an old desodorizer bottle,
using a Kleenex to pick up the excess.
Nect the deck was mated to the hull which went without fuss. Generally speaking, fit was good, though some parts are rather basically detailed and others oversized. I cut off the gun barrels and used lengths of hypodermic needles and pieces of brass rod instead. I also opted not to paint the guns dark metal but rather in the same color as the ship, with details picked out and some drybrushing.
|
MORE CONSTRUCTION |
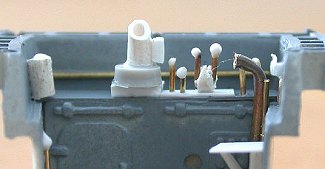 The open bridge looked rather empty,
and having seen a reference pic, I got out some strip styrene, stretched
sprue and wire and set to work, adding a compass, speaking tube, some
levers and a chart table. The knob on the levers were made from white
glue. I also filled the charthouse windows with Kristal Kleer which
helped them up quite a bit. Also added were position lights and handrails
to the side of the charthouse.
The open bridge looked rather empty,
and having seen a reference pic, I got out some strip styrene, stretched
sprue and wire and set to work, adding a compass, speaking tube, some
levers and a chart table. The knob on the levers were made from white
glue. I also filled the charthouse windows with Kristal Kleer which
helped them up quite a bit. Also added were position lights and handrails
to the side of the charthouse.
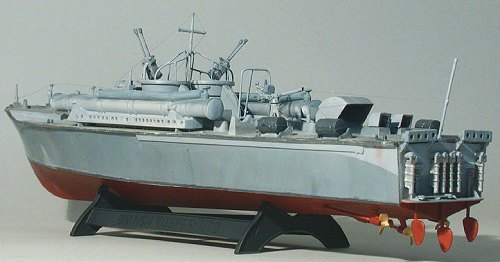
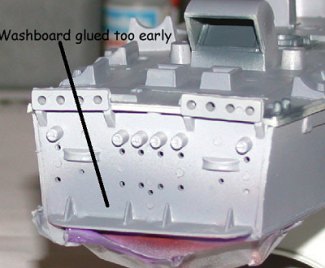
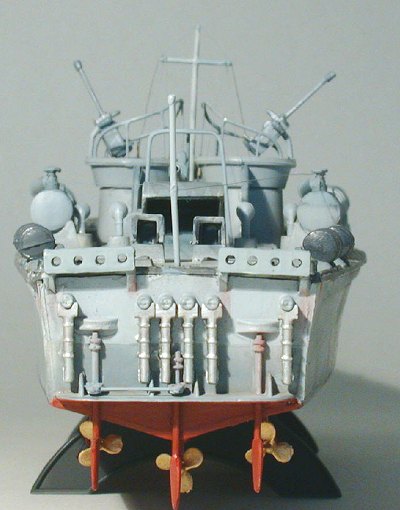
At this point I decided to complete the stern assembly with its washboard and cooling water dischargers or exhausts, and I found out I had glued the washboard prematurely, as you have to glue the rudders first. Nothing that can´t be fixed ...
 Meanwhile, I had
really fun with washing and shading the boat to let it look a bit more
lively. I tried not to overdo things, especially with the rust, as it´s a
wooden hull, but I pastel-chalked a little rust under the cleats and some
darker shades to bring the hull and superstructures to life. The black
waterline stripe had suffered from handling, so I repainted it by hand,
desiring some uneven look as of use and repaint. Generally, I tried to
achieve the look of a hard-working, yet well-kept boat with unavoidable
signs of wear.
Meanwhile, I had
really fun with washing and shading the boat to let it look a bit more
lively. I tried not to overdo things, especially with the rust, as it´s a
wooden hull, but I pastel-chalked a little rust under the cleats and some
darker shades to bring the hull and superstructures to life. The black
waterline stripe had suffered from handling, so I repainted it by hand,
desiring some uneven look as of use and repaint. Generally, I tried to
achieve the look of a hard-working, yet well-kept boat with unavoidable
signs of wear.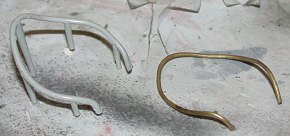
The next conversion item was rather important. The two twin .303 AA machine guns right astern of the bridge have protective railings around them to prevent the gunner from accidentally firing into his own ship (remember Indiana Jones III – the dogfight scene?) These are way too oversize and had to be replaced, especially as they make or break the silhouette and general look of the boat. After some discussion and meditation I decided to proceed as stated in the following, which took me about 30-45 minutes in all:
I took a convenient length a 1 mm
brass tube and glowed it soft, taking out all elasticity and making it
easier to bend. Then I carefully bent it with little pliers from the
hardware supermarket, using the kit part as a guide until the brass part
lay on the 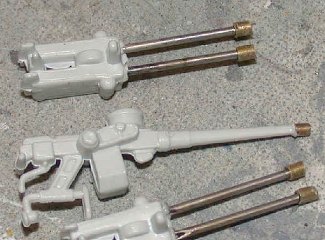 kit part snugly. Then I took a length of .5m mm brass, heated
it and melted it into place in the amidships position. That had to be
redone a few times until satisfied. Then I glued the brass railing to the
pole and to the gun mount, using CA glue. Next came 4 lengths of .5 mm
brass for the remaining supports, also glued with CA, alos giving the
construction strength.
kit part snugly. Then I took a length of .5m mm brass, heated
it and melted it into place in the amidships position. That had to be
redone a few times until satisfied. Then I glued the brass railing to the
pole and to the gun mount, using CA glue. Next came 4 lengths of .5 mm
brass for the remaining supports, also glued with CA, alos giving the
construction strength.
The deflector for the 20 mm gun was fashioned likewise and to me adds to the model´s appeal. The depth charges and torpedo tubes were glued OOB, aoart from drilling open the lightening holes in the torpedo tubes´ support construction.
I omitted the figures and the decals
so far, as I´m still not through with the idea of entering this model
into a dio of some kind.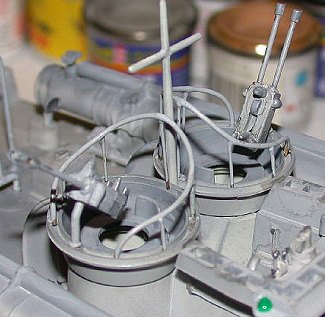
Now the rigging was the only thing remaining. I always try to do something new in each project, and next to the washing I decided to use very fine copper wire for the rigging.
I got that from model railroading wires, removing the insulation and picking out single copper filaments, which should be somewhere between .02 and .05 mm in diameter. I found them strong and easily applied. I always like using my dental equipment, and so I applied the wires as follows: I worked out which lines could be done together and fixated one end with a knot and drop of CA. Then I ran the wire as desired and applied a clothes oin to the free end to get a feeling for even pull. One thing I always hated at plastic ship rigging is that the masts and yards are much to soft. I might also have replaced the mast with brass tubing (which I did for the stern flagstaff), but left it at that. The other ends of the wires were hotglued using a heated dental waxing instrument, melting the wire into the styrene which is strong and hardens immediately. So rigging was a matter of less than an hour. In the end, I painted the rigging and added the lifebelts and dinghi which were painted tan and washed with the watercolor mix.
The only thing that gave me trouble in this project was the stand, which is flimsy and wobbly. I glued an additional brace into its middle and called it quits, still thinking of a dio showing the boat on a slippery slope, resting on a trolley and being pulled up on railtrack out of the water ...
|
CONCLUSIONS |
 Now this was an extremely fast
build, aided by being on holiday and having so warm weather that I felt
most comfortable in my cellar. The kit goes together well, is adequately
detailed and looks becoming when completed. Especially at the price I
paid a very good buy and leaving much room for adding accoutrements,
figures, scratchbuilding and anything you might name. Highly recommended.
Now this was an extremely fast
build, aided by being on holiday and having so warm weather that I felt
most comfortable in my cellar. The kit goes together well, is adequately
detailed and looks becoming when completed. Especially at the price I
paid a very good buy and leaving much room for adding accoutrements,
figures, scratchbuilding and anything you might name. Highly recommended.
September 2003
If you would like your product reviewed fairly and quickly by a site that has over 200,000 visitors a month, please contact me or see other details in the Note to Contributors.