|
KIT: |
Revell 1/125 U-99 U-boat |
KIT # |
5054 |
|
PRICE: |
$21 |
|
DECALS: |
U-99 “Golden Horseshoe” |
|
REVIEW & PHOTOS BY: |
|
|
NOTES: |
Minor use of brass parts, aluminum tubing |
|
HISTORY |
Of all the weapons employed by the Third Reich against the Allies during World War II, none were more effective than the U-boat. The U-boat, or "unterseeboot" in German, had nearly defeated England in WWI, and, as a result, the Versailles Treaty prohibited the Germans from having submarines. Yet, as they did in so many other weapon areas, the Germans wasted little time circumventing the treaty. As early as 1922, the Germans set up shop to secretly produce submarines. By 1933, Germany was already forging plans for a secret U-boat fleet, and parts for U-1 through U-24 were ordered in other countries to be smuggled into Germany during 1935.
But with Hitler's renunciation of the Versailles Treaty in 1935, secrecy was no longer a necessity, and the Germans proceeded openly and with haste to develop their submarine fleet. Under Karl Donitz, Germany's U-boat strategy began to take shape. As England, a great maritime power, was to be the primary focus of the U-boat fleet, Donitz theorized that the way to defeat England was via a strategy called "Tonnageschlact" or "Tonnage War." Donitz argued that to defeat England, Germany must sink more merchant shipping than England could replace, and do this for as long as it took to economically strangle the enemy. During WWI, merchant ships were only a secondary target for Germany's submarines, so Donitz decided that they must become the prime target in order to defeat England.
Starting from this premise, Donitz developed the Wolfpack approach to submarine warfare: 6 to 9 U-boats spread out in formation working across the Atlantic Ocean. When one of the boats sighted a convoy, the other boats would be called and assemble on the convoy. Contrary to the popular submarine movies of the late forties/early fifties, the primary tactic to be used was for the U-boats to surface at night and attack the slower merchant ships on the surface.
To exercise this tactic, Donitz decided on a large fleet of medium sized, very maneuverable, relatively inexpensive boats. Thus was born the Type VII, a 626-ton sea-going submarine. It's design came directly from the 1931 German design of the Finnish "Vetehinen."
 The first
VII, the A-type, had most of the same characteristics of the rest of the Type
VIIs. Germany constructed a total of 10 A Types (U-27 through U-35) before
moving to the B Type (the subject of this review), which represented some rather
minor revisions to the A. These included: a 7-foot longer hull; increased
capacity (an additional 33 tons) saddle tanks (the distinctive external bulges
amidships on the Type VII, which encased the tanks where fuel oil was stored);
and more powerful diesel engines. These improvements gave the Type B more
operational range (about 2500 NM) and a greater surface speed. The VIIB carried
the same armament as the VIIA - four bow torpedo tubes and one stern tube, with
room for storage of an additional three torpedoes for a total of 14. Other
modifications included two rudders instead of the one on the VIIA, which gave
the B type more agility at sea. Surface gun armament included a 20mm C/30 cannon
on the rear of the conning tower and an 88mm cannon (88/45) on the deck in front
of the bridge (This weapon was not the German Army 88mm anti-tank/anti-aircraft
weapon; rather, it was a gun specifically designed for the Kreigsmarine). The
Type VII boats usually carried about 250 rounds of 88mm ammunition when they
left on patrol.
The first
VII, the A-type, had most of the same characteristics of the rest of the Type
VIIs. Germany constructed a total of 10 A Types (U-27 through U-35) before
moving to the B Type (the subject of this review), which represented some rather
minor revisions to the A. These included: a 7-foot longer hull; increased
capacity (an additional 33 tons) saddle tanks (the distinctive external bulges
amidships on the Type VII, which encased the tanks where fuel oil was stored);
and more powerful diesel engines. These improvements gave the Type B more
operational range (about 2500 NM) and a greater surface speed. The VIIB carried
the same armament as the VIIA - four bow torpedo tubes and one stern tube, with
room for storage of an additional three torpedoes for a total of 14. Other
modifications included two rudders instead of the one on the VIIA, which gave
the B type more agility at sea. Surface gun armament included a 20mm C/30 cannon
on the rear of the conning tower and an 88mm cannon (88/45) on the deck in front
of the bridge (This weapon was not the German Army 88mm anti-tank/anti-aircraft
weapon; rather, it was a gun specifically designed for the Kreigsmarine). The
Type VII boats usually carried about 250 rounds of 88mm ammunition when they
left on patrol.
Only 24 of
the VIIBs were produced, but they were some of the most successful U-boats of
the war, including the U-47, U-99, U-100, and the most successful German U-boat
of the war: the U-48. In 12 patrols, the U-48 managed to sink a total of 52
ships with a combined tonnage of 307,935. Four of her skippers received the
Knight's Cross (one of Germany’s highest award for valor), and two of them,
Herbert Schultze and Heinrich Bleichrodt, were credited in their careers with
sinking 26 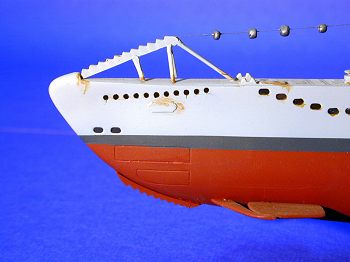 and 27 ships, respectively (both received the Knight’s Cross with Oak
Leaves. Only 29 U-boat crewmembers won this decoration during the war). The last VIIB was launched in 1941and was superseded by the VIIC (a slightly larger and
heavier model). Germany built a total of 568 VIICs.
and 27 ships, respectively (both received the Knight’s Cross with Oak
Leaves. Only 29 U-boat crewmembers won this decoration during the war). The last VIIB was launched in 1941and was superseded by the VIIC (a slightly larger and
heavier model). Germany built a total of 568 VIICs.
Although the German U-boat had great success during the first years of the war (by late March 1943, they had sunk over 14 million tons of allied shipping, and the Allies had been able to replace only half of that amount), the Allies countered the U-boat offensive by increasing the number of convoy escorts and employing technological advances such as a shorter wavelength radar that could not be detected by the U-boat's "Metox," a device that detected conventional radar and gave the U-boat sufficient warning to submerge. Thus, by the beginning of 1944, more U-boats were being sunk than allied merchant ships, and for Donitz, the handwriting was on the wall. The bottom was reached in August 1944 when 44 U-boats were sunk. As a measure of their waning impact on the allies, in October of that year, U-boats sank only one merchant ship.
|
THE KIT |
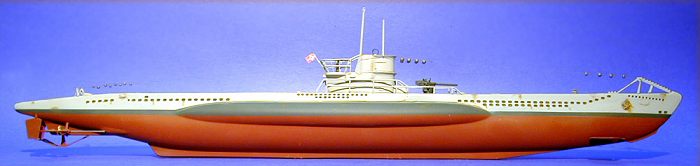
 Molded in light gray plastic and consisting of 41 parts, the Revell U-boat kit
has been around for a while. Accordingly, one can expect a little flash and
minor fit problems when assembling this model. The detail is okay, given the
kit’s age, but super detailers can have a ball with the basic kit in adding
details that the mold makers overlooked or couldn’t accommodate.
Molded in light gray plastic and consisting of 41 parts, the Revell U-boat kit
has been around for a while. Accordingly, one can expect a little flash and
minor fit problems when assembling this model. The detail is okay, given the
kit’s age, but super detailers can have a ball with the basic kit in adding
details that the mold makers overlooked or couldn’t accommodate.
Some of the parts (for example, the deck railings that frame the conning tower and the net cutter on the bow) are on the thick side and out of proportion, so one might opt to replace these and/or thin down the kit parts. Additionally, the grab handles and horseshoe-shaped life buoys are molded onto the conning tower, and, as a result, not very authentic looking. Finally, one could opt for drilling and carving out all the flooding holes (there are about 200 of them! Needless to say, I did not elect to do this).
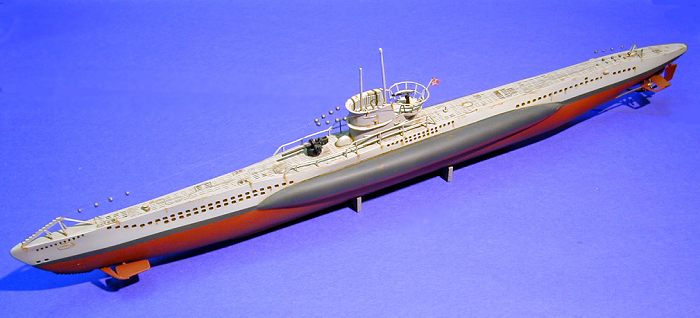
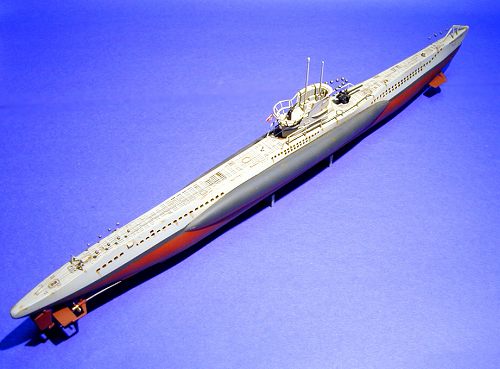
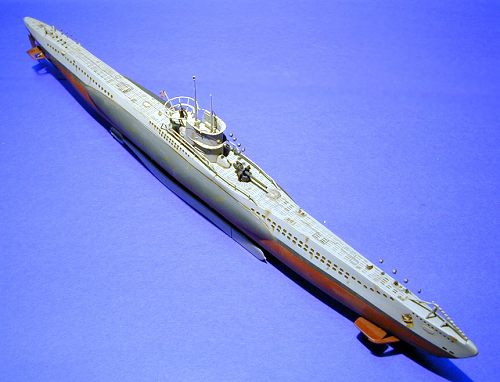
The kit comes with a “torpedo” stand that cradles the finished model by the keel for display. Once built up, the model is fairly impressive, and accurately represents the shape and dimensions of a Type VIIB U-boat.
|
CONSTRUCTION |
Okay.
Call me crazy, incorrigible, or just plain weird, but this kit represented
another needed diversion from aircraft modeling for me (talking about slipping
over to the “Dark Side:” a ship model? Say it isn’t so, Ethel!). I built this
kit during some 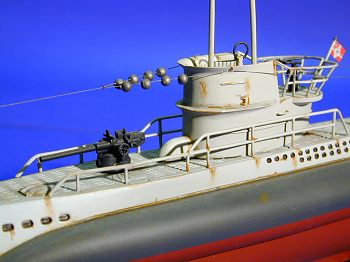 advanced stages of the dreaded “syndrome” just to see if it
would get me back into the modeling groove, and it actually turned out to be
great therapy (does this mean I can now apply for a counselor’s license?).
advanced stages of the dreaded “syndrome” just to see if it
would get me back into the modeling groove, and it actually turned out to be
great therapy (does this mean I can now apply for a counselor’s license?).
Given
the relatively small number of parts, construction of the kit is very straight
forward, and painting is relatively simple, also. I started with the two-piece
hull, and after dry fitting the two halves, glued it together using my favorite
liquid cement: methyl ethyl ketone (MEK. You can buy a ton of this stuff from
any automotive paint store, and it will last you a lifetime. It works just as
well as any liquid modeling cement on the market today at about a tenth of the
cost. As usual, this stuff is deadly, so take the appropriate precautions when
using it. Personally, however, I have already sniffed enough MEK, airplane glue,
and lacquer thinner during my nearly fifty years of plastic modeling that it
clearly does not matter what I do. As I like to say, “I take my MEK straight
up!” But you younger guys PLEASE ventilate your workspace when using MEK and
lacquer thinner!). 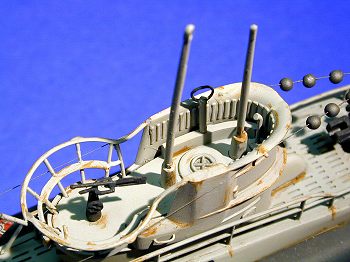 (Additional
safety note from your editor; MEK is absorbed directly through the skin and does
not leave your body. I highly recommend using gloves and a respirator when
working with this carcinogenic material. Better yet, don't use it at all. I
don't think a few dollars savings are worth your health.)
(Additional
safety note from your editor; MEK is absorbed directly through the skin and does
not leave your body. I highly recommend using gloves and a respirator when
working with this carcinogenic material. Better yet, don't use it at all. I
don't think a few dollars savings are worth your health.)
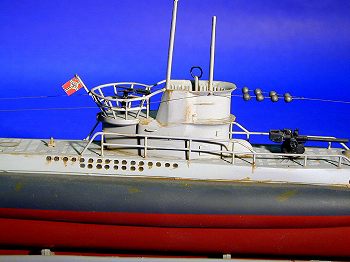
The next step was to glue down the two-piece deck. While this was drying, I assembled the conning tower. Even with dry fitting and adjustments, this was a rather rough fit, and required some sanding and filling to eliminate the ugly resulting seam between the two tower halves. I decided to remove the molded on grab handles and life buoys (I couldn’t find too many pictures of Type VIIBs with these in place, so I decided to just eliminate them). Using an Exacto knife, I slowly carved these details from the conning tower and then sanded them smooth. For a little more scale appearance, I replaced the removed grab handles with small diameter brass wire that I superglued to the conning tower. I also added a direction finding (D/F) loop made out of brass wire to the bridge. The periscope and other topside pieces were then cemented in place. Once finished, I glued the conning tower to the deck.
 At
this point, I decided on three other modifications to the kit. The first was to
replace the deck gun’s plastic barrel with a piece of aluminum tubing. The
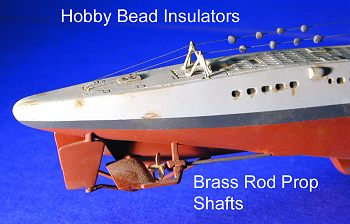
second was to install brass propeller shafts on the boat’s hull. Both of these
additions gave a more scale appearance.
At
this point, I decided on three other modifications to the kit. The first was to
replace the deck gun’s plastic barrel with a piece of aluminum tubing. The
second was to install brass propeller shafts on the boat’s hull. Both of these
additions gave a more scale appearance.
The third modification was to string the long wire antennas from the bow and stern to the conning tower. I used small fishing line for these wires. After stringing some beads I picked up at Hobby Lobby on the fishing line to represent the insulators seen on these boats, I drilled holes in the hull and the conning tower with a pin vise and attached the antennas using CA glue. In hindsight, the beads I used were a little too large and if I had it to do over again, I would search for a smaller, flatter bead than I used (the real insulators looked like oval tin cans instead of balls).
|
PAINT |
I decided to model a generic VIIB, so I chose not to use the U-99 decals. To give it a little more color, I also opted to depict the model with a red lower hull (I have found paintings of these boats with both a dark gray waterline and lower hull and red…others may pick their own poison!). I painted the entire boat with Model Master light gray, and then I masked off the hull top and sprayed the bottom sides of the hull with dark gray. To finish off the hull, I masked the water line and sprayed the rest of the hull with Floquil anti-fouling red.
 I
sprayed the deck gun and the 20mm cannon with MM gunmetal and attached them to
the boat. I hand-painted the D/F antenna with MM gunmetal. Again in retrospect I
probably should have painted the deck gun and the 20mm in the same overall light
gray that I used for the rest of the boat (I’m trying to learn this ship/boat
coloring stuff for all you Navy types out there), but again, I have seen
pictures where they seem to appear both ways.
I
sprayed the deck gun and the 20mm cannon with MM gunmetal and attached them to
the boat. I hand-painted the D/F antenna with MM gunmetal. Again in retrospect I
probably should have painted the deck gun and the 20mm in the same overall light
gray that I used for the rest of the boat (I’m trying to learn this ship/boat
coloring stuff for all you Navy types out there), but again, I have seen
pictures where they seem to appear both ways.
I hand-painted the propellers in MM brass, and then attached the flag decal to the flag mast on the rear of the conning tower. As I had opted not to drill out all the flooding holes, I filled each of these in using a black ink pin to simulate the holes.
As a final touch, I weathered the model by brushing on Floquil Rust (would you believe I’ve had the same bottle of paint since 1972?) in strategic locations and rubbing some of the exposed areas with ground-up graphite from a No. 2 pencil to simulate wear.
|
CONCLUSIONS |
This kit was another pleasurable diversion from the world of aircraft modeling. Despite its age, the kit is easy to assemble, has some fit problems that can be corrected with a reasonable amount of effort, and looks pretty good when assembled. The addition of a few relatively inexpensive detailing items can greatly enhance the finished product.
|
REFERENCES |
1. “Uboats In Action,” Squadron Signal Publications, 2001.
2. U-boat.net, 2002.
If you would like your product reviewed fairly and quickly by a site that has well over 150,000 visitors a month, please contact me or see other details in the Note to Contributors.