Another photo at bottom of review
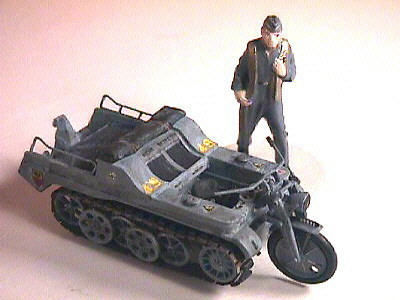
Kendall 1/48 Luftwaffe Kettenkraftrad
Price: $32.99
Media: Cast Resin and Photo Etched Brass
Decals: None Provided
Accuracy: Did not have good reference material, but overall the kit appears to be well rendered
Overall: B+
Review and Photos by: R. Swift
Another photo at bottom of review
Other than a few blurred B&W photos we have very little reference on this subject. We do know it was used by Luftwaffe personnel as a general purpose carry-all during WWII on and around active air bases. It may have been used by other service branches as well; we have seen one photo from the Russian Front showing two Whermacht personnel on a recon patrol using this machine. I can say this with certainty, I would really like to have one of these today.
The kit was a Christmas present from our eldest son who had heard me complain that some of today's aircraft kits are being supplied with resin and brass parts. Being unfamiliar with these, it would be very easy to mess up a good model by trying to use media for which you only have one chance to get it right. His thinking was to use this kit for practice, since I don't build armor or vehicles; if I messed it up, no big deal. The more I thought about it, the more I became convinced that it would look good next to the Do-335 and the little people my grandson conned me into painting when we built that kit. The clincher came when I saw what the kit cost; very expensive for a small model.
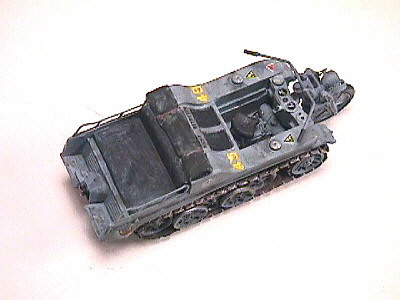
The resin portion of the kit is cast in creamy-yellow material. Initial examination revealed excellent detail on the numerous small parts which are attached to oversized sprue blocks; I am told this is typical for this medium as it provides adequate overflow for the casting process, and aids in the removal of trapped air bubbles. The resin itself turned out to be rather brittle compared to styrene; removal of small thin parts requires great care. Lightly scoring attachment points with a #11 blade until separation worked best. The bottom of the large chassis casting has a big, rectangular block that needs to be removed. Because of the length, using a razor saw was not an option; using a large wood carving blade and removing small increments until 10%, or so remained, worked well. Fixing a piece of 400 wet-or-dry to a flat surface, then moving the work back and forth smoothed the bottom down very nicely. Considering the size of this piece, I expected more air bubbles than there were. Two annoying pockets did show up on the round area just behind the drive sprocket attachment points on both sides. Lost some material here. These were built up with auto body filler then sanded down to the original shape.
The instruction sheet is very basic, but adequate. One part was not defined on the sheet; an e-mail was sent to Kendall who replied promptly with the information that the part was the muffler which attached under the rear step where it joins the chassis. There are no less than 26 parts on the front end. Twenty-one of them comprising the steering/suspension sub-assembly. This turned out to be the most difficult part of the entire assembly (next to keeping the super-glue off ten fingers) as it required careful dry fitting and measurement to establish correct alignment with the chassis.
Most tedious part of the assembly was painting, separating and attaching the eighty small rubber pads to the tracks. A side view mirror is provided, but it didn't look right and seemed to be out of scale; so, we took it off. The brass fret contains sixteen nicely etched pieces. We were advised to fix this to a flat surface with doubled masking tape, sticky side out, before removing any parts. The sticky had to be subdued considerably with fingers as it would have been impossible to remove parts without deforming them, otherwise. We were also advised to anneal the metal in a candle flame to remove the "spring" from it; we didn't find this step to be necessary.
As mentioned earlier, the tracks were tedious work. We worked with them flat,
then shaped them over the provided form; slipped them over the many wheels and
secured with CA. There are sixteen wheels/sprockets involved, and these required
a good bit of clean-up around holes and spokes. They are nicely detailed,
however. Painting is recommended as dark grey overall,
 except where noted on the sheet. We used
Poly-S but it was too glossy; we flattened with a matte clear. I chose to leave
the model plain, but my grandson (a Jeff Gordon/NASCAR addict) insisted that no
real man would drive a neat machine like that without decorating it. So, right
or wrong, we added a few touches from the spares envelope in obvious places.
except where noted on the sheet. We used
Poly-S but it was too glossy; we flattened with a matte clear. I chose to leave
the model plain, but my grandson (a Jeff Gordon/NASCAR addict) insisted that no
real man would drive a neat machine like that without decorating it. So, right
or wrong, we added a few touches from the spares envelope in obvious places.
This project was quite time intensive, but the results were worth the time invested. I would rate the model higher except for the fact that the cost presupposes more history and marking info be provided with the kit; a certain amount of research is tolerable but I prefer not to spend the time trying to find reference material on an obscure subject, and put it into the modeling instead. A nice little decal sheet would have been welcomed, as well. Still, it is a well rendered, interesting piece; I'm glad we had a chance to build it, and it did provide excellent experience in handling resin and photo-etched parts.
Copyright ModelingMadness.com. All rights reserved.