Dragon 1/35 JS-II 'Stalin'
| KIT: | Dragon 1/35 JS-II 'Stalin' |
| KIT #: | ? |
| PRICE: | £12.00 (used) |
| DECALS: | See review |
| REVIEWER: | Steve 'Jurassic' Budd |
| NOTES: |
| HISTORY |
The JSII was Russia’s answer to the German Tigers and Panthers that were causing T34 crews ‘problems’ whenever they ran into each other. Packing the punch of a Tiger with the all up weight of a Panther its arrival on the battlefield was something of a shock to the Germans who thereafter no longer had it quite so much their own way. Readers will encounter the nomenclature ‘ISII’ and ‘JSII’ when touring the web – these are, for all practical purposes, the same animal.
| THE KIT |
Dragon’s kit is a delight of beautiful surface texture and finely rendered detail hampered in places by what is something of a signature tendency towards ‘problematic fit’.
Moulded in light grey plastic throughout the kit would be a quick build straight out of the box. The plastic is softish and responds well to both Tenax R and Micro Weld.
 Decals provide turret
markings for several vehicles and if memory serves these are for Russian,
Polish and Czech examples.
Decals provide turret
markings for several vehicles and if memory serves these are for Russian,
Polish and Czech examples.
The only ‘option’ I guess (if you can call it that) is whether to include all, some or none of the external fuel drums.
Examination of the parts reveals tedious clean up of mould seams is centred around the road wheels. I put mine into my mini drill and zapped them in short order with 1200 wet n dry. Ejector pin marks appear on all the visible track sections – you either accept them, depict a vehicle running through glutinous mud or fill and sand (as I did).
The instructions are straightforward and clear with no hidden pitfalls beyond this one avoidable glitch – the return rollers are probably located too high on the hull. This makes it impossible to fit the upper track runs if you assemble the hull halves together and then add the rollers before trying to sort the tracks. I simply built up and painted the whole running gear and nailed it to the lower hull half. The upper hull can then be glued on. Dress the seams, mask the tracks and spray the upper hull and ‘Bobs Your JS2’.
Sadly, the kit is currently out of production but if it ever comes back ‘on line’ or you see a second hand one buy it (even if you don’t ‘do’ tanks) as it’s a luvvie.
| CONSTRUCTION |
 No need for a
‘Glue A to B’ yawnathon here, I’ll just deal with the main events.
No need for a
‘Glue A to B’ yawnathon here, I’ll just deal with the main events.
Lower Rear Hull Plate – I wound up with a whopping three mill gap along the lower edge. A piece of plastic strip and some medium thick superglue dealt with this.
Tracks – Comprised of separate links, each side was made up into two sections: the long straight bit that lies under the road wheels curving half way up the front idler wheel and ditto the rear drive sprocket and then the equivalent run over the top.
The links are a sufficiently tight fit without glue that a pretty accurate test section can be pressed together and offered up to ascertain how many are required each side, dependent on how much sag you want in the finished result. See the ‘Kit’ section above for a few choice words in how to avoid ‘track depression’.
Turret – The kit supplied grab handles were ditched over brass wire replacements simply because it avoided having to try and eliminate the mould separation lines while keeping the things round (impossible!).
The welding along the sides was dressed with a pyrogravure to eliminate the seam between top and bottom halves.
 Extras
– Sadly, there was no dedicated brass set for the Dragon kit when I bought
it so I picked up the Eduard one for the Italeri JSII ‘en spec’. Happily,
the engine screens were a pretty good match for the plastic mouldings so
the apertures in the hull were cut out and a simple, rectangular box was
made for each (to avoid simply seeing through into the bottom of would
otherwise have been a featureless hull).
Extras
– Sadly, there was no dedicated brass set for the Dragon kit when I bought
it so I picked up the Eduard one for the Italeri JSII ‘en spec’. Happily,
the engine screens were a pretty good match for the plastic mouldings so
the apertures in the hull were cut out and a simple, rectangular box was
made for each (to avoid simply seeing through into the bottom of would
otherwise have been a featureless hull).
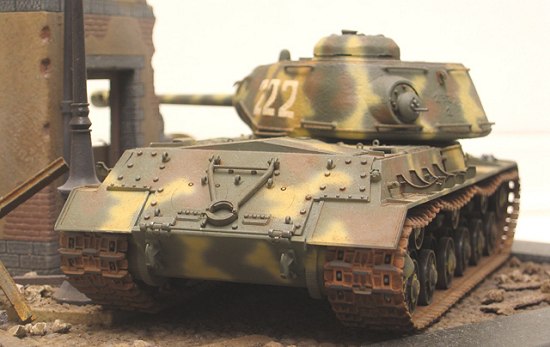
Similarly, the external fuel tank support brackets were sourced from the brass set. These make up into neat, scale replacements but each employ four parts and are equally challenging to hold, bend, align and glue without dropping the retaining strap brackets in particular and losing them forever to the part-eating floor covering. Don’t chicken out on doing them though as they do look the biz.
Finally an etched spade and saw was made up and put to one side for fitting after the paint was on (the metal parts of these were left in the supplied nickel plate as this looks far better than paint).
Oh yes, an MV clear lens was super glued into the headlight aperture. I know this would never have survived the trip to Berlin in WWII but it’s a groovy addition and as I insist on full editorial control over all matters headlight you’re overruled.
| COLORS & MARKINGS |
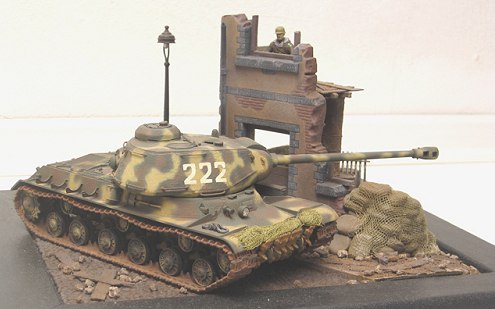
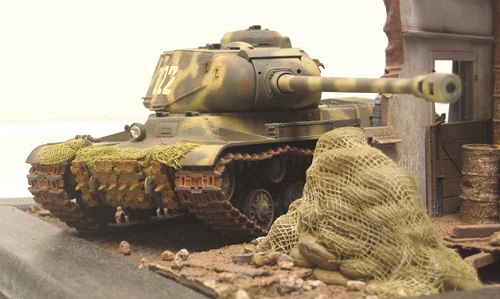
I’d always been led to believe that your WWII Russian tank can be supplied to you, the discerning user, in any Model T colour so long as it’s pretty much any dark green in your paint collection. Wrong. Apparently, as I was happy to discover, while examining Eduard’s paint mask set for the JSII those Ruskies knocked out ‘222’ in a scheme of sand and earth brown over the ubiquitous green. ‘That’s for me’ I thought and it was.
The tracks were sprayed Tamiya Dark Earth and then plastered in several reddish shades of pastel chalks. This was ‘fixed’ by a dusting of matt varnish.
| THE DIORAMA |
I’ve never had a quick turn around in kit completion. In fact I’m not so much a slow finisher as someone who’s better off measuring the period taken in nailing a model together in geological time – this effort’s actually from my plasticeous period when numerous techniques gleaned from various magazines and books converged in an evolutionary soup of ‘let’s give it a try and see how it goes…’
 It was this
willingness to suck ‘n see that nearly resulted in the almost completed
diorama flying against a wall. The thing was just about as you see it in
the shots – virtually there and seeing the end in sight I found myself in a
dangerously confident mood.
It was this
willingness to suck ‘n see that nearly resulted in the almost completed
diorama flying against a wall. The thing was just about as you see it in
the shots – virtually there and seeing the end in sight I found myself in a
dangerously confident mood.
I figured all it needed was a liberal dusting of pastel chalks to bind the groundwork together. So I got busy with the stuff until, utterly sated from an orgy of weathering, I sat back for the final, decisive act – fixing the chalk.
I remembered some modelling sage reporting in the plastic press that 3M Photo Mount was the ideal weapon of choice for this task and as I had a can handy reached for it while continuing to leave my conscious brain idling in neutral. Oh dear.
The can was shaken (but not stirred) and in one fluid movement I hit the button, the cross hairs set for a firing pass over the base in a full deflection shot. Expecting a fine, gossamer spray, the remarkable thing (to me) was the unexpectedly astonishing quantity of viscous liquid that flooded towards and over the carefully manicured components. If you had walked in immediately following this fatal act (with your hands clamped over your ears) you’d be forgiven for believing that Toby Maguire himself had loosed off a double dose of Spiderman web at my latest effort.
I simply couldn’t believe that I could navigate through what was for me, a real modelling odyssey only to wrench defeat from the slavering jaws of plastic victory. It was a mess. A really, really big mess. I sat just staring at it, suddenly able to see every minute of the many hours nudging the thing closer to the moment I’d be able to sit back and appreciate the results.
I was overwhelmed by a powerful urge to trash it and try to forget I ever started it. I went outside my modelling shed and picked an appropriate wall. A little plastic voice inside said that I was actually about to pursue a cop out, adding hopefully that every problem has a solution. Mine was white spirit (a solution indeed) brushed over the gunk. Brush, clean, brush, clean, brush, clean. It was laborious but heartening as it all returned to a pre-apocalyptic state with a light (!) spray of matt varnish.
 I’m truly glad I
didn’t lunch it after all and ironically the episode taught me a great deal
about things I should have worked out before hand. These days I test
something new on a bit of scrap first!
I’m truly glad I
didn’t lunch it after all and ironically the episode taught me a great deal
about things I should have worked out before hand. These days I test
something new on a bit of scrap first!
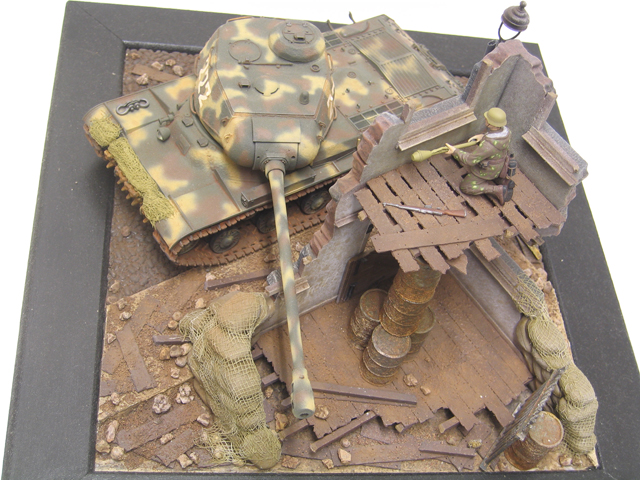
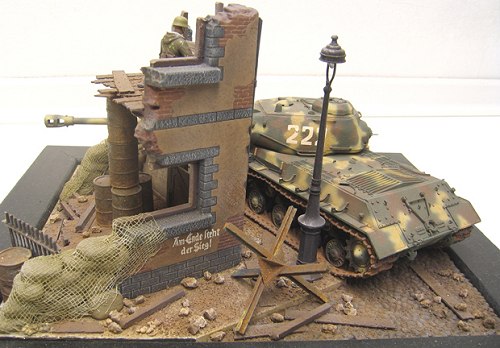
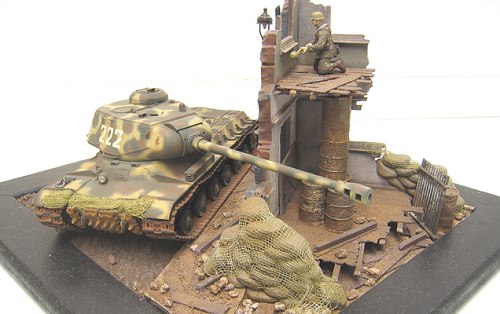
The thing represents a JSII in central Germany having apparently fought its way up to the street corner (an emergency, hastily constructed firing position).
Unbeknown to the crew Hans has hidden out of sight and fancies doing the anti social thing of lobbing a Panzer Faust into the engine deck of Ivan’s JSII once it’s fired and begun moving off to a (safer) distance.
The cobbles are mung beans (never eaten them) and the pavement is ubiquitous plastic card and foam board.
The house is a £3 Italeri cheapie skinned with card and fitted with scratched floors and sundry fittings. Likewise the wooden door was scratched with plastic, brass sheet and wire.
The figure is from the Dragon Volksturm set.
| CONCLUSIONS |
I love it – the kit and the real thing. The JSII embodies two difficult design targets in a tank: a big gun and a relatively light weight. It looks the mean Russian bruiser that it so obviously was.
The diorama was so nearly a disaster but persistence paid off and I’m glad. Hope you like it – enjoy your modelling. I do!
October 2004
If you would like your product reviewed fairly and quickly, please contact me or see other details in the Note to Contributors.