Omega K 1/35 Ural 4320 Truck
|
KIT # |
147 |
|
PRICE: |
$39.95 CDN |
|
DECALS: |
See Review |
|
REVIEW : |
Jimmy Cancino |
|
NOTES: |
Original kit much modified. |
|
HISTORY |
(By Scott Van Aken) Apparently the URAL 4320 is the major 6x4 truck type produced in Russia. As is normal with a well designed and rugged truck chassis, the number of possible uses other than for transporting troops and military equipment are only limited by the imagination of the constructor. With the fall of the Soviet Union and massive monetary support, companies have had to rely on strict capitalism to stay alive. That means designing their equipment to meet the needs of prospective users. For the folks that make the 4320, that meant expanding beyond the military and moving into other fields like providing mobile work shops for oil fields as well as making fire trucks, produce trucks and general delivery vehicles, all based on the same chassis.
|
THE KIT |
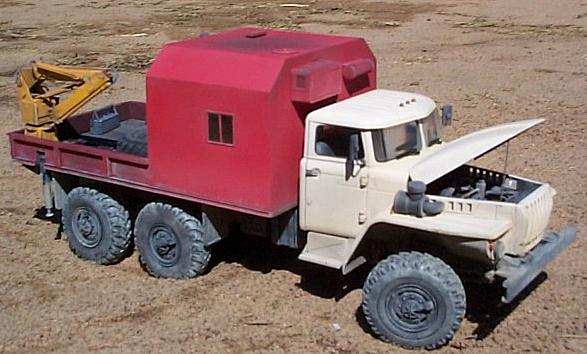
When Omega K models released their 1/35 scale Ural 4320 Soviet military truck, I was simply compelled to build one. The sucker for offbeat subjects that I am just couldn’t resist. The kit represents the standard cargo-carrying version of this very prolific soviet truck. No options or alternate versions are offered in this kit
 However, as inspiring as the box art was., I could not resist
digging the internet for any form of civilian version of this truck. I found a
goldmine at a Russian website of the what seems like the export agency for this
type truck ( www.gird.ru). It featured over seventy different civilian variants
of this basic model. From fire truck to dumpers, from loggers to tankers… you
name it!
However, as inspiring as the box art was., I could not resist
digging the internet for any form of civilian version of this truck. I found a
goldmine at a Russian website of the what seems like the export agency for this
type truck ( www.gird.ru). It featured over seventy different civilian variants
of this basic model. From fire truck to dumpers, from loggers to tankers… you
name it!
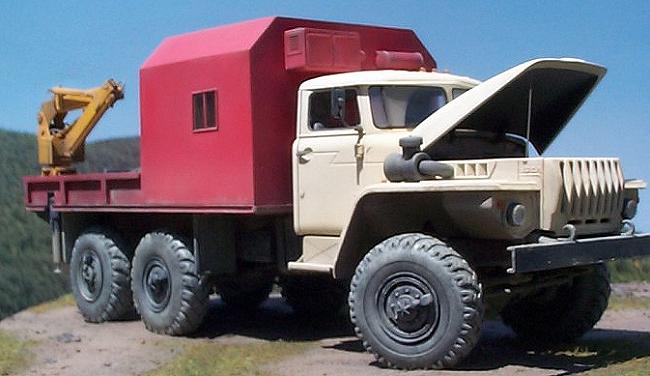
The one that appealed to me most was an oil field repair unit named Ural ANRV-1U.
An in-box lookup revealed the sprues molded in a very soft dark green plastic with heavy flash in some areas but at least the mold halves were not offset and the round or tubular parts showed a proper round cross-section. Several parts displayed deep sink marks. The most notable among those were the frame rails, rear suspension units, Frame crossmembers, the cargo bed and tailgate, the fuel tank, the cabin roof and the fender tops among others.
A small decal sheet featuring glossy national insignias for several eastern block and post eastern block countries as well as a few unit markings is included. Quality is fair at best.
The clear parts turned out to be quite nice actually. I would later discover that the fit between the windshield and the cabin especially in the corners left a bit to be desired. This was corrected using a drop of MicroKrystalKlear and a bit of of convincing with 5 minute Epoxy.
|
CONSTRUCTION |
Basic assembly started with the chassis and suspensions. The chassis was lengthened aft of the rear wheels using Evergreen "C" section styrene channel to match the frame rail dimensions.
 After about 25 hours of parts clean up, the suspension
components were assembled and detailed with additional scratch built details
such as piano wire brake, fuel & hydraulic lines as well as styrene steering
linkages, air tanks and shock absorbers. Once cleaned up, I found the kit’s
chassis to be fairly well detailed and the multi-part drive shafts are a nice
touch which gives the drivetrain a genuinely busy look.
After about 25 hours of parts clean up, the suspension
components were assembled and detailed with additional scratch built details
such as piano wire brake, fuel & hydraulic lines as well as styrene steering
linkages, air tanks and shock absorbers. Once cleaned up, I found the kit’s
chassis to be fairly well detailed and the multi-part drive shafts are a nice
touch which gives the drivetrain a genuinely busy look.
The soft vinyl tires looked really good except for the fact that they displayed many deep recessed swirl marks on the sidewalls. After pondering what type of filler could do the job on such resilient material, I tried trusty old Tamiya putty and it worked just fine. It sanded away perfectly and maintained good adhesion to the vinyl. A circumferential mold separation line also had to be cut away with a fresh X-Acto blade. The tires were then rotated by hand against a piece of coarse sandpaper (#1500) to give the treads a worn and used look .
A note of caution here: having used putty on the tires, this of course implied that they would have to be painted. Do not use oil-based enamels or lacquers on the tires. If you do, they are likely to remain sticky for the next million years or So. I used ModelMaster 2 Panzer grey acrylic and they turned out great and they were dry within an hour.
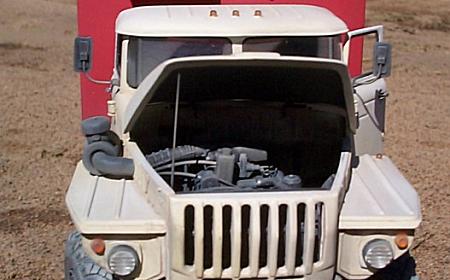
Although an engine is supplied in the kit, it was so basic that I elected to scratch build a new one from sheet styrene wrapped around an acrylic block. A few components from the kit’s engine were retained and the rest of the engine and compartment details including the distribution pulleys ant intake ducting were fashioned from styrene and brass wire following reference photographs obtained from the engine manufacturer: YAMZ. The distribution belt was fashioned using thin vinyl material cut into a 0.015" wide strip and wrapped around the engine pulleys ant tacked in place at each pulley using MicroLiquitape. An epoxy droplet secures the joint located under the lowest pulley.
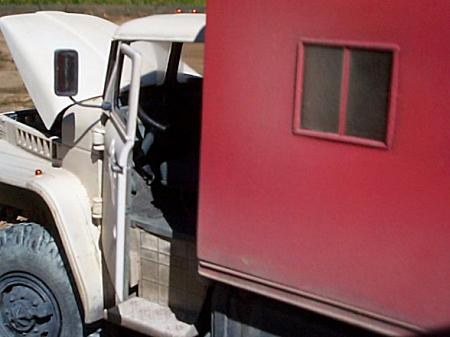 Next up was the cab interior. A new shift lever was fabricated
from .020" piano wire with an epoxy knob and a fresh set of pedals were
fashioned from styrene . The integral seat bases were cut out and replaced with
proper tube framing from 0.025" brass rod. A new "civilian style"
fender mounted air cleaner assembly was fabricated to match reference photos
using various diameters of styrene tubing and rod.
Next up was the cab interior. A new shift lever was fabricated
from .020" piano wire with an epoxy knob and a fresh set of pedals were
fashioned from styrene . The integral seat bases were cut out and replaced with
proper tube framing from 0.025" brass rod. A new "civilian style"
fender mounted air cleaner assembly was fabricated to match reference photos
using various diameters of styrene tubing and rod.
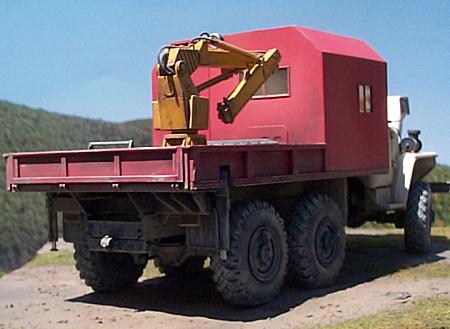
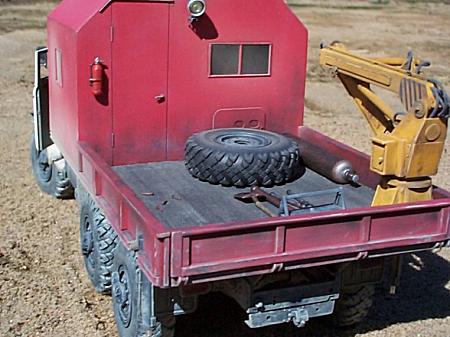
Now the fun parts… The rear bed, shop compartment and crane assemblies now had to be created (Basically all that is red or yellow). The kits bed was used as a dimensional guide to cut the new bed.
Bed sides, shop compartment and door were the cut from 0.040" ABS sheet and assembled with Tenax7R adhesive. The rain gutter, window sills, vents, air conditioning and filtering units were scaled from the reference photograph and again made from Evergreen styrene sheet and shapes. The exposed part of the bed floor was lined with strips of scale planking from Northeastern Scale Lumber and given a wash of 8 parts Isopropyl alcohol 70%USP and 1 part of Tamiya acrylic mix of ½ flat black and ½ dark brown.
The crane was then scratch built by first laying up the basic shapes of the booms ,base and outrigger frame from styrene sheet and shapes and the unit was then detailed with miscellaneous bits of photo etched brass, piano wire or 0.032"rubber "spaghetti" for hydraulic hoses (Verlinden). Also, the crane underfloor sub- frame (in black at the aft/lower end of the chassis) featuring the hydraulic stabilizing jacks, is among the hand made assemblies. It too was fabricated using the same materials as the rest of the crane. Grandt Line nuts & bolt heads were used throughout and most of the assembly was carried-out using thin and medium consistency Alpha-cyanocrylate (CA) glues.
The kit-supplied spare Tire and wheel was then prepared, weathered and "thrown" in the back end of the truck along with a Nitrogen bottle, tool box, valve wrench, and padlock cutters all of Italeri origin.
A few Grandt Line bolts were also "thrown in" for good measure. A parts box fire extinguisher and worklight complete the bed area.
|
PAINT |
 Painting was relatively straightforward as all the major
components could be painted separately.
Painting was relatively straightforward as all the major
components could be painted separately.
I used my trustworthy ModelMaster enamels in basic colors: flat black, insignia white, red and yellow.
The engine compartment and cab interior were painted ModelMaster light ghost grey.
The molded-on cab roof marker lights were painted chrome silver and the coated using Tamiya clear orange acrylic.
In order to give this truck a well worn and sed look, weathering was applies using hand and airbrushed accents using ModelMaster flat gull gray and light earth as well as brushed-on dry pastels sealed with AeroMaster flat clear acrylic.
|
CONCLUSIONS |
In conclusion, this is a very decent kit , which after much cleaning up, will turn out to be a very convincing replica of a massively produced Soviet workhorse.
This medium sized project turned out to be quite enjoyable and breaks away from the usual military subjects.
Recommended !
Copyright ModelingMadness.com
If you would like your product reviewed fairly and quickly, please contact the editor or see other details in the Note to Contributors.