Academy 1/35 Tiger I (early)
| KIT #: | 1348 |
| PRICE: | $49.96 |
| DECALS: | ? |
| REVIEWER: | Jason Blair |
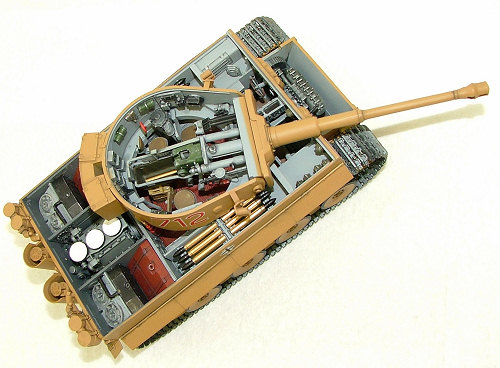
| NOTES: | kit includes complete interior |
| HISTORY |
Not being a big researcher and trusting the model companies that they know more than me, I will refrain from adding to the piles of information that can be found on the web.
| THE KIT |
The kit contains 1 lower
hull and 9 trees all in beige, 3 trees in grey and 4 trees in dark grey that
make up the individual track links.
 Parts are bagged in groups according to
where the items are located to build the tank. Rounding out the parts are s tree
of poly caps for the road wheels and one tree of 4 vinyl hoses for the air
cleaner. One fret of photo etched screen is also included for covering the rear
engine decking area.
Parts are bagged in groups according to
where the items are located to build the tank. Rounding out the parts are s tree
of poly caps for the road wheels and one tree of 4 vinyl hoses for the air
cleaner. One fret of photo etched screen is also included for covering the rear
engine decking area.
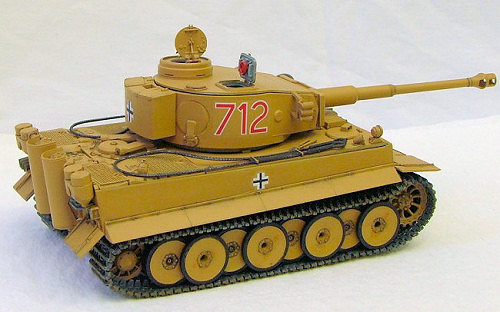
Decals are provided for 4 different machines one in dark, yellow, red brown and forest green. One in dark yellow with a winter white wash based in Russia. The third and forth options are in Panzer grey or dark yellows both based in different parts of Russia. The final version in dark yellow based in Tunisia.
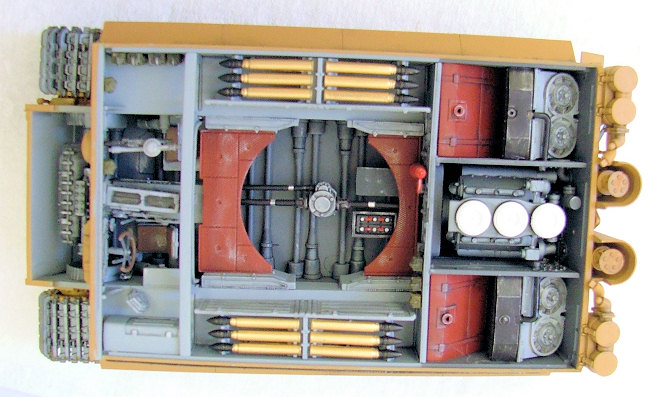
Instructions are contained in a 20 page booklet with the center of the book showing a 3D cutaway view of the interior of all major parts and callouts identify everything that is visible. Box shows an illustrated version of the tank with the side panels of photos of an actually built model. These pictures came in handy in identifying a few locations of where certain parts were to be installed.
| CONSTRUCTION |
I decided early on to build it in 4 subsections, lower hull, top decking, main gun and turret and last the road wheels.
Beginning with the lower
chassis I added all the road wheel arms and other small stuff to the bottom of
the hull. Once all that was installed I moved to the back and worked on the back
cover plate. The first option that needed to be decided on was what air filters
 to use. I chose the early
type. One area that was difficult was the exhaust muffler. There are five small
pins that attach to a plate on top and the actual muffler can on bottom.
Removing these pins had me crawling around on my hands and knees looking for
them as they exploded off the tree when cut free. As it ended up one side only
has 3 holding the top to the bottom. Thank goodness that the muffler comes with
a shroud that covers most of it.
to use. I chose the early
type. One area that was difficult was the exhaust muffler. There are five small
pins that attach to a plate on top and the actual muffler can on bottom.
Removing these pins had me crawling around on my hands and knees looking for
them as they exploded off the tree when cut free. As it ended up one side only
has 3 holding the top to the bottom. Thank goodness that the muffler comes with
a shroud that covers most of it.
With that done I moved to the interior. I followed the instructions as much as possible on color callouts and construction sequence. I did use Model Master Light ghost grey for light interior and Model Master Euro gray for the engine compartment. The engine and drive train assembly look very realistic when completed. I left off the round pieces (F28 x 3) till I was almost finished since these were going to be painted white. All detail painting was done according to the instructions using Model Master colors. There is a ton of detail painting which really slowed the progression of completing this model.
Top decking came next which was a nice break from all the tiny painting and washes. I glued everything that the instructions called for and left them for final painting.
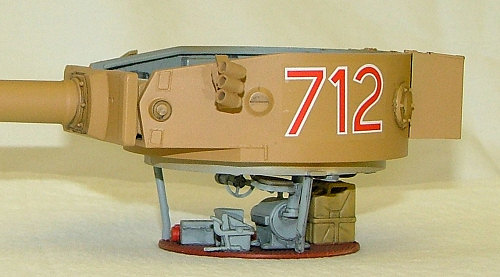 The turret was next. No
real surprises here except for locating where part J42 is attached. The picture
shows it attaching at one location but as other pieces are attached I realized
it was wrong. None of the photos on the side of the box help much either.
Another problem was attaching the hatch on the side of the turret. I had
planned on leaving this hatch open but realized I had already glued the
mechanism that keeps it from opening and closing to the inside of the turret. Oh
well.
The turret was next. No
real surprises here except for locating where part J42 is attached. The picture
shows it attaching at one location but as other pieces are attached I realized
it was wrong. None of the photos on the side of the box help much either.
Another problem was attaching the hatch on the side of the turret. I had
planned on leaving this hatch open but realized I had already glued the
mechanism that keeps it from opening and closing to the inside of the turret. Oh
well.
The last assembly was the road wheels. I did this step in three nights. Painting the wheels was started with a sharpie pen and then filled in with flat black. I did forget to install the spindle that held the rear most wheels in position when the lower hull was being built. Thank goodness for super glue. Once the road wheels where done I assembled the track links. These fit really well, which made building them rather quickly. I built about 5 straight sections using at least 10 links. Only challenge was making sure they were straight. Once dried I installed them on the wheels. I did manage to only mess up one set. I probably will go back and break them off and re-attach.
| COLORS & MARKINGS |
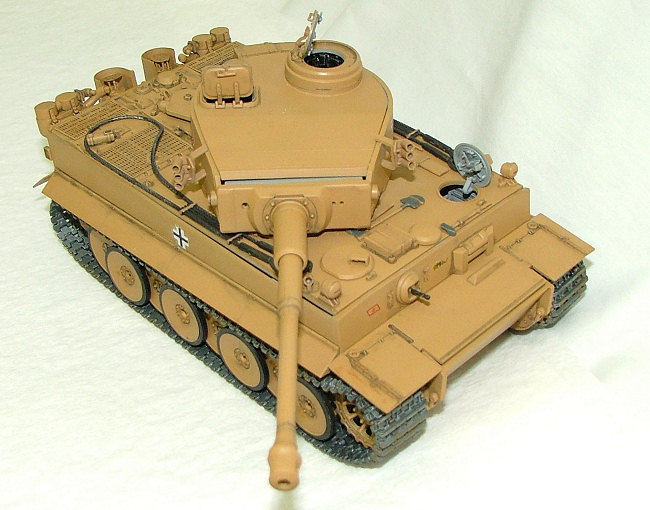
 Since so much work had been
spent on painting all the detail I decided to be lazy on the outside paint
scheme. I chose an all dark yellow version of the 504th Heavy Tank
Battalion Afrika Korp, based in Tunisia. I used Tamiya dark yellow for this
color. Painting was fast and easy since no other colors would be used.
Since so much work had been
spent on painting all the detail I decided to be lazy on the outside paint
scheme. I chose an all dark yellow version of the 504th Heavy Tank
Battalion Afrika Korp, based in Tunisia. I used Tamiya dark yellow for this
color. Painting was fast and easy since no other colors would be used.
All markings were from the box. I did have problems with the two decals that fit between the front machine gun and driver’s periscope. The decals when placed next to each other were too long to fit the required space. I took my own liberty and stacked them instead of placing them side by side.
| CONCLUSIONS |
Well once I finished it I
had my son and his friend tell me what they thought. They couldn’t believe that
5 guys rode in one of those things. I guess I had to take it that they liked it.
Overall it was a very time consuming project. It was not a difficult build just
a lot of thought had to go into each step so that items that were the same were
painted together. I believe that anyone who has built a few models can build
this thing. The serious modeler can probably even spruce it up and make it look
great. I would highly recommend it to anyone interested in recreating a historic
piece o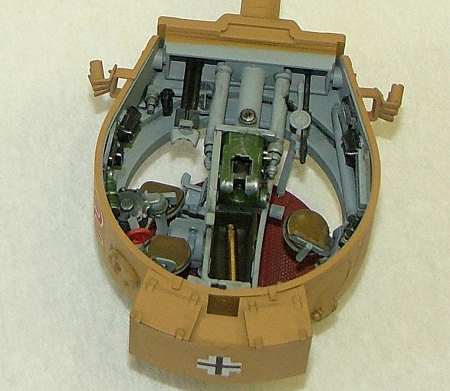 f history and
learning what is actually inside of one of these beasts.
f history and
learning what is actually inside of one of these beasts.
On a side note, does anyone have any ideas as to how to show all the pieces together? I have all the exterior panels and don’t want to set them aside to be lost in the future. Please email me cadman66@comcast.net with any suggestions. Thanks.
| REFERENCES |
Google search Tiger-1 Early Version
December 2006
If you would like your product reviewed fairly and fairly quickly, please contact the editor or see other details in the Note to Contributors.