A friend of mine noticed that my armor was alwayz dark and brooding and
suggest that I lighten them up a little with different shades. I admit,
it was something that I thought of too after my SdKfz 251/1 a few months
prior to this build. So, I purchased a new GREX TRG with Compressor in
March after retiring my old faithful Paasche H airbrush. (I still use it
for overall primer coats) I had seen a demo in Mufreesboro last October
and talked to the Rep (Bryant Dunbar) again in January in Chattanooga,
my new home. WOW!!! So this is what it's like in the modern age! I love
this set. Anyway, in a departure from my usual routine, I gave the
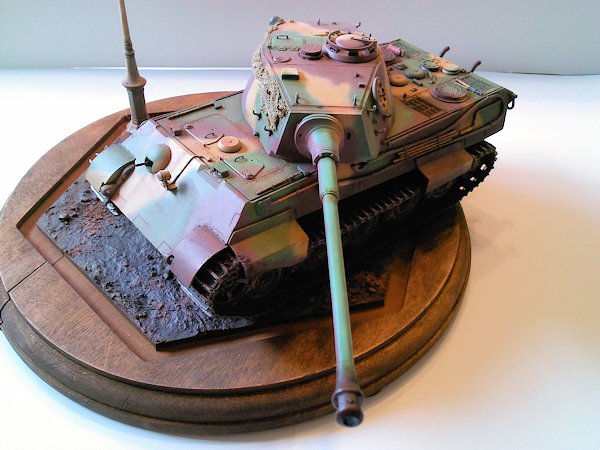
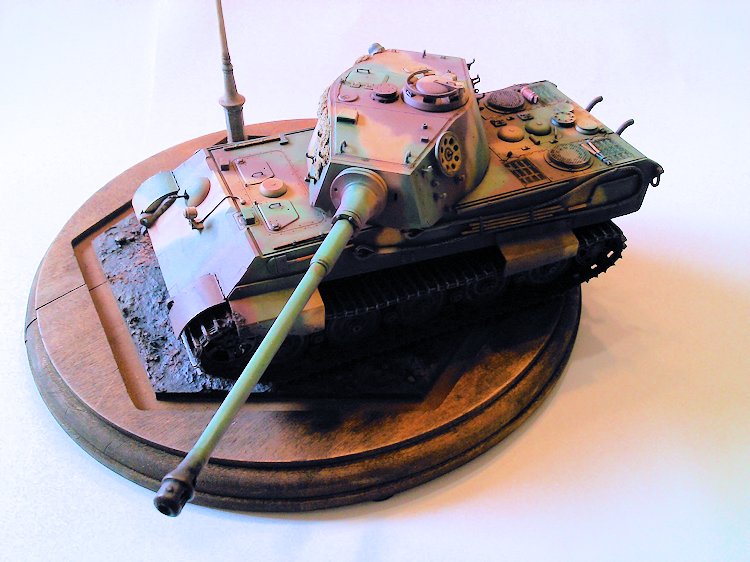
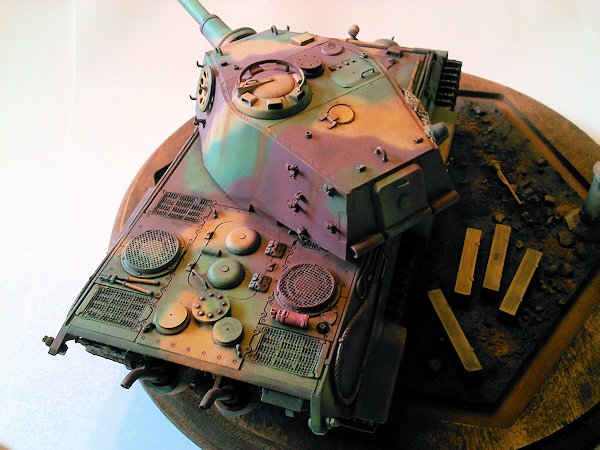
Tiger an overall coat of Dark Primer Red. TAMIYA Hull Red was used
straight from the bottle with a little TAMIYA thinner.....about ten
percent. I let all this dry about four hours and took the GREX out and
started with the VALLEJO Tank Aces colors.....the buff color like yellow
first.......by freehand, I used the Splinter Blotched pale green and an
off color reddish brown.....and got up close and used my imagination for
the pattern....all in one sitting with just a Distilled Water cleaning
before every color. This was unheard of for me....the new GREX
compressor stopped every time it was not in use and it made things just sooooo smooth, not to mention the trigger action of the air brush
itself. I was getting lines I never got before and really enjoyed this
eminencely. I let it sit and cure and the next day, armed with my
T-GREX (my name for it) I sprayed lightened up versions of the same
Buff/Green/Brown into the centers of the pattern to give depth. (this
process I call: Johnny Depth) With all that out of the way I started on
the Chasis and used an earth brown VALLEJO color getting the tracks and
road wheels. I was careful to use the same color in the painting of the
Base, so this was put off to the side. A nice MISTING coat of FUTURE
followed and after it dried it was time to do my Dick Van Dyke Brown
wash....only not as heavy this time.......I mixed a new bottle of this
using the old TESTORS Liquid empty glue bottle.....filled it 90% with
Turpentine and put a medium sized sliver of WINDSOR-NEWTON Van Dyke
Brown (hence, the Dick) and mixed/shook it up REALLY good.
Using one of those
brushes with the long soft bristles I applied a soft wash using
capillary action doing most of the work. I repeated this application
several times as I built up the wash till it was very
pleasing....well, to me anyway, I do get out but this is SPECIAL.
Over a period of a few days I repeated the wash on the road wheels
by tipping the tank on either side, careful not to let the wash dry
in a muddled up appearance. PATIENCE is the key here and this gave
me time to start the base (I'll cover THAT next just not to deviate
from the Tiger). Corrections can be made by dipping a Q-Tip in the
terp and softly rubbing the offending place that you went a little
heavy on. I also use this technique to add streaks. After it was
all to my liking I let it dry and sprayed (misted) several coats of
VALLEJO Matte (clear) and it just sorta POPPED out at me. Very Dull
and I loved it. I broke out my pigments and TAMIYA Thinner and went
to work applying heavy dust/earth/mud build up on the running gear
and sponsons.......road wheels too, but just don't over do it.
Again, PATIENCE. Using a eye dropper I slowly dropped a small amount
of TAMIYA thinner in the area's of built up pig ness. When this
dry's, after about a few hours, you can see how realistically you
have built-up earth and mud where it's supposed to be and the
appropriate color. You can also use washes to intensify the
tone/appearance. BELIEVE me, your not there yet...........I took
out my silver pencil (ART STORE) and ribbed it on the teeth of the
drive wheel and DON'TOVER DO IT, along areas of the track and road
wheels where the metal on metal would rub it clear of paint. I had
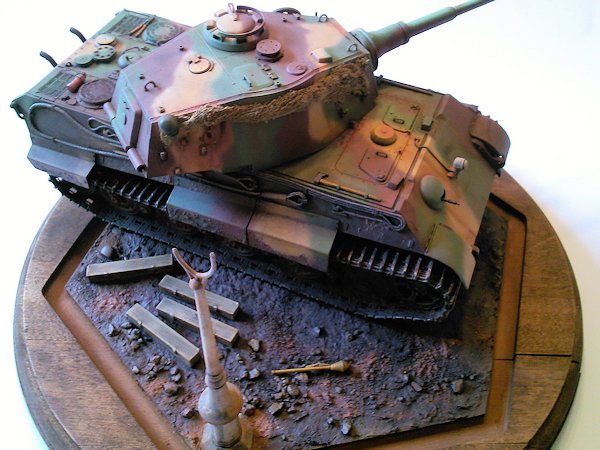
decided to mount my Beast on a street corner a while ago and in an
abandon state. So I needed to be careful about this as grim/dirt and
a wee bit of rust would soon have it's effect. When I got it to my
liking I applied VALLEJO periscope color to the scope's and sealed
that with TAMIYA Clear gloss. On to the tools. In order to REALLY
make you kit POP at you, these must be done well.........and use
your imagination. First, I took the fire extinguisher and brought it
from the INTERIOR of the Tank and mounted it on the outside, hence
the RED color.......we can do that, we be modelers....for the wood
handles of the tools I did a dark grey, using POLLYSCALE DK Grey and
 started with TAMIYA BUFF for the wood. When the Buff was dry, I
applied a small bit of Burnt Umber Oil Paint and dragged it in one
direction give it a wood grain effect, which is exactly like I
wanted. This was hand sealed with VALLEJO Matte clear when it dried
a day. The Cables were given the DK Grey paint and I sealed those as
well, the same as the tools and went over the high points with the
silver pencil given it a metallic sheen. Again, what I wanted.
These all got a light wash of their own using the Dick Van Dyke
wash. When I wanted this to dry I place it in a vice so that I
could give the underneath a was too.........this I applied heavy
because after all, it was the bottom. And a point here. If you are
serious in competing at Shows as I once was, you must pay attention
to the bottom. It's part of the Model, so don't think that Judges,
like myself, don't look there......sometimes attention to detail is
the difference.
started with TAMIYA BUFF for the wood. When the Buff was dry, I
applied a small bit of Burnt Umber Oil Paint and dragged it in one
direction give it a wood grain effect, which is exactly like I
wanted. This was hand sealed with VALLEJO Matte clear when it dried
a day. The Cables were given the DK Grey paint and I sealed those as
well, the same as the tools and went over the high points with the
silver pencil given it a metallic sheen. Again, what I wanted.
These all got a light wash of their own using the Dick Van Dyke
wash. When I wanted this to dry I place it in a vice so that I
could give the underneath a was too.........this I applied heavy
because after all, it was the bottom. And a point here. If you are
serious in competing at Shows as I once was, you must pay attention
to the bottom. It's part of the Model, so don't think that Judges,
like myself, don't look there......sometimes attention to detail is
the difference.
 as a Panther and a unreliable transmission. Needless to mention that
it consumed an ungodly amount of fuel at a time when fuel was
critical. It is said that for every King Tiger built, three
Panthers or 5 Mark IV's could be built...........personally, I would
have gone for the Mark IV's which would have given the Germans at
least 3000 more Tanks to deal with the Allied Offensives on both
Fronts. It would NOT have won the War for Germany, but it would have
perhaps prolonged the outcome for other Weapons to come online. The
King Tiger is a most intimidating Vehicle. The massive frame
mounting the 88 gun was deadly accurate and facing a numerically
superior enemy had it's choice of targets. Used in a defensive roll
it would hinder any advance except when facing air power in
conjunction with ground forces. Thru out 1944 most of the Armor on
the Western Front was hidden during the day because of roving bands
of Fighter Bombers, such as the Thunderbolts and Typhoons that were
having field days against ground forces of the Whermacht. Even 8th
Army P-51's, during long range escort duty were given orders to
strafe all moving targets on the way back from Bombing missions into
Germany. By that time Luftwaffe interdiction was useless.
as a Panther and a unreliable transmission. Needless to mention that
it consumed an ungodly amount of fuel at a time when fuel was
critical. It is said that for every King Tiger built, three
Panthers or 5 Mark IV's could be built...........personally, I would
have gone for the Mark IV's which would have given the Germans at
least 3000 more Tanks to deal with the Allied Offensives on both
Fronts. It would NOT have won the War for Germany, but it would have
perhaps prolonged the outcome for other Weapons to come online. The
King Tiger is a most intimidating Vehicle. The massive frame
mounting the 88 gun was deadly accurate and facing a numerically
superior enemy had it's choice of targets. Used in a defensive roll
it would hinder any advance except when facing air power in
conjunction with ground forces. Thru out 1944 most of the Armor on
the Western Front was hidden during the day because of roving bands
of Fighter Bombers, such as the Thunderbolts and Typhoons that were
having field days against ground forces of the Whermacht. Even 8th
Army P-51's, during long range escort duty were given orders to
strafe all moving targets on the way back from Bombing missions into
Germany. By that time Luftwaffe interdiction was useless. 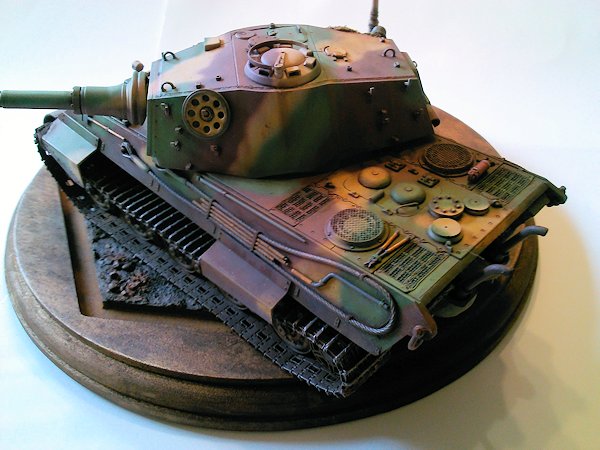 painting. I did not glue the chasis and hull together as yet because I decided early on the use the FANTASTIC
MAGIC TRACK, from a bitch kit I had from DRAGON. While looking over the DRAGON
kit I sought out better tool parts along with Periscopes for the Commanders
cupola position. I must say that most of the time you can get superior
replacement parts out of your extra parts box. I don't know why, but ever since
plastic individual track link came into being, I took to it like a fish in
water. It really is easy and add's to the extreme realism of the model. These
offerings were no different and I used the TESTORS Black Bottle Applicator Glue,
which give you plenty of set up time. I waited about 15 minutes after a three
quarter run was assembled and mounted them onto the running gear.....take your
time and don't force the issue....and do not forget to give it the proper
tension/sag...............make real sure your alignment is even and straight
too. During the rear plate construction I used liquid glue to stipple the
exhaust. Planning ahead is always to your favor as this will be given a rust
treatment using pigments and washes after the paint/weathering process.
I might want to suggest that you leave the jack holder off until last. I knock
mine off countless times. It just makes sense. On the front plate I used fine
solder wire for the electrical leed for the head light. An often forgotten item
of importance. The tank is starting to take shape and more fun will begin as we
now move to the Turret.
painting. I did not glue the chasis and hull together as yet because I decided early on the use the FANTASTIC
MAGIC TRACK, from a bitch kit I had from DRAGON. While looking over the DRAGON
kit I sought out better tool parts along with Periscopes for the Commanders
cupola position. I must say that most of the time you can get superior
replacement parts out of your extra parts box. I don't know why, but ever since
plastic individual track link came into being, I took to it like a fish in
water. It really is easy and add's to the extreme realism of the model. These
offerings were no different and I used the TESTORS Black Bottle Applicator Glue,
which give you plenty of set up time. I waited about 15 minutes after a three
quarter run was assembled and mounted them onto the running gear.....take your
time and don't force the issue....and do not forget to give it the proper
tension/sag...............make real sure your alignment is even and straight
too. During the rear plate construction I used liquid glue to stipple the
exhaust. Planning ahead is always to your favor as this will be given a rust
treatment using pigments and washes after the paint/weathering process.
I might want to suggest that you leave the jack holder off until last. I knock
mine off countless times. It just makes sense. On the front plate I used fine
solder wire for the electrical leed for the head light. An often forgotten item
of importance. The tank is starting to take shape and more fun will begin as we
now move to the Turret.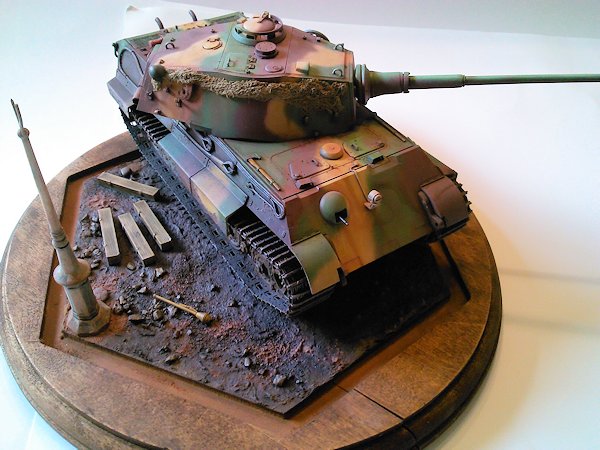 On the Third day I carefully sprayed the same red brown
VALLEJO color of brown that I used on the chasis and
wheels/tracks..........I added two more browns to bust it up for
depth and added some pigments too. The accessories were already
painted and the whole thing glossed with FUTURE in misting
coats. After about an hour I gave it a sludge wash of Dick Brown
it really was looking nice. The Lamppost was beat up, painted,
washed and pigmented too......when dry a final few misting's of
flat coat did the whole scene justice. Off came the masking
tape and an oil wash of the wood area of the base was applied. I
let it dry overnight and another sealer coat of flat and it was
finished except for putting white glue under parts of the track
and mounting it on the base.
On the Third day I carefully sprayed the same red brown
VALLEJO color of brown that I used on the chasis and
wheels/tracks..........I added two more browns to bust it up for
depth and added some pigments too. The accessories were already
painted and the whole thing glossed with FUTURE in misting
coats. After about an hour I gave it a sludge wash of Dick Brown
it really was looking nice. The Lamppost was beat up, painted,
washed and pigmented too......when dry a final few misting's of
flat coat did the whole scene justice. Off came the masking
tape and an oil wash of the wood area of the base was applied. I
let it dry overnight and another sealer coat of flat and it was
finished except for putting white glue under parts of the track
and mounting it on the base.