| KIT #: | 7030 |
| PRICE: | $12.50 MSRP |
| DECALS: | 3 options |
| REVIEWER: | Hank Gruben |
| NOTES: | ESCI rebox - ALZ ZER Wargames approved |
| HISTORY |
(As taken from the kit
provided history): This gigantic, self-propelled tank killer was built on the
chassis of the heavy King Tiger tank, which entered service with the crack
armored divisions of the German Army in 1944. The Jagdtiger mounted a mighty
12.8 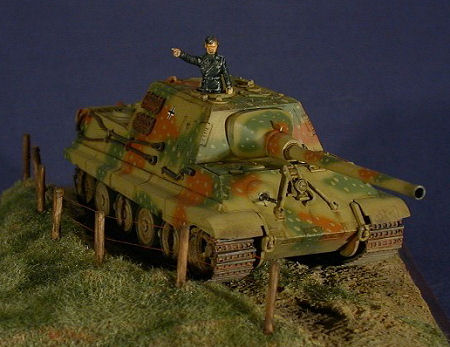 cm cannon that could
destroy any allied tank before it got within firing range. Its thick armor made
it near-invulnerable to enemy firepower, yet its weak point was the unreliable
engine, which resulted in most of them being abandoned and then destroyed by the
Germans themselves when they found it impossible to fix breakdowns.
cm cannon that could
destroy any allied tank before it got within firing range. Its thick armor made
it near-invulnerable to enemy firepower, yet its weak point was the unreliable
engine, which resulted in most of them being abandoned and then destroyed by the
Germans themselves when they found it impossible to fix breakdowns.
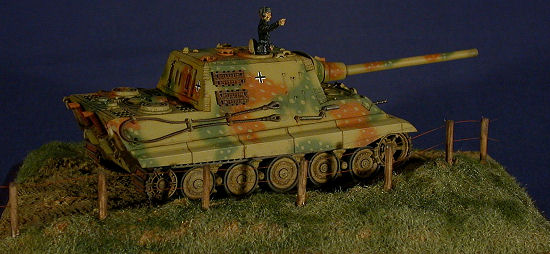
As well as the above, it could be noted that The Jagdtiger was based on the Tiger II's lengthened chassis (by 26 cm, or almost a foot) and components. It was well armed with a 128mm Pak 44 L/55 gun and one, later two MG34/42 machine guns (only one in this kit) for local and later air defense. The gun had a limited traverse of 10 degrees to the left and to the right. Its gun was the most powerful and the largest anti-tank weapon used in action during WWII and it could easily destroy any Allied tank from the range beyond the reach of most Allied guns. The maximum range of the gun was 22410 meters. The Jagdtiger was operated by a crew of six. The space inside allowed only 38 to 40 heavy two-piece (projectile and the cartridge) rounds of armor piercing and high explosive ammunition to be stored, which were handled by two loaders. The gun was mounted in a centrally mounted, fixed armored box-like superstructure. The sides of the superstructure were one-piece sloping plates with the sides of the hull.
| THE KIT |
Scott has a great sense of humor… I’ll build anything but I really like to build 1/48 British aircraft… It figures that he sends me a 1/72 German tank! You gotta love that guy, whatta kidder.
Anyways,
For a detailed review of the plastic in the box, I suggest you look at the preview… He really got this one right! I saw an old ESCI kit of this subject matter and the molds have been cleaned up a bit. Super detailers take heart, this on is right up your alley.
| CONSTRUCTION |
Hmmm. Where to start. The first four panels of the well-detailed instructions would have you clean up and build the road wheels and track. Considering that the road wheels are well detailed and also have rubber tires, I started on step five of the instructions and put the lower hull together. The lower hull itself is just two side pieces, a bottom and a back plate. Once this is together and the glue is curing, I test fitted the chassis top and was surprised to see that once everything is together, it fit quite square and proper.
 Step six has some decisions…
do you want to show off the figures or not? If you would like to show off the
beautiful figures, then you must remember to put in the stands that they fit to.
If you don’t there will be nothing for your guys to stand on and since there
isn’t any interior… I tested putting in the figures through the hatch openings
and had no troubles so the stands were glued in and the figures were cleaned up,
ready to be painted and fixed into their hatches at the end.
Step six has some decisions…
do you want to show off the figures or not? If you would like to show off the
beautiful figures, then you must remember to put in the stands that they fit to.
If you don’t there will be nothing for your guys to stand on and since there
isn’t any interior… I tested putting in the figures through the hatch openings
and had no troubles so the stands were glued in and the figures were cleaned up,
ready to be painted and fixed into their hatches at the end.
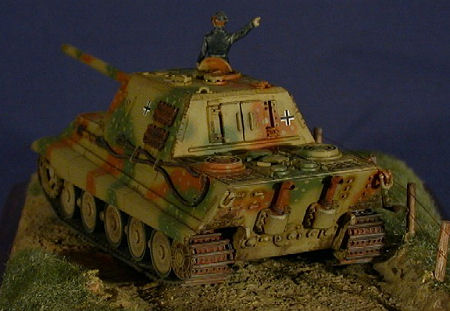
The last three build stages in the instructions would have you place the turret plate and the rear plate to the hull top. As well, it also has you place all of the pioneering tools, tow cables and extra tracks on the hull. I chose to first glue and putty the plates (with drying time in between) to get the plates “true” front and back. If this is done carefully, a minimum of putty is needed to make a seamless hull (the hull was comprised of HUGE plates of steel, welded together) with the exceptions of the “welded” detail included in the moldings.
Before attaching the top and bottom hull, I gave the interior a spray of Testors interior black. The engine vents on the rear of the chassis allow some view into the tank so black is a good way to hide this. Once the top and bottom was together, I used Mr. Surfacer 1000 (A plastic filler that is best applied with a brush, this is truly a great product) to fill in the small seams.
A word about the tow
cables. There are two cables and one of them is (surprisingly) in two parts. The
sprue that holds them is thick and the mounting stubs that hold them are thick
as well, with the end results being a couple of parts that will disintegrate no
 matter how careful you are… I
used an Exacto saw, a hot knife and far too much patience to get these parts off
the sprue. I was somewhat successful and only managed to break one of them into
tiny bits. Experienced modelers will want to replace the tow cables with thread
or wire, inexperienced modelers will have to be veeeeeeery careful.
matter how careful you are… I
used an Exacto saw, a hot knife and far too much patience to get these parts off
the sprue. I was somewhat successful and only managed to break one of them into
tiny bits. Experienced modelers will want to replace the tow cables with thread
or wire, inexperienced modelers will have to be veeeeeeery careful.
You have a choice of either vinyl, rubber band tracks or link and length tracks. The rubber band tracks are very nice and also have the roller teeth included (strangely, the teeth are missing on the link and length track) but I’m more comfortable with the styrene stuff. Both tracks are molded in a silvery medium so painting and weathering them was a snap. The instructions are very good when it comes to fitting these on the rollers.
The suspension is molded onto the bottom of the hull so the posture of the finished tank is fixed. I then cleaned up the road wheels, put everything onto the hull that was going to be the basic hull colour and then prepared the (extremely small) parts for the paint booth.
| COLORS & MARKINGS |
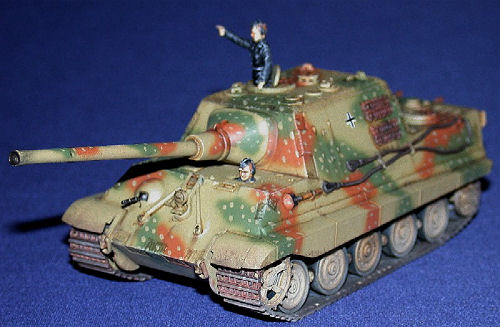
On to the paint. Here you
get some choice as there are four schemes to be had. First off is plain Panzer
Dunkelgelb 1943. The next is Dunkelgelb and panzer Olivgrun, The third is
Dunkelgelb, Olivgrun and Signalbraun and the last is Dunkelgelb, Olivgrun and
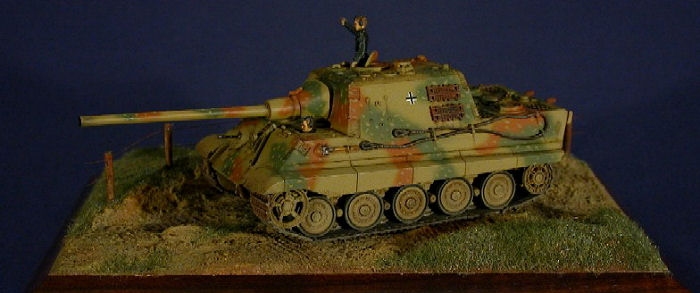
Signalbraun with spots of Dunkelgelb overall… I liked the last one so that was
my choice. There is also a full colour three-view on the back of the
side-opening box that helps greatly. All paints were from the Testors model
master range with the three main
 colours airbrushed freehand. I
usually shoot at 40lbs psi with a relatively thin paint… If you take your time
and don’t rush, a flawless finish is possible.
colours airbrushed freehand. I
usually shoot at 40lbs psi with a relatively thin paint… If you take your time
and don’t rush, a flawless finish is possible.
The figures included are stunning. Although the poses are non-too-inspiring, the detail is gorgeous. If you check, you can see an Iron Cross on the chest of the commander as well as his rank badges on both his hat and shoulders… Wow. The cabling and tools were painted in steel/gunmetal with the shovel’s handle being done in wood. Rustal was brushed onto the exposed “steel” parts to represent, well… rust. Great product this Rustal… Give it a good shake, brush the stuff onto a steel painted piece and voila, rusted metal. The exhaust stacks were also treated to a wash of the stuff with great results.
You get markings for four tanks. If you do your research though, you’ll see that five tanks can be modeled with the available markings… I chose to do a generic, late model Jagdtiger of the 653rd s.Pz.Jag.Abt. – Late 1944 or early 1945. Decals went on great with no silvering. I used a bit of Microsol “just in case”. Aftermarket decals shouldn’t be needed.
At his point, the model was fully assembled and all detail parts placed onto the kit. Because of the road wheels and tracks, you can only, really do final assembly at the end when everything is finished.
| CONCLUSIONS |
Like I said earlier, I like things that fly. That being said, building this little tank was a great break from the ordinary! My research showed that this is indeed an accurate and well done kit. The basic builder will like that the build will be simple. The advanced builder will like that the kit has enough details to make a great start on something to super-detail. For me, I found that I spent about twenty hours on this project and didn’t see anything terribly bad with it (with the exceptions of the tow cables!). As you can see I even made a base for it… I must have liked it!
| REFERENCES |
http://www.achtungpanzer.com/pz12.htm
http://tanxheaven.com/fedcol/jagdtiger/jagdtiger.htm
http://www.fprado.com/armorsite/tiger-variations.htm
February, 2006
Copyright ModelingMadness.com
If you would like your product reviewed fairly and fairly quickly, please contact the editor or see other details in the Note to Contributors.